Pic microcontroller programming using Mikroc Pro for PIC. The purpose of this article is to introduce you to the pic microcontrollers programming and familiarizing with the programming environment of a software; MikroC Pro. MikroC Pro is an Embedded-C compiler that allows you to convert a code written in C language to machine language. MikroC Pro for Pic is used for pic microcontroller programming in c. Before learning how to program pic microcontroller in c, let first get the basic introduction on microcontrollers and pic microcontrollers. After that you will be easily able to understand pic microcontroller programming.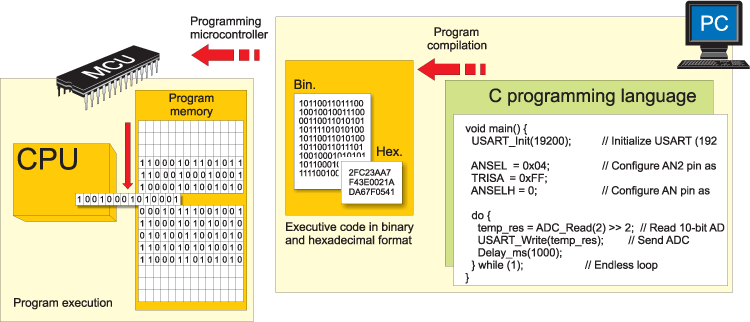
What is a pic microcontroller?
Before starting with pic microcontroller programming in c, lets have a overview of pic microcontrollers. A pic microcontroller (sometimes abbreviated as uC or MCU) is a small computer in a single integrated circuit containing a processor core, memory and programmable I/O peripherals. Program memory in the form of NOR flash is also often included on chip, as well as a typical small amount of RAM.Pic Microcontrollers are designed for embedded applications in contrast to the microprocessors used in personal computers or other general purpose applications.
Microcontrollers are manufactured by a number of companies with varying features. As technology is advancing, not only new features are being added in the previous controllers’ family but new families are also being introduced. The most common controllers used are PIC, Atmel, AVR, Intel, ATmega etc. Even in a single family you will find a lot many variations from number of pins of the chip to number of features provided in it.

Microcontrollers programming
Before knowing about pic microcontroller programming, you should know about hardware were pic microcontroller program stores. Typically pic microcontroller programs must fit in the available on-chip program memory, since it would be costly to provide a system with external, expandable memory. Compilers and assemblers are used to convert high-level language and assembler language codes into a compact machine code for storage in the microcontroller’s memory. Depending on the device, the program memory may be permanent, read-only memory that can only be programmed at the factory or program memory that may be field-alterable flash or erasable read-only memory.PIC Microcontrollers programming in c language
What Functionalities are provided by a pic Microcontroller?
General Purpose I/O (GPIO): Microcontrollers usually contain from several to dozens of general purpose input/output pins (GPIO). GPIO pins are software configurable to either an input or an output state. When GPIO pins are configured to an input state, they are often used to read sensors or external signals. Configured to the output state, GPIO pins can drive external devices such as LEDs or motors.
Analogue-to-Digital Converters (ADC): Many embedded systems need to read sensors that produce analog signals. This is the purpose of the analog-to-digital converter (ADC). Since processors are built to interpret and process digital data, i.e. 1s and 0s, they are not able to do anything with the analog signals that may be sent to it by a device. So the analog to digital converter is used to convert the incoming data into a form that the processor can recognize. A less common feature on some microcontrollers is a digital-to-analog converter (DAC) that allows the processor to output analog signals or voltage levels.
Timers: In pic microcontrollers programming timers are very useful. In addition to the converters, many embedded microprocessors include a variety of timers as well. One of the most common types of timers is the Programmable Interval Timer (PIT). A PIT may either count down from some value to zero, or up to the capacity of the count register, overflowing to zero. Once it reaches zero, it sends an interrupt to the processor indicating that it has finished counting. This is useful for devices such as thermostats, which periodically test the temperature around them to see if they need to turn the air conditioner on, the heater on, etc. Timers are a very important part of Microcontrollers that would be focused on in later labs.
Pulse-Width Modulation (PWM): A dedicated Pulse Width Modulation (PWM) block makes it possible for the CPU to control power converters, resistive loads, motors, etc., without using lots of CPU resources in tight timer loops. The PWM generation hardware remains busy in generating a clock signal of your desired frequency and duty cycle whilst the processor can execute regular programs.
Universal Synchronous Asynchronous Receiver/Transmitter (USART): This block makes it possible to receive and transmit data over a serial line with very little load on the CPU. Dedicated on-chip hardware also often includes capabilities to communicate with other devices (chips) in digital formats such as I²C and Serial Peripheral Interface (SPI).
Pic microcontroller Programming environments
Mainly C language is used for programming of pic microcontroller. But a specific name is given to this c language and it called embedded C. Though C and embedded C appear different and are used in different contexts, they have more similarities than the differences. Most of the constructs are same; the difference lies in their applications.
- C is used for desktop computers, while embedded C is for microcontroller based applications.
- C takes more resources of a desktop PC like memory, OS, etc. while programming on desktop systems what embedded C cannot. Embedded C has to use the limited resources (RAM, ROM, I/Os) on an embedded processor. Thus, program code must fit into the available program memory. If code exceeds the limit, the system is likely to crash.
- Compilers for C (ANSI C) typically generate OS dependent executable files. Embedded C requires compilers to create files to be downloaded to the microcontrollers/microprocessors where it needs to run. Embedded compilers give access to all resources which is not provided in compilers for desktop computer applications.
- Embedded systems often have the real-time constraints, which is usually not there with desktop computer applications.
Compiler MikroC Pro for PIC Microcontroller programming
The first thing you need to write a program for the pic microcontroller is a PC program, this program must understand the programming language you use, C in this case, and ‘know’ the architecture of the microcontroller in use, PIC18 in this case.There is no one compiler that can be used to compile programs for all the microcontrollers. It’s all about software used to program a group of similar microcontrollers of one manufacturer. We will be using mikroC PRO for PIC compiler . As the name suggests, the compiler is intended for writing programs for PIC microcontrollers programming in C language. It is provided with all data on internal architecture of these microcontrollers, operation of particular circuits, instruction set, names of registers, their accurate addresses, pin-outs etc.
Pic microcontroller programming data types in MikroC Pro for Pic
A few important points you need to remember while coding in MikroC Pro are listed below:
| 1. | Every variable must be declared at the start of function prior to being used for the first time in the program. | ||||||||||||||||||||||||||||||||||||||||||
| 2. | All the variables are stored in RAM and the constants are stored in ROM. Most microcontrollers have a very small RAM and a large ROM. 16F877A for example has 368 Bytes of RAM and 14.3 Kilo Bytes of ROM. So due to limited RAM of the microcontroller, you have to be very sensible in defining the variable types. Using unnecessarily large variables would not only eat up your RAM but would also take longer processing time.
The following table lists the variable types available in MikroC. | ||||||||||||||||||||||||||||||||||||||||||
| 3. | Every microcontroller program you write should include an infinite while loop at the end. This is to keep you microcontroller busy when it finishes executing your code. Since a microcontroller does not have an operation system that stops a program execution in our personal computers, the loop prevents the program from running out of things to do and doing random things that may be undesirable. Keeping above points in mind, you will need to define a for loop like this:
Writing your first program for pic microcontroller | ||||||||||||||||||||||||||||||||||||||||||
| |||||||||||||||||||||||||||||||||||||||||||
| 4. | Apart from standard C libraries there are many other microcontroller specific libraries that are available in MikroC. These libraries can simplify access to various peripherals of microcontroller and can help interfacing various components to microcontroller. We will explore these library throughout our course. A most commonly used microcontroller specific function is delay_ms(). This function is used to cause precise delays in execution of code. | ||||||||||||||||||||||||||||||||||||||||||
| 5. | Every microcontroller has some special function registers that can be read and written into. These registers are automatically defined when you create a project in MikroC. In your program you will write and read these registers to control various features of you microcontroller. Two commonly used registers include:
Pic microcontroller input out port programming
TRISB, this registers is define which pins of a port are to be used as inputs and output. PORTB, this register is used to read the digital inputs and write digital outputs to PORTs. |
Reading and Writing Registers in pic microcontroller programming
There are a number of ways you can read and write internal registers of a microcontroller.
| PORTB.B0 = 1; PORTB.B3 = 0; | //Sets bit#0 of PORTB register to 1. //Resets bit#3 of PORTB register to 0. |
| PORTB = 12; | //Writing decimal value //Sets bit#2 and bit#3, resets all other bits |
| PORTB = 0b00001100; | //Writing binary value //Sets bit#2 and bit#3, resets all other bits |
| PORTB = 0x0C; | //Writing hex value //Sets bit#2 and bit#3, resets all other bits |
| short myByte = PORTA; PORTB = myByte; | // reads the entire value of the 8 bit port B into the variable mybyte // writes whatever is in ‘myByte’ variable into PORTB |
| PORTB | = 1<<2; | //Sets bit#2 of PORTB register // Remember bitwise operations |
| PORTB & = ~(1<<3) | //Clears bit#3 of PORTB register // Remember bitwise operations |
Simple pic microcontroller program
| int myGlobalInteger=100; // global variables can be accessed anywhere in the program, but try to minimize these to conserve memory short MyAdderFunction(short a, short b); //this is your function’s prototype void main(){ // The program always start executing from the main function // all local variables must be declared at the very beginning of any function short mybyteA=25; short mybyteB= 30; short result=0; TRISB=0; //setting entire port B as output result = MyAdderFunction (mybyteA, mybyteB); PORTB=result; //result is shown on the output } short MyAdderFunction (short a, short b){ short result=0; //this is a local variable, memory is freed when you go out of the function myresult = a + b; return result; }
|
Creating your first project in MikroC Pro
Step 1: Open MikroC from your desktop the following window will open.
Step 2: Click on the New Project, A new windows would appear. Click next. The following windows will appear:
Step 3: Select the folder you want to save your project to. Select the device name from dropdown menu. Check the value of crystal you have been provided and mention that in device clock.Click Next and complete the wizard, A new window appears in front with the following code window.
By default, a ‘main’ function has been created for you, you would remember from you knowledge of CS200 that every program start executing rom the main function, though you could define any other function outside. To know about pic microcontroller programming in Mikro c for pic, check this video lecture:
PIC hardware overview
Before starting microcontroller programming, let me give you a brief overview of pic microcontroller features. Microchip offers wide range of 8-bit microcontroller which are usually known as PIC (Peripheral Interface Controller). 8051 is based on CISC architecture (Complex instruction set computer) whereas PICs are based on the RISC architecture (Reduced instruction set computer). PIC18FxxKxx family is among the highest performing and most widely used 8-bit microcontroller family. They have speed up to 16 MIPS (Million instructions per second). Like other controllers it have following internal components:
- Up to 16 MIPS operation.
- Up to 35 I/O Pins plus 1 Input-Only Pin.
- Three programmable external interrupts.
- Two Capture/Compare/PWM (CCP) modules.
- Two Master Synchronous Serial Port (MSSP) modules.
- 10-bit resolution ADC.
- Serial communication (USART, I2C SPI etc.).:
The setup of Mikro c pro for pic for pic microcontroller programming can be downloaded from this link. If the setup prompts you for the installation of MikroProg drivers or MikroProg suite, select yes to continue.Assembling your hardware. Make the following circuit on your breadboard.
Microcontrollers are very sensitive equipment. Any mistake in connecting the power pins might permanently damage the internal hardware. Please consult datasheet of your controller to know the absolute maximum voltage rating on VDD with respect to VSS. Power your microcontroller using 5V output of your power supplies.
The Clock
You should be well aware by now that every digital circuitry is run on a clock. Same is also true for our microcontroller, this clock can be provided using a crystal oscillator, external RC oscillator, Square Wave, and internal oscillator block of a microcontroller. In our labs we will be using a crystal for clock since it is every accurate and requires minimum circuitry. The two capacitors connected to the crystal are called loading capacitors, they are required for proper functioning of crystals.
The Reset
Every microcontroller has an active-low reset pin, when the reset pin is connected to the ground the microcontroller forgets everything and starts executing the code from start. During normal operation this pin is pulled up using a resistor to VCC, to avoid involuntary resets.
Pic microcontroller programming in C example 1
Developing your first Program, LED Blinking Program
code that turns on led for 1 second and turn it off after 1 second.
#define LED PORTB.B0

//Using #define preprocessor macros will make

//code easier to read, write and debug

void main() {

 TRISB=0;//Set PORTB to Output

  LED = 0;//Initialize the LED to 0

  while(1){

  LED = ~LED; //Bitwise not, to toggle LED

  delay_ms(1000);//Delay of 1000ms = 1s

   }

}
Pic microcontroller programming in c example 2
In this task you have to create a running Traffic light system, For the sake of simplicity, your traffic system will be only for two roads, each equipped with three LEDs,
#define RED1 PORTB.B0
#define ORANGE1 PORTB.B1
#define GREEN1 PORTB.B2

#define RED2 PORTB.B5
#define ORANGE2 PORTB.B6
#define GREEN2 PORTB.B7

#define REDTIME 1000
#define ORANGETIME 500
//Using #define preprocessor macros will make your
//code easier to read, write, update and debug

/* Pin Map
0 RED
1 ORANGE
2 GREEN
3 X
4 X
5 RED
6 ORANGE
7 GREEN
*/

void main() {
 TRISB=0;//Set PORTB to Output
 while(1){
 RED1=1;
 ORANGE1=0;
 GREEN1=0;
 RED2=0;
 ORANGE2=0;
 GREEN2=1;
 delay_ms(REDTIME);

 RED1=1;
 ORANGE1=0;
 GREEN1=0;
 RED2=0;
 ORANGE2=1;
 GREEN2=0;
 delay_ms(ORANGETIME);

 RED1=0;
 ORANGE1=1;
 GREEN1=0;
 RED2=1;
 ORANGE2=0;
 GREEN2=0;
 delay_ms(ORANGETIME);

 RED1=0;
 ORANGE1=0;
 GREEN1=1;
 RED2=1;
 ORANGE2=0;
 GREEN2=0;
 delay_ms(REDTIME);

 RED1=0;
 ORANGE1=1;
 GREEN1=0;
 RED2=1;
 ORANGE2=0;
 GREEN2=0;
 delay_ms(ORANGETIME);

 RED1=1;
 ORANGE1=0;
 GREEN1=0;
 RED2=0;
 ORANGE2=1;
 GREEN2=0;
 delay_ms(ORANGETIME);
 }
}
I will keep updating this article with more pic microcontroller programming examples. This is just a basic tutorial on pic microcontroller programming in c language.
dear advisers
I have made a few projects by using Flow code 6 & 7 ,USE pic16f1937. all icons are set right & the actions are showed in my Lab top perfect including the set up text by icon to EB001- gLCD
But I can not get the transaction of programmed data to the PIC16F1937.
Iam using the programmer Module EB006–00-8 . in fact I ca not get any of my programmed projects to
any of the fallowing PICs 1 pic 16f88, 2pic16f84A, 3 pic16f877A, 4 pic16f1937, soo on with pic18´s
don´n know if there is any help to this
its very simple and detailed tutorial hope will upload more examples such as wireless remote control
I solicit your work. it’s very helpful. Thanks
Can u send the code for digital voltmete r 0 to 300 input and 230 V output.our mailid is Swijan.reddyit@gmail.com
i want a code for solar tracker using pic microcontroller
Good work…
i want the code for sound sensor interfacing with pic microcontroller