INTRODUCTION TO Arduino LILY PAD: Arduino has introduced a lot of development boards to serve the purpose of automation, robotics, server and client configuration, security and much more. Development boards of Arduino are widely used because of cost effectiveness, flexibility, open source hardware and software and much more. Today we are going to introduce you to the new family to Arduino, which is mainly developed for e-textiles and wearable projects known as LilyPad Arduino.
INTRODUCTION to Arduino Lilypad
LilyPad, Arduino family of boards is especially designed for wearable applications. We have discussed many type of Arduino development boards and all those boards have one thing in common besides of input and output pins is their operating voltage from which we can turn on the board. That operating voltage was from any external device and we also need to regulate that supply so that our board doesn’t get damage. But LilyPad Arduino works on batteries that are rechargeable providing us an easy connection with actuators and sensors for easy integration in fabrics and clothes.
In this article we will discuss briefly about almost all LilyPad boards, their specifications and purpose for which they should be preferred. We will also highlight some of the interesting projects that are developed using these boards. One of the main things that are common in all these boards is that they don’t support Ethernet or Wi-Fi. Only cellular 3G connection is currently supported.

TYPES OF Arduino LILYPAD
There are many types of LilyPad Arduino board and we can choose anyone of them according to our project requirements.
- Arduino LilyPad Simple
- Arduino LilyPad USB
- Arduino LilyPad Simple Snap
- Arduino LilyPad USB plus
- Arduino LilyPad Main Board 328
From the above list , LilyPad simple and Simple snap are different from other Arduino boards as for programming purposes USB to serial interface is needed. If USB to serial interface is not available then we can make use of any standard interface which is FTDI compatible. The above recommended USB to serial interface servers the purpose of Arduino UNO and have same drivers of it. Now let’s discuss features and uses of above mentioned boards briefly.
LILYPAD ARDUINO SIMPLE:
This board is one of the most popular boards for beginner level projects of Arduino and one of the most important reasons is its spacious layout. It is based on ATMega328 microcontroller. Pin identification is much easier in this board. When it comes to stitching, it has more space for that without the fear of accidently colliding with other pins on board.
If we talk about built in battery then it’s easy and convenient to select LiPo battery. We can choose any LiPo battery that suits best for our project run time. The best thing about this battery is that we can easily recharge it just by plugging our board into USB port of our computer or by simply using a 5 V wall charger. Now let’s discuss about the features of this board.
FEATURES OF LILYPAD ARDUINO BOARD SIMPLE:
- Total number of input output pins : 9
- Digital input output pins : 5
- Analog input output pins : 4
- Reset button
- It uses ATmega328
- On / Off switch is built-in
- JST connector (built-in power supply socket) for 3.7 V LiPo battery
- Built-in charging socket i.e. we don’t have to worry about any external voltage supply to charge our batteries.
- Simple layout
- Suitable for simple projects
PROGRAMMING:
Programming is done by uploading sketches (Arduino program made in IDE) but we must have USB mini B cable or FTDI basic breakout of LilyPad for connecting our board to computer and uploading our required sketch.
PRECAUTIONS:
- Don’t supply more than 5.5 V else you will damage your board.
- Per pin max current allowed is 40 mA
- Max current for entire package should not exceed 200 mA
2. LILYPAD ARDUINO USB
This board is based on ATmega32U4. It is almost same as LilyPad Arduino simple and the only difference is that LilyPad Arduino USB uses ATMega32U4 microcontroller and this microcontroller has a built-in support for USB. If we don’t feel easy with FTDI header pins on our development board then we can make use of this board because it has USB support instead of FTDI header pins.
FEATURES OF LILYPAD ARDUINO USB:
- Total number of input output pins: 9
- Number of digital input output pins: 5
- Number of analog input output pins: 4
- Based on ATMega32U4 microcontroller
- On / off built-in switch
- JST connector (for built-in power supply socket)
- Charging circuit built-in
- No additional battery charger is required
- Simple layout having less number of input / output pins
- More compatible with less complex projects
- Supports Micro USB cable instead of using FTDI header pins
- Reset button
PROGRAMMING:
Programming for these boards is done in Arduino IDE known as sketches. Those sketches are uploaded on our board by using Micro USB cable for connecting our LilyPad Arduino USB to computer
PRECAUTIONS:
- Don’t supply more than 5 V else you will damage your board.
- Per pin max current allowed is 20 mA
- Max current for entire package should not exceed 200 mA
3. LILYPAD ARDUINO SIMPLE SNAP:
This board is based on ATmega328 microcontroller. It uses FTDI programming interface just like Arduino simple. It is almost same as LilyPad Arduino simple having 2 major differences.
- Built-in LiPo battery of 110 mAh and it is rechargeable too
- Female snap connectors are present
It requires connection to Simple Snap Protoboard or arrangement of sew on fabric snaps which are useful when we need to remove our board from project. Because of this ability we can swap out our board in case of reprogramming and to share it in multiple projects.
FEATURES OF LILYPAD ARDUINO SIMPLE SNAP
- Total number of input output pins: 9
- Number of digital input output pins: 5
- Number of analog input output pins: 4
- Based on ATMega328 microcontroller
- Built-in power switch button
- Built-in charging circuit
- Built-in LiPo battery i.e. no JST connector needed
- Reset button
- Less number on input / output pins
- Built-in snaps for attachment / detachment with multiple projects.
PROGRAMMING:
Programming is done by uploading sketches (Arduino program made in IDE) but we must have USB mini B cable or FTDI basic breakout of LilyPad for connecting our board to computer and uploading our required sketch.
PRECAUTIONS:
- Don’t supply more than 5.5 V else you will damage your board.
- Per pin max current allowed is 40 mA
- Max current for entire package should not exceed 100 mA
- Battery is soldered to this board so it cannot be washed. We have to unsnap our LilyPad from base before washing process.
4. LILYPAD ARDUINO USB PLUS
This board is based on ATmega32U4 microcontroller. It uses FTDI programming interface just like Arduino USB. It is an update to LilyPad Arduino USB having additional features, tabs and labeling. It includes RGB LED for the purpose of quick prototyping without using any additional part. 6 white LEDs in a row are used as simple data visualization or for indicator lights. 
FEATURES OF LILYPAD ARDUINO USB PLUS
- Total number of input output pins: 17
- Number of digital input output pins: 10
- Number of analog input output pins: 7
- Based on ATMega32U4 microcontroller
- RGB Led for quick prototyping
- Simple visualization of data with the help of 6 white LEDs in a row
- Built-in power switch button
- Built-in charging circuit
- Built-in LiPo battery i.e. no JST connector needed
- Reset button
- More number on input / output pins as compared to LilyPad Arduino USB
- Ground and power sew tabs are accessible from opposite sides of this board providing us with more options to connect our board.
- Micro USB cable support
PROGRAMMING:
Programming for these boards is done in Arduino IDE known as sketches. Those sketches are uploaded on our board by using Micro USB cable for connecting our LilyPad Arduino USB to computer
PRECAUTIONS:
- Don’t supply more than 5.5 V else you will damage your board.
- Per pin max current allowed is 40 mA
- USB plus is not supported on operating system Windows 7
- Max current for entire package should not exceed 100 mA
- Battery is soldered to this board so it cannot be washed. We have to unsnap our LilyPad from base before washing process.
LILYPAD ARDUINO MAIN BOARD
It is based on ATMega328 microcontroller. Unlike other types of LilyPad boards this board has all ATMega328 pins open for connection purposes to wearable project. This board comes handy if large number of input output pins are required. It doesn’t have battery port or built-in battery. We have to supply power to this board externally by stitching power source positive and negative terminal to the + and – terminals of our board. We can also use simple power board of LilyPad for providing power connection and charging circuit to our board.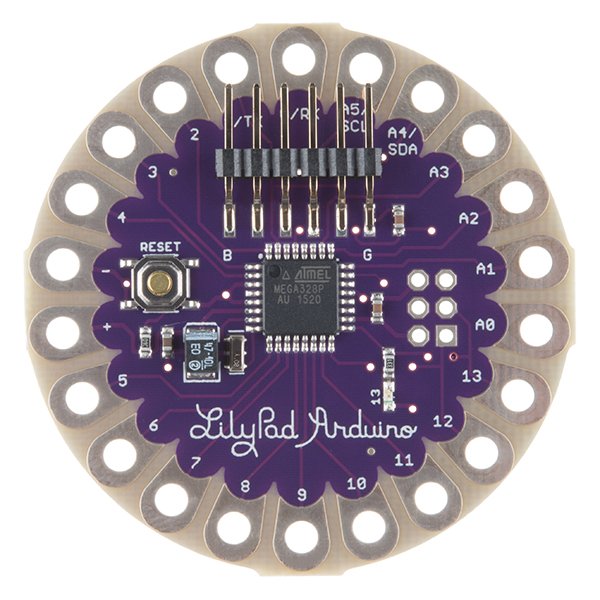
FEATURES OF LILYPAD ARDUINO MAIN BOARD:
- Total number of input output pins : 20
- Digital input output pins : 14
- Analog input output pins : 6
- It uses ATmega328
PROGRAMMING:
Programming is done by uploading sketches (Arduino program made in IDE) but we must have USB mini B cable or FTDI basic breakout of LilyPad for connecting our board to computer and uploading our required sketch.
PRECAUTIONS:
- Don’t supply more than 5 V else you will damage your board.
- Per pin max current allowed is 20 mA
- Max current for entire package should not exceed 200 mA
PROJECTS:
So far we have discussed 5 types of LilyPad boards of Arduino. Now we are going to highlight some interesting projects made with the help of these boards
- Remote control robotic hand
- Starry night prom
- TV T-shirt
- Fiber optic homecoming
That’s all for this article. Any questions regarding this article can be asked in comment section below