In this tutorial, we will learn the concept of auto-indexing using loops in LabView. At the start, there is a complete general introduction explaining the workings and uses of auto-indexing. After that, auto-indexing is explained with the help of a program on LabView. Enabling and disabling auto-indexing are done. At the end of the tutorial, we have provided an exercise for you to do on your own, and in the next tutorials, we will assume that you have done those exercises, and we will not explain the concept regarding them.
Auto-Indexing in LabVIEW
Using loops in LabVIEW, we can notice that whenever we place an outgoing wire through a loop, the tunnel is either solid or has square brackets on it. What do these differences in the tunnels represent? When we have small brackets inside the tunnels, auto-indexing is enabled. This setting is unique in all versions of LabVIEW, using either a for loop or a while loop. LabVIEW also sets the count terminal to the array if we enable auto-indexing on an array wired to a “For Loop” input terminal, so we do not need to wire the count terminal.
The common application of a “For loop” is basically to process the individual elements of an array. Therefore, auto-indexing is enabled by default for every array we wire to a For Loop. If processing array elements individually is not required, we can also disable auto-indexing. The for loop handles all the elements in the array at once if we disable auto-indexing input instead of handling an element per iteration.

Enable or Disable Indexing
The output array receives a new element with every iteration of the loop when we auto-index an array output tunnel. Hence, the size and number of iterations of the auto-indexed output array are always equal. The last iteration data will be received if we disable auto-indexing in the output tunnel and not the elements individually. We can also change this setting by clicking right on the tunnel and selecting Disable Indexing or Enable Indexing.
When working with while loops, auto-Indexing is disabled by default, so the wiring tunnel will be solid. The while loop indexes of the array work in the same manner as those of the for loop. When we enable auto-indexing for an array entering a While Loop. It iterates until a specific condition is satisfied; therefore, the number of iterations a While Loop executes is not limited by the size of the array. The output array receives a new element with every iteration when we auto-index an array output tunnel.
Auto-Indexing program in LabVIEW
Create a VI as discussed in tutorial 1. Two windows will pop up: one is a block diagram, and the other is the front panel.
For Loop
As an example, consider a for loop that generates random numbers in the output. For this purpose, create a blank VI and save it for future use by pressing <Ctrl + S>.
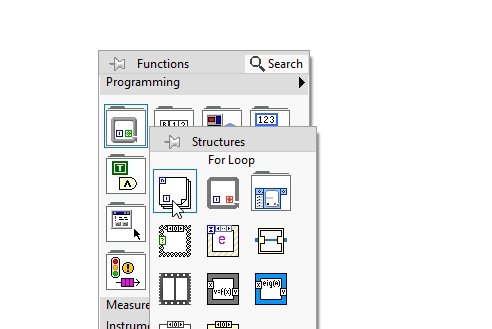
Now, place a for loop in it from Function Palette >> Structures >> For Loop, as shown below.
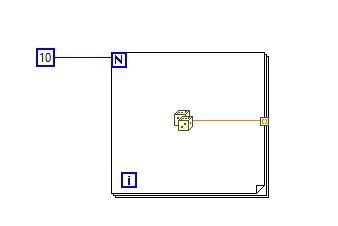
Set the number of iterations to 10 by using a constant.
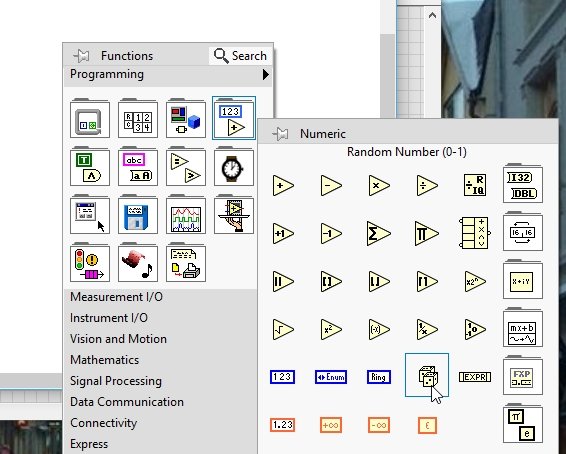
From the Function Palette, select Numeric and then select Random Number; this will generate random numbers automatically.
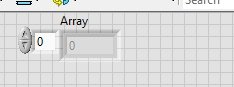
Connect the output terminal of the random number generator to the boundary of the for loop. It will create a tunnel; see the figure below.
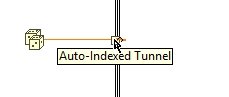
Auto Indexing Tunnel
We can see two square brackets inside the tunnel, and when we hover over the tunnel, the pointer will say “Auto-indexed tunnel”. Refer to the figure below.
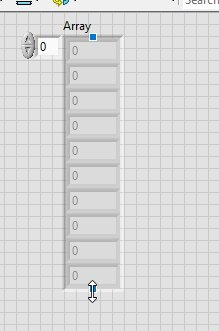
This means that auto-indexing is enabled. The loop will automatically create an array from the scalar values that reach the values inside the loop. Now, by right-clicking on this tunnel, a dropdown menu will appear; select create from that menu, and then select indicator as shown below.

This will automatically place an array indicator on the tunnel because of the auto-indexing tunnel.
As we have discussed in the introduction portion, the size of this array must be equal to the number of iterations. We have set the number of iterations equal to 10, thereby expanding the size of the array to 10 elements, as shown below.
Now, run the program from the run button or by pressing <Ctrl + R> to see the results.
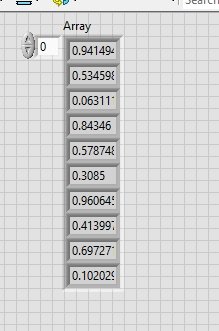
As the array was connected to the output of a random generator of range 0-1, the outputs are randomly generated numbers between 0 and 1.
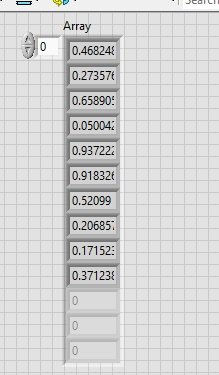
Now, if we expand the size of the array beyond 10, those elements will remain undeclared even after running the VI. Refer to the figure below.
We do indeed have an array of 10 randomly generated elements.
Second For Loop
In a similar manner, auto-indexing is also used to loop through an array in addition to generating an array. To see this, we will add another for loop to loop through the already created loop, and on one side of the loop boundary, attach the output of the first loop and also connect the constant selection number of iterations for each loop, as shown below.

In this VI, we will loop through the previously generated array and add five to each element of the array. In the second loop, insert an addition block. Connect one input terminal of the addition block to the terminal already present on the loop boundary, and on the second input, add a constant and insert a value of 5, as shown in the figure below.
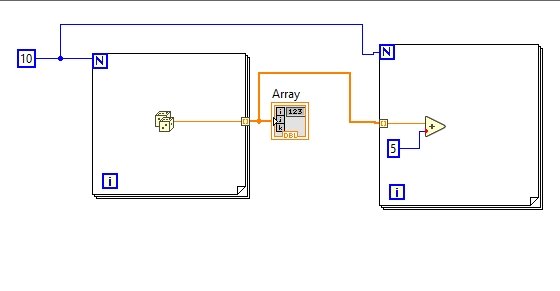
Again, take the output of this from the loop boundary; this will also place an auto-indexed tunnel. The auto-indexing tunnel will again have square brackets; again, at the output, create an indicator. Increase the size of this indicator to 10 as well.
Run this code and compare the results of the second array with the first array; see the figure below.
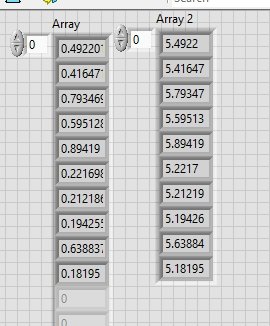
Compare both arrays element-wise. Both have the same digits except for the number 5. The decimal portion of all elements in both arrays is the same. The second for loop installed loops through the first array element-wise, adds five to it and stores it in another array named array 2.
Disabling Auto-Indexing in LabVIEW
The bracket at the output of the loop boundary appears because auto-indexing is enabled for loops by default in LabView. We can also disable auto-indexing. For this purpose, right-click on the tunnel, and a drop-down menu will appear. From there, select Tunnel Mode, and then select the one option for a tunnel to act in. See the figure below.

Selecting the last value will return the last value of the array only, and we will have no record of any of the elements of the array.
Exercise
- Try to work on loop auto-indexing using a while loop.
(Hint: In the while loop, auto-indexing is not enabled by default in LabView)
Conclusion
In conclusion, auto-indexing in LabVIEW is a powerful feature that allows for efficient manipulation and processing of array elements using loops. By enabling auto-indexing, LabVIEW automatically creates an array from scalar values, simplifying the programming process. Whether using a for loop or a while loop, the concept of auto-indexing remains the same, with the option to enable or disable it based on the specific requirements of the application. The provided tutorial demonstrates how to implement auto-indexing in LabVIEW, creating arrays, manipulating data, and showcasing the benefits of this feature. With a solid understanding of auto-indexing, users can optimize their LabVIEW programs and streamline their data processing tasks.