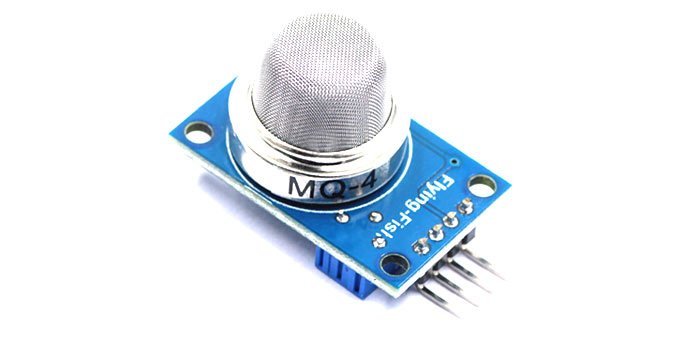
Gas sensors are quite useful devices for controlling pollutants in the air. Similar is the MQ4 Methane Gas sensor. The MQ4 sensor is a compact gas sensor which is highly sensitive to methane gas and less prone to alcohol and other gases. This methane gas sensor provides an output signal according to the sensed concentration of CH4 in the surrounding or environment. This sensor is proved to be effective in alarm systems, gas detection circuits whether at a commercial level or in coal mines, etc.

In this post, we will see an introduction to the MQ4 methane gas sensor, it’s working, interfacing with Arduino, and applications.
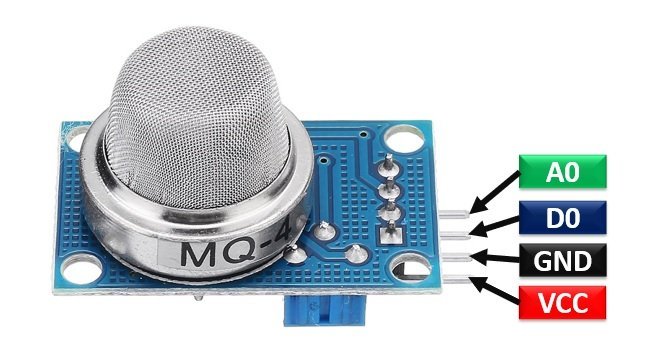
MQ-4 Pinout
This methane gas sensor module contains onboard voltage regulator, pull-up resistors to define a default state, a potentiometer for sensitivity, and a capacitor for noise filtering. It has two inbuilt LEDs i.e power LED and a digital output indication LED. The pinout of the MQ-4 Methane Gas Sensor module is as shown:

Pin Configuration
The sensor has 8 pins in total which consists of 2 H, A, and B pins each. The pin configuration of the MQ-4 Methane Gas Sensor module in tabular are detailed below:
| Pin Name | Function |
|---|---|
| VCC | Positive power supply pin |
| GND | Reference potential pin |
| AO | Analog output pin. It generates a signal proportional to the intensity of methane. |
| DO | Digital Output pin. It also produces a digital signal whose limit can be set using a potentiometer. |
If you are using MQ-4 Methane Gas Sensor only, the listed table should be followed to configure the connections.
| Pin Name | Function |
|---|---|
| H-pins | 2 heater coil pins. One is connected to the power supply and the other to the ground. |
| A-pins | 2 Test pins. These are connected together to the supply pin. |
| B-pins | 2 Test pins. These are replaceable with A pins. One is ground and the other is used for output. |
Features & Specifications
- Operating Voltage: 5V±0.1
- Heating voltage: 5V±0.1
- Load Resistance: 2 Kohms
- Sensing Resistance Range: 10 – 60 Kohms
- CH4 Sensing Range: 300 – 10000 ppm
- Sensor Heat Consumption: ≤ 950 mW
- Relative Humidity: >95% RH
- Standard Oxygen concentration: 21%
- Output Analog Voltage: 2.5 – 4 Volts (5000 ppm CH4)
- Preheating Time: Over 48 Hours
- The sensor is a simple and stable circuit with a TTL DO pin.
- The device sensitivity may vary due to oxygen concentration.
- It is very sensitive to methane making it quite useful for detecting systems
- A small compact sensor for easy assembly in DIY projects.
MQ-4 Working Principle
As soon as the module is powered, the power LED lights up. The MQ-4 works by sensing the methane concentration in the air. The analog pin of the sensor then generates an analog signal proportional to the amount of CH4 in the air. We can measure the analog output of a sensor with an ADC microcontroller.
Nowadays most microcontrollers come with a built-in ADC peripheral which can be used to read the analog output of such sensors such as MQ4. Microcontroller reads the analog output signal of the methane gas sensor and performs signal conditioning to convert the measured analog voltage into Methane concentration in air. Based on this measurement, we can take proper actions such as alarm triggering, etc. whatever you have coded for it to do.
Similarly, the same goes for the digital output pin of the MQ4 methane sensor. When methane gas is detected, the digital pin goes HIGH and the Digital output inbuilt led glows up. This digital pin can also be used for different activities being commanded by a microcontroller.
MQ4 Interfacing with Arduino
This section will guide through the interfacing of the Arduino UNO and MQ-4 Methane sensor.
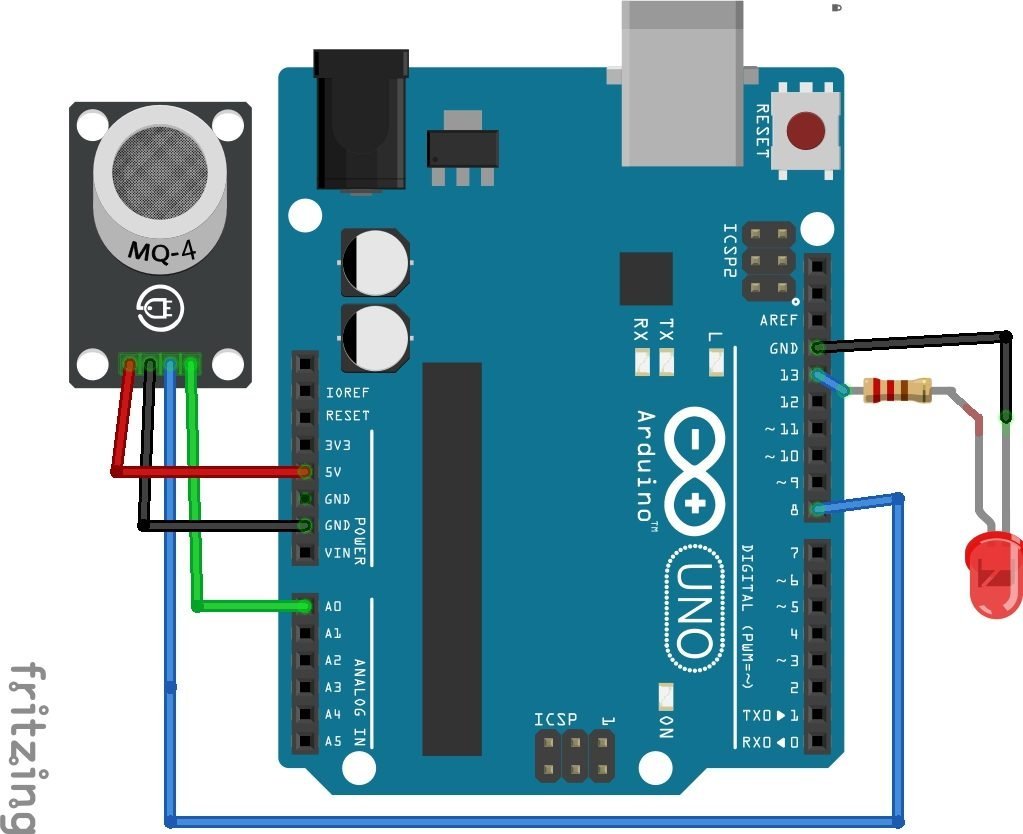
Connection Diagram

- Connect the power supply pins of the MQ-4 methane sensor to the GND pin and the 5 Volts pin of the Arduino UNO. This will power up the sensor.
- Connect the analog and digital pins of the mentioned methane sensor to the analog pin and digital pin of the Arduino UNO for transferring data readings respectively.
- An LED is connected to indicate whenever methane gas is detected in a particular area.
| Arduino UNO | MQ-4 Methane Sensor |
|---|---|
| 5V | VCC |
| GND | GND |
| Analog pin 0 | AO |
| Digital pin 8 | DO |
Arduino Code
The Arduino code for MQ-4 Methane Sensor is provided below:
/* MQ-4 Methane Sensor module with Arduino */
/* Interfacing with Arduino */

const int AO_Pin=0; // Connect AO of MQ4 with Analog channel 0 pin (A0) of Arduino
const int DO_Pin=8; // Connect DO of MQ4 with Digital pin 8 (D8) of Arduino
const int Led_Pin=13; // Connect an LED with D13 pin of Arduino
int threshold_value; // A variable to store digital output of MQ4
int AO_Out; // stores analog output of MQ4 sensor

void setup() {
Serial.begin(115200);  // Initialize serial communictation with a baud rate of 115200
pinMode(DO_Pin, INPUT); // Configure D8 pin as a digital input pin
pinMode(Led_Pin, OUTPUT); //Configure D3 pin as a digital output pin
}

void loop()
{
AO_Out= analogRead(AO_Pin); // Take Analog output measurement sample from AO pin of MQ4 sensor
threshold_value= digitalRead(DO_Pin); //Read digital output of MQ4 sensor
Serial.print("Methane Conentration: ");
Serial.println(AO_Out);//prints the methane value
Serial.print("threshold_value: ");
Serial.print(threshold_value);//prints the threshold_value reached as either LOW or HIGH (above or underneath)
delay(100);
if (threshold_value== HIGH){
digitalWrite(Led_Pin, HIGH);//if threshold_value has been reached, LED turns on as status indicator
}
else{
digitalWrite(Led_Pin, LOW);//if threshold not reached, LED remains off
}
}
How Does Code Work?
Pin Declaration
First, we need to define the pins of the MQ4 sensor module which are connected to Arduino. They must be defined for the microcontroller to read the data. The “AO_Pin” pin is defined with analog channel 0 and the “DO_Pin” variable is defined for digital output pin 8. Furthermore, a variable name “LedPin” is used for D13. Two variables are declared to store the analog and digitals outputs received through the sensor.
/* MQ-4 Methane Sensor module with Arduino */
/* Interfacing with Arduino */

const int AO_Pin=0; // Connect AO of MQ4 with Analog channel 0 pin (A0) of Arduino
const int DO_Pin=8; // Connect DO of MQ4 with Digital pin 8 (D8) of Arduino
const int Led_Pin=13; // Connect an LED with D13 pin of Arduino
int threshold_value; // A variable to store digital output of MQ4
int AO_Out; // stores analog output of MQ4 sensor
Inside setup Function
The void setup performs two things. It initializes the serial monitor with 115200 bps and sets the pin mode of the pins. DO_Pin will be the input to the microcontroller and Led_Pin is the output to indicate according to the executions.
void setup() {
Serial.begin(115200);  // Initialize serial communictation with a baud rate of 115200
pinMode(DO_Pin, INPUT); // Configure D8 pin as a digital input pin
pinMode(Led_Pin, OUTPUT); //Configure D3 pin as a digital output pin
}
Inside main loop Function
The void loop reads the analog signals through the analogRead() function and stores them in “AO_Out” variable. Similarly, digital values are read through the digitalRead() function and keep it in the “threshold_value” variable. The “threshold_value” will either be HIGH or LOW. These are displayed on the Serial monitor with coded messages. Next, it checks the condition for turning the led on or off. If the limit is HIGH it will immediately turn on the LED to indicate that the content of methane is more than usual. Otherwise, it will remain off.
void loop()
{
AO_Out= analogRead(AO_Pin); // Take Analog output measurement sample from AO pin of MQ4 sensor
threshold_value= digitalRead(DO_Pin); //Read digital output of MQ4 sensor
Serial.print("Methane Conentration: ");
Serial.println(AO_Out);//prints the methane value
Serial.print("threshold_value: ");
Serial.print(threshold_value);//prints the threshold_value reached as either LOW or HIGH (above or underneath)
delay(100);
if (threshold_value== HIGH){
digitalWrite(Led_Pin, HIGH);//if threshold_value has been reached, LED turns on as status indicator
}
else{
digitalWrite(Led_Pin, LOW);//if threshold not reached, LED remains off
}
}
We can use this if condition and code to make practical applications like alarm systems etc. Upload the code and observe the readings. The device will sense accurately after 2-3 seconds of powering up the module.
Alternate Options
- MQ214
- MQ306A
- MQ-5
Applications
- Alarm Systems
- Industrial Applications
- Environmental pollution control
- Coal mines
- Gas sensing devices
2D Diagram

Related Articles:
- CCS811 Indoor Air Quality Gas Sensor
- MQ137 Ammonia Gas Sensor Interfacing with Arduino
- MQ-2 gas sensor interfacing with pic microcontroller
- Interfacing of MQ135 Gas Sensor with Arduino
- Interfacing LM75 Temperature Sensor Module with Arduino
- Interface MLX90614 Non-Contact IR Temperature Sensor with Arduino
- Interface LM35 Temperature Sensor with Arduino
I’m getting a high on pin DO even when the green LED is off. The D0 goes low when the LED turns on? Is this the normal operation?