In this tutorial, we will learn to use EMQX Cloud MQTT broker. Firstly, we will learn how to connect an ESP32 development board with an EMQX Cloud MQTT broker. Our aim is to successfully make a connection between our ESP32 board and the MQTT broker using EMQX cloud and using its free public MQTT server. Additionally, we will also be able to subscribe to MQTT topics and publish messages using this free MQTT server. We will use the PubSubClient library to connect ESP32 with the MQTT broker. PubSubClient library provides useful functions to easily connect with MQTT brokers. After the ESP32 successfully connects with the MQTT broker, we will learn to subscribe to a particular topic.

MQTT Introduction
- MQTT is known as Message Queuing Telemetry Transport protocol.
- It is a lightweight messaging protocol and helps resource constrained network clients with a simple communication mechanism.
- Unlike, most messaging system, we don’t have to assign addresses to MQTT clients.
- MQTT uses simple publish/subscribe communication based on a topic.
- This protocol runs on top of TCP / IP in order to provide reliable data delivery.
MQTT Broker
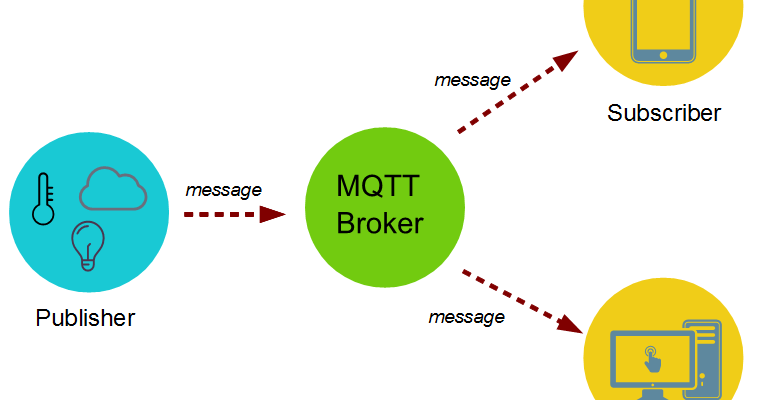
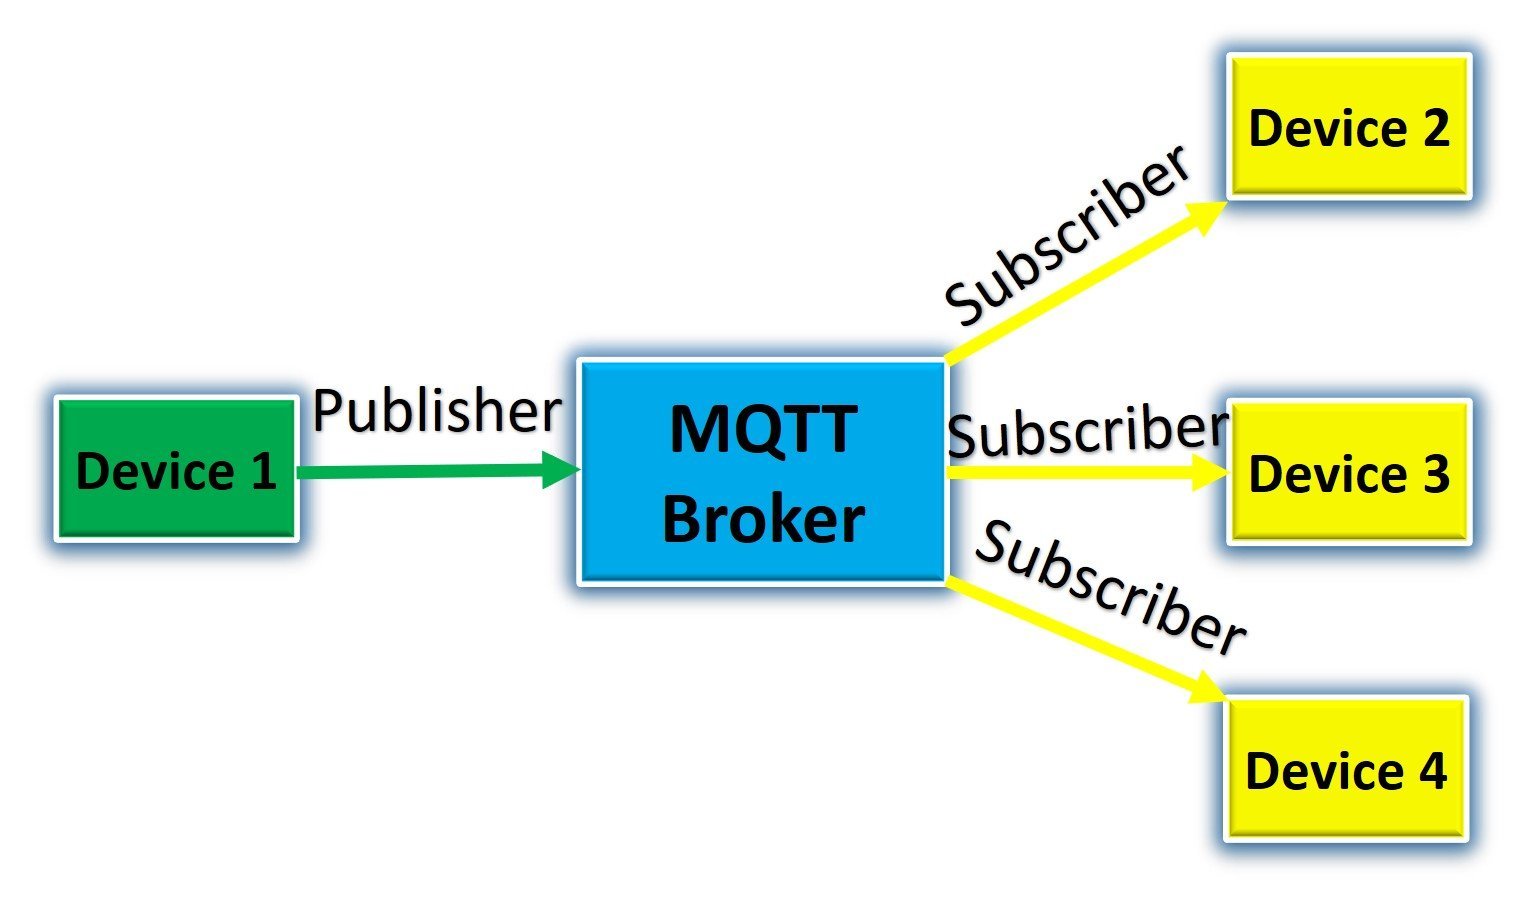
Broker is a hub that performs data receiving and sending functionality from publisher to subscriber. It receives messages from the publisher and decodes the message. After decoding the message, Broker sends the message to subscribed clients according to Topics.
As you can see in this diagram, central main component to publish/subscribe system is MQTT broker. Every device first sends message to the broker. After performing filtration on received data, it distribute command or message to each subscribed device.
How does MQTT Work?
The MQTT protocol enables resource constraint IoT devices to publish or send information about some topics to a server that functions as an MQTT message broker. The function of the broker is to push that piece of information to only those clients that are previously subscribed to that topic. In simple words, we can explain this basic idea as the publisher is responsible for generating and transmission of information to subscribers through a broker. The main function of a broker is to ensure security by checking the authorization of subscribers and publishers.
The MQTT protocol is divided into 4 stages such as connection, authentication, communication, and termination.
- First of all, a TCP / IP connection is initiated from client to broker by using a standard or custom port which is defined by a broker’s operation.
- While establishing a connection, it’s important to recognize that whether the server has continued an old session or a new session.
- The old session continued if reused client identity is provided to the broker.
For a detailed tutorial regarding MQTT Broker, follow the link: What is MQTT and How MQTT Works?
Installing PubSubClient MQTT Library
Before we proceed further, you should make sure that you have the latest version of Arduino IDE installed on your system. Moreover, you should also install an ESP32 add-on in Arduino IDE. f your IDE does not have the plugin installed you can visit the link below:
Installing ESP32 library in Arduino IDE and upload code
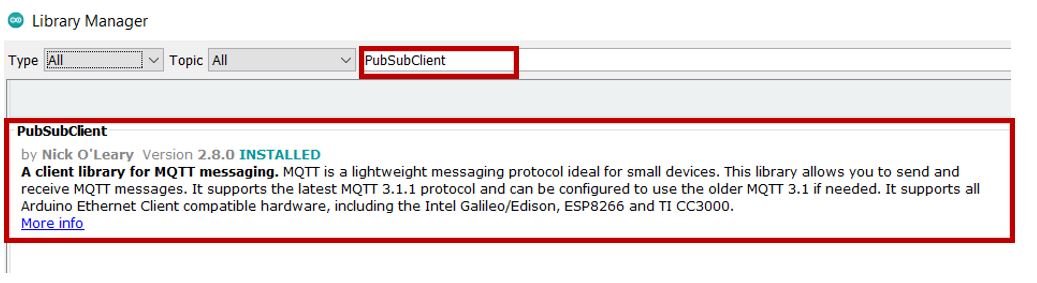
For this project, we will have to the PubSubClient library.
As we will be using MQTT protocol to send and receive sensor data that is why we need this library. We will use the Library Manager in our Arduino IDE to install the latest version of this library. Open your Arduino IDE and go to Sketch > Include Libraries > Manage Libraries. Type PubSubClient in the search bar and press enter. Install it as well.
ESP32 Public MQTT Broker Arduino Sketch
Open your Arduino IDE and go to File > New to open a new file. Copy the code given below in that file and save it. You need to enter your network credentials. Additionally, we will also have to specify topic to publish and subscribe to.
#include <WiFi.h>
#include <PubSubClient.h>

const char *ssid = "Your_SSID";
const char *password = "Your_Password";

const char *mqtt_broker = "broker.emqx.io";
const char *topic = "esp32/message";
const char *mqtt_username = "emqx";
const char *mqtt_password = "public";
const int mqtt_port = 1883;

WiFiClient wifiClient;
PubSubClient mqttClient(wifiClient);

void setup() {

 Serial.begin(115200);
 WiFi.begin(ssid, password);
 while (WiFi.status() != WL_CONNECTED) {
     delay(500);
     Serial.println("Connecting to WiFi..");
 }
 Serial.println("Connected to the WiFi network!");

 mqttClient.setServer(mqtt_broker, mqtt_port);
 mqttClient.setCallback(callback);
 while (!mqttClient.connected()) {
   String client_id = String(WiFi.macAddress());

     if (mqttClient.connect(client_id.c_str(), mqtt_username, mqtt_password)) {
         Serial.println("Connected to Public MQTT Broker");
     } else {
         Serial.print("Failed to connect with MQTT Broker");
         Serial.print(mqttClient.state());
         delay(2000);
     }
 }

 mqttClient.publish(topic, "Hello! I am ESP32");
 mqttClient.subscribe(topic);
}

void callback(char *topic, byte *payload, unsigned int length) {
 Serial.print("Message arrived in topic: ");
 Serial.println(topic);
 Serial.print("Message:");
 for (int i = 0; i < length; i++) {
     Serial.print((char) payload[i]);
 }
 Serial.println();
 Serial.println("************");
}

void loop() {
 mqttClient.loop();
}
How the Code Works?
Let us understand how each part works to successfully connect the ESP32 board to the MQTT broker and also to include the publishing/subscribing functionality.
Installing Libraries
The code starts with including all the necessary libraries which are needed for the proper functionality of the code. The WiFi.h library will help in establishing the connection between our ESP32 module to a wireless network. Additionally, the PubSubClient library will be needed for MQTT protocol.
#include <WiFi.h>
#include <PubSubClient.h>
Setting Network Credentials
Next, we will create two global variables, one for the SSID and the other for the password. These will hold our network credentials which will be used to connect to our wireless network. Replace both of them with your credentials to ensure a successful connection.
const char *ssid = "Your_SSID";
const char *password = "Your_Password";
Specifying Broker Parameters
Next, we will define the MQTT broker parameters. As we are using EMQ X as the MQTT broker so we have defined the mqtt_broker as “broker.emqx.io.” Next we are specifying the topic as ‘esp32/message.’ You can change it according to your prefernce. For username and password, leave them as ’emqx’ and ‘public’. This is because we are using the free public MQTT server deployed on the EMQ X cloud. The port is also defined. You only need to change the topic variable according to your needs. Everything else remains the same.
const char *mqtt_broker = "broker.emqx.io";
const char *topic = "esp32/message";
const char *mqtt_username = "emqx";
const char *mqtt_password = "public";
const int mqtt_port = 1883;
Creating Objects
Next, we will create an object of WiFiClient called wifiClient which we will pass as a parameter inside PubSubClient mqttClient().
WiFiClient wifiClient;
PubSubClient mqttClient(wifiClient);
setup()
Inside the setup() function, we will open a serial connection at a baud rate of 115200.
Serial.begin(115200);The following section of code will connect our ESP32 board with the local network whose network credentials we already specified above. We will use the WiFi.begin() function. The arguments will be the SSID and the password which we defined earlier in the code. After a successful connection is established, “Connected to the WiFi network!” will get displayed on the serial monitor.
WiFi.begin(ssid, password);
 while (WiFi.status() != WL_CONNECTED) {
     delay(500);
     Serial.println("Connecting to WiFi..");
 }
 Serial.println("Connected to the WiFi network!");
Next, we will configure the MQTT broker which will also set up the call-back function. We will initialize the MQTT broker by using mqttClient.setServer(). We have specified the broker’s server and its port as parameters inside it. Additionally, we will also register a call-back function by using mqttClient.setCallback(). We will define the callback() function shortly.
mqttClient.setServer(mqtt_broker, mqtt_port);
mqttClient.setCallback(callback);
The following lines of code will check for a successful connection of the ESP32 board with the MQTT broker and display it on the serial monitor. First, it will store the unique MAC address of the ESP32 board in the variable ‘client_id.’ Then, through mqttClient.connect() we will pass the MAC address, the MQTT username and password to successfully connect with the public MQTT broker.
while (!mqttClient.connected()) {
   String client_id = String(WiFi.macAddress());

     if (mqttClient.connect(client_id.c_str(), mqtt_username, mqtt_password)) {
         Serial.println("Connected to Public MQTT Broker");
     } else {
         Serial.print("Failed to connect with MQTT Broker");
         Serial.print(mqttClient.state());
         delay(2000);
     }
 }
In case, the connection is successfully made then the ESP32 client will subscribe to the message saved in the variable ‘topic’ by using mqttClient.subscribe(). In our case the topic was ‘esp32/message.’ This will be used to receive messages from the MQTT broker. To publish messages to MQTT topic we will use mqttCleint.publish() and pass the message ‘Hello! I am ESP32’ inside it. This will be published to the server by ESP32 when a successful connection is made.
mqttClient.publish(topic, "Hello! I am ESP32");
mqttClient.subscribe(topic);
void callback()
We will use the callback() function to subscribe to MQTT topics so that our ESP32 board will be able to receive messages of that topic. We had subscribed our ESP32 board to the “esp32/message” topic. In the callback() function, the client will receive the messages of the subscribed topic. These will get displayed in the serial monitor.
void callback(char *topic, byte *payload, unsigned int length) {
 Serial.print("Message arrived in topic: ");
 Serial.println(topic);
 Serial.print("Message:");
 for (int i = 0; i < length; i++) {
     Serial.print((char) payload[i]);
 }
 Serial.println();
 Serial.println("************");
}
loop()
This will create an indefinite connection with the MQTT server.
mqttClient.loop();Uploading Code
Before uploading the code to our ESP32 board we will choose the correct board and COM port. Go to Tools > Board and select ESP32 Dev Module.

Next, go to Tools > Port and select the appropriate port through which your board is connected.

Click on the upload button to upload the code into the ESP32 board. After you have uploaded your code to the board press its ENABLE button.

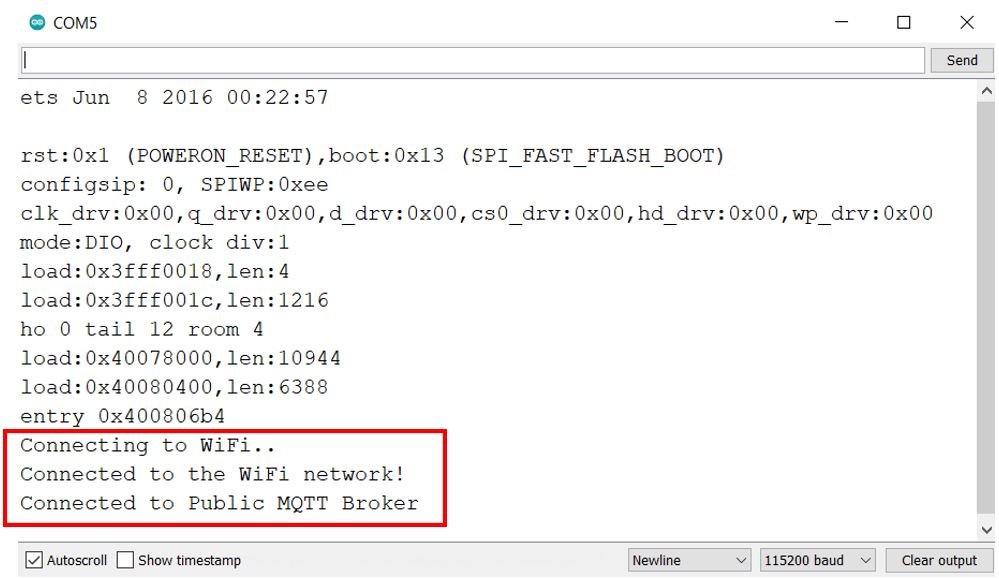
Open your Serial Monitor to view the progress of the project. You will be able to view if the Wi-Fi is connected or not and a successful connection formed between the ESP32 board and the public MQTT broker.
Testing Publishing and Subscription on MQTT X Client
For testing purposes we will use the MQTT 5.0 client tool – MQTT X. To download this application follow the link: https://mqttx.app/
The following page will open. Click ‘Download.’

As we are using Windows, hence we will download the setup for it. You can choose appropriately according to your operating system.

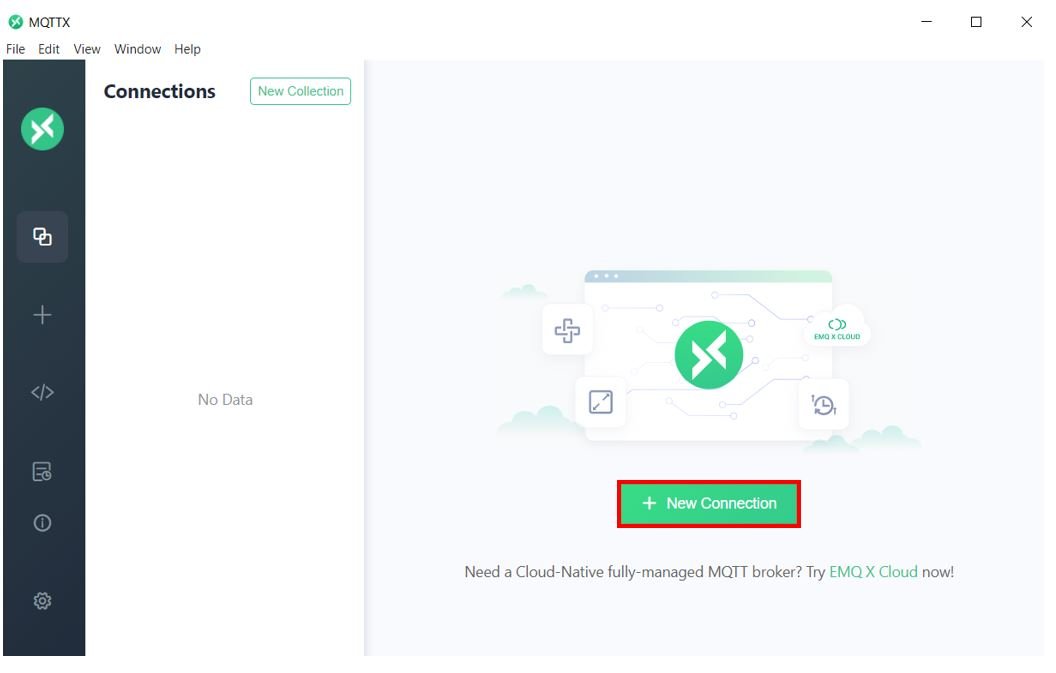
After the installation is complete, open MQTT X application. Head over to ‘+ New Connection.’
Add the details as shown below. For the Name specify ‘public’ and leave the rest as default. Then click ‘Connect’ to start the connection between the server and the module.

The connection has become active as indicated by the green dot under Connections. Now go to ‘+ New Subscription.’

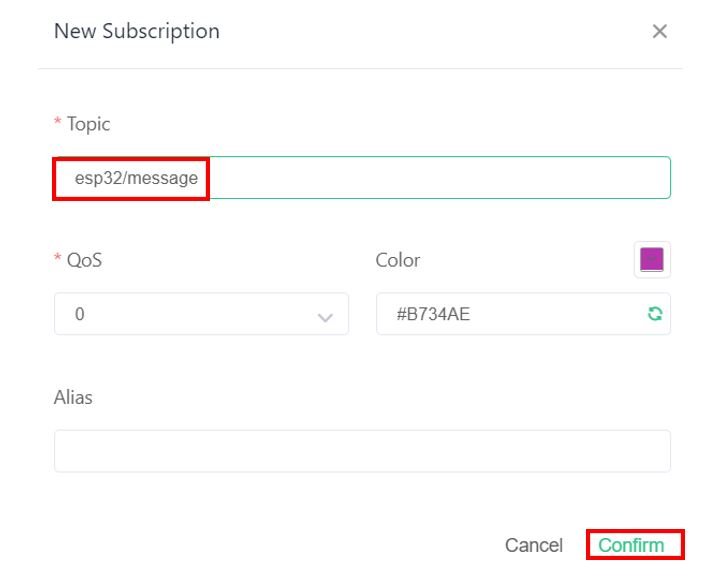
Add the subscription topic which we used in the program sketch. In our case, it is ‘esp32/message.’ Click Confirm.
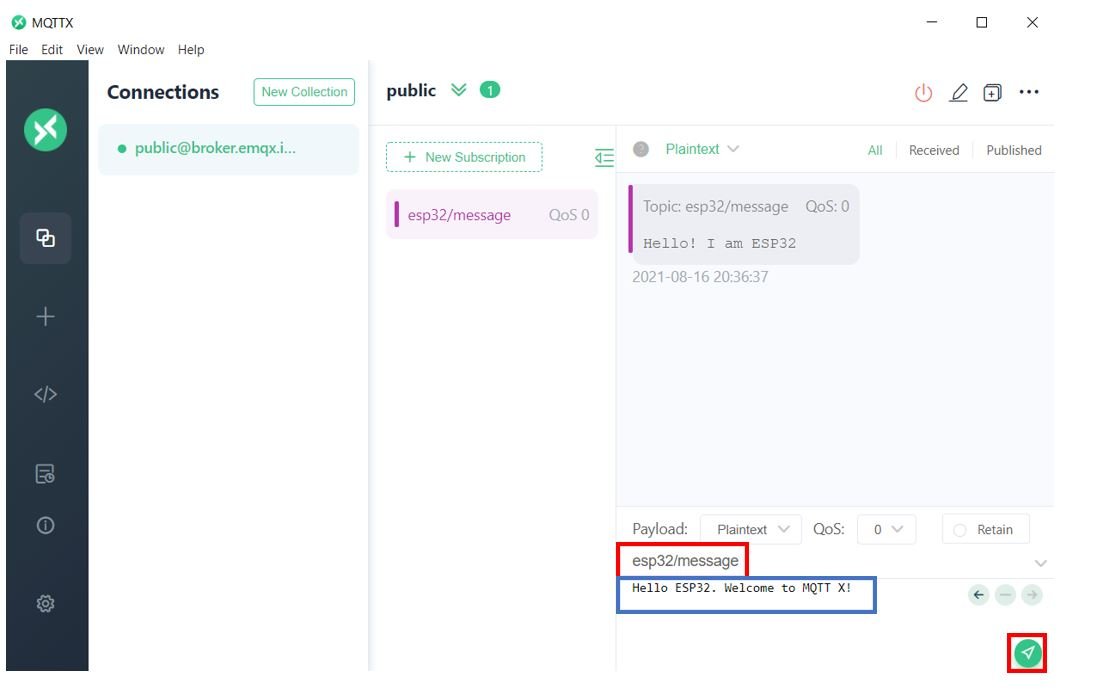
Now, the ESP32 publishes the message: “Hello! I am ESP32” which is highlighted below.

Now we will check the ESP32 topic subscription on the topic where we have subscribed our ESP32 module. Add the topic ‘esp32/message’ as highlighted in red and the message that is highlighted in blue. Write any text which you want to send to your board. Click the send button.
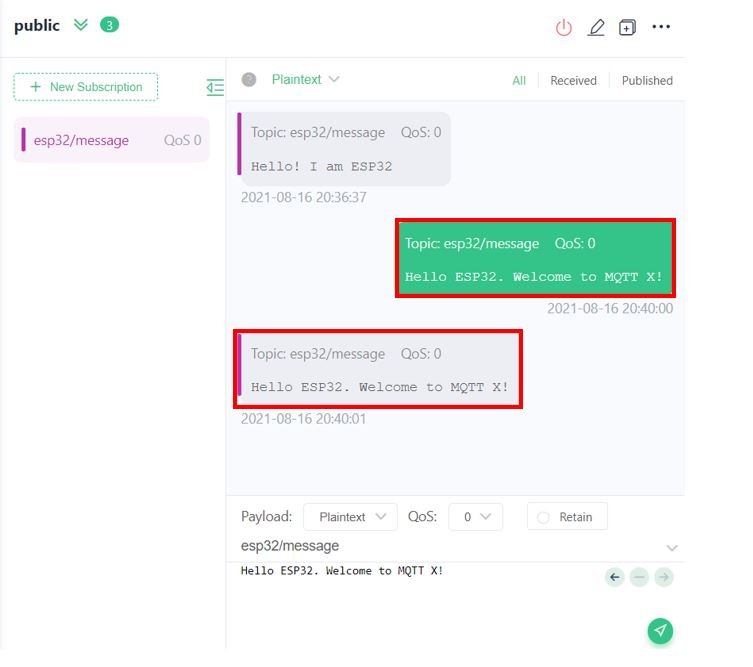
You can view the same message being sent by the server and the board as the topic has been subscribed and the message it contained published.
Open your serial monitor. You will be able to see the same message get published to your ESP32 board.
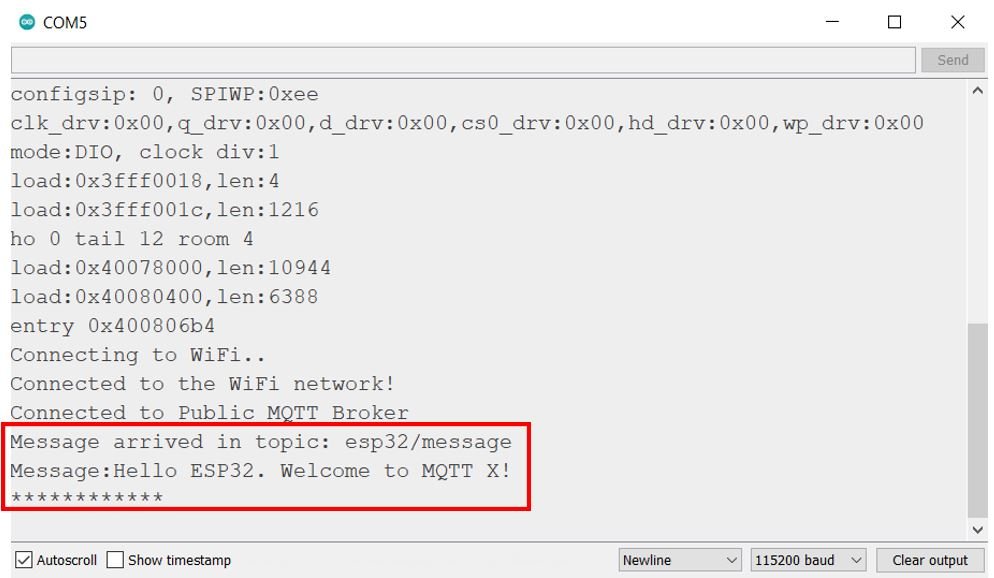
Inside the MQTT X application, you can also view the number of messages published and received as shown below.
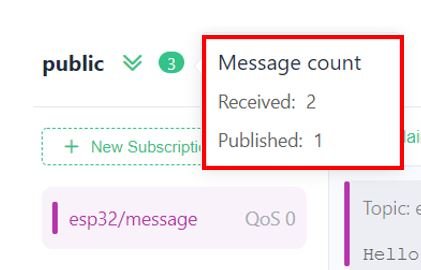
You can even view individual published and received messages.

Published Messages 
Received Messages


Conclusion
In conclusion, we were able to successfully connect our ESP32 board to a free public MQTT broker and tested publishing and subscribing with the help of EMQ X cloud and MQTT X. You can even send useful sensor readings from the module to the broker via MQTT protocol. We have another tutorial dedicated to that where we used HiveMQ as the MQTT broker. Follow the link below to access it:
by this code, I am not sure if ESP32 behaves as an publisher or subscibers…