In this tutorial, we will learn how to install the Mosquitto MQTT broker on a Raspberry Pi. The Mosquitto broker will be used for MQTT communication on the Raspberry Pi, allowing IoT devices to exchange messages efficiently using the publish/subscribe model.
The Mosquitto MQTT broker is a lightweight and efficient messaging server designed for IoT applications, making it an excellent choice for Raspberry Pi projects. Whether you are setting up a smart home system, collecting sensor data, or experimenting with IoT communication, installing Mosquitto on a Raspberry Pi allows seamless message exchange between devices. In this guide, we will walk you through the step-by-step process of installing and configuring the Mosquitto MQTT broker on a Raspberry Pi, ensuring a stable and reliable messaging setup for your IoT network.
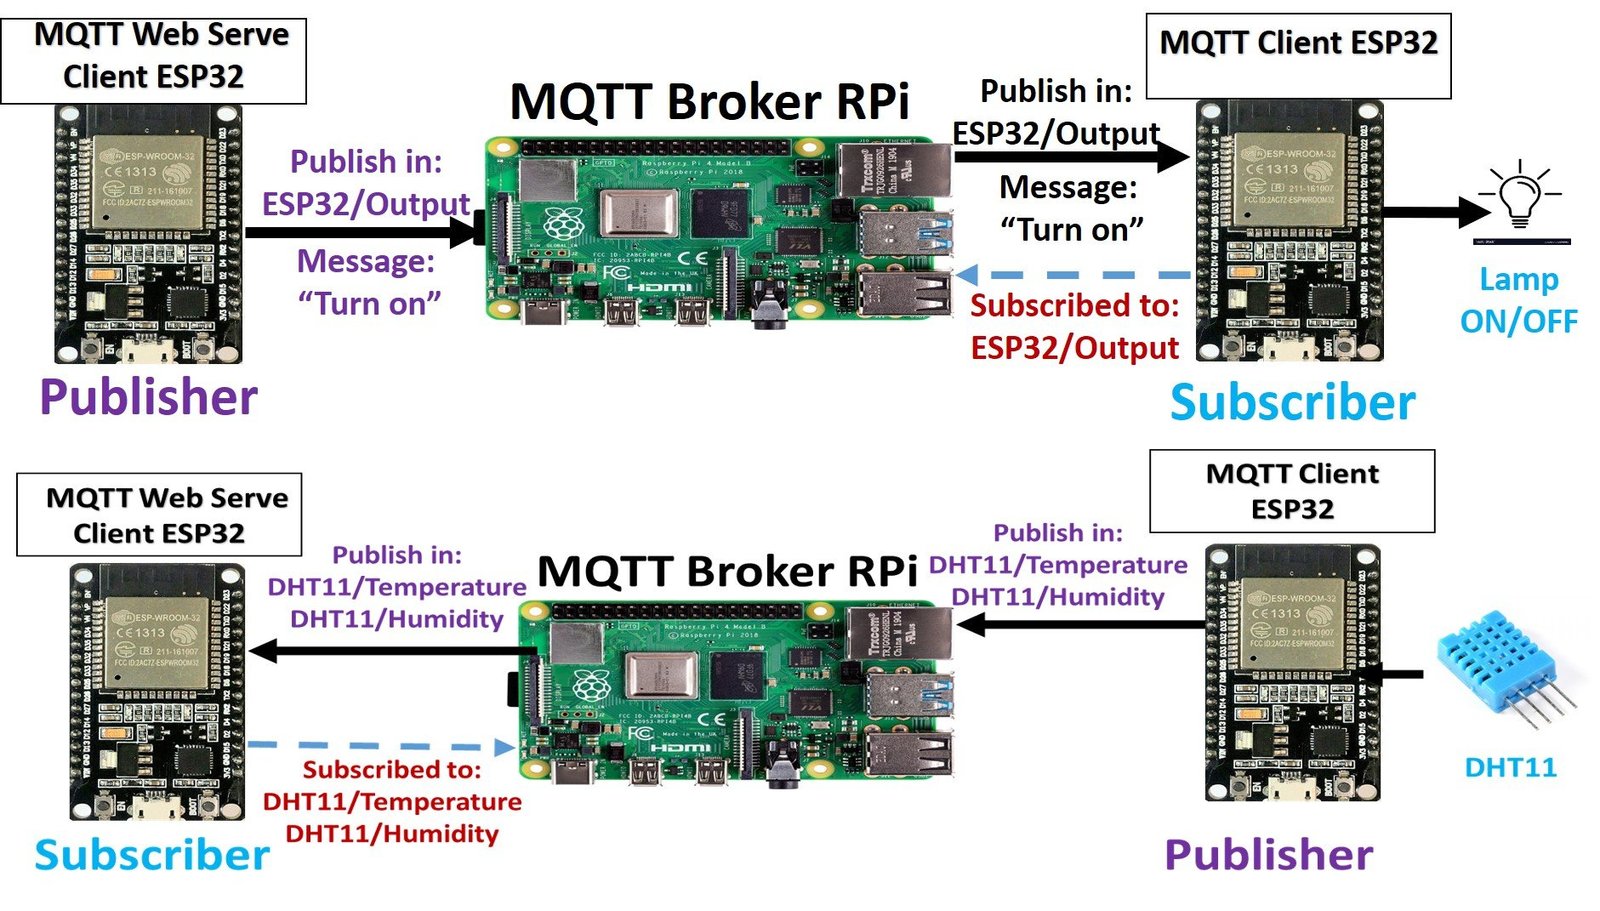
Although in this tutorial we will install the Mosquitto broker on a Raspberry Pi, you can also install it in the cloud by purchasing a hosting service. By using a Mosquitto broker in the cloud, you will be able to connect many MQTT clients running on various boards such as ESP32 and ESP8266 with the Mosquitto broker. Moreover, IoT devices will be able to communicate with the MQTT broker from anywhere in the world as long as they have an internet connection.
In this tutorial, we will focus on installing the Mosquitto broker on Raspberry Pi only. You can also install Mosquitto on your Windows and Ubuntu machine, but it is not recommended to do so because you need to keep your machine up and running all the time in order for IoT devices to remain connected with the broker. The Raspberry Pi is ideal for this purpose since it consumes very little power and can run 24/7 without any issues.
Buy raspberry pi here: Buy here
Prerequisites
Before you begin this tutorial, make sure you have the following prerequisites in place. You will need a Raspberry Pi (any model with networking capability, such as Raspberry Pi 3, 4, or 5) running Raspberry Pi OS. The Raspberry Pi should be connected to your local network either via Ethernet or Wi-Fi. You should also have SSH access configured so you can run terminal commands on the Raspberry Pi remotely. If you have not set up your Raspberry Pi yet, follow our guide on Headless Setup of Raspberry Pi without Keyboard and Monitor.
What is MQTT
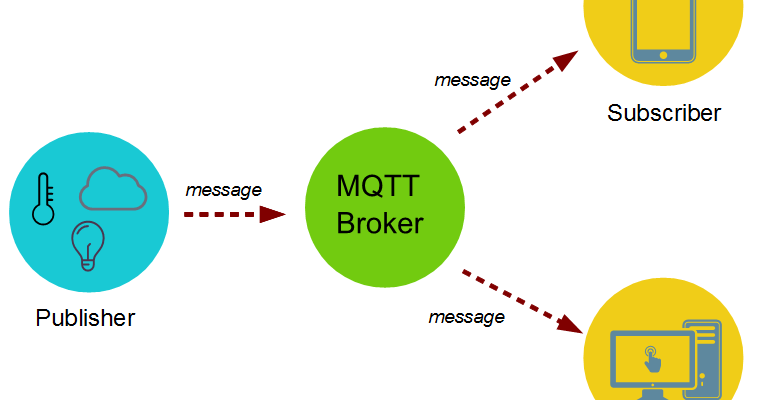
MQTT stands for Message Queuing Telemetry Transport. It is a lightweight messaging protocol specifically designed for IoT device communication. MQTT operates on a publish/subscribe model, which means devices do not communicate directly with each other. Instead, they communicate through a central server called the MQTT broker. This architecture makes MQTT highly efficient for constrained devices and unreliable networks.
Here are the key characteristics of MQTT that make it ideal for IoT projects:
- It is a lightweight messaging protocol that helps resource-constrained network clients with a simple communication mechanism.
- Unlike most messaging systems, we do not have to assign addresses to MQTT clients.
- MQTT uses simple publish/subscribe communication based on topics.
- This protocol runs on top of TCP/IP in order to provide reliable data delivery.
- MQTT supports three Quality of Service (QoS) levels: QoS 0 (at most once), QoS 1 (at least once), and QoS 2 (exactly once).
In order to understand the MQTT protocol, you should grasp these four main components:
MQTT Publisher/Subscriber
The first main concept in MQTT is the Publisher/Subscriber system. A publisher device publishes a message on a specific topic, and a subscriber device subscribes to that topic to receive the messages. More than one device can subscribe to the same topic, and a single device can both publish and subscribe to multiple topics simultaneously.
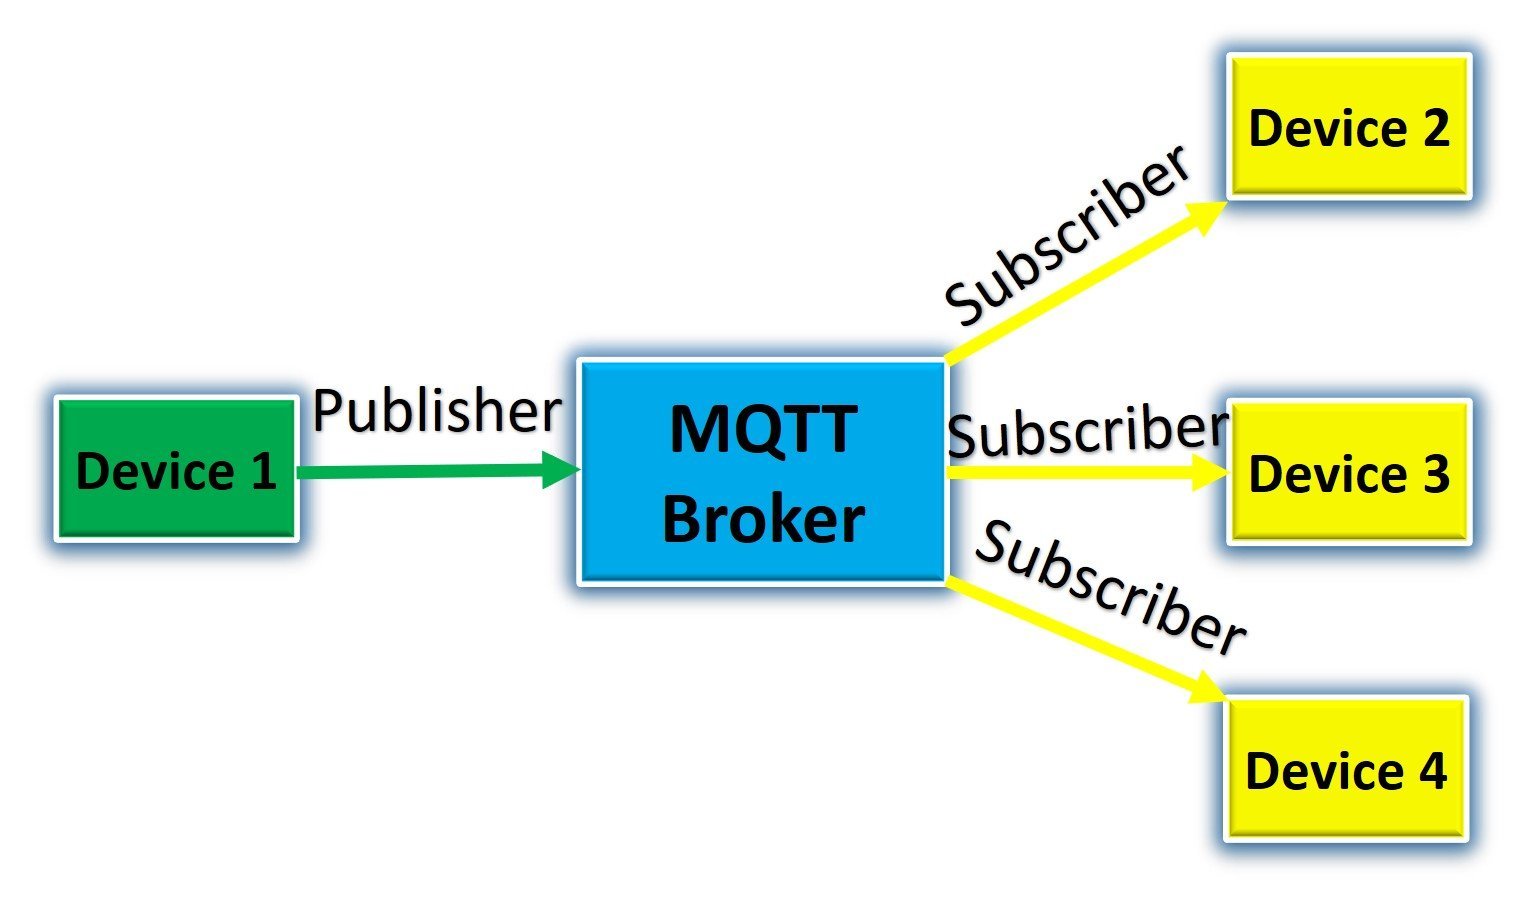
For example, according to the figure above:
- Device1 is a publisher and Devices (2-3) are subscribers.
- Device1 publishes on a topic “ESP32/Temperature” and Devices (2-3) subscribe to the same topic.
- Hence, Devices (2-3) are receivers and Device1 is the sender.
Installing Mosquitto Broker on Raspberry Pi
First, you need to set up your Raspberry Pi with the latest Raspberry Pi OS. You can follow this guide to set it up:
After you have set up your Raspberry Pi and Raspberry Pi OS is running, open the terminal and start installing the Mosquitto Broker.
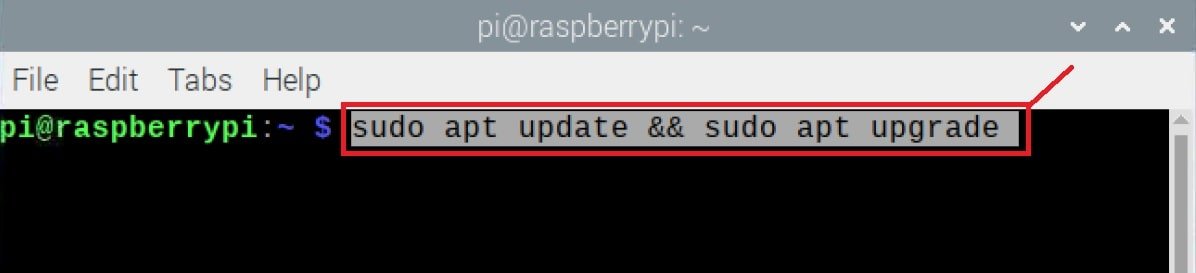
Step 1: Update System Packages
First, update and upgrade the Raspberry Pi packages with the following command to ensure all packages are up to date:
sudo apt update && sudo apt upgradeThis command may ask you for the option of Y/N, which means whether you want to update and upgrade packages or not. Select Y and press Enter. It will take some time to update and upgrade packages depending on your internet speed.
Step 2: Install Mosquitto Broker and Clients
Now we are ready to install the Mosquitto Broker on the Raspberry Pi. Execute the following command in the terminal:
sudo apt install -y mosquitto mosquitto-clientsThe above command installs both the Mosquitto broker and the Mosquitto client applications. The Mosquitto client package includes mosquitto_pub and mosquitto_sub command-line tools that we can use to publish and subscribe to MQTT topics for testing purposes.
Step 3: Enable Mosquitto to Start on Boot
The Mosquitto package creates a systemd service that we can use to start and stop the Mosquitto broker on the Raspberry Pi. The mosquitto.service file enables the Mosquitto broker to start automatically on boot by default. You can ensure this is enabled with the following command:
sudo systemctl enable mosquitto.service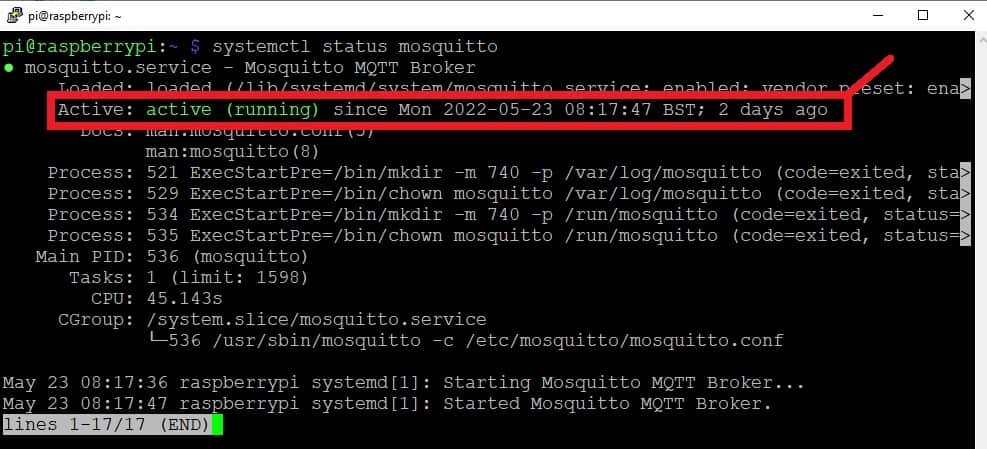
Step 4: Verify the Installation
Now let us test the Mosquitto broker installation by running Mosquitto with the verbose flag:
mosquitto -vThis command will return the Mosquitto broker version that we just installed and is running on our Raspberry Pi. One important point to note in the output is the following message:
“Starting in local-only mode. Connections will only be possible from clients running on this machine. Create a configuration file which defines a listener to allow remote access.”
This means we can only access the Mosquitto broker from the local machine. We need to create a listener port to accept connections from other machines on the network.
Step 5: Configure Remote Access
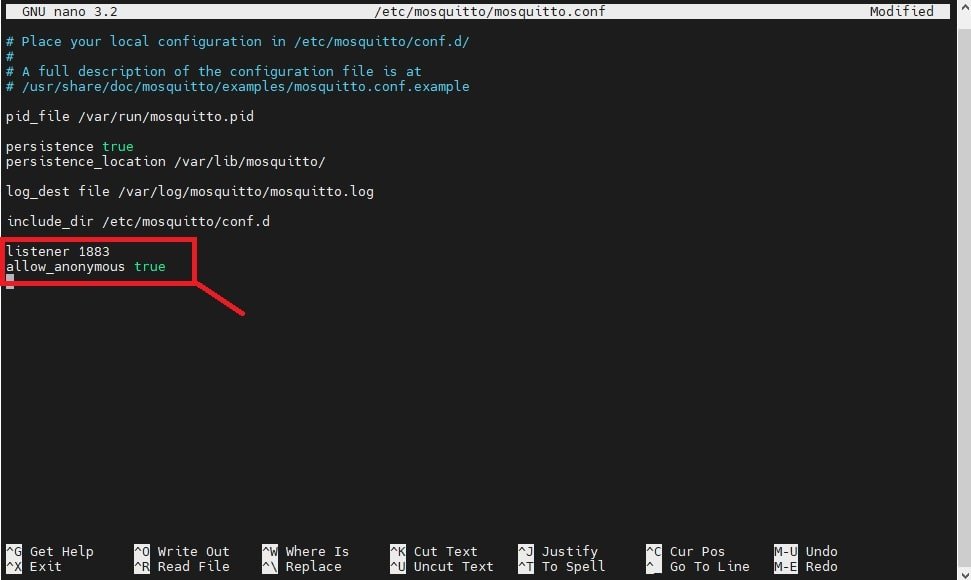
In order to enable remote access from outside the localhost of Raspberry Pi, we need to edit the mosquitto.conf file. By doing this, we will allow other IoT devices to communicate with the Raspberry Pi Mosquitto broker. Open the configuration file with the nano editor:
sudo nano /etc/mosquitto/mosquitto.confScroll to the end of this file and add the following two lines:
listener 1883
allow_anonymous true
The first line tells Mosquitto to listen on port 1883 for incoming connections from any network interface. The second line allows anonymous connections without requiring a username and password. After adding these lines, save the file by pressing CTRL+X, then Y, and finally Enter.
Finally, for the changes to take effect, reboot your Raspberry Pi with the following command:
sudo rebootAfter rebooting, your Mosquitto broker is ready to use and will accept connections from other devices on your network.
Test Mosquitto Broker with MQTT.fx
Now let us verify that we can access our Mosquitto broker from another machine. To test it, we will install a Mosquitto client application on a Windows machine. There are many desktop MQTT client applications available, but in this tutorial, we will use the popular MQTT.fx application.
Go to the following link, download, and install MQTT.fx on your Windows, Linux, or Mac machine.
After installing MQTT.fx, find the IP address of your Raspberry Pi using the following command, and also verify that the Mosquitto broker is running:
hostname -I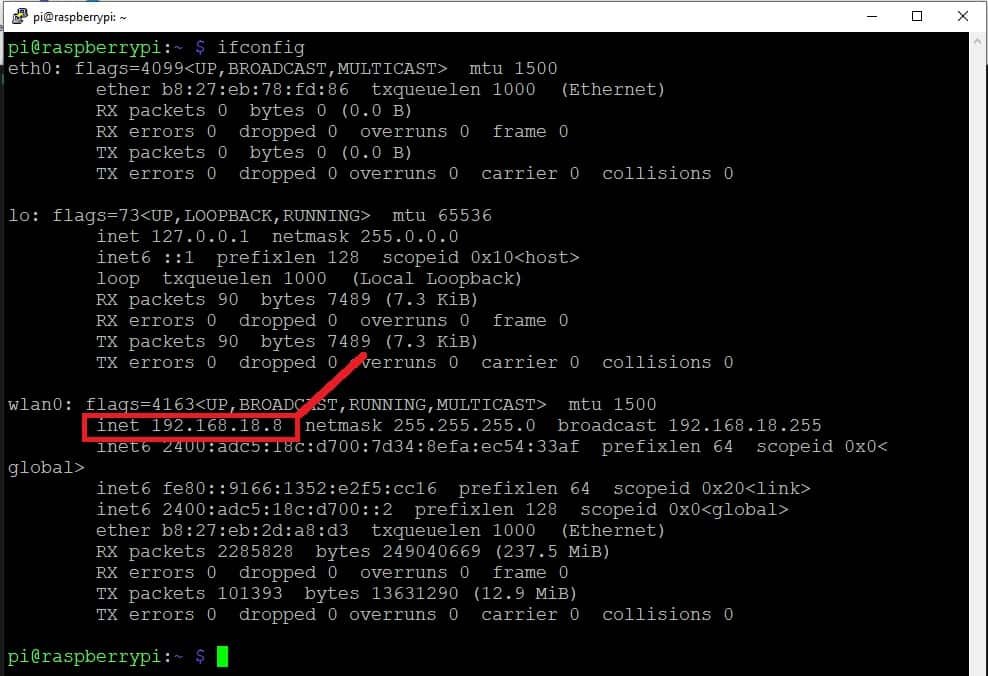
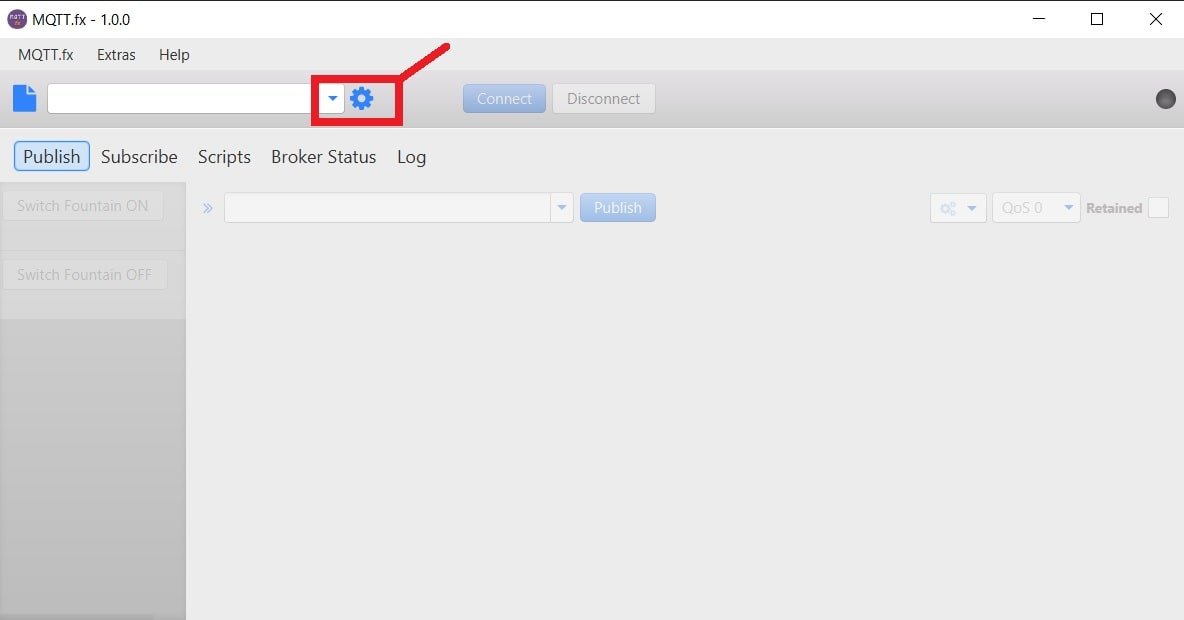
Now open the MQTT.fx desktop client application and click on the Settings button to configure the connection to the Mosquitto broker running on your Raspberry Pi.
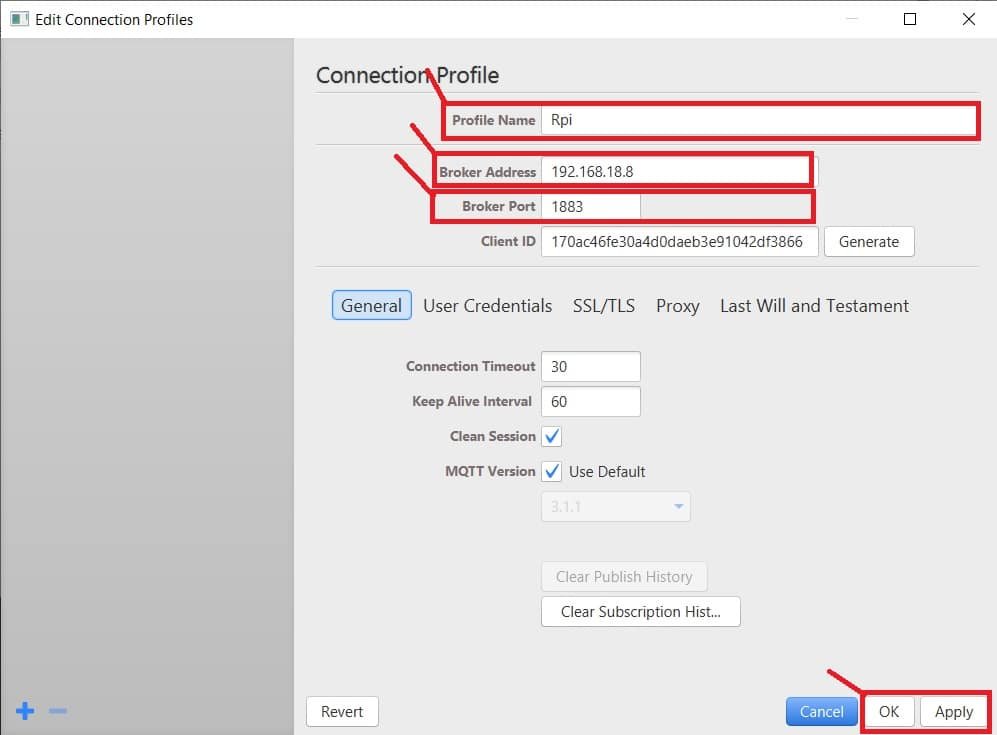
The MQTT client profile settings page will open as shown below. Give a descriptive name to your broker profile (for example, “pi”). In the Broker Address field, enter the IP address of your Raspberry Pi, and set the port number to 1883. After that, click OK.
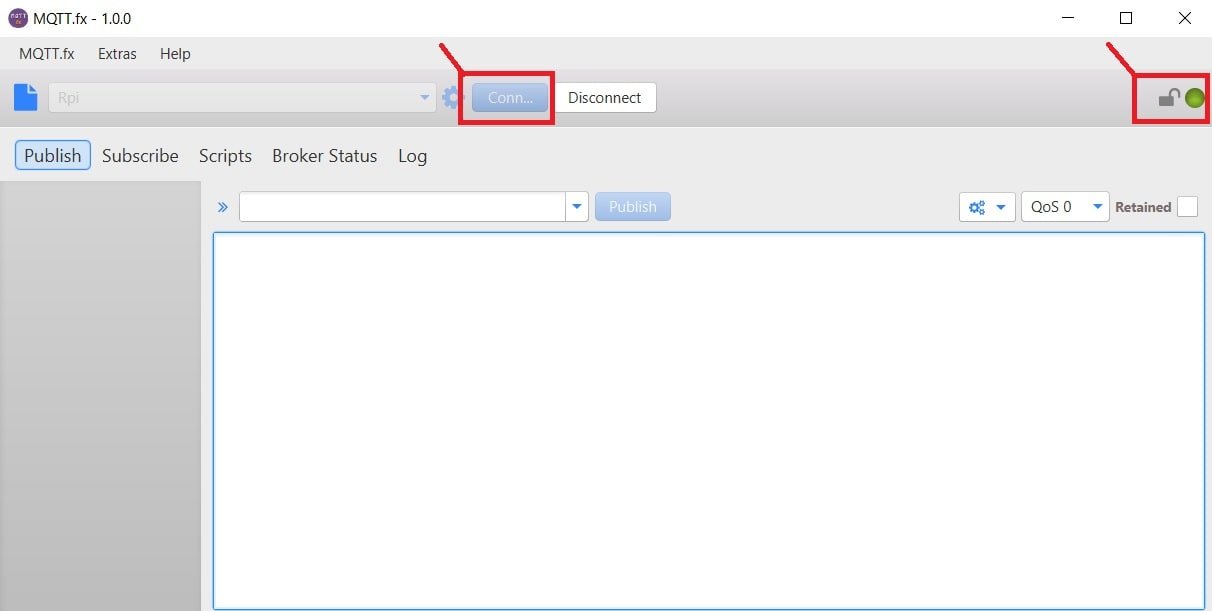
Now click the Connect button. The indicator on the top right side of MQTT.fx will turn green, which indicates that MQTT.fx is successfully connected to your Raspberry Pi Mosquitto broker.
Now let us demonstrate publishing a message from MQTT.fx to an MQTT client running on the Raspberry Pi.
Subscribe to a Topic on Raspberry Pi
To subscribe to an MQTT topic with the Mosquitto client on the Raspberry Pi, open the terminal and enter the following command:
mosquitto_sub -d -t test_topic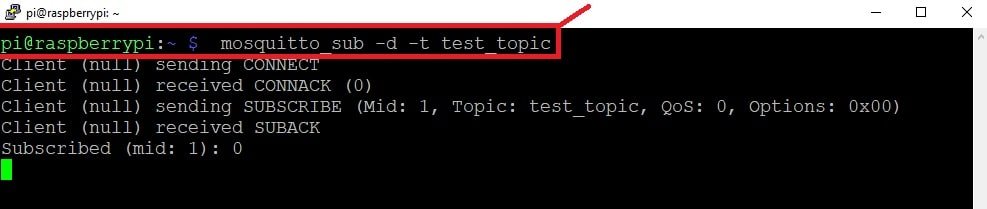
When we install the Mosquitto broker on a Raspberry Pi, it also installs the mosquitto_sub and mosquitto_pub client applications. The above command subscribes to a topic named test_topic. Whenever any publisher publishes a message on this topic, we will receive it on this terminal.
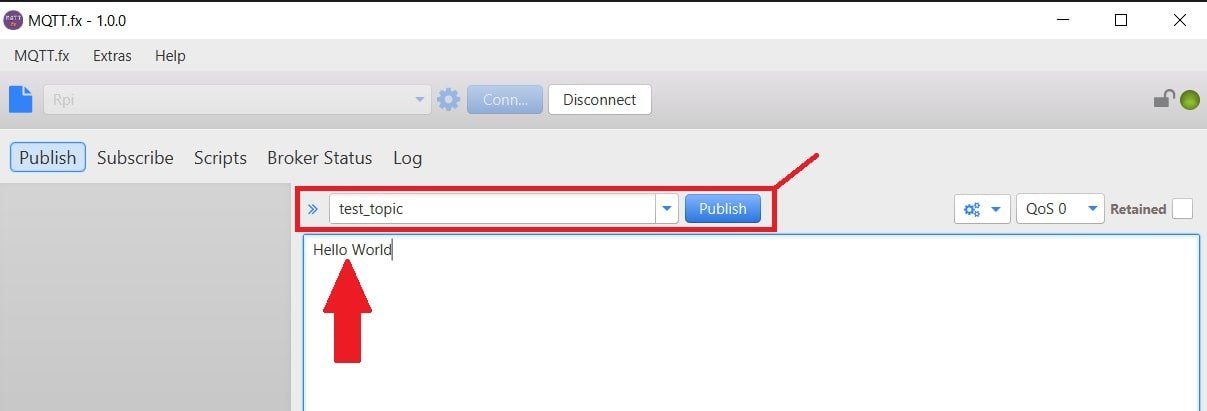
Publish a Message from MQTT.fx
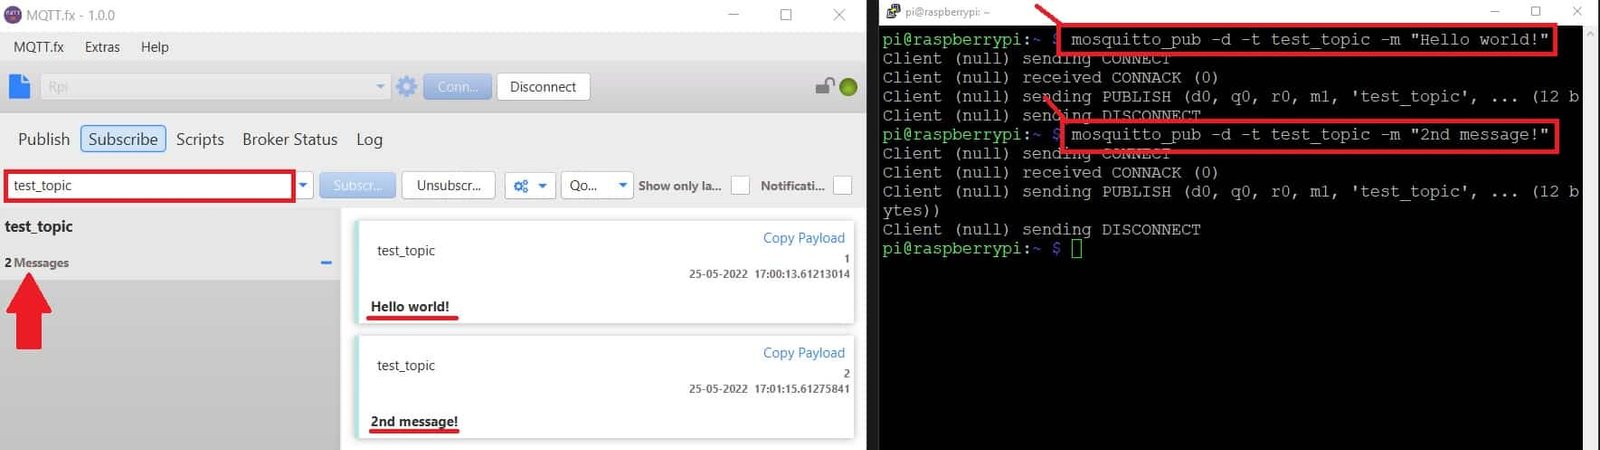
Now let us publish a message on test_topic using the MQTT.fx application. In the client application, click on “Publish” in the menu bar, enter the topic name and your message in the message window, and click the Publish button. It will publish the message on “test_topic”.
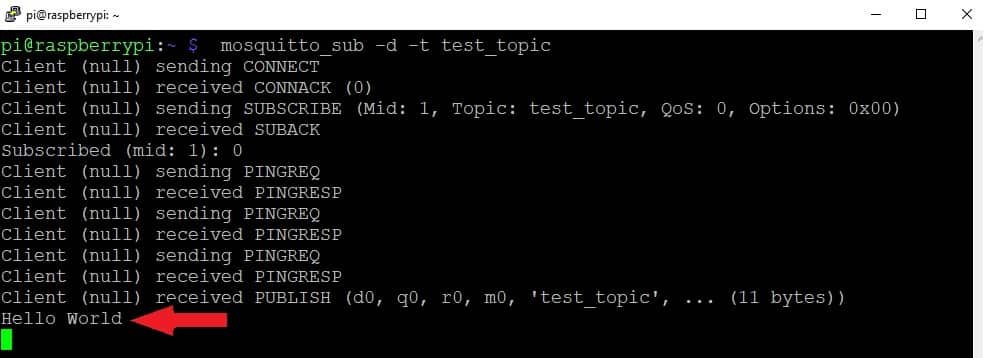
Now if you check the Raspberry Pi terminal, you will see the message received by the Mosquitto subscriber client:
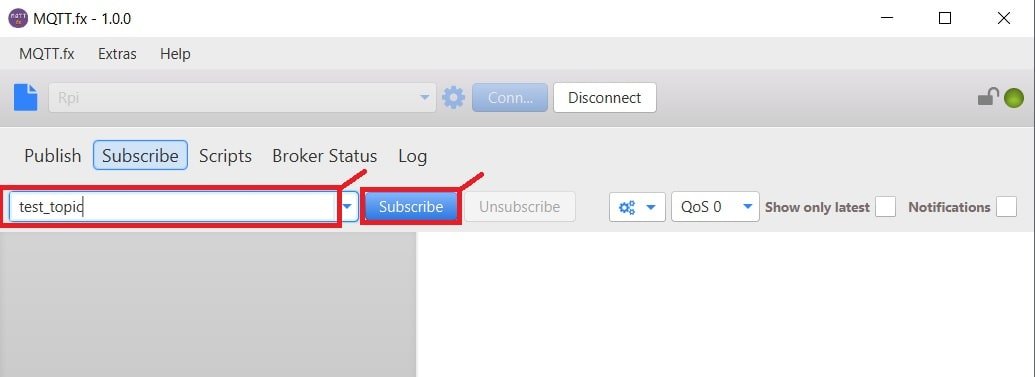
Similarly, we can subscribe to topics with MQTT.fx and receive messages whenever any client publishes a message:
On the Raspberry Pi terminal, type the following command to publish a message:
mosquitto_pub -d -t test_topic -m "Hello world!"As you can see, the message published from the Raspberry Pi is received on MQTT.fx.
Testing with Multiple Terminal Windows
If you do not want to use MQTT.fx, you can test the Mosquitto broker using mosquitto_sub and mosquitto_pub directly. Open multiple Raspberry Pi terminal windows and publish/subscribe to messages from these terminals as shown below:
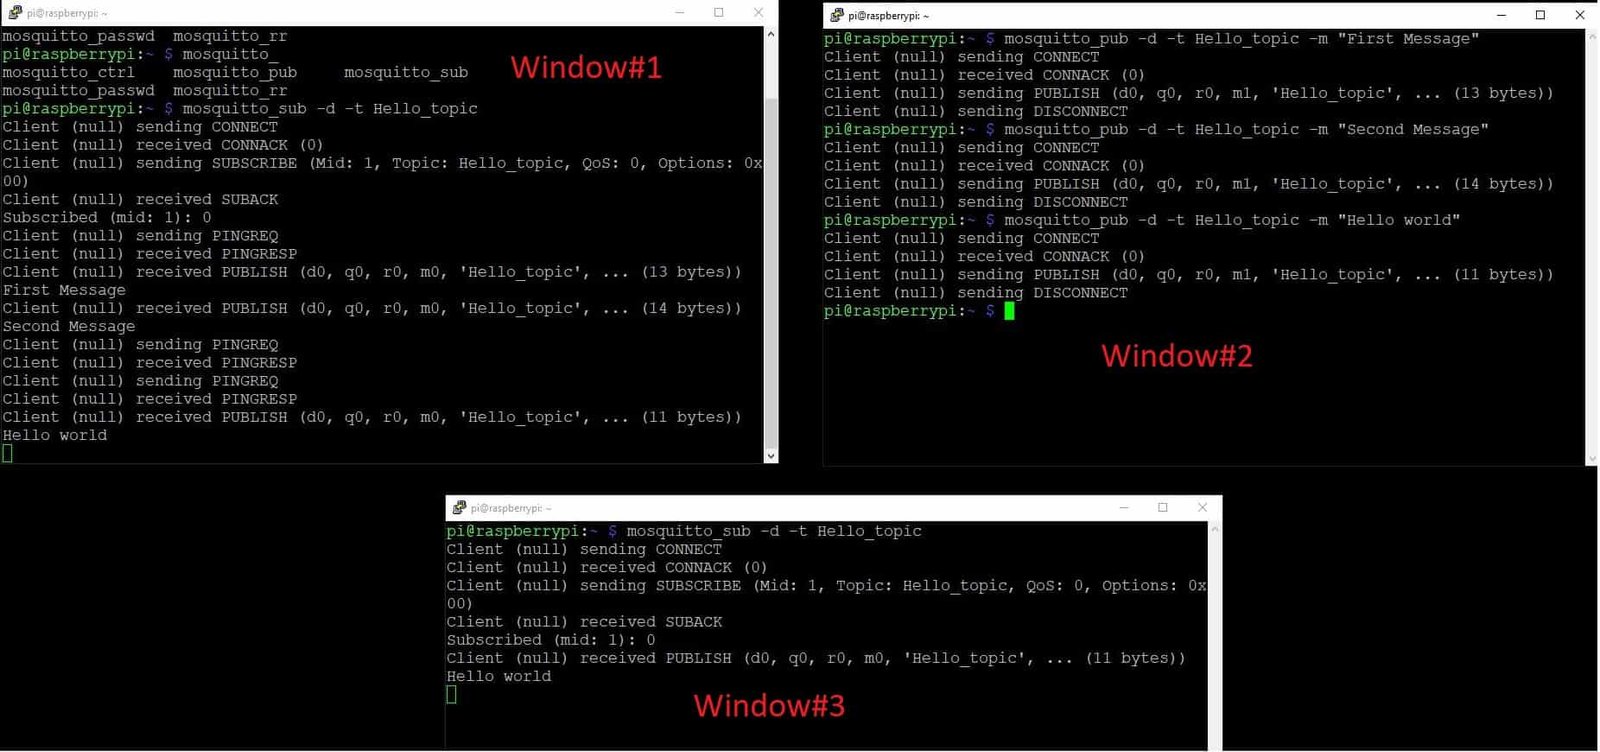
In the above example, Window #1 and Window #3 have subscribed to a topic called “Hello_topic”, and Window #2 publishes a message on “Hello_topic”. Both subscribing clients receive the message “Hello World!” simultaneously, demonstrating how MQTT enables one-to-many communication through topic-based messaging.
Securing Mosquitto with Username and Password
In the configuration above, we enabled anonymous access for simplicity. However, for any production or internet-facing deployment, you should secure your Mosquitto broker with username and password authentication. This prevents unauthorized devices from publishing or subscribing to your MQTT topics.
To set up authentication, first create a password file using the mosquitto_passwd utility:
sudo mosquitto_passwd -c /etc/mosquitto/passwd your_usernameYou will be prompted to enter and confirm a password. Next, update the Mosquitto configuration file to use this password file and disable anonymous access:
sudo nano /etc/mosquitto/mosquitto.confReplace the allow_anonymous true line with the following:
allow_anonymous false
password_file /etc/mosquitto/passwd
Save the file and restart the Mosquitto service for the changes to take effect:
sudo systemctl restart mosquittoNow, when connecting to the broker, clients must provide valid credentials. For example, to subscribe with authentication:
mosquitto_sub -d -t test_topic -u your_username -P your_passwordAnd to publish with authentication:
mosquitto_pub -d -t test_topic -m "Hello!" -u your_username -P your_passwordTroubleshooting Common Issues
If you encounter problems while setting up or using the Mosquitto MQTT broker on your Raspberry Pi, here are some common issues and their solutions.
If the Mosquitto broker fails to start, check the service status by running sudo systemctl status mosquitto in the terminal. This command will show you any error messages that prevent the broker from starting. A common cause is a syntax error in the mosquitto.conf file. Double-check the configuration file for any typos or incorrect formatting.
If remote clients cannot connect to the broker, verify that the listener is configured correctly in mosquitto.conf and that port 1883 is not blocked by a firewall. You can check if Mosquitto is listening on port 1883 by running sudo netstat -tlnp | grep 1883 or ss -tlnp | grep 1883. If the port is not listed, the listener configuration may be incorrect.
If you see an “Address already in use” error when starting Mosquitto, it means another instance of Mosquitto is already running. Stop the existing service first with sudo systemctl stop mosquitto before starting a new one. You can also check for running instances with ps aux | grep mosquitto.
If clients connect but messages are not being delivered, make sure the publisher and subscriber are using the exact same topic name. MQTT topics are case-sensitive, so “Test_Topic” and “test_topic” are treated as different topics. Also verify that the QoS levels are set appropriately for your use case.
Useful Mosquitto Commands
Here are some useful commands for managing your Mosquitto MQTT broker on the Raspberry Pi:
To check the status of the Mosquitto service, run: sudo systemctl status mosquitto
To start the Mosquitto service manually: sudo systemctl start mosquitto
To stop the Mosquitto service: sudo systemctl stop mosquitto
To restart the Mosquitto service after configuration changes: sudo systemctl restart mosquitto
To check the installed Mosquitto version: mosquitto -v
To view the Mosquitto broker log for debugging: sudo tail -f /var/log/mosquitto/mosquitto.log
To subscribe to all topics using a wildcard: mosquitto_sub -d -t “#”
Video demo:
Summary
In this tutorial, we learned how to install and configure the Mosquitto MQTT broker on a Raspberry Pi. We covered the complete process from updating system packages, installing the Mosquitto broker and client tools, enabling the service to start on boot, and configuring remote access through the mosquitto.conf file. We also tested the broker using both the MQTT.fx desktop client and the command-line mosquitto_pub and mosquitto_sub tools. Additionally, we explored how to secure the broker with username and password authentication, troubleshooting tips for common issues, and useful commands for managing the Mosquitto service. With this setup, your Raspberry Pi can serve as a dedicated MQTT broker for all your IoT devices and home automation projects.
You may also like to read:
- Install Node-RED on Raspberry Pi (32-bit and 64-bit RPI OS)
- Node-RED Send Email Alerts and Notifications
- Node-RED Send Messages to WhatsApp Number
- Headless Setup of Raspberry Pi without Keyboard and Monitor
| Raspberry Pi Components | Amazon Links |
|---|---|
| Raspberry Pi 5 Starter Kit PRO - Turbine Black (128GB Edition) (8GB RAM) | Buy Now |
| Raspberry Pi 5 Starter Kit MAX - Turbine White (256 GB Edition) (16GB RAM) | Buy Now |
| Raspberry Pi 5 8GB | Buy Now |
| Raspberry Pi 5 4GB | Buy Now |
| Raspberry Pi 5 (16GB) | Buy Now |
| CM5 Pi Compute Module 5 Kit | Buy Now |