In this tutorial, we will learn about 8051 microcontroller. Firstly, we will start with the history and introduction of 8051 and how it evolves as a famous microcontroller among engineering students. Secondly, we will discuss the architecture such as internal block diagram, registers, timers, counters, serial ports programming, types of interrupts and many other features. Furthermore, we will also see how registers of these external and internal peripherals work. Thirdly, we look into the pinout diagram and pin configuration description of all pins. On top of that, we will go through the functionality of each GPIO pin. After that, we will discuss GPIO pins programming. In conclusion, there will be some suggestions about how to learn 8051 microcontroller programming with examples and projects.
But before reading this article you should know the basic difference between microprocessors and microcontrollers?
8051 microcontroller Introduction
Intel Corporation is the first company who presented 8051 microcontroller in the market. It is an 8-bit microcontroller. It has on-chip 128 bytes of RAM, 4K bytes ROM, two timers, one serial port, and four general-purpose input/output ports. Each port has an 8-bit register. The central processing unit is also of an 8-bit processing unit. Therefore, it can process 8 bit of data at a time. Large data must be divided into 8-bit information for processing.
In addition to this, many versions with different processing speed, on-chip RAM and ROM sizes are also available. But all these versions have the same instruction set and a program written for one will run on any other version without any change. 8052, 8031 are other versions of its family.
Main Features and Peripherals
Other main features are:
| Features | Quantity |
|---|---|
| ROM | 4K Bytes |
| RAM | 128 Bytes |
| Input/output pins | 32 |
| timer | 2 |
| Serial port | 1 |
| Interrupts | 6 |
8051 microcontroller pinout diagram
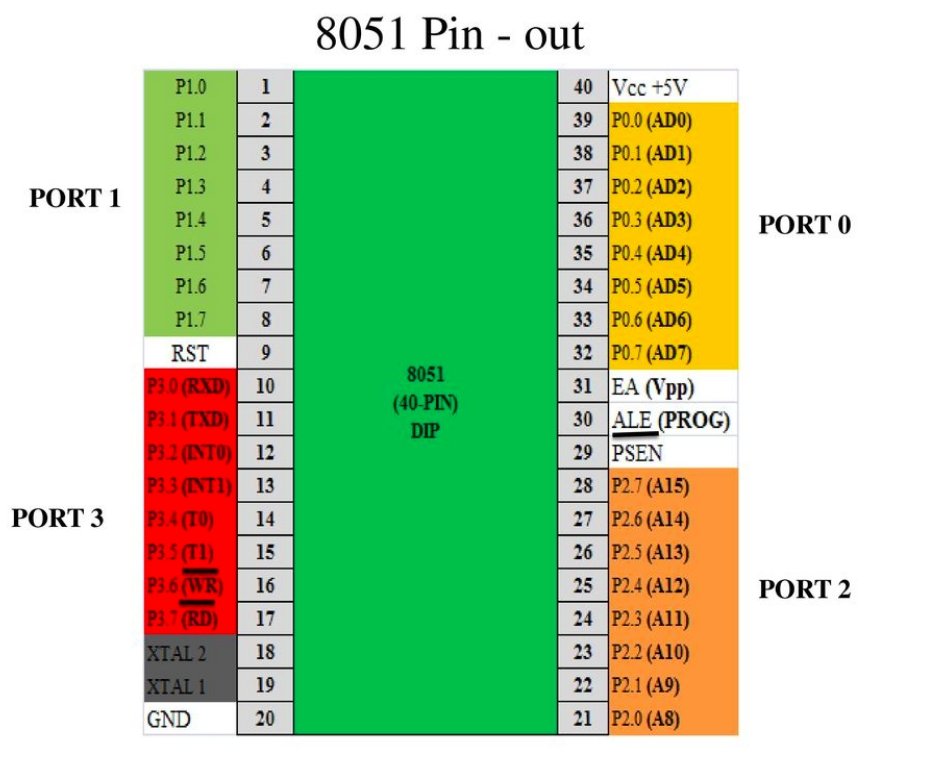
It comes in different 40 pin packages such as DIP (dual inline package), QFP (quad flat package) and LLC(a leadless chip carrier). Pin configuration diagram of 8051 is shown below:
Some manufacturers also introduced 20 pins 8051 with less number of input /output pins. As shown in the pinout diagram, it has 40 pins out of which 32 pins are dedicated to four GPIO ports. We will explain these four ports in later sections.
Pin Configuration Details
A brief explanation of all pins is given below
- Vcc : It provides supply voltage to chip. The operating voltage is 5 volt.
- GND : It connect with ground of voltage supply
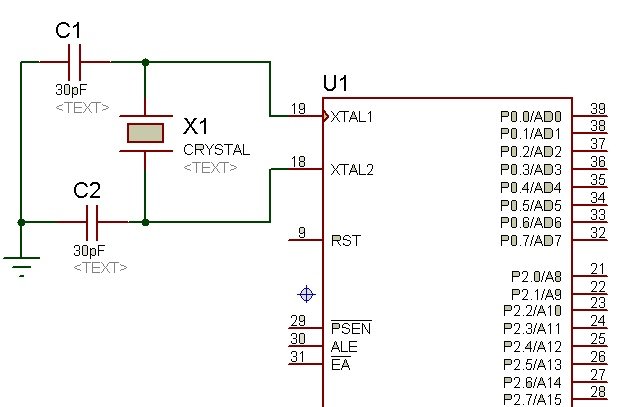
- XTAL1 and XTAL2 pin: Although 8051 have on chip crystal oscillator. But still it requires an external clock oscillator. External crystal oscillator is connected to XTAL1 and XTAL2 pins. It also requires two capacitors of 30pF as shown in figure below. Capacitors one terminal is connected with crystal oscillator and other terminal with ground. Processing speed of 8051 microcontroller depends on crystal oscillator frequency. But each microcontroller have maximum limit of operating frequency. We cannot connect crystal oscillator more than maximum operating limit frequency.
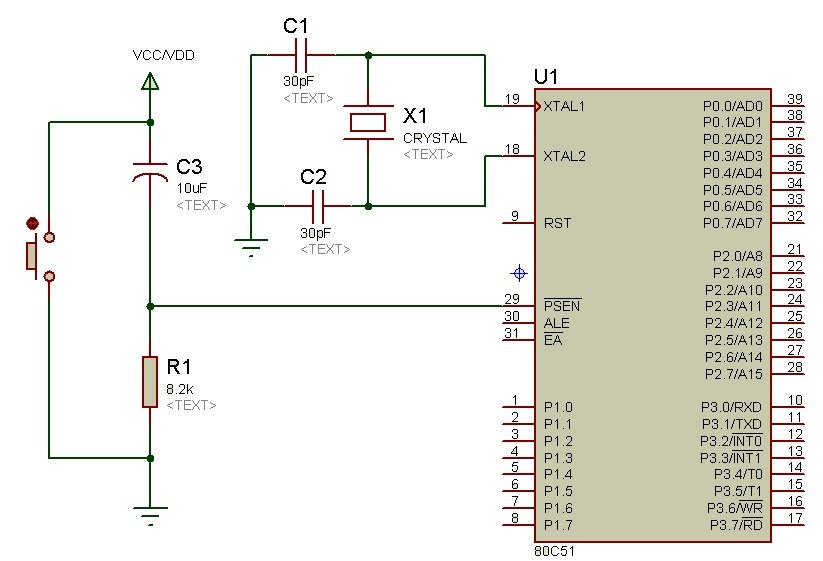
- RST pin number 9 is a reset pin. It is active high pin. It is used to reset. If we apply active high signal to this pin, 8051 microcontroller will reset and turn off all its functions. It will erase all values of registers and it will make all program counter values to zero. Figure below shows the power on reset circuitry. Rest input will be effective only, if we apply high pulse for more than two machines cycles. Otherwise it will not rest.
- EA Pin number 33 is used to store program. All family of 8051 microcontrollers comes with on chip ROM to store programs. For such purpose EA pin is connected with Vcc. EA stands for external access.
- PSEN Pin number 29 is an output pin. It is stands for “Program store enable”. It is also used for programming.
Input/output ports P0, P1, P2 and P3 use to interface 8051 microcontroller with external devices. I have already explained it above.
8051 microcontroller architecture
In this section we will discuss its internal architecture and main registers. Registers are mainly used while programming microcontrollers in assembly language. But for c programming, we still need to know about some registers. Registers are used to perform MOV and ADD instructions.
Registers
As you know in microprocessors registers are used to store temporary instructions and data. Instructions are used to processed addresses to fetch data. 8051 microcontrollers have 8 bit registers. 8 bit registers have 8 bit start from D0-D7. D0 is least significant bit and D7 is least significant bit. To process data larger than 8 bit, it should be broken into 8 bit pieces. It has many registers but general purpose registers are mostly accessible to programmers. There are two types of registers 1) General purpose registers 2) Special purpose registers. List of mostly used general purpose registers is given below:
- A accumulator ( It is used to perform arithmetic and logic instructions)
- B, R0, R1, R2, R3, R4, R5, R6, R7 registers ( They are used to store instruction address and data)
- DPTR ( Data pointers is used to access and process data in different addressing modes) It consists of high byte ( DPH) and a low byte (DPL) which is used to hold 16 bit address. we can use it as a base register in indirect jumps, external data transfer and lookup table instructions.
- PC (Program counter is 16 bit register. It is used to store the address of next instruction to be executed )
All these registers are of 8-bits other than data pointer and program counter registers.
Data Types
8051 microcontroller has only one data type of 8 bit. The size of each register is also 8 bit. If data is larger than 8 bit, it is programmer responsibility to divide data into 8 bit pieces before processing. DB directive is most widely used data directive in assembly language for assemblers.
Program status word register
8051 microcontroller has program status register also know as flag register. Flag register is used to show status of arithmetic logic instructions like carry bit, zero carry bit etc. PSW is an 8 bit register. Only 6 bits are used. PSW register is also called flag register. Flag register has 8 flags. Four flags are called conditional flags which execute instruction only if condition is fulfilled. These conditional flags are OV (overflow), P (parity), AC (auxiliary carry) and CY (carry). Bit number 3 and 4 of PSW register is used to change the bank registers. Bit number 1 and 5 of program status register are unused and it can be used by programmer for any specific purpose.
Register banks
32 Bytes of RAM are dedicated for register banks and stacks. These 32 bytes are broken in four banks. Each back has 8 registers from R0-R7. R0 is RAM location zero and so R7 is RAM location seven. The second bank register is started from location 8 and end 05H. The third bank starts from 10H and finished on location 17H. The last bank is located between the 18H-1FH.
8051 microcontroller stack
Stack is a part of RAM which is used by the processor to store data or an address temporarily. It is very important part of microprocessor. Because there are very limited numbers of registers to store data and addresses. Stack pointer is 8051 is 8 bit wide. Therefore, it can hold data from 00 to FFH. Stack pointer is used by CPU to access the stack. 8051 have 8 bit stack pointer. It means it can access values from 00H-FFH. When it is turned on, the stack pointer contains value of 07.
Memory organization
It have complex memory organization. Because 8051 microcontroller have separate adress bus for program memory, Data memory and exteranl RAM. It is based on Harvard architecture developed by Harvard in 1944.
Addressing modes
Microprocessor fetches data in different ways. The data usually stored in register, memory and can be used from immediate value. These different ways of accessing data is called addressing modes. Different microcontrollers have different addressing modes. It depends on design of manufacturers. 8051 has 5 addressing modes.
- Indexed
- Register indirect
- Direct
- Register
- Immediate
8051 microcontroller I/O port programming
It has four input/output ports to interact with external devices. As shown in figure below, it has 40 pins but 32 pins are assigned to I/O 4 port. Port P0, P1, P2 and P3. Each port has 8 bits. Each bit can be used either as an input or output pin. Resetting these pins make them input ports. In other words they can be used as an input. But all ports can be configured either as an input or output.
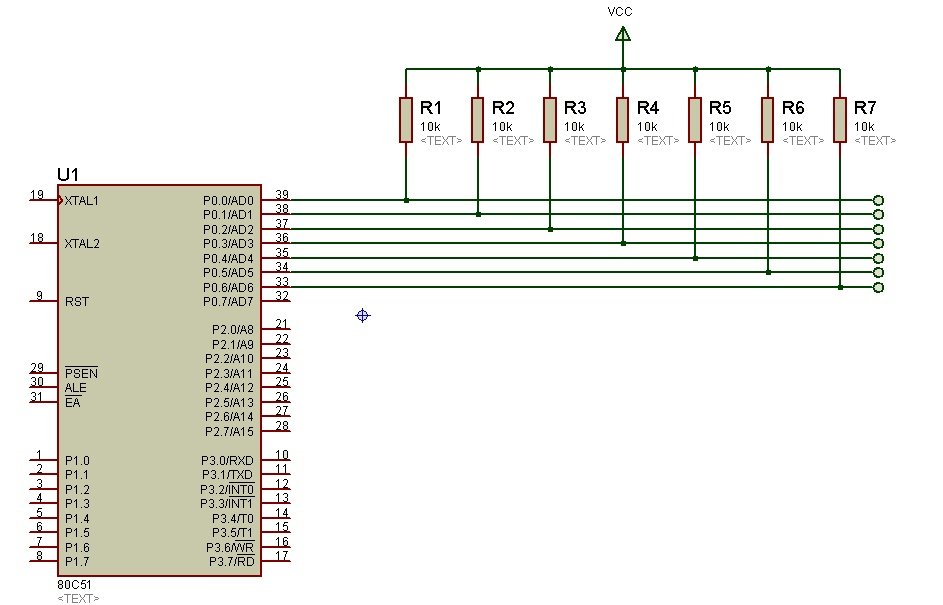
To configure any port as an input port writes 0 to it and to configure any port as an output write 1 to it. But to use port 0 as an input or output each pin must be externally pulled up with 10K ohm resistor. Because port 0 is an open drain. Rest of the ports can be configured either as an input or output by writing either 0 or 1 to all the bits. One no needs to use pull up resistor with P1, P2 and P3 ports. Sometimes we may need to access only one or two bits of port. 8051 microcontroller provides facility to access individual bits.
For example we want to access bit 0 of port 1, we can use P1.0 to access bit zero of port 1. Similarly we can access any bit of any port. We will see how to do it in programming in later part of this article.. Check this complete tutorial on How to use input output ports of 8051 microcontroller:
8051 microcontroller features
8051 microcontroller have following basic components inside it or it provides following features. Although we can connect additional components externally.
- Internal ROM = 4k bytes
- RAM = 128k bytes
- It have foure 8 bit input/output ports
- One serial communicatiom port
- 210 bit address bus
- 64k bytes external memory for code
- 64K bytes external memory for data
- Two 16 bit timers and counters
- UART serial communication port
- Interrupts ( External and internal)
- Internal on chip clock
Block diagram
As I mentioned earlier 8051 microcontroller has 4 input output ports, 2 timers which can be used either as a timer and counter. It has one serial communication PORT or UART communication is possible with this microcontroller. All other features are also shown in block diagram. Block diagram of 8051 microcontroller is given below.
Timers in 8051 microcontroller
8051 microcontroller have two timers. Timer is kind of counter which increment its value by one every time an instruction is executed. Time of increment depends on frequency of crystal oscillator. I will post a separate article on how to use timers of 8051. For more information about how to use these two timers either as a timer or as counter you can check following article on timer working:
External interrupts
It has two external interrupt pin which can be used to monitor any external event as a interrupt. There are two methods which are usually use in microcontrollers to measure external events. One is polling and other is interrupts. To know how to use interrupts of 8051 microcontroller check this article:
How to measure analog values ADC
It 8051 does not contain built in analog to digital converter as mostly microcontroller does. As you already know, Analog to digital converter has many applications. All microcontrollers or digital devices only deals with binary forms like 0’s and 1’s. So to interface any analog sensor with microcontroller, we need to use analog to digital converter. we can interface external analog to digital converter with 8051 microcontroller to measure external world analog signals. To know more about how to interface 8051 with Analog to digital converter check this complete guide:
8051 microcontroller tutorials
you may also like to check other 8051 microcontroller tutorials


your RST button is wrong, it making vcc and gnd short