In this user guide, we will learn how to publish sensor readings from ESP32/ESP8266 to Google Sheets using IFTTT as a third-party service. This guide will be helpful for the users who want to access data for a predetermined amount of time and also store it appropriately. Any preferred sensor, such as DS18B20, BME680, and MPPU6050, can be used but for this article, we will use a BME280 sensor which will be used to measure temperature, pressure and humidity. The sensor readings will be accessed from the BME280 sensor connected with the ESP32/ESP8266 module. These readings will get updated on Google Sheets after every few minutes. To integrate Google Sheets with ESP32/ESP8266 we will use IFTTT which is an open-source web service. Via IFTTT, it will become extremely simple to publish updated sensor data to Google Sheets promptly.
This article is divided into these sub-topics:
- Introduction of BME280 Sensor Module and connecting it with ESP32/ESP8266 module
- Setting up and testing IFTTT
- Setting up Arduino IDE to publish sensor readings to Google Sheets via IFTTT
We have a similar guide for ESP32 using MicroPython:
Project Overview – Sending Sesnor Readings to Google Sheet
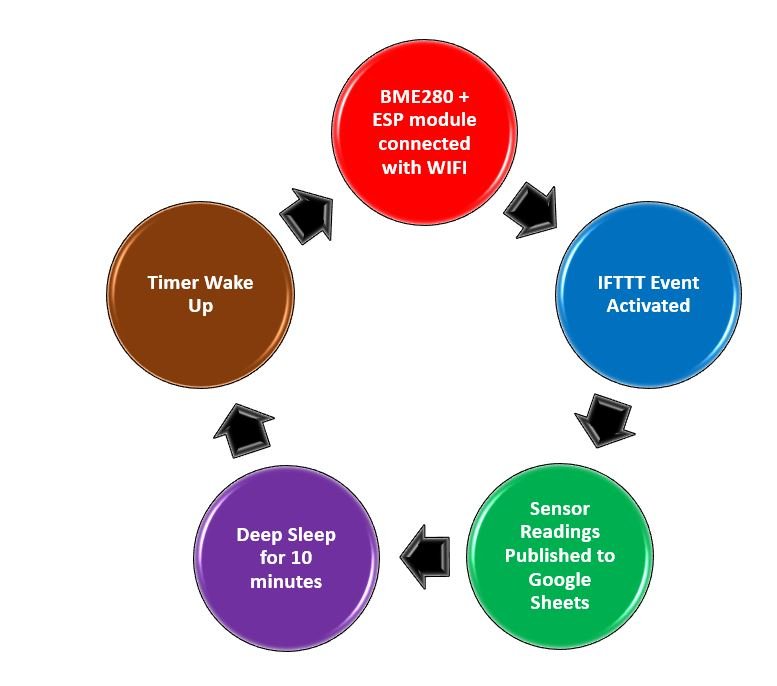
Our project starts with our ESP32/ESP8266 booting and connecting to the local WiFi network. The BME280 sensor will be connected to the ESP board through the I2C GPIO pins which we will specify later. When the development board boots, the BME280 sensor gets particular readings of temperature, pressure and humidity. This acts as a trigger that causes the HTTP post request to be sent to the IFTT service which causes the sensor readings to be published to Google Sheets. The Google Sheets will be linked to the user’s Google Drive and will be present there. After every 10 minutes, new sensor readings will get published on Google Sheets. The rest of the time the ESP board will remain in deep sleep mode.
Recommended Readings:
- MicroPython: ESP32 Deep Sleep Mode and Wake Up Sources
- ESP32 HTTP POST using Arduino IDE (ThingSpeak and IFTTT)
- MicroPython: Send Sensor Readings via Email (IFTTT) with ESP32 and ESP8266
BME280 sensor Introduction
The BME280 sensor is used to measure readings regarding ambient temperature, barometric pressure, and relative humidity. It is mostly used in web and mobile applications where low power consumption is key. This sensor uses I2C or SPI to communicate data with the micro-controllers. Although there are several different versions of BME280 available in the market, the one we will be studying uses the I2C communication protocol and SPI.
Connecting BME280 sensor with the ESP32/ESP8266 development board
The connection of BME280 with the ESP boards is very easy. We have to connect the VCC terminal with 3.3V, ground with the ground (common ground), SCL of the sensor with SCL of the module, and SDA of the sensor with the SDA pin of the ESP modules.
The I2C pin in ESP32 for SDA is GPIO21 and for SCL is GPIO22.
For ESP8266 the default I2C pins for SDA are GPIO4 and for SCL are GPIO5.
Required Components:
We will need the following components to connect our ESP32 board with the BME280 sensor.
- ESP32 or ESP8266 board
- BME280 Sensor
- Connecting Wires
- Breadboard
Schematic Diagram
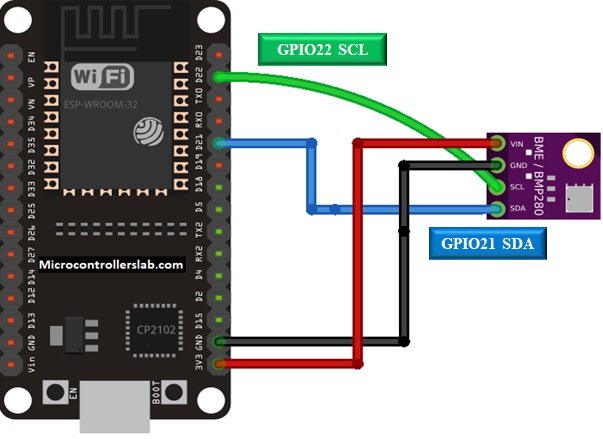
Follow the schematic diagrams below for both the ESP modules and connect them accordingly. If you are using ESP32 for this project, connect the ESP32 device with BME280 as shown in the schematic diagram below:
Similarly, if you are using ESP8266 NodeMCU for this project, connect the ESP8266 device with BME280 as shown in the schematic diagram below:
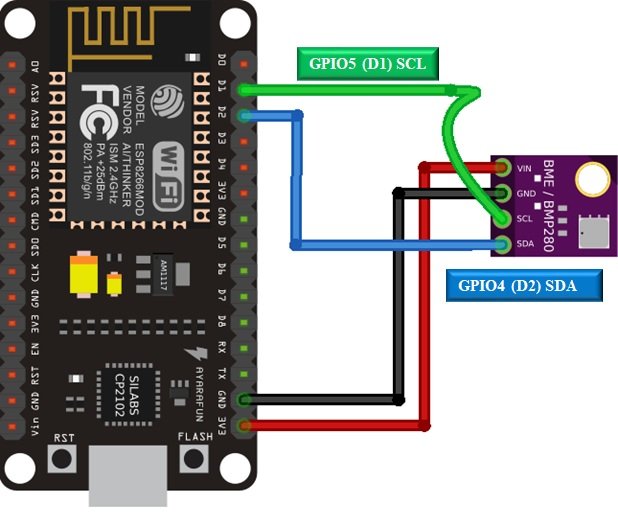
In some BME280 sensors as seen in the above connection diagram, the SCK terminal means the SCL pin and is connected with its respective GPIO pin on the ESP board. Likewise, the SDI terminal means the SDA pin and is connected with its respective GPIO pin on the board. Vin is connected with a 3.3V pin on the module and both the ESP board and the sensor is commonly grounded.
Introduction of IFTTT
IFTTT means ‘If this, then that.’ It is an open-source service that gives the user the freedom to program a response to an event according to their likes. We can create an applet which are chains of conditional statements by a combination of several app services and add triggering parameters. For our project, we will be using this service, whenever the ESP board makes a request and hence send the sensor readings to our email. To work with this web service, we will have to follow a series of steps to ensure the proper functionality.
Creating an Account
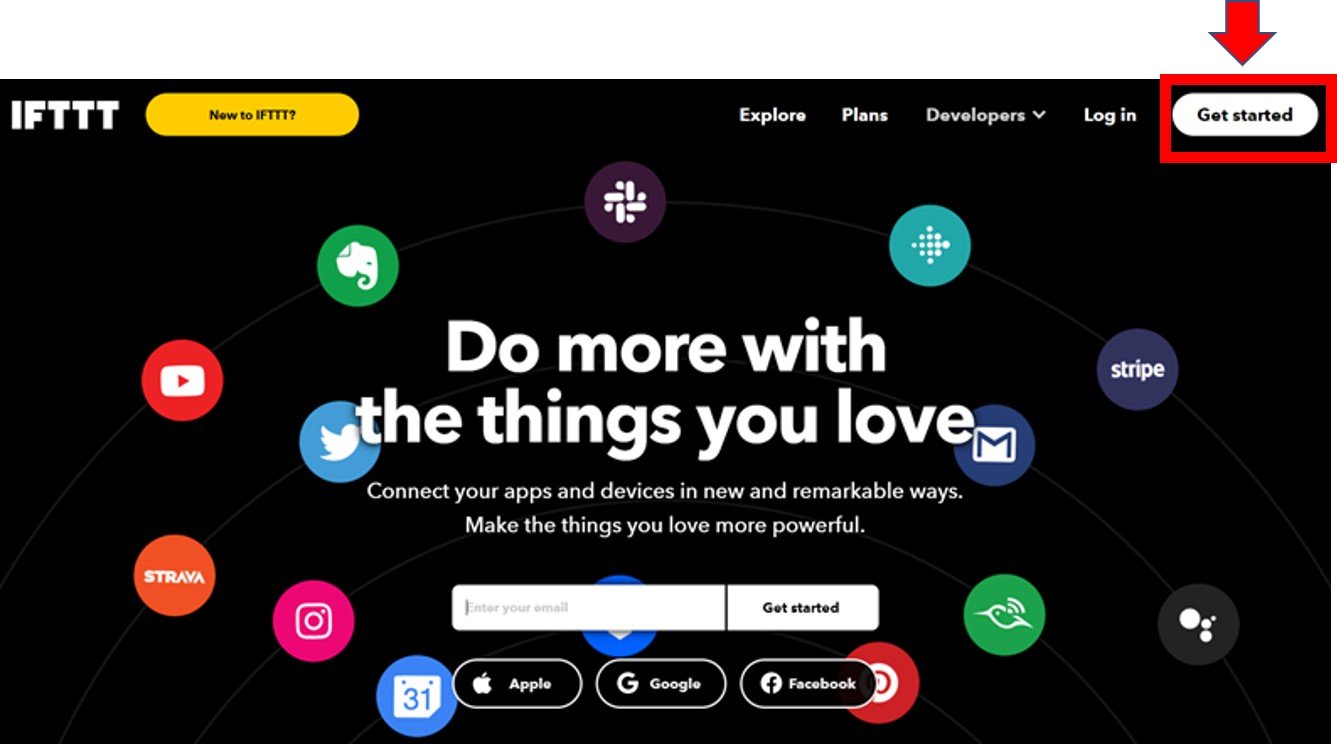
Although the IFTTT service is free to use, we will have to create an account. First go to the following website: https://ifttt.com/
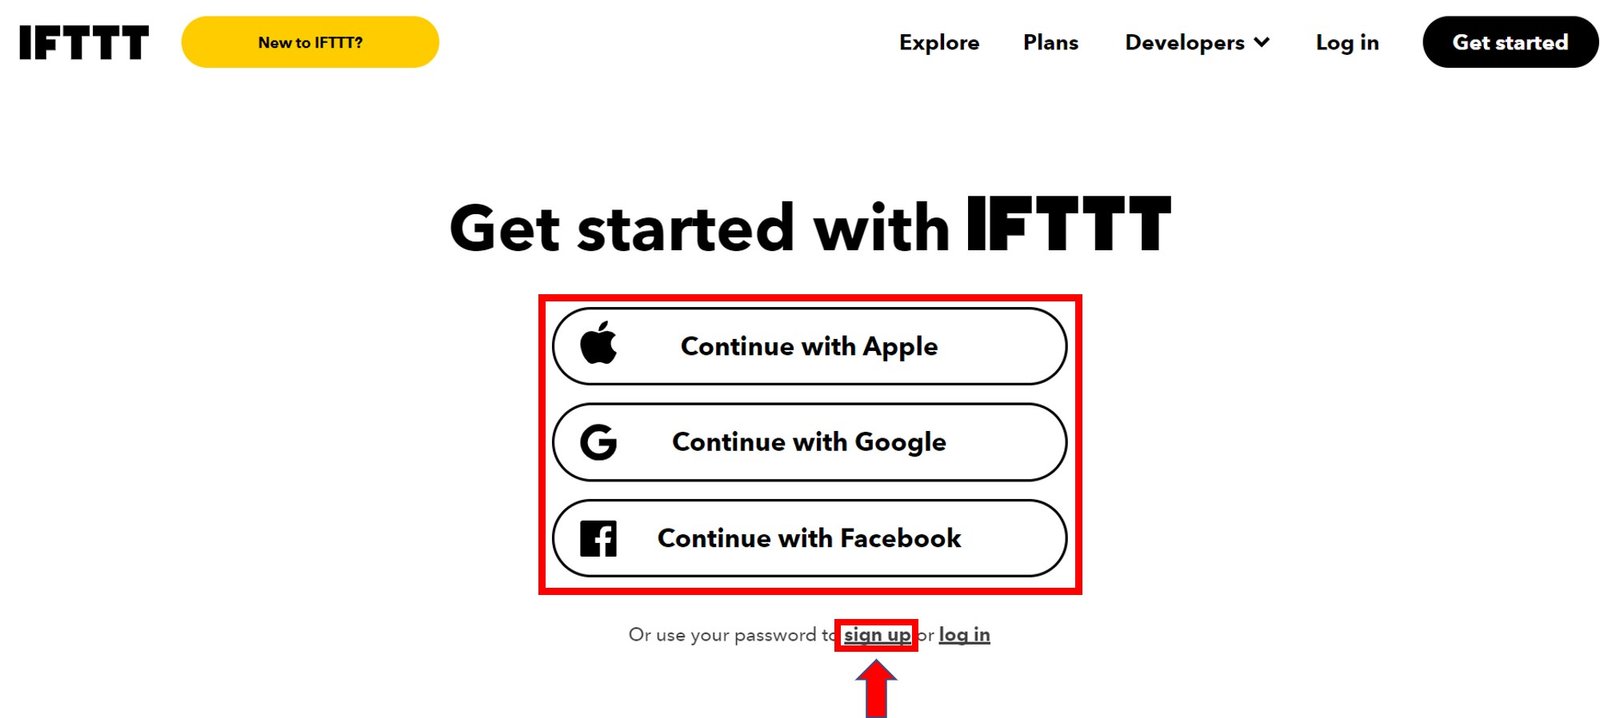
The following window will appear. Click on the ‘Get Started’ button.
The following window will appear. You can select any one from these three options (Apple, Google or Facebook) to connect. Or you can simply ‘sign up’ with your own given email. We will be following this scheme.
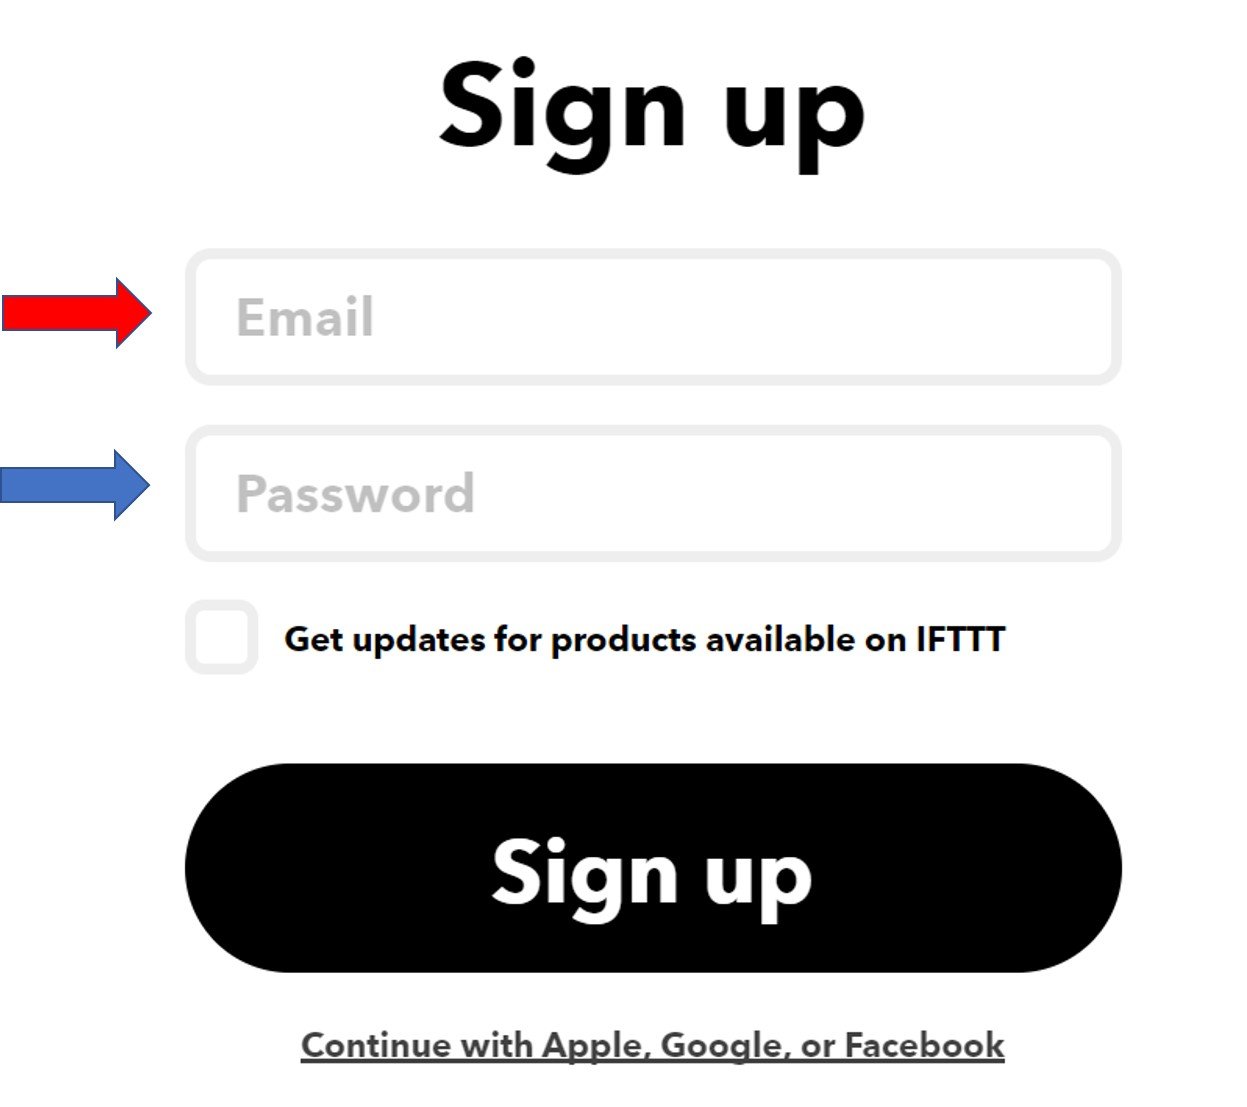
Click the ‘sign up’ tag. You will see the following window pop up. Enter your email address and password to start working in IFTTT. This whole process is free of cost for the first three applets.
Creating an Applet
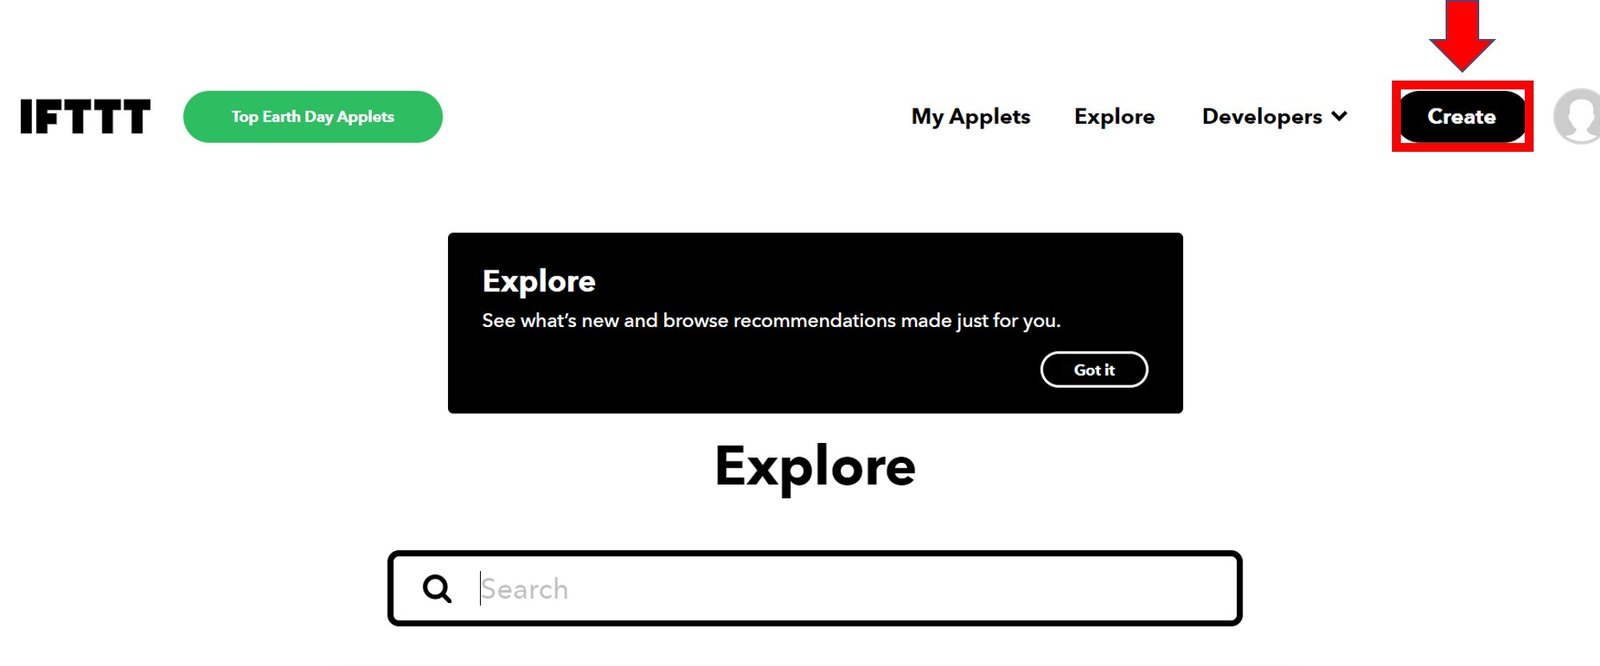
After you have created your account, we will be directed to the page where we will create our applet. Click on ‘Create.’
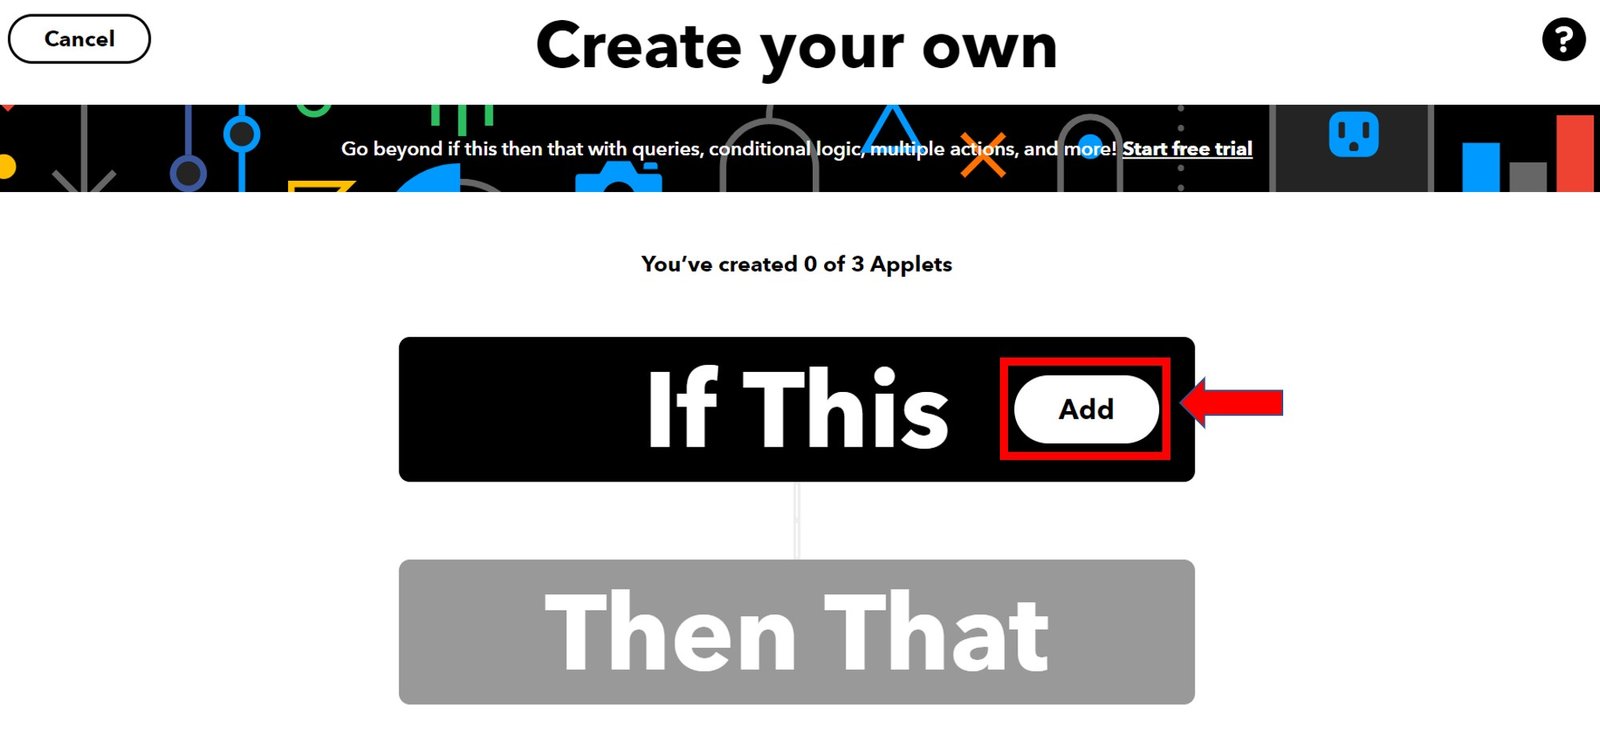
The following window opens up. Click the following Add button in the ‘If This’ section.
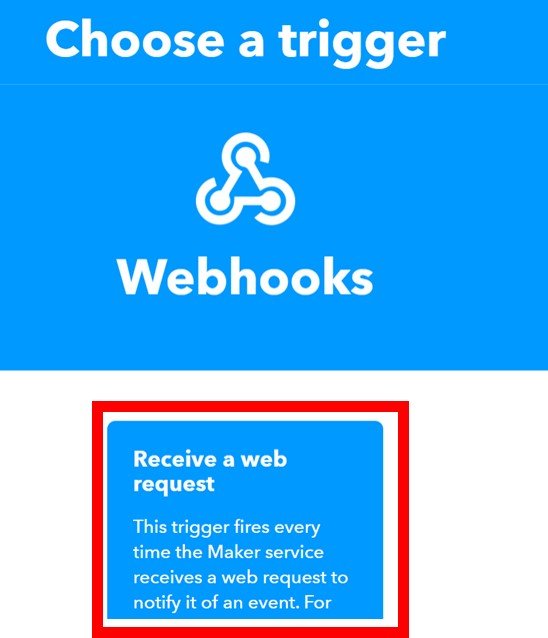
Another page will open in which we will have to choose our service. There is a lot of options to choose from. Write down ‘webhooks’ in the search option and its icon will appear:

Select Trigger
Next, choose the trigger as: ‘Receive a web request’ by clicking on it. Whenever webhooks will receive a web request, some action will take place. This we will define in the ‘THAT’ section.
After clicking the Receive a web request, the following window will open up. We will write down BME280_Sensor_Readings as the event name for the web request. You can use any other name of your choice. Click ‘Create Trigger’ button.

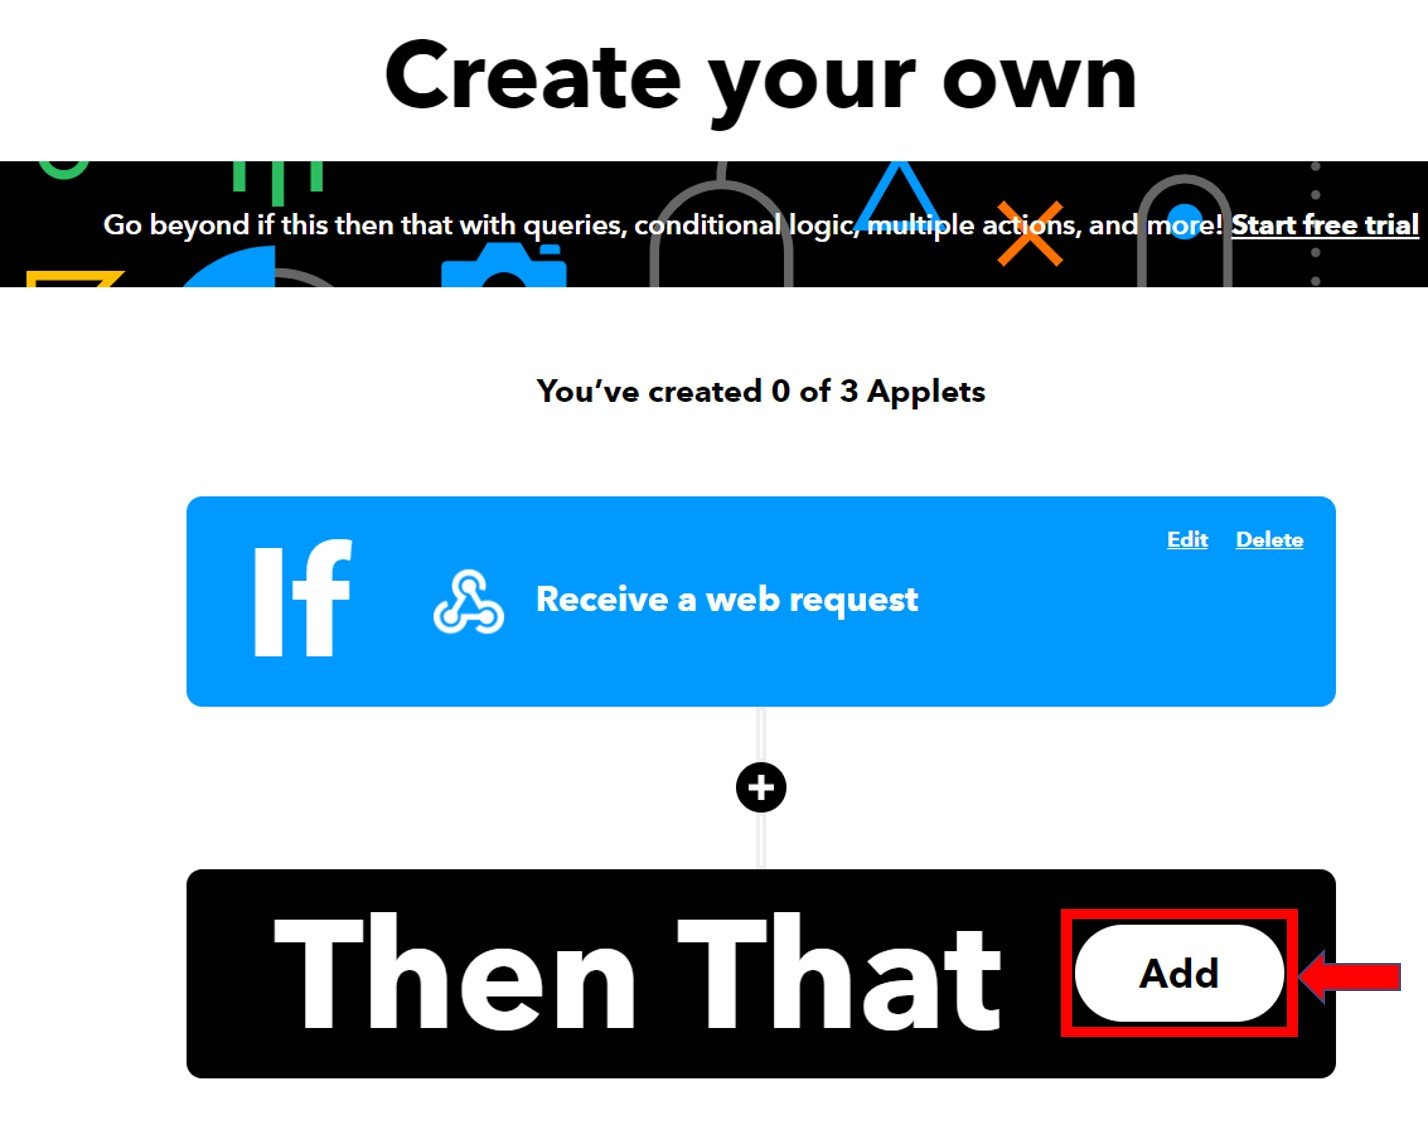
After the trigger is created, we are taken back to the web page where we first added the service for the ‘IF THIS’ section. Now we will click the ADD button for the ‘THEN THAT’ section.
Now we will choose the service. We have to choose what will happen if a web request is received. Thus, we will type ‘google sheets’ in the search option and click on its icon. This is because we want to publish updated sensor reading to Google Sheets send whenever a web request is received.

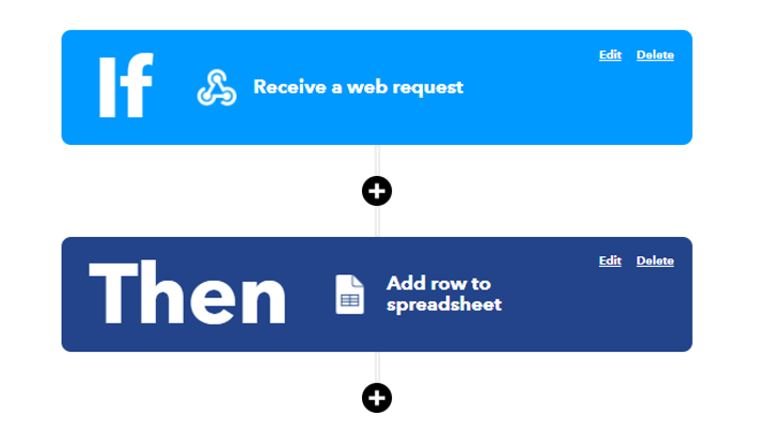
The following window opens up where we will choose ‘Add row to spreadsheet.’

Next click ‘Connect.’

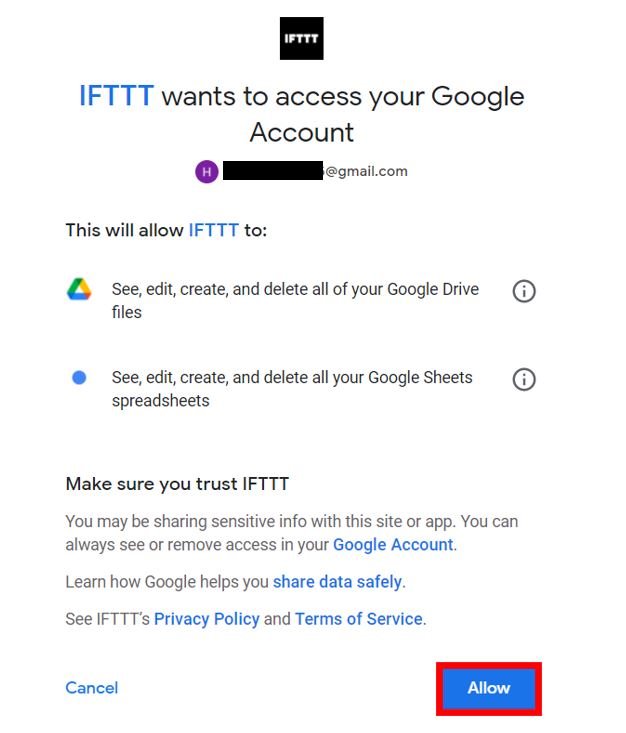
Another window will open which will prompt you to choose an email account and then will ask for your permission. Click “Allow” to proceed.
Now fill in all the entries as given below and click ‘Create Action.’

After we have created the action, we will be guided towards the initial web page of IFTTT. Click Continue to proceed.
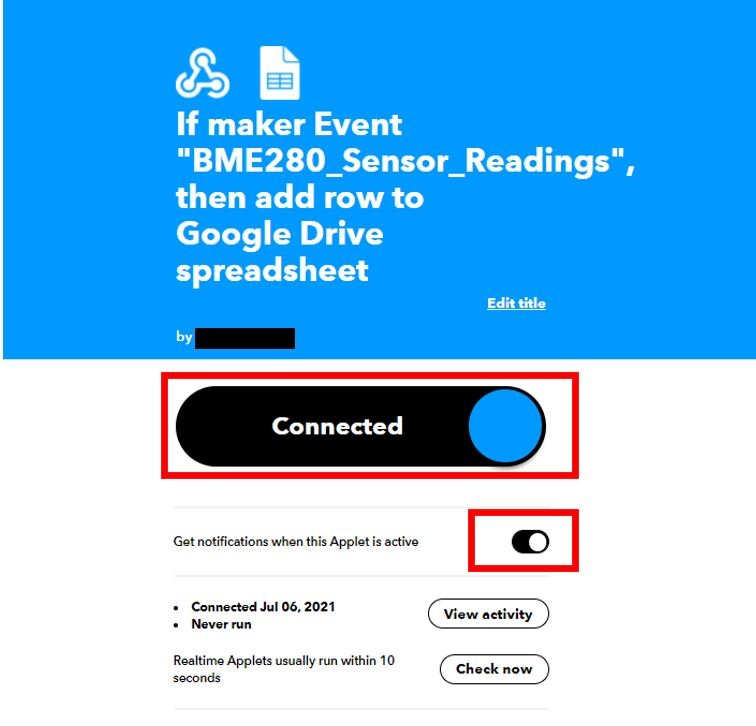
You have successfully created the applet. Make sure to turn on the notifications whenever the applet becomes active.
Testing the Applet
Before we proceed further with our project, let us first test our applet. Go to your applet and select “My Services” or open a webpage with the link: ifttt.com/my_services. The following windows will appear. Afterward, click on Webhooks.

This will take you to the following web page. Click on ‘Documentation.’

You will receive a key that should be secure with you. Next, enter the details as shown to trigger the event. We will give hypothetical values for the three variables for now. At the end click, ‘Test it.’
Note: Save the URL highlighted in the blue box. This is the IFTTT URL resource which we will use later on in our program code.

You will get a notification on top of the web page: ‘Event has been triggered.’ Now go to your google drive and you will find a folder named ‘IFTTT.’ Open it and you will find the spreadsheet inside it.
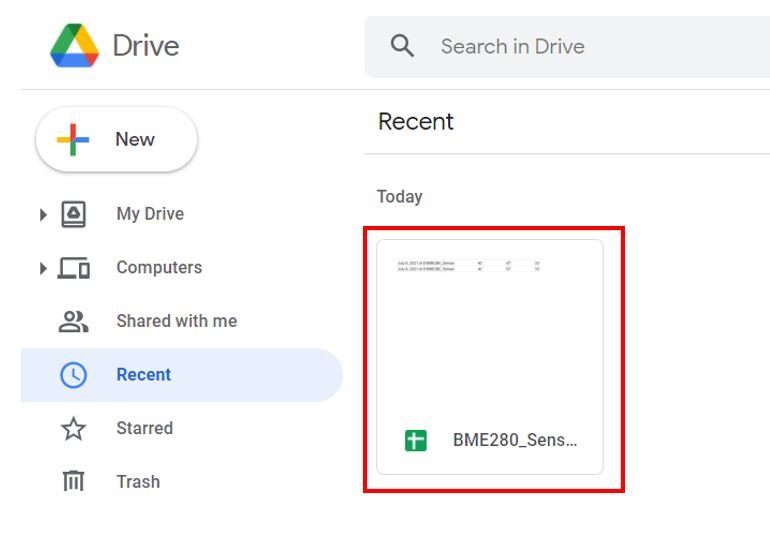
Click to open it. You will be able to see the same hypothetical values that you entered. This means that the applet is running successfully. Now let us learn how to incorporate real sensor readings from the BME280 sensor.

Setting up Arduino IDE
Before we proceed further, you should make sure that you have the latest version of Arduino IDE installed on your system. Moreover, you should also install an ESP32 add-on or an ESP8266 add-on in Arduino IDE. f your IDE does not have the plugins installed you can visit the link below:
Installing ESP32 library in Arduino IDE and upload code.
Installing ESP8266 library in Arduino IDE
For this project, we will have to install libraries for the BME280 sensor.
Installing BME280 Libraries
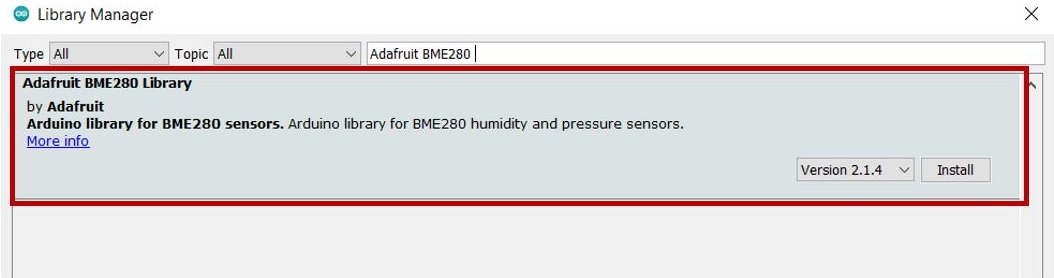
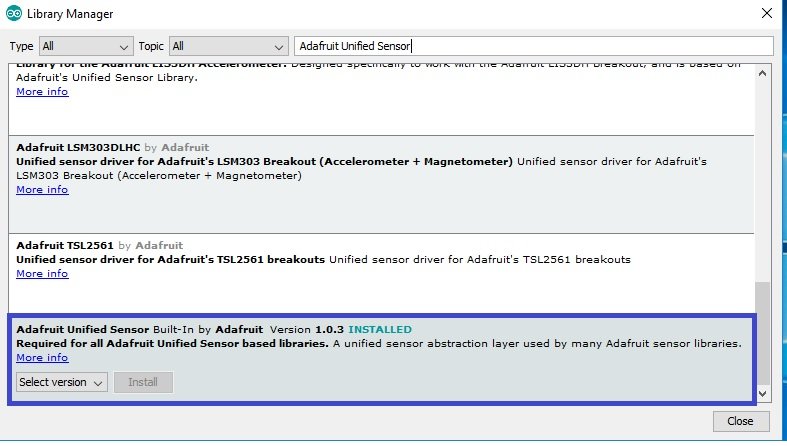
As we are connecting the BME280 sensor with ESP32/ESP8266 so we will have to install BME280 libraries to our module. We will require two libraries for this project:
- Adafruit_BME280 library
- Adafruit_Sensor library
We will use the Library Manager in our Arduino IDE to install the latest versions of the libraries. Open your Arduino IDE and go to Sketch > Include Libraries > Manage Libraries. Type each library name in the search bar and install them both.
Arduino Sketch to Publish Readings to Google Sheet
Open your Arduino IDE and go to File > New to open a new file. Copy the code given below in that file. This code will work for both ESP32 and ESP8266 development boards. You just have to replace the network credentials and IFTTT URL resource with your values.
#ifdef ESP32
  #include <WiFi.h>
#else
  #include <ESP8266WiFi.h>
#endif

#include <Wire.h>
#include <Adafruit_Sensor.h>
#include <Adafruit_BME280.h>

const char* ssid     = "Your_SSID"; // Write your SSID
const char* password = "Your_Password";  //Write your Password

const char* IFTTT_URL = "/trigger/BME280_Sensor_Readings/with/key/gkb_HtIpE-FeOWMH20obLTvUR7_fPip************";
const char* server = "maker.ifttt.com";

uint64_t uS_TO_S_FACTOR = 1000000;
uint64_t TIME_TO_SLEEP = 600;

#define SEALEVELPRESSURE_HPA (1013.25)

Adafruit_BME280 bme;

void setup() {
  Serial.begin(115200);
  delay(2000);

  bool status;
  status = bme.begin(0x76);
  if (!status) {
    Serial.println("BME280 not connected properly. Check circuit!");
    while (1);
  }

  initWifi();
  makeIFTTTRequest();

  #ifdef ESP32
    esp_sleep_enable_timer_wakeup(TIME_TO_SLEEP * uS_TO_S_FACTOR);
    Serial.println("Going to sleep now");
    esp_deep_sleep_start();
  #else
    Serial.println("Going to sleep now");
    ESP.deepSleep(TIME_TO_SLEEP * uS_TO_S_FACTOR);
  #endif
}

void loop() {

}

void initWifi() {
  Serial.print("Connecting... ");
  WiFi.begin(ssid, password);

  int timeout = 10 * 4; // 10 seconds
  while(WiFi.status() != WL_CONNECTED  && (timeout-- > 0)) {
    delay(250);
    Serial.print(".");
  }
  Serial.println("");

  if(WiFi.status() != WL_CONNECTED) {
     Serial.println("Failed to connect, going back to sleep");
  }

  Serial.print("WiFi connected in: ");
  Serial.print(millis());
  Serial.print(", IP address: ");
  Serial.println(WiFi.localIP());
}

void makeIFTTTRequest() {
  Serial.print("Connecting to ");
  Serial.print(server);

  WiFiClient client;
  int retries = 5;
  while(!!!client.connect(server, 80) && (retries-- > 0)) {
    Serial.print(".");
  }
  Serial.println();
  if(!!!client.connected()) {
    Serial.println("Failed to connect...");
  }

  Serial.print("Request resource: ");
  Serial.println(IFTTT_URL);

  String jsonObject = String("{\"value1\":\"") + bme.readTemperature() + "\",\"value2\":\"" + (bme.readPressure()/100.0F)
                      + "\",\"value3\":\"" + bme.readHumidity() + "\"}";


  client.println(String("POST ") + IFTTT_URL + " HTTP/1.1");
  client.println(String("Host: ") + server);
  client.println("Connection: close\r\nContent-Type: application/json");
  client.print("Content-Length: ");
  client.println(jsonObject.length());
  client.println();
  client.println(jsonObject);

  int timeout = 5 * 10; // 5 seconds
  while(!!!client.available() && (timeout-- > 0)){
    delay(100);
  }
  if(!!!client.available()) {
    Serial.println("No response...");
  }
  while(client.available()){
    Serial.write(client.read());
  }

  Serial.println("\nClosing Connection");
  client.stop();
}
How the Code Works?
Including Libraries
We will start by including all the necessary header files which are required for ESP32 and ESP8266 for this project. As this code is compatible with both ESP32 and ESP8266, therefore, both libraries WiFi.h and ESP8266WiFi.h) are defined. As a result, this library will help in establishing the connection between our ESP modules to a wireless network. We will also include the other libraries for BME280 which we installed previously.
#ifdef ESP32
  #include <WiFi.h>
#else
  #include <ESP8266WiFi.h>
#endif
#include <Wire.h>
#include <Adafruit_Sensor.h>
#include <Adafruit_BME280.h>
Setting Network Credentials
Next, we will create two global variables, one for the SSID and the other for the password. These will hold our network credentials which will be used to connect to our wireless network. Replace both of them with your credentials to ensure a successful connection.
const char* ssid = "Your_SSID";  //Write your SSID
const char* password = "Your_Password";  //Write your Password
Defining IFTTT URL resource and server
The next step is very important. We will create two global variables. One will hold the IFTTT resource URL which we previously saved when we were testing our applet. This will be unique for your created applet. The other variable will hold the server which will be identical for everyone.
const char* IFTTT_URL = "/trigger/BME280_Sensor_Readings/with/key/gkb_HtIpE-FeOWMH20obLTv********************";
const char* server = "maker.ifttt.com";
Adding the sleep time
We want our ESP module to go to deep sleep whenever we will not be accessing the sensor readings. As we are publishing sensor readings after every 10 minutes thus, the module will go to sleep during that time. This will make our project very efficient. Specify the time in seconds. We have set it to 600 which means 600/60=10 minutes.
uint64_t TIME_TO_SLEEP = 600;Creating BME280 Object
Additionally, we will create an object of Adafruit_BME280 called ‘bme’ which we will use later on to initialize the sensor.
Adafruit_BME280 bme;Setup() function
Inside the setup() function, we will start the serial connection at a baud rate of 115200.
Serial.begin(115200);Then we will initialize the BME280 sensor. If the connection between the module and the sensor is incorrect it will print that message on the serial monitor.
bool status;
  status = bme.begin(0x76);
  if (!status) {
    Serial.println("BME280 not connected properly. Check circuit!");
    while (1);
  }
Then we will call the initWiFi() function which will connect our ESP32/ESP8266 board with the local network whose network credentials we already specified above. After the connection will be established, the IP address of the ESP32 board will get printed on the serial monitor. The connection will be established keeping in mind the timer wake up and deep sleep mode.
void initWifi() {
  Serial.print("Connecting... ");
  WiFi.begin(ssid, password);

  int timeout = 10 * 4; // 10 seconds
  while(WiFi.status() != WL_CONNECTED  && (timeout-- > 0)) {
    delay(250);
    Serial.print(".");
  }
  Serial.println("");

  if(WiFi.status() != WL_CONNECTED) {
     Serial.println("Failed to connect, going back to sleep");
  }

  Serial.print("WiFi connected in: ");
  Serial.print(millis());
  Serial.print(", IP address: ");
  Serial.println(WiFi.localIP());
}
Then, we will call the makeIFTTTRequest() function. Inside this function we will first connect with the IFTTT server. Then we will use a jsonObject to send sensor readings to IFTTT and print them on our google spreadsheet. The sensor readings will be displayed in a single row with three columns. The first column will correspond to temperature (degree Celsius), the second pressure (hPa) and the third will be humidity (%).
void makeIFTTTRequest() {
  Serial.print("Connecting to ");
  Serial.print(server);

  WiFiClient client;
  int retries = 5;
  while(!!!client.connect(server, 80) && (retries-- > 0)) {
    Serial.print(".");
  }
  Serial.println();
  if(!!!client.connected()) {
    Serial.println("Failed to connect...");
  }

  Serial.print("Request resource: ");
  Serial.println(IFTTT_URL);
  String jsonObject = String("{\"value1\":\"") + bme.readTemperature() + "\",\"value2\":\"" + (bme.readPressure()/100.0F)
                      + "\",\"value3\":\"" + bme.readHumidity() + "\"}";

  client.println(String("POST ") + IFTTT_URL + " HTTP/1.1");
  client.println(String("Host: ") + server);
  client.println("Connection: close\r\nContent-Type: application/json");
  client.print("Content-Length: ");
  client.println(jsonObject.length());
  client.println();
  client.println(jsonObject);

  int timeout = 5 * 10; // 5 seconds
  while(!!!client.available() && (timeout-- > 0)){
    delay(100);
  }
  if(!!!client.available()) {
    Serial.println("No response...");
  }
  while(client.available()){
    Serial.write(client.read());
  }

  Serial.println("\nClosing Connection");
  client.stop();
}
Demonstration
Make sure you choose the correct board and COM port before uploading your code to the board. Therefore go to Tools > Board and select ESP32 Dev Module or ESP8266 Module.
If you are using ESP32, select the ESP32 Dev module as follows:

If you are using ESP8266 NodeMCU, select the NodMCU module as follows:

Then, go to Tools > Port and select the appropriate port through which your board is connected.

Click on the upload button to upload the code to ESP32 or ESP8266 development board.
After you have uploaded your code to the ESP32 or ESP8266 development board, press its ENABLE button.

ESP8266 NodeMCU reset button:

In your Arduino IDE, open up the serial monitor and you will see that the IP address will be assigned to your ESP32/ESP8266 board.

Now go to your Google Drive and open the IFTTT folder. Inside it you will find the google spreadsheet. Open it to view a set of sensor readings. Temperature followed by pressure followed by humidity. After every 10 minutes, new readings will be updated.

Conclusion
In conclusion, we learnt how to publish sensor readings from ESP32/ESP8266 + BME280 sensor to Google Sheets via IFTTT. In order to make our project more efficient we also incorporated deep sleep mode for our ESP board and used timer wake up only when it was time to transmit sensor readings. Likewise, you can use this project to publish data from similar sensors and save it in spreadsheets.
Como eu posso aplicar essa teoria usando o sensor DS18B20?
The board remains in sleep mode after the first trigger.
Only update as a trigger that causes the HTTP post request to be sent to the IFTT service to be published to Google Sheets, if I make an RST in the module
I will be appreciate for your support.
Thank you and have a nice day
Ramon
Maybe you didn’t have the patience to wait 10 minutes :)), just test the functions, without sensors, something like:
uint64_t uS_TO_S_FACTOR = 1000000; //1000000 us = 1 s
uint64_t TIME_TO_SLEEP = 5; // 5 seconds
void setup() {
Serial.begin(115200);
Serial.println(“Wakeup”);
esp_sleep_enable_timer_wakeup(TIME_TO_SLEEP * uS_TO_S_FACTOR);
Serial.println(“Going to sleep now”);
esp_deep_sleep_start();
Serial.println(“XXX”); //never show this print
}
void loop() {
}
//activate toogle timestamp ( the clock ) of Serial Monitor windows of Arduino IDE to see the event time…