Light dependent resistor interfacing with pic microcontroller : Hi everyone I hope you are fine and doing well. In this article, you will learn how to interface light sensor or light dependent resistor with pic microcontroller. I have already posted an article on how to interface arduino with light sensor with Arduino. you may you may like to check this article as well but in this article I will show you how to interface light sensor or light dependent resistor with pic microcontroller. light dependent resistor are used to measure light intensity. Light dependent resistor works on the principle of variable resistance. whenever light falls on LDR, it changes its resistance according to light intensity. For example when light intensity is low, resistance of LDR will be high and similarly when light intensity is hig, LDR will offer a low resistance. so LDR resistor works on the principle of variable resistance if you can measure resistance change of LDR, you can measure light intensity as well I have also posted an article on how to measure resistance using pic microcontroller, you can check this article as well. So light interfacing with pic microcontroller Project can be used to make a project related to auto intensity control of street lights and automatic control of street lights.
Introduction to light dependent resistor
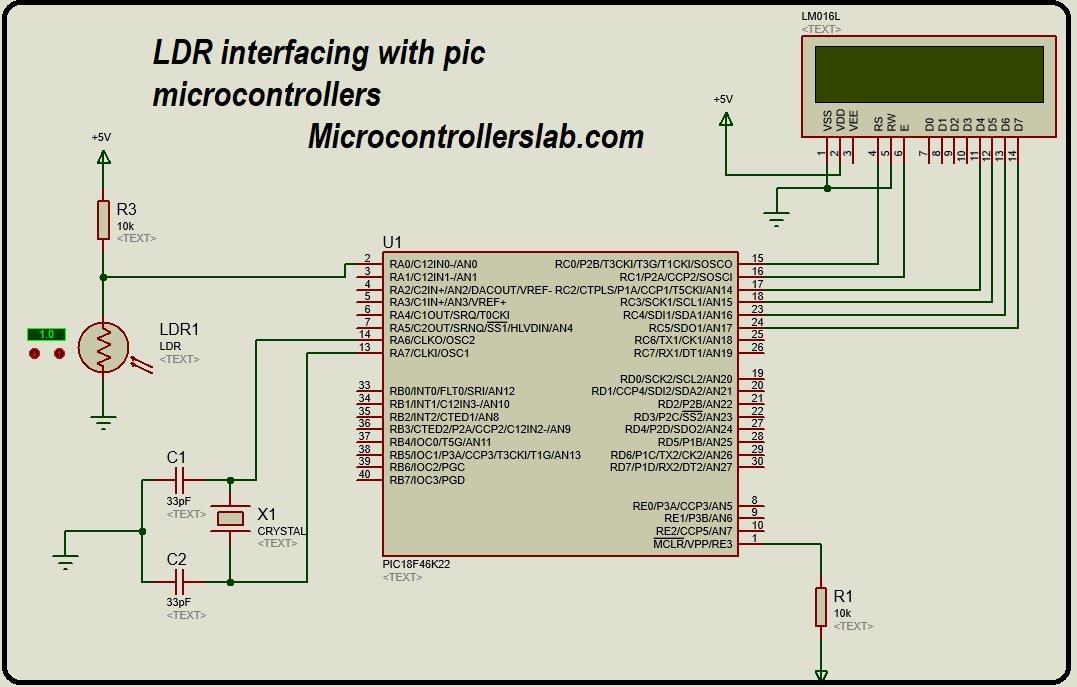
So let’s start with introduction to LDR or light dependent resistor. Figure of light dependent resistor is shown below. LDR has two Terminal Like a normal resistor. but this is not a normal resistor it is a light dependent resistor whose resistivity changes with the light intensity. as mentioned earlier, resistance of LDR decreases with the increase of intensity of light and similarly resistors of LDR increases with decrease of intensity of light. let’s see how we can use light dependent resistor to measure intensity of light. We have connected one terminal of LDR with ground and other terminal of LDR is connected with 10k ohm resistor and same terminal terminal is connected with analogue to digital converter of pic microcontroller. Terminal of 10 kilo ohm resistor connected with 5 volt power supply. So this circuit will act like a voltage divider circuit. voltage divider circuit always have two resistors and we measure a voltage across a resistor Which is connected with the ground. similarly our circuit has one fixed resistor and other is LDR. So we want to measure a voltage across Light dependent resistor. so if we are able to measure a voltage across light dependent resistor will be able to measure intensity of light with little bit error compensation. so let’s see how we can measure light intensity with the help of light dependent resistor.
How to measure voltage across light dependent resistor?
https://www.youtube.com/watch?v=W6warGUewa4
so now let’s see how we can measure voltage across light dependent resistor. if you are new to programming of pic microcontroller you should know about how to use analogue to digital converter of pic microcontroller. in this tutorial we are using pic 18 f 4622 microcontroller. it has built in 29 ADCs. so will need only 1 ADC to measure voltage across LDR. in this tutorial I have used analogue channel zero of pic 18fk4622 microcontroller . Built in ADC of pic microcontroller PIC18F46K22 converts the measured analogue voltage into digital value. This measured digital value converted back into voltage by using a resolution factor of pic microcontroller. The resolution of pic microcontroller is 4.88mV. so the minimum voltage we can measure with built in ADC of pic microcontroller is 4.8 mV. the line given below shows how we measure analogue voltage with the help of built in library of Mikro c for pic and how we converted back into voltage and how volt is converted into light intensity
adc_value=ADC_Read(0);

light = 100 – adc_value/10.24
Circuit diagram of Light dependent resistor interfacing with pic microcontroller
Circuit diagram of light dependent resistor interfacing with pic microcontroller is shown below as you can see I have connected 16×2 LCD with PORTC of pic18f46K22 microcontroller. Light dependent resistor is connected with analog channel zero of pic microcontroller. ADC will measure the light intensity and will display it on Liquid crystal display.
if you don’t know how to interface LCD with pic microcontroller I recommend to check the following particle:
Code for LDR interfacing with pic microcontroller
Code for light dependent Resistor interfacing with pic microcontroller is shown below. code is written in C language. it is written using mickr c for pic compiler . I have also made necessary comments in code for your understanding.
// LCD module connections
sbit LCD_RS at RD2_bit;
sbit LCD_EN at RD3_bit;
sbit LCD_D4 at RD4_bit;
sbit LCD_D5 at RD5_bit;
sbit LCD_D6 at RD6_bit;
sbit LCD_D7 at RD7_bit;

sbit LCD_RS_Direction at TRISD2_bit;
sbit LCD_EN_Direction at TRISD3_bit;
sbit LCD_D4_Direction at TRISD4_bit;
sbit LCD_D5_Direction at TRISD5_bit;
sbit LCD_D6_Direction at TRISD6_bit;
sbit LCD_D7_Direction at TRISD7_bit;

int adc;
char value[7];
void main(void)
{
 TRISE=0x00;
 ADC_Init();
 Lcd_Init(); // Initialize LCD
 Lcd_Cmd(_LCD_CLEAR); // Clear display
 Lcd_Cmd(_LCD_CURSOR_OFF); // Cursor off
 Lcd_Out(1,1,"light sensor" ); // Write text in first row

while(1) { // Endless loop


adc=adc_read(3);
 adc = 100-adc/10.23;
 inttostr(adc,value);
 lcd_out(2,2,value);
 delay_ms(1000);
 if ( adc > 60 )
 PORTE.B0=0;
 else
 PORTE.B0=1;

}
}
You may also read: BH1750 Ambient Light Sensor Interfacing with Arduino