A relay is an electromechanical switch that has many industrial applications to provide isolation between high-voltage and low-voltage circuits. These two circuits have different voltage ratings. One might be a low-voltage side and another a high-voltage side. A relay is an electrical mechanical switch that we use for switching between 5-volt circuits and 220/120-volt AC circuits. For example, in the case of a microcontroller circuit, we use the relay to isolate microcontrollers from a 220-volt AC supply.
Components of an Electromechanical Relay
An electromechanical relay has three main components:
- Coil
- spring
- contacts
A five-volt signal at the coil can turn on a relay. When the coil energizes with a 5-volt signal, current flows through the coil. As the current flows through the coil, it creates a magnetic field in the coil, which causes the armature (contacts) to attract towards the spring. When no current flows through the coil, the spring causes the contacts to pull towards the normal position.
Working of an Electromechanical Relay
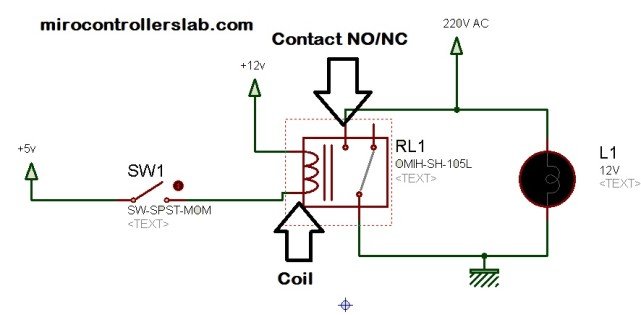
A circuit diagram of an electromechanical relay with components is given below:
In the above circuit diagram, the coil of an electromechanical relay receives a 5 V signal. When the switch is in a closed state, current flows through the coil and energizes the coil. As the coil energizes through a 5-volt signal, the spring attracts contact from the normally open position to the closed position. On the left-hand side of the coil, there is normally an open position of contact. Because the circuit is not complete, or, in other words, the current flow path is not complete. When the coil is energized with the help of a 5-volt signal, the internal spring of the electromechanical relay attracts or pulls contact towards another point and completes the circuit.
An electromechanical relay can be either normally open or normally closed. In the above circuit diagram, the example demonstrates a normally open electromechanical relay. The voltage requirement to energize the coil varies from relay to relay. Voltage may vary from 5 volts to 50 volts, and current may vary from 10 mA to 20 mA. The relays also have a minimum voltage rating. It means that, below the voltage rating, the relay will not operate. One can check the minimum operating voltage of a relay in its datasheet. But current requirements are not specified in datasheets. Datasheets usually provide the coil resistance of a relay, from which we can find the current requirement of the relay using Ohm’s law formula V = IR. After getting a basic understanding of relays, we can now move on to the relay driver and how to use relay driver circuit IC ULN2003.
What is Relay Driver Circuits IC?
Relays mostly interface with microcontrollers and digital systems. But microcontrollers can usually not provide enough current to drive relays. Microcontroller pins usually provide a maximum current of 1-2 mA per pin, which is not enough to operate a relay. The circuits that we use to drive relays are the relay driver circuits. Therefore, relay driver circuits using ULN2003 are helpful in driving relays. There are many other ways to operate relays. We will also discuss other methods of relay driver circuits in the later part of this article.
Why Do We Need to Use Relay Driver Circuits?
While working on electronics projects that use a microcontroller, we need to use relays to control AC loads or high-voltage loads. Relays provide isolation between the microcontroller’s circuits and high-voltage operating loads. Microcontrollers only provide on/off signals to relays. They don’t have enough current sourcing ability to drive relays. Therefore, we rely on the relay driver circuit (IC) to drive relays properly. There are many ways to design relay driver circuits. But dedicated relay driver circuits and integrated circuits are available that serve the purpose of relay driver ICs. Relay driver circuit IC ULN2003 is one of the most popular relay driver circuits. We will discuss relay driver IC ULN2003 in this article. The following types of relay driver circuit ICs are also available on the market:
- ULN2003
- CS1107
- MAX4896
- FAN3240
- A2550
Relay Driver Circuit Using Transistor
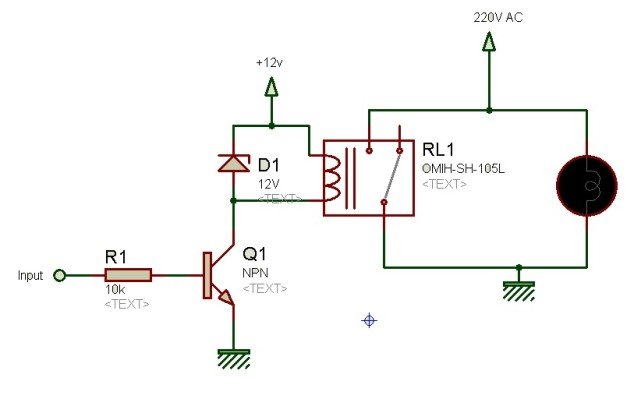
The relay driver circuit using an NPN transistor is given below. A transistor is useful as a switch in this circuit. The microcontroller provides high or low input signals to NPN transistors. The NPN transistor provides high driving current to the electromechanical relay through the 12-volt external power supply.
The relay driver circuit uses the following components using transistors:
- Base current limiter resistor R1 = 1K
- Zener diode of 12 volts used as a freewheeling diode
- NPN transistor
- 12-volt dc power supply
- Electromechanical relay rating depends on your requirement of load
Pinout ULN2003
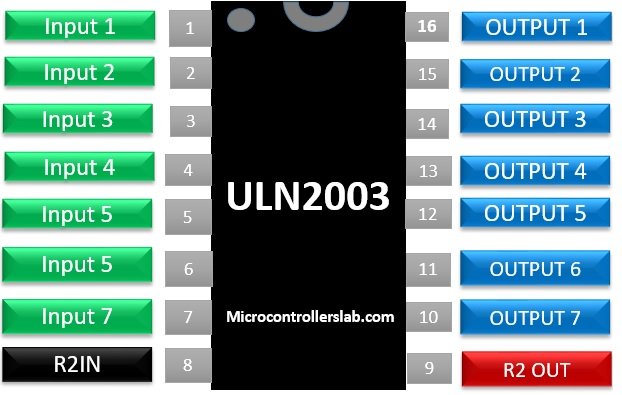
Relay Driver Circuit Using ULN2003
ULN2003 is a very famous relay driver integrated circuit. Relay driver IC ULN2003 is a high-voltage and high-current integrated IC that uses a Darlington array. It contains seven Darlington pairs of transistors that have high voltage and high current-carrying capability. It means the ULN3002 can drive up to seven relays at a time. A diode is used with each pair of NPN Darlington transistors. The diode makes it easily usable with inductive loads.
Applications of Relay Driver IC Using ULN2003
There are many applications of a relay driver circuit using ULN2003, but some of the famous applications are as follows:
- Relay drivers circuits
- Motor drivers circuits
- Lamp drivers
- Line drivers
- Hammer drivers
- Logic buffers and many others
Diagram of Relay Driver Circuit Using ULN2003
The relay driver circuit using ULN2003 is given below. In this circuit diagram, the pic microcontroller is providing a signal to 4 relays through relay driver IC ULN2003.
If we make the above circuit diagram using transistors, it will be very difficult to design this circuit. A single ULN2003 can easily replace this circuit and drive up to five relays. Microcontrollers can easily provide a high or low signal to relays through their output port D. Simple programming instructions tell the microcontroller to provide either a high or low signal to relays. According to signals provided by a microcontroller, ULN2003 IC drive relays
We have posted a project on the greenhouse system in which we drive four relays with the help of a relay driver circuit using ULN2003. Four relays connect with four different pins. Check out the following link to learn more about the practical use of relay driver circuits:
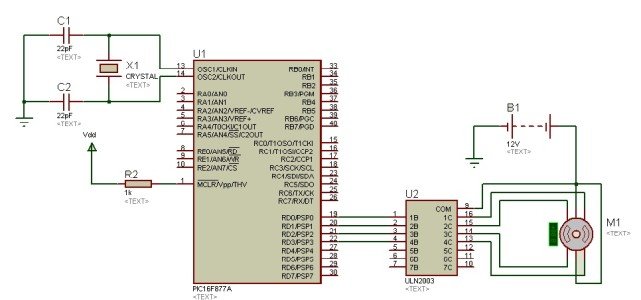
Stepper Motor Interfacing Using ULN2003
While interfacing stepper motors with microcontrollers, the use of relay driver circuits such as ULN2003 is very prominent. Its circuit diagram using a PIC microcontroller is as follows:
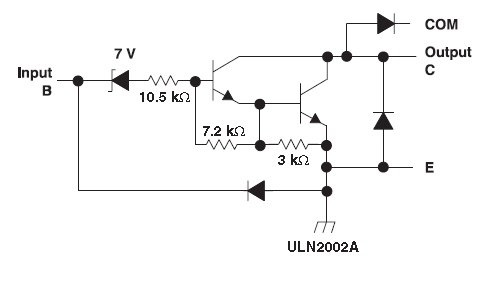
Schematic of a Relay Driver Circuit Using ULN2003
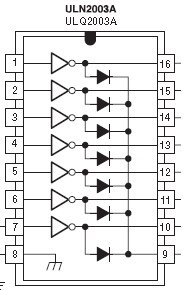
The internal circuit diagram of the relay driver IC with the Darlington pairs is given below. A clamped diode is used as a freewheeling diode to avoid the back-emf effect in the case of inductive loads.
Each output pin of ULN2003 provides up to 500mA current and peak current of 600mA. So this is all about relay driver circuit using uln2003.
Conclusion
In conclusion, this tutorial provides an in-depth overview of relay driver IC ULN2003. It covers basic components of electromechanical relays along with their working. After this we move towards the motor driver IC, its need and applications to help us better understand the concept. You can utilize this tutorial for working with motor driver project. Hopefully this was helpful in expanding your knowledge.
You may also like to read:
- STM32 Blue Pill with Stepper Motor (28BYJ-48 and ULN2003 Motor Driver)
- Control 28BYJ-48 Stepper Motor with ULN2003 Motor Driver and Arduino
- DC Motor Control with LabVIEW and Arduino – Tutorial 3
- Stepper Motor Control with L298N Motor Driver and ESP32
- Arduino L293D Motor Driver Shield Control DC, Servo, and Stepper Motors
- DC Motor Speed and Direction Control with L293D Driver IC and Arduino
This concludes today’s article. If you feel any issues while using ULN2003 IC in your project, you can let us know in the comment section below.

Great site just kept up.Its helpful. Nice and great job you are doing.
THANKS A LOT…
🙂
Hello
I am using a 12v, 10A dc motor on my project. How can I use a UNL2003 to interface my motor and the PIC16F84A microcontroller. Please assist me on this.
Great tutorial malik, thanks
great tutorial.. thank u alot
Salam Mr Malik
I have one question about uln2003 driving four relays if instead off using relays 12v I used 5 v relays is that effecting on Micro controller performance because relays drowns current?
My son has been set a homework from his Engineering teacher that uses one of your above circuit diagrams. Please could you help me identify one of the components?
Hi
About which component you want to ask?
Não entendi o diagrama “Diagrama do circuito acionador do relé usando uln2003”. Nesse diagrama aparece um diodo paralelo a cada bobina dos relés, no entanto esse CI ULN2003 NÃO dispensa o uso desses diodos paralelos às bobinas dos relés?
I wanted to ask how the value of 1K resistor was found in the raly driver circuit that uses a transistor.
ULM2003 has an Internal free wheeling diode (flyback diode ). In your green house project , why you are using external flyback diode across each RELAY coil ?