In the last tutorial, we have seen the tasks management process of FreeRTOS with Arduino Uno. But today, we will learn how to create Queues using FreeRTOS API. In the last post, we have seen how to create tasks. But individual tasks cannot create an efficient and complete application. Because these independent tasks are smaller programs having their own stack, memory, and execution jobs. Therefore, it is obvious that we need a mechanism for these autonomous tasks to communicate with each other. So that they can share data or messages with each other.
Like other modern RTOS Kernel, FreeRTOS Kernel also provides a process for inter-task data communication. These are known as message Queues. They are the underlying primitive used by all FreeRTOS communication and synchronization mechanisms. They are used to send and receive messages between tasks.
Recommended Components
The following are recommended for following along with these FreeRTOS Arduino tutorials.
| Component | How it’s used in this project | Buy on Amazon |
|---|---|---|
| Arduino Starter Kit (Uno R3) | An Arduino board and parts to build and run the FreeRTOS example tasks. | Check Price |
| 37-in-1 Sensor Modules Kit | Assorted sensor modules handy for the FreeRTOS tasks, queues and semaphore demos. | Check Price |
| Hands-On RTOS with Microcontrollers (Book) | Recommended reference for learning FreeRTOS concepts in depth. | Check Price |
| Hands-On RTOS with Microcontrollers (2nd Edition) | Updated second edition of the FreeRTOS reference book. | Check Price |
As an Amazon Associate we earn from qualifying purchases. Prices and availability are accurate as of the date/time indicated and are subject to change.
Queues Introduction
A message queue is a kind of FIFO buffer that holds fixed-size data items. Also, the number of items a queue can hold is also fixed, after its initialization. Usually, tasks write data to the end of the buffer and read from the front end of the buffer. But it is also possible to write at the front end. Multiple writers and readers can write and read from the buffer.
But only one writer/reader can access buffer at a time and Other, tasks remain block. Therefore, blocking is possible both on reads and writes to buffer.
Blocking on Queue Reads
Blocking on reads possible in following scenarios:
- If multiple tasks are ready to receive data from the message queue, then the highest priority task gets to read data first and lowest priority one read data at the end. Meanwhile, other tasks remain block. We can also specify the maximum blocking time of a task while sending a read request. But different tasks can also have different blocking time.
- The other possible case is when a queue is empty. In such a case, all read requests go to a blocking state. Once data become available from the message queue (when another task places data into the ready queue), all readers moved to the ready state according to their priority.
Blocking on Queue Writes
Just as when reading from a queue, a task can optionally specify a block time when writing to a queue. In this case, the block time is the maximum time the task should be held in the Blocked state to wait for space to become available in the queue should the queue already be full.
Queues can have multiple writers so it is possible that a full queue will have more than one task blocked on it waiting to complete a send operation. When this is the case only one task will be unblocked when space on the queue becomes available.
The task that is unblocked will always be the highest priority task that was waiting for space. If the blocked tasks have equal priority, then it will be the task that has been waiting for space the longest that is unblocked.
This simulation shows the sequence of reads/writes:
Use FreeRTOS Queue API
Till now we have covered the basics of Queues write and read process. Now let’s begin with the main part of this tutorial. This section covers the following contents of FreeRTOS queue API:
- How to create queue
- How to write and read data/message
Creating Queue with FreeRTOS
xQueueCreate() API Function is use to create a queue with required number of buffer elements and size of each element.
QueueHandle_t xQueueCreate( UBaseType_t Queue_Length, UBaseType_t Item_Size );xQueueCreate() allocates memory according to queue length and data size. Assigned memory also holds the required data structure for a queue. Therefore, be careful while using it with Arduino Because Arduino comes with limited memory.
This function use reference by handles with a return type variable QueueHandle_t. This handler decides if enough memory is available on Arduino to create queue not.
| Argument | Description |
|---|---|
| Return Value | Handler returns NULL value, if enough memory is not available on heap to create queue otherwise it returns Non-Null value |
| Queue_Length | The length of queue that is the total number of elements it can hold |
| Item_Size | Size of each item in bytes |
For example, to create a Queue, create a variable of type xQueueHandle. This is used to store the handle to the queue return variable.
xQueueHandle long_queue;The queue is created to hold a maximum of 5 values, each of which is large enough to hold a variable of type long.
Long_queue = xQueueCreate( 5, sizeof( long ) );
Before creating tasks that read and write data to queue, you should check long_queue handler return value this:
if( long_queue != NULL )
{
//create read and write message routines
}
This is how we create queue with FreeRTOS in Arduino IDE. On top of that, xQueueReset() API function can also be used to reset it to its original state.
FreeRTOS Sending data to Queue
FreeRTOS API provides these two functions to read and write message to/from queue.
- xQueueSendToBack() or xQueueSendToFront() ( both have same functionality)
- xQueueSendToFront()
As their name suggests, these functions write data to the front or back end of a buffer. These function takes three arguments as an input and returns one value that is success or failure of message write.
BaseType_t xQueueSendToFront( QueueHandle_t xQueue, const void * pvItemToQueue, TickType_t xTicksToWait );
BaseType_t xQueueSendToBack( QueueHandle_t xQueue, const void * pvItemToQueue, TickType_t xTicksToWait );| Arguments | Details |
| xQueue | This provides the reference of the queue to which we want to write data. It is the same handle variable that we used while creating queue with xQueueCreate() |
| pvItemToQueue | A pointer variable to the message that we want to send to queue |
| TickType_t xTicksToWait | In case, if queue is full, it specifies the maximum blocking time of a task until space to become available. Passing value zero will force the task to return without writing, If queue is full. Similarly, passing portMAX_DELAY to function will cause the task to remain in blocking state indefinitely |
| Return value | It returns two values such as pdPASS ( if data is successfully written ) and errQUEUE_FUL( if data could not be written) |
FreeRTOS Receiving data from Queue
Similar to write API functions, xQueueReceive() is used to read message/data from a queue.
Note: Once you read the data using xQueueReceive(), it will be removed from the queue.
BaseType_t xQueueReceive( QueueHandle_t xQueue, void * const pvBuffer, TickType_t xTicksToWait );
All input arguments and return value of xQueueReceive() has same working as write API except second argument “const pvBuffer”. It is a pointer to a variable to which we want to store received data.
Arduino FreeRTOS queue Read/Write Data Example one
This Arduino example demonstrates a queue being created, data being sent to the queue from multiple tasks, and data being received from the buffer.
- The queue is created to hold data items of type long.
- The tasks that send data do not specify a block time, while the task that receives from the queue does.
- The priority of the tasks that send to the queue is lower than the priority of the task that receives from the queue.
- This means the queue should never contain more than one item because as soon as data is sent to the queue the receiving task will unblock, pre-empt the sending task, and remove the data leaving the queue empty once again.
Writing to Queue Task
This code shows the implementation of the task that writes to the queue. Two instances of this task are created, one that continuously writes the value 100 to the queue, and another that continuously writes the value 200 to the same queue. The task parameter is used to pass these values into each task instance.
void vSenderTask( void *pvParameters )
{
long lValueToSend;

lValueToSend = ( long ) pvParameters;
for( ;; )
{
xQueueSend( xQueue, &lValueToSend, portMAX_DELAY );
Serial.print( "Sent = ");
Serial.println(lValueToSend);
taskYIELD();
}
}
Reading from Queue Task
This Arduino code shows the implementation of the task that receives data from the queue. The receiving task specifies a block time of 100 milliseconds so will enter the Blocked state to wait for data to become available. It will leave the Blocked state when either data is available on the queue, or 100 milliseconds passes without data becoming available. In this example, the 100 milliseconds timeout should never expire as there are two tasks that are continuously writing to the queue.
void vReceiverTask( void *pvParameters )
{
long lReceivedValue;
for( ;; )
{

if (xQueueReceive( xQueue, &lReceivedValue, portMAX_DELAY ) == pdPASS)
{
Serial.print( "Received = ");
Serial.println(lReceivedValue);
}
taskYIELD();

}
}
Creating Queue List
This code contains the definition of the Arduino setup() function. This simply creates the queue and the three tasks before starting the scheduler. The queue is created to hold a maximum of 5 long values even though the priorities of the tasks are set so the queue will never actually contain more than one item at a time.
#include <Arduino_FreeRTOS.h>
#include <queue.h>
QueueHandle_t xQueue;
void setup()
{
  Serial.begin(9600);
  xQueue = xQueueCreate( 5, sizeof( long ) );
if( xQueue != NULL )
{
xTaskCreate( vSenderTask, "Sender1", 240, ( void * ) 100, 1, NULL );
xTaskCreate( vSenderTask, "Sender2", 240, ( void * ) 200, 1, NULL );
xTaskCreate( vReceiverTask, "Receiver", 240, NULL, 2, NULL );
vTaskStartScheduler();
}
else
{
/* The queue could not be created. */
}

}

void loop()
{
  // put your main code here, to run repeatedly:

}
Arduino complete Sketch
This is complete Arduino sketch to read/write message to/from queue.
#include <Arduino_FreeRTOS.h>
#include <queue.h>
QueueHandle_t xQueue;
void setup()
{
  Serial.begin(9600);
  xQueue = xQueueCreate( 5, sizeof( long ) );
if( xQueue != NULL )
{
xTaskCreate( vSenderTask, "Sender1", 240, ( void * ) 100, 1, NULL );
xTaskCreate( vSenderTask, "Sender2", 240, ( void * ) 200, 1, NULL );
xTaskCreate( vReceiverTask, "Receiver", 240, NULL, 2, NULL );
vTaskStartScheduler();
}
else
{
/* The queue could not be created. */
}

}

void loop()
{
  // put your main code here, to run repeatedly:

}

void vSenderTask( void *pvParameters )
{
long lValueToSend;

lValueToSend = ( long ) pvParameters;
for( ;; )
{
xQueueSend( xQueue, &lValueToSend, portMAX_DELAY );
Serial.print( "Sent = ");
Serial.println(lValueToSend);
taskYIELD();
}
}
void vReceiverTask( void *pvParameters )
{
long lReceivedValue;
for( ;; )
{

if (xQueueReceive( xQueue, &lReceivedValue, portMAX_DELAY ) == pdPASS)
{
Serial.print( "Received = ");
Serial.println(lReceivedValue);
}
taskYIELD();

}
}
The tasks that send to the queue call taskYIELD() on each iteration of their infinite loop. taskYIELD() informs the scheduler that a switch to another task should occur now rather than keeping the executing task in the Running state until the end of the current time slice. A task that calls taskYIELD() is in effect volunteering to be removed from the Running state.
As both tasks that send to the queue have an identical priority each time one calls taskYIELD() the other starts executing – the task that calls taskYIELD() is moved to the Ready state as the other sending task is moved to the Running state. This causes the two sending tasks to send data to the queue in turn. The output produced by Example 10 is shown in Figure below:

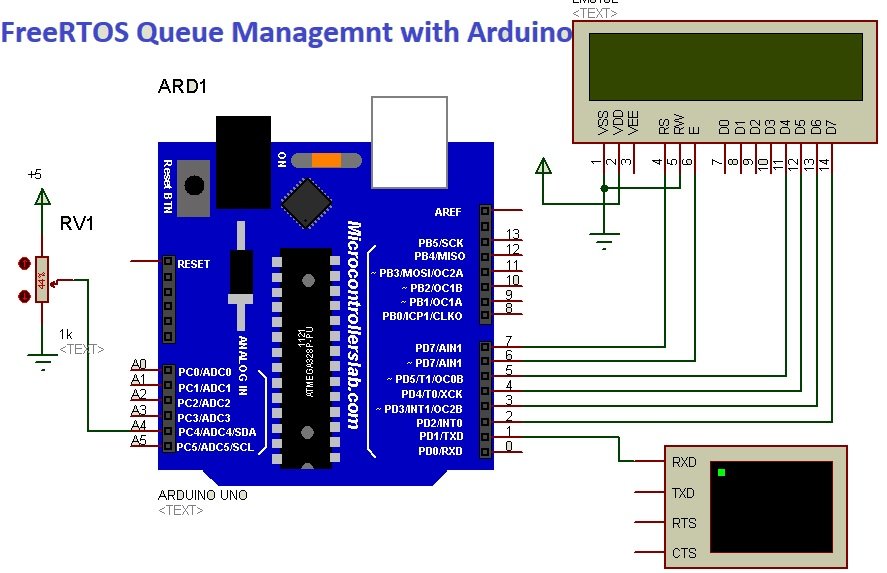
Arduino FreeRTOS Queue LCD and ADC Example
In this example, we will create two tasks:
- AdcTask: It writes ADC value to queue.
- LcdTask: It reads data from the queue and displays its value on 16×2 LCD
Circuit Diagram
This circuit reads analog voltage value with analog channel A4 and prints value on 16×2 LCD using Arduino.
Arduino Code
Copy this complete code to Arduino IDE and upload code to Arduino or you can also use proteus simulation.
#include <Arduino_FreeRTOS.h>
#include <queue.h>
#include<LiquidCrystal.h> // include LCD library function
LiquidCrystal lcd (7,6,5,4,3,2); //RS, E, D4, D5, D6, D7
QueueHandle_t xQueue;
void setup()
{
  Serial.begin(9600);
  lcd.begin(16, 2);
  xQueue = xQueueCreate( 5, sizeof( int ) );
if( xQueue != NULL )
{
xTaskCreate( AdcTask, "Sender", 240, NULL, 1, NULL );
xTaskCreate( LcdTask, "Receiver", 240, NULL, 2, NULL );
vTaskStartScheduler();
}
else
{
/* The queue could not be created. */
}

}

void loop()
{
  // put your main code here, to run repeatedly:

}

void AdcTask( void * pvParameters )
{


for( ;; )
{
 int adc_value;
adc_value = analogRead(A4);
xQueueSend( xQueue, &adc_value, portMAX_DELAY ==pdPASS);
Serial.print( "AdcTask = ");
Serial.println(adc_value);
//vTaskDelay(100);

}
}


void LcdTask( void *pvParameters )
{
int ReceivedValue = 0;
for( ;; )
{

if (xQueueReceive( xQueue, &ReceivedValue, portMAX_DELAY ) == pdPASS)
{
Serial.print( "Received = ");
Serial.println(ReceivedValue);
lcd.clear();
lcd.setCursor(0, 0);
lcd.print("ADC : ");
lcd.setCursor(6, 0);
lcd.print(ReceivedValue);
}
taskYIELD();
}
}
Simulation Result
As you can see in this video, we can see tasks excution on serial monitor and also adc result on LCD.
How Code works?
First, we inlcude header files of FreeRTOS, queue and LCD.
#include <Arduino_FreeRTOS.h>
#include <queue.h>
#include<LiquidCrystal.h> // include LCD library function
LiquidCrystal lcd (7,6,5,4,3,2); //RS, E, D4, D5, D6, D7
Setup Function
Declare a variable of type QueueHandle_t. This is used to store the handle
to the queue that is accessed by all AdcTask and LcdTask.
QueueHandle_t xQueue;You need to enable LCD and serial libraries.
Serial.begin(9600);
lcd.begin(16, 2);
Creare Integer Queue
Create one instance of the “AdcTask” that will send to the queue (sender). Also, create the task “LcdTask” that will read from the queue. The task is created with
priority 2, so above the priority of the sender task. After that Start the scheduler so the created tasks start executing.
xQueue = xQueueCreate( 5, sizeof( int ) ); //create queue of 5 integer elements
if( xQueue != NULL )
{
xTaskCreate( AdcTask, "Sender", 240, NULL, 1, NULL );
xTaskCreate( LcdTask, "Receiver", 240, NULL, 2, NULL );
vTaskStartScheduler();
}
else
{
/* The queue could not be created. */
}
Create Sender Task
This function defines the sender task that is “AdcTas”. First, read ADC value and store it inside the adc_value variable. After that, use xQueueSend() to write measured value to the queue.
- The first parameter is the queue to which data is being sent. The queue was created before the scheduler was started, so before this task started to execute.
- The second parameter is the address of the data to be sent, in this case
- the address of adc_value.
- The third parameter is Block time – the time the task should be kept in the Blocked state to wait for space to become available in the queue should the queue already be full.
- In this case, block time is portMAX_DELAY which is waiting for an indefinite time.
void AdcTask( void * pvParameters )
{

for( ;; )
{
int adc_value;
adc_value = analogRead(A4);
xQueueSend( xQueue, &adc_value, portMAX_DELAY ==pdPASS);
Serial.print( "AdcTask = ");
Serial.println(adc_value);
}
}
Receiver Task
This LCDTask reads value fromt the queue and displays its vaue on LCD.
void LcdTask( void *pvParameters )
{
int ReceivedValue = 0;
for( ;; )
{

if (xQueueReceive( xQueue, &ReceivedValue, portMAX_DELAY ) == pdPASS)
{
Serial.print( "Received = ");
Serial.println(ReceivedValue);
lcd.clear();
lcd.setCursor(0, 0);
lcd.print("ADC : ");
lcd.setCursor(6, 0);
lcd.print(ReceivedValue);
}
taskYIELD();
}
}
In this example, we use just a variable resistor for the input of analog channel. But you can use sensors also such as temperature, light sensor.
Where to go Next?
use FreeRTOS structure Queue to Receive Data from Multiple Tasks
FreeRTOS Queue Sets to Receive Data from Multiple Queues
not sure which board and which simulator s/w used for this example.
Board Arduino and simulation in Proteus
Is there a way to create multiple queues?