In this tutorial, we will learn how to perform a headless setup of a Raspberry Pi without using a keyboard, mouse, monitor, or even a USB-to-serial converter. A headless setup means configuring and controlling the Raspberry Pi entirely from another computer over a network connection. This approach is ideal for users who want to use their Raspberry Pi as a server, IoT gateway, or embedded device where a display and input peripherals are not necessary.
We will start by installing Raspberry Pi OS onto a microSD card using the official Raspberry Pi Imager tool. During the imaging process, we will pre-configure SSH access and Wi-Fi credentials so the Pi connects to your network automatically on first boot. After that, we will connect to the Raspberry Pi remotely using SSH from a Windows, Linux, or macOS computer. Finally, we will enable VNC to access the full graphical desktop of the Raspberry Pi from your computer’s screen.

Why Use a Headless Setup?
Many Raspberry Pi projects do not require a dedicated monitor, keyboard, or mouse. For example, if you are building a home automation server, a network-attached storage (NAS) device, a web server, a media center, or an IoT sensor hub, the Raspberry Pi will run in the background without any direct user interaction. In these cases, purchasing a separate monitor and peripherals just for the initial setup is an unnecessary expense. A headless setup eliminates this cost entirely by allowing you to configure and control the Pi remotely from your existing computer.
Additionally, a headless setup is useful when the Raspberry Pi is physically located in a hard-to-reach location, such as inside an enclosure, mounted on a wall, or placed in a server rack. With SSH and VNC configured, you can manage the Pi from anywhere on your local network.
What You Will Need
You will require the following equipment for the headless setup of a Raspberry Pi:
Hardware components:
- Raspberry Pi (any model with Wi-Fi support: Pi 3, Pi 4, Pi 5, Pi Zero 2 W, etc.) (Buy here)
- MicroSD card (8 GB minimum, 16 GB or 32 GB recommended for better performance)
- USB-C or Micro-USB power supply (depending on your Pi model)
- A computer with an SD card reader (Windows, macOS, or Linux)
- A Wi-Fi network or Ethernet cable for network connectivity
Software components:
- Raspberry Pi Imager (free, available for Windows, macOS, and Linux)
- PuTTY (free SSH client for Windows) or the built-in terminal on Linux/macOS
- VNC Viewer by RealVNC (free, for remote desktop access)
Step 1: Install Raspberry Pi OS to a MicroSD Card
The first step in the headless setup process is to write the Raspberry Pi OS to a microSD card. We will use the official Raspberry Pi Imager tool, which simplifies the process of downloading and flashing the operating system.
Head over to the official Raspberry Pi website and download the Raspberry Pi Imager for your operating system (Windows, macOS, or Linux). Make sure your computer has an SD card reader, either built-in or connected via USB.

After downloading the installer, run the .exe file (on Windows) or the .dmg file (on macOS) and follow the on-screen instructions to install the Raspberry Pi Imager on your system.
Choose the Operating System
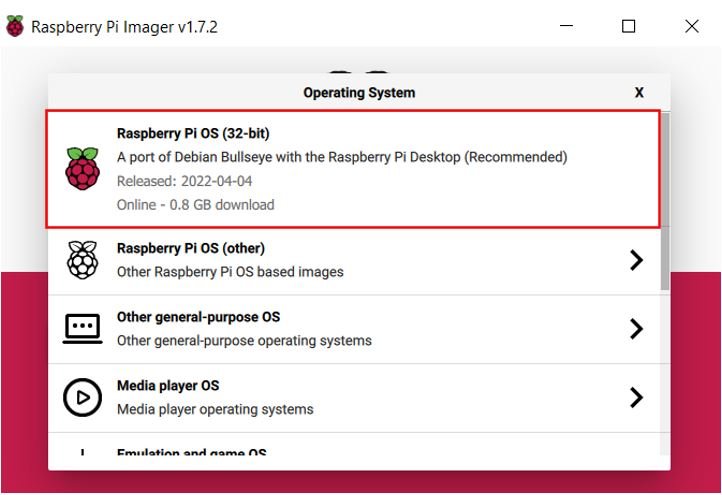
Once the installation is complete, launch the Raspberry Pi Imager. You will see the main window with three options. Click “Choose OS” to select the operating system you want to install.

Select “Raspberry Pi OS (32-bit)” as the operating system. This is the recommended option for most users as it provides a full desktop environment and is compatible with all Raspberry Pi models. If you have a Raspberry Pi 4 or Pi 5 with 4 GB or more RAM, you may also consider the 64-bit version for better performance with memory-intensive applications.
Select the Storage Device
Next, click “Choose Storage” and select your microSD card from the list. Make sure you select the correct device, as the writing process will erase all existing data on the selected card.


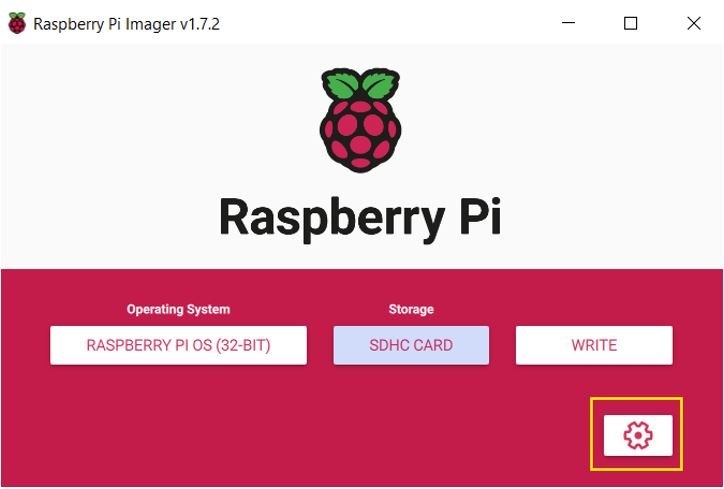
At this point, you should have both the operating system and the storage device selected, as shown below:

Configure Advanced Settings (SSH, Wi-Fi, Hostname)
This is the most important step for a headless setup. Before writing the OS to the card, you need to pre-configure SSH access, Wi-Fi credentials, and the hostname. Click the settings icon (gear icon) to open the Advanced Settings menu.
In the Advanced Settings window, configure the following options:
- Set hostname: Enter a name for your Raspberry Pi on the network, for example,
raspberrypi. This allows you to connect to it usingraspberrypi.localinstead of needing to know its IP address. - Enable SSH: Check this box and select “Use password authentication.” This is essential for headless access, as SSH allows you to connect to the Pi’s command line from another computer.
- Set username and password: Enter a username (e.g.,
pi) and a strong password. You will use these credentials to log in via SSH and VNC later. Make sure to remember them. - Configure wireless LAN: Enter your Wi-Fi network name (SSID) and password. Also select the correct wireless LAN country code for your region. This ensures the Pi connects to your Wi-Fi network automatically on first boot.
- Set locale settings: Configure your timezone and keyboard layout to match your region.
After configuring all the settings, click “Save” to store your preferences.

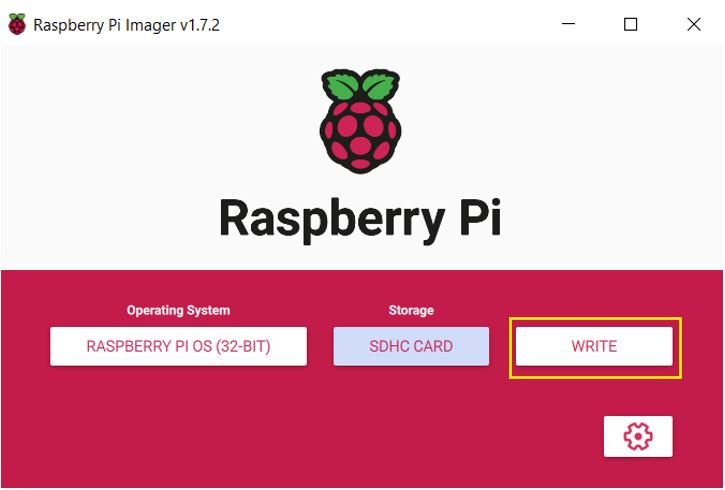
Write the OS to the MicroSD Card
Now click the “Write” button to begin flashing the operating system onto the microSD card.
A warning dialog will appear informing you that all data on the microSD card will be erased. Click “Yes” to confirm and proceed with the writing process.

The Imager will now download the OS image (if not already cached), write it to the microSD card, and then verify the data to ensure it was written correctly. This process typically takes 5 to 15 minutes depending on the speed of your SD card and internet connection.


After the process is completed, you will receive a “Write Successful” notification. Click “Continue” and safely eject the microSD card from your computer.

Insert the MicroSD Card and Power On
Insert the microSD card into the Raspberry Pi’s card slot on the underside of the board. Connect the power supply to the Pi using a USB-C cable (for Pi 4/5) or a Micro-USB cable (for Pi 3/Zero). The Raspberry Pi will boot up automatically and connect to your Wi-Fi network using the credentials you configured earlier. Allow about 60 to 90 seconds for the first boot to complete before attempting to connect via SSH.

Step 2: Connect to Raspberry Pi via SSH
Once the Raspberry Pi has booted and connected to your network, you can access its command line remotely using SSH (Secure Shell). SSH provides a secure, encrypted connection between your computer and the Raspberry Pi.
SSH from Windows Using PuTTY
On Windows, one of the most popular SSH clients is PuTTY. It is free to download and easy to use. Download PuTTY from the official website:
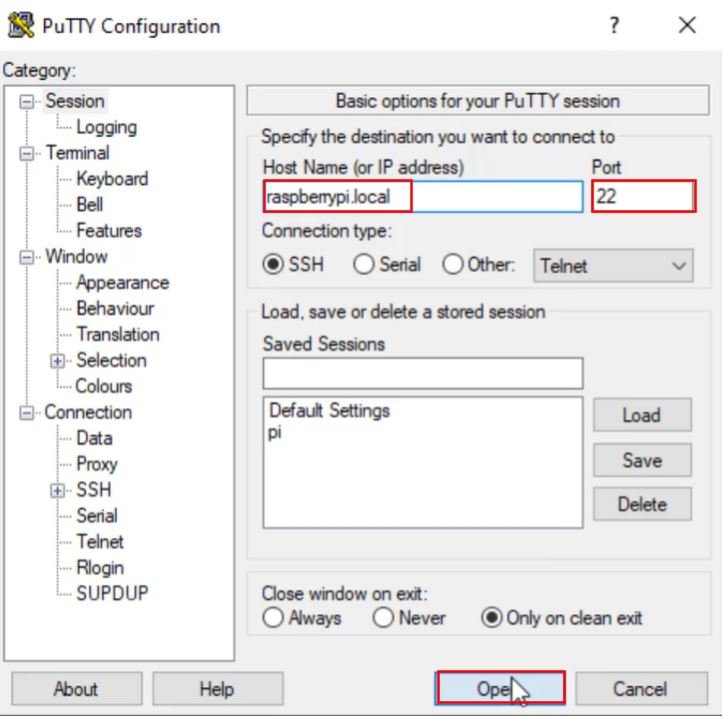
After installing PuTTY, open it and enter raspberrypi.local as the hostname. Leave the port set to 22 (the default SSH port) and make sure the connection type is set to SSH. Then click “Open” to initiate the connection.
If this is your first time connecting, PuTTY will display a security alert about the server’s host key. This is normal for a first-time connection. Click “Accept” to proceed.
SSH from Linux or macOS
On Linux and macOS, SSH is built into the operating system. Simply open a terminal window and type the following command:
ssh pi@raspberrypi.localReplace pi with the username you configured in the Raspberry Pi Imager if you chose a different one.
Enter Your Credentials
When prompted, enter the username and password that you set during the Raspberry Pi Imager configuration. Note that when typing the password in the terminal, no characters will be displayed on the screen — this is normal Linux behavior for security reasons. Simply type the password and press Enter.
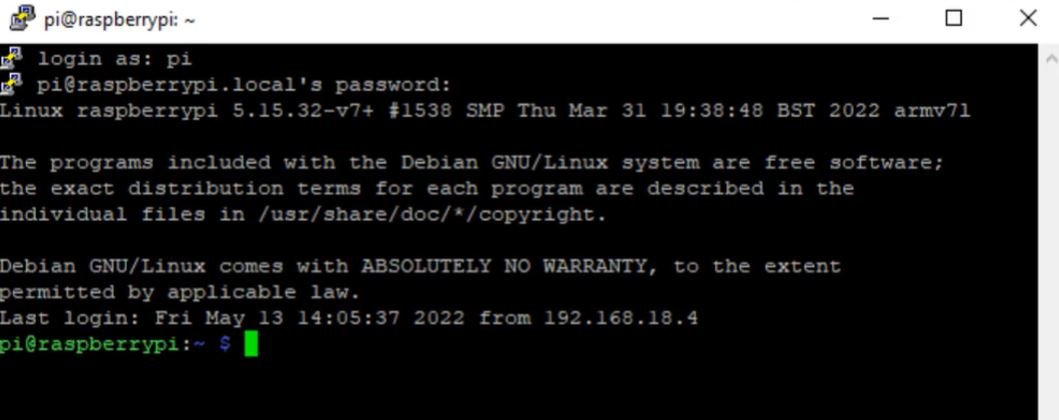
Once authenticated, you will see the Raspberry Pi command prompt. You now have full command-line access to your Raspberry Pi and can run any Linux commands, install software, configure services, and more.
Troubleshooting SSH Connection Issues
If you are unable to connect via SSH, here are some common issues and solutions:
- “Host not found” error: The Raspberry Pi may not have finished booting or may not be connected to Wi-Fi. Wait another minute and try again. Verify that your Wi-Fi SSID and password were entered correctly in the Imager.
- raspberrypi.local does not resolve: Some older routers and networks do not support mDNS (multicast DNS). In this case, you will need to find the Raspberry Pi’s IP address from your router’s admin panel or by using a network scanning tool such as Advanced IP Scanner (Windows) or
nmap(Linux/macOS). - Connection refused: Make sure SSH was enabled in the Raspberry Pi Imager Advanced Settings. If not, you will need to re-flash the microSD card with SSH enabled.
- Wrong password: Double-check the credentials you set in the Raspberry Pi Imager. The default password “raspberry” is only used if you did not set a custom password during the imaging process.
Step 3: Access the Raspberry Pi Desktop via VNC
While SSH provides command-line access, you may also want to see and interact with the full graphical desktop of the Raspberry Pi. VNC (Virtual Network Computing) allows you to do this by streaming the Pi’s desktop to your computer screen. You can then use your mouse and keyboard to control the Pi as if you were sitting in front of it with a monitor connected.
Enable VNC on the Raspberry Pi
Before you can connect via VNC, you need to enable the VNC server on the Raspberry Pi. SSH into the Pi (if you are not already connected) and run the following command to open the Raspberry Pi configuration tool:
sudo raspi-config
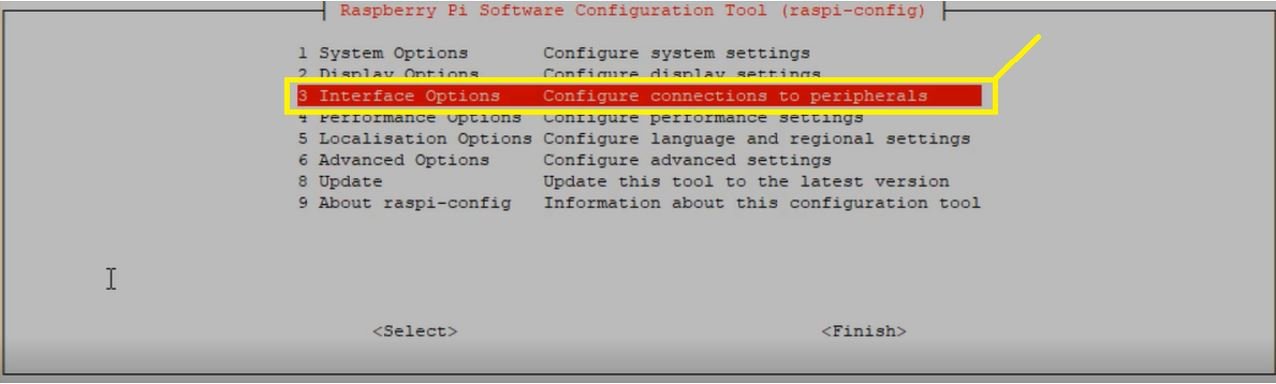
This will open the Raspberry Pi Software Configuration Tool, a text-based menu system. Navigate to “Interface Options” using the arrow keys and press Enter.
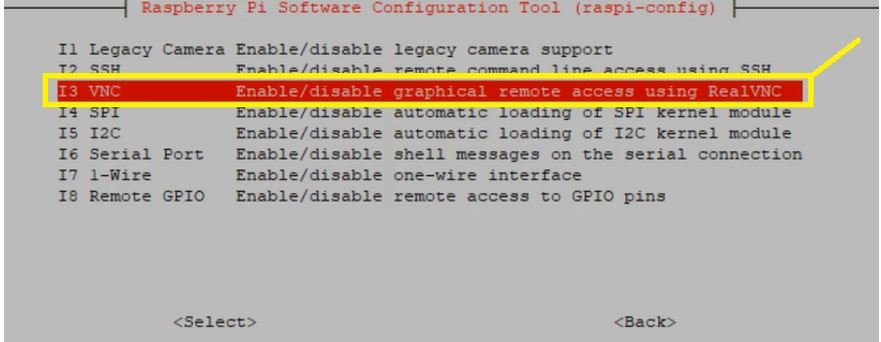
Select “VNC” from the list of interface options.
When prompted, select “Yes” to enable the VNC server.

You will see a confirmation message indicating that the VNC server has been enabled successfully. Click “Ok” to continue.

Navigate to “Finish” to exit the configuration tool. If asked to reboot, select “Yes” to apply the changes.

Install and Connect Using VNC Viewer
On your computer, download and install the VNC Viewer application from RealVNC. It is available for Windows, macOS, Linux, and even mobile devices (iOS and Android).

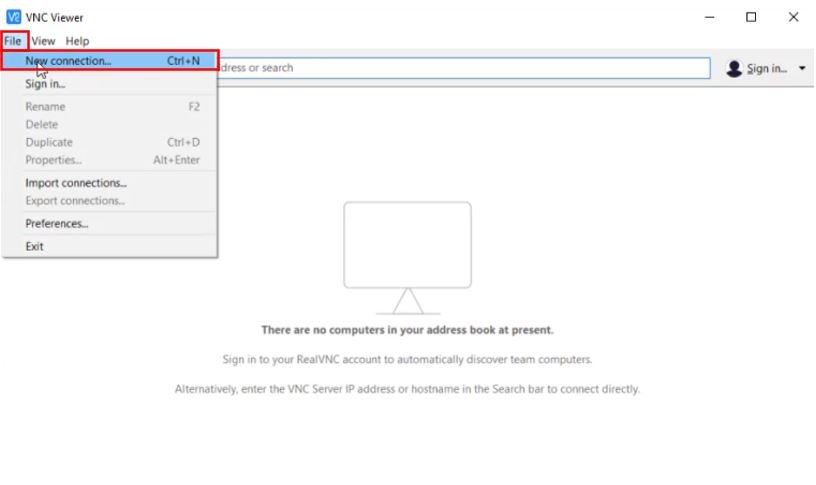
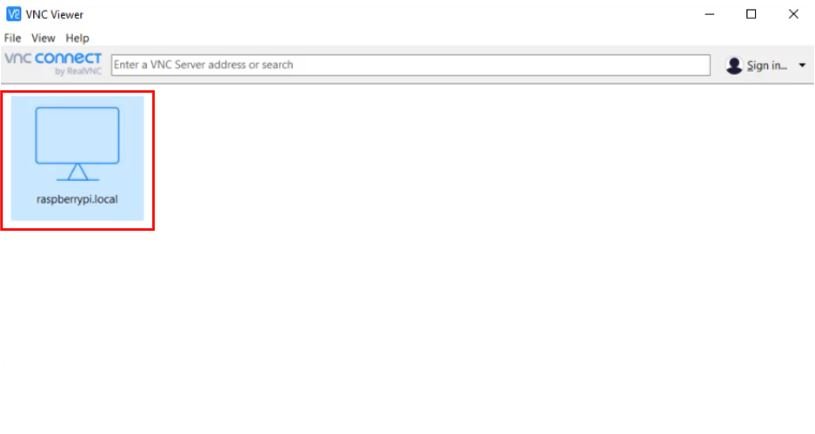
After installing VNC Viewer, open it and go to File > New Connection. In the Properties window, enter raspberrypi.local as the VNC Server address and give the connection a friendly name. Click “Ok” to create the connection.

Double-click the connection icon to start the VNC session.
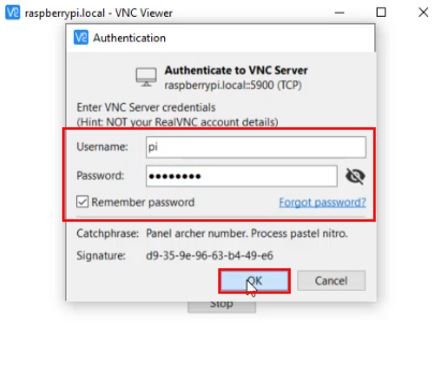
If you see an identity check warning, click “Continue” to proceed. This warning appears because VNC is verifying the identity of the Raspberry Pi for the first time.

Enter the same username and password that you configured in the Raspberry Pi Imager and click “Ok” to authenticate.
You will now see the Raspberry Pi desktop displayed inside the VNC Viewer window. You can interact with it using your computer’s mouse and keyboard, just as if you had a physical monitor connected. You can open applications, browse files, configure settings, and perform any task available on the desktop.

Useful Commands After Headless Setup
Once you have SSH access to your Raspberry Pi, here are some useful commands to help you get started:
- Update the system:
sudo apt update && sudo apt upgrade -y— keeps your Pi’s software up to date with the latest security patches and bug fixes - Check the IP address:
hostname -I— displays the current IP address of the Raspberry Pi on the network - Check disk space:
df -h— shows how much storage space is available on the microSD card - Check CPU temperature:
vcgencmd measure_temp— useful for monitoring thermal performance - Reboot:
sudo reboot— restarts the Raspberry Pi - Shut down safely:
sudo shutdown -h now— powers off the Raspberry Pi safely to prevent SD card corruption - Open configuration tool:
sudo raspi-config— access the configuration menu to change settings like Wi-Fi, interfaces, locale, and more
Video Demo
Watch the video tutorial below for a visual walkthrough of the entire headless setup process:
Summary
In this tutorial, we covered the complete process of performing a headless setup of a Raspberry Pi without using a keyboard, mouse, or monitor. We used the Raspberry Pi Imager to flash the OS onto a microSD card while pre-configuring SSH access, Wi-Fi credentials, a hostname, and a user account. After inserting the card and powering on the Pi, we connected remotely via SSH using PuTTY on Windows or the terminal on Linux/macOS. We then enabled VNC through the raspi-config tool and connected to the full graphical desktop using VNC Viewer. We also covered common SSH troubleshooting tips and useful post-setup commands. This headless approach is cost-effective, efficient, and ideal for projects where the Raspberry Pi will run as a dedicated server, IoT device, or automation hub.
You may also like to read:
- Install Node-RED on Raspberry Pi (32-bit and 64-bit RPI OS)
- Install Mosquitto MQTT Broker on Raspberry Pi
- Cross Compilation Toolchain for ARM – Example with Raspberry Pi
- Bare Metal Embedded Systems Build Process using GNU Toolchain
- Embedded Linux Introduction
Looking for a reliable Raspberry Pi for your next project? Check out this great option on Amazon: Raspberry Pi on Amazon. Whether you are building an IoT system, a home automation setup, or a personal server, this powerful board is perfect for beginners and experts alike.
| Raspberry Pi Components | Amazon Links |
|---|---|
| Raspberry Pi 5 Starter Kit PRO - Turbine Black (128GB Edition) (8GB RAM) | Buy Now |
| Raspberry Pi 5 Starter Kit MAX - Turbine White (256 GB Edition) (16GB RAM) | Buy Now |
| Raspberry Pi 5 8GB | Buy Now |
| Raspberry Pi 5 4GB | Buy Now |
| Raspberry Pi 5 (16GB) | Buy Now |
| CM5 Pi Compute Module 5 Kit | Buy Now |