In this tutorial, we will learn to write a very basic and simple program using LabView VI. We will provide basic information regarding the blocks and palettes. The first program uses just string constants and indicators, and the second program does simple addition and subtraction. At the end of each program, we have given some exercises that are left for the reader to perform themselves to make their concepts clear.
Introduction to LabView Programming
We have already discussed some of the basic concepts of LabView in a previous tutorial. Let’s now move towards programming. Writing a program in LabView is way simpler than writing the same functionality in any other programming language, i.e., C, C#, Java, etc. We do not need to learn any coding skills or syntax. All we have to do is make a block diagram and run it.
LabView Virtual Instrument (VI)
A LabView program is known as a virtual Instrument (VI). In the entire series of upcoming tutorials, we will use VI instead of LabView programs. When we create a new VI in LabView, it will show two windows: one for the block diagram, which serves as the functional graphical code, and another for the front panel, which serves as the user interface. We build the block diagram of the required task using controls (input devices) and indicators (output devices) in the block diagram window. The front panel is a user interface, and the output of our block diagram is displayed on the front panel, which includes all the controllable inputs and all the output devices. Let’s move toward the programming now.

Writing First LabView Program
The front panel and block diagram are side by side, as shown below.

Right-clicking anywhere on the front panel gives a dropdown menu known as the control palette, and right-clicking on the block diagram also gives a dropdown known as the function palette. From these palettes, we can select the controls and indicators and place them on the front panel. A control placed on the front panel will automatically appear on the block diagram as well.

- In a similar way, we can also place indicators. Placing indicators on the front panel will automatically display them on the block diagram too.
- The control palette and function palette contains almost everything one can use to interact with the VI and to display graphs or runtime values of a variable. Both of these palettes collectively provide an entire variety of controls and indicators.
- Every time we drop an item on the panel, there is a corresponding terminal that appears on the block diagram. Clicking on the item in the front panel will blink the corresponding item in the block diagram, and updating the value in either of the windows will update the value in the other. In short, both windows are linked together.
- One can also resize and recolor any of these items to their liking using the panel shown in the figure below.

The function palette includes different functionality dropdowns, including structure, arrays, clusters, waveforms, etc., as shown in the figure below.

Now let’s see sample examples of LabView programs.
Hello!! World Program in LabView
- Let’s now create a very simple LabView program that will print “Hello!! World” on the front panel.
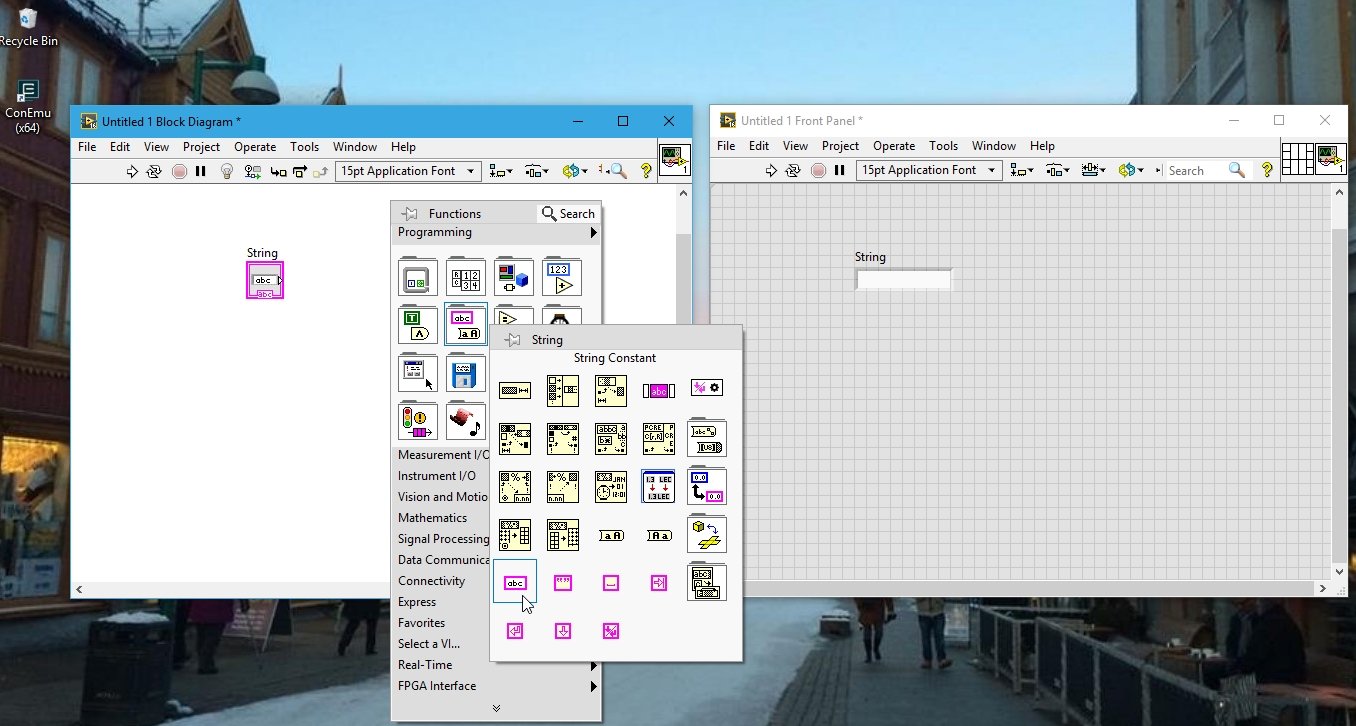
- From the Control Palette on the front panel, select string and path, and then select string indicator, as shown in the figure below.

Placing this control on the front panel will also place a string control on the block diagram. Now in the function palette on the block diagram, select String, then select String constant and place it on the block diagram as shown below.
Hover over the string constant and double-click to start a wire and connect it to the string control, as shown in the figure below.

Now in the string constant, write “Hello!! World”.

Now run the VI from the “run” button on the block diagram or press “Ctrl+R”. The string indicator at the control panel will display “Hello!! World”.

This is the basic program used to understand the working of string constants and indicators and is used as beginner’s code all over the world. Now let’s do a simple exercise to make this concept clear.
Exercise
- Try to display your name and address on 2 separate string indicators
(Hint: Use different string constants and indicators)
Addition and Subtraction Program in LabView
Trying to do difficult tasks, including complex mathematics, will somehow always find its way to simple addition and subtraction. If we are not familiar with doing simpler tasks, we will never be able to do complex tasks. Starting up our pace using addition will make us feel like we are learning something. If I start with a complex problem where the beginner is not even able to write simple code after the end of the tutorial, then writing these tutorials is of no use. Using numerical operators such as addition, subtraction, multiplication, and division is the key to being a good programmer in the future.
Let’s now move towards the programming part and try to do some calculations. At the end, we will assign you an exercise to do by yourself because learning without practice is of no use, and programming cannot be learned just by reading. You have to write programs and solve particular tasks if you are willing to be a good programmer in the future.
Procedure
Now, from the function palette in the block diagram, select Numeric, and then select Add, as shown in the figure below.

- The operator used is a 2-input addition operator; if you want to do multiple input additions, you have to use multiple operators using associative properties.
- Place numeric constants from the function palette >> Numeric >> Numeric constant and connect them to the input side of the add operator.

Now place numeric indicators from the numeric palette >> Numeric >> Numeric indicator and connect their associated indicator in the block diagram at the output of the add operator.

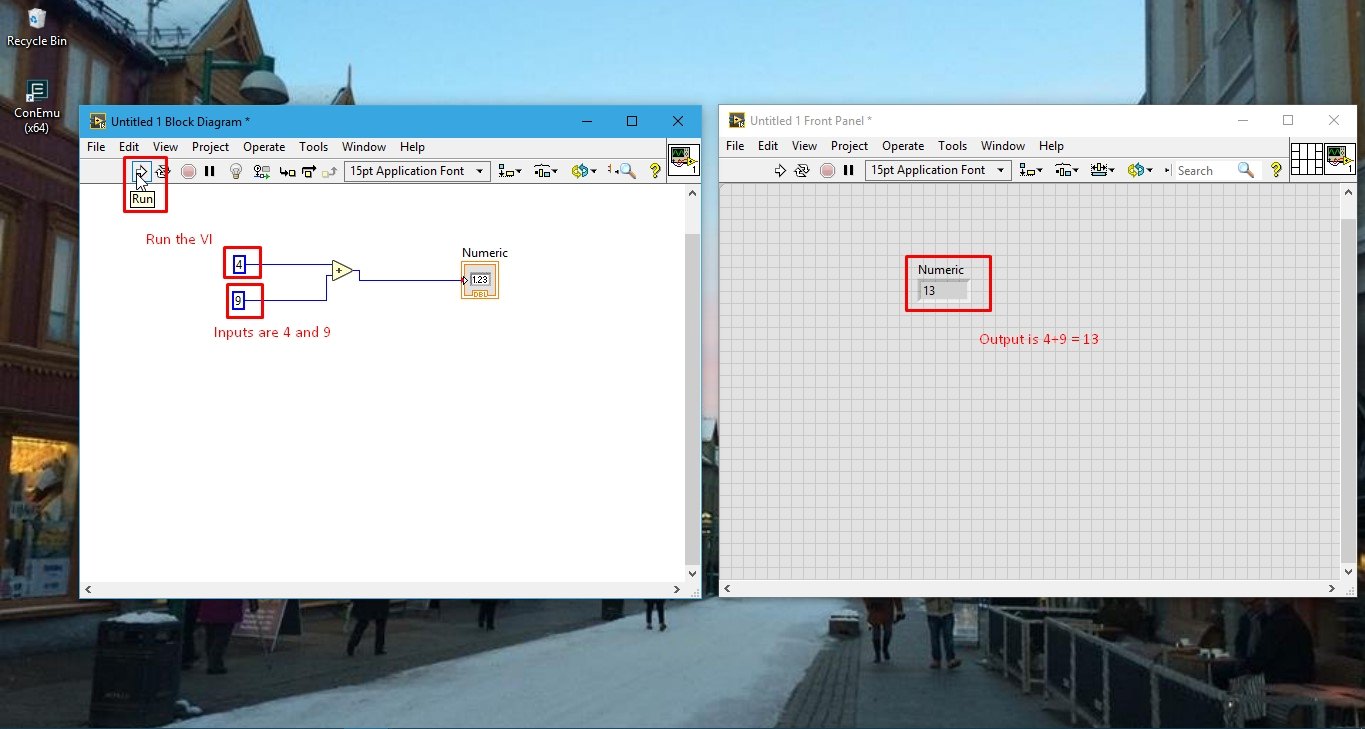
Now in the constant, enter the values you want to add, and then press the “run” button at the top or press “Ctrl+R” to run the VI. The input constant after addition will be displayed on the numeric indicator.
For subtraction, the procedure remains the same. We just have to replace the add operator with the subtract operator, as shown below.

The output after subtracting two numbers is given below.
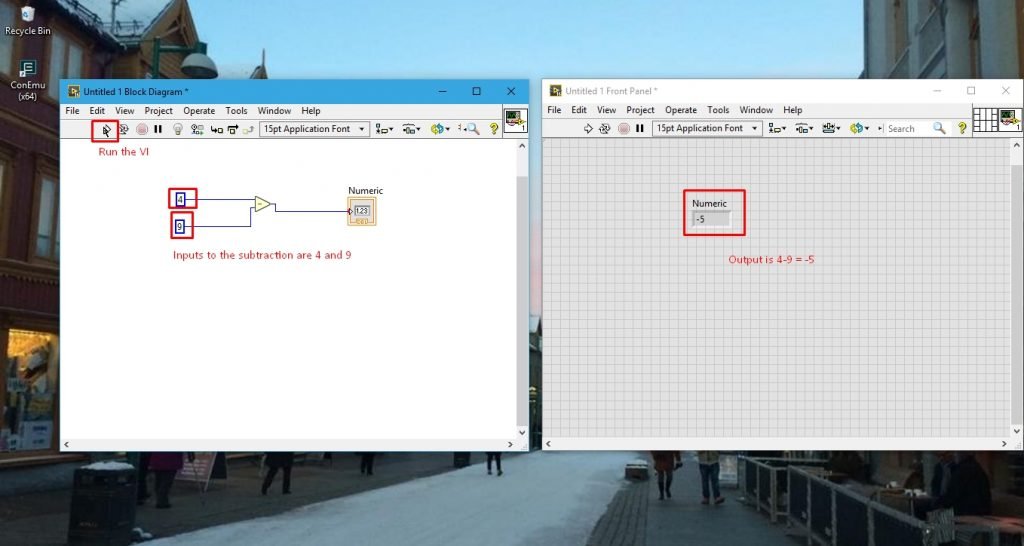
We can see that the second digit is subtracted from the first digit. If we get stuck at any part of the code and don’t know how to use an operator, just right-click on the operator and select Help. The built-in LabView help feature will give us details on how the operator works. The figure below shows the help window for the subtract operator.

Now do a small exercise to make your concepts of simple numeric operators and constants clear.
Exercise to Learn LabView Programming
- Try to do multiple input addition, i.e., give three inputs to the add operator, display the output, and verify your answer. Similarly, do addition for four and five input values.
- (Hint: Try using multiple add operators.)
- Try to do multiple input subtractions, i.e., three, four, and five input subtractions.
- (Hint: Always remember the order of subtraction to avoid ambiguity.)
- Try using multiplication as well as division operators.
No one is so rich that they can not help others, and no one is too poor to help others in some way
Thanks for this