This is a first tutorial on series of tutorials on labview. In this tutorial, we tried our best to make the reader comfortable with reading environment, so that the beginner user of LabView (which is also known as a graphical programming environment) can get enough knowledge to work with LabView, making themselves familiarize with the basic LabView features. We use these features to build data acquisition and instrument control applications. This manual is an introduction to LabView programming environment.
Introduction to LabView
LabView is developed by National Instruments sometime in the mid to late 80’s by Jeff Kodosky and it is a graphical programming language. A program in LabView is called a VI, which stands for Virtual Instrument. To create a VI (Virtual Instrument), LabView programming environment can be used. The user interface can be made by simply dragging and dropping objects, and arranging them in a required pattern to complete the path. Multiple functionalities can be added to the interface in the form of a diagram, similar to a flowchart, “wired” with the various structures and functions. So, in most LabView programs, no lines of code are written, the functionality of the program is provided by the diagram. That is why LabView is called a graphical programming language.
In recent years, due its ease of coding labView have become one of the most popular data collection system. Data collection, data analysis ,signal generation and creating a user friendly interface are the main tasks needed to be focused within the framework of Labview. LabView can also be tied up or linked with you C code or MATLAB codes if it is not performing the required functionality.
Summing this up, LabView is an extremely powerful graphical programming system that is compatible with data collection and storage. People use it because it is convenient and no knowledge of conventional programming languages is required.
LabView Programs
Because of the appearance and physical instruments used in it, LabVIEW programs are called virtual instruments, or Vis. For data acquisition including data storing, data sorting, data analyzing and displaying LabVIEW contains a comprehensive set of tools. as well as it has tools to help you debug your code.
User Interfaces:
An interface can be built on block diagram, and results will be displayed on front panel using controls and indicators. Buttons, potentiometers, knobs, and other input mechanisms are included in controls. Indicators include charts and graphs from oscilloscopes, LEDs to represent on or off, and other output displays. The block diagram contains a code, the output of which is available on front panel once you run the code. Once the front panel is displayed, you add code using VIs and structures to control the front panel objects.
Communication with hardware:
We can also communicate our LabView program with hardware such as we can acquire data from hardware and process it in our program, vision and motion from cameras and motion control devices.
Getting started with labview
- Once you get done with the downloading and installation part of LabView it will appear in you search bar. Open the search bar in your computer and type labview and click on NI Labview as shown in the figure below.


Figure 1: Launching LabView
- A window similar to the one shown below will appear when you launch LabVIEW. You can create new project and open an existing project using the GUI interface of this window.

Figure 2: Getting started
- This window will disappears as soon as you click on create a new file or open an existing file and it will appear again reappears when you close the front panels and block diagrams.
- Depending upon the requirement of the project you can create any of the templates already provided by NI and then click finish, but according to our current requirement we will open Blank VI as show in the figure below.

Figure 3: Creating blank VI
LabVIEW displays two windows: the front panel window and the block diagram window both of them are explained below.
Block Diagram in labview
The graphical source code is to be built in the block diagram panel, also known as G code or block diagram code, for how the VI runs. Graphical representation of a code is known ad block diagram code. This code uses graphical representations of functions and includes inputs and controls to control the objects in the front panel. Objects on the Front panel appear as icon terminals on the block diagram. Controls and indicators are connected via wires and they collectively perform a specified task. Data transfers from one control unit to other via wires in the order given below:
- from controls to VIs and functions
- from VIs and functions to indicators
- and from VIs and functions to other VIs and functions.
The movement of data through the nodes on the block diagram determines the execution order of the VIs and functions. This +-movement of data is known as dataflow programming.
Figure 4: Block diagram
Front Panel:
The user interface in LabView is known as front panel of a VI. Combination of controls and indicators results in the formation of front panel, where controls are the input and indicators are the output terminals of the VI. We can select the required controls and indicators from the control palette. Push buttons, knobs, potentiometers, dials, and other input mechanisms are controls. Input data is simulated by the controls and then they supply data to the block diagram of the VI. Indicators include charts and graphs, LEDs, and other displays. Instrument output mechanisms are simulated by indicators and display data the block diagram acquires or generates.
Figure 5: Front Panel
Front Panel and Block diagram tools in labview
Moving the cursor over an object on the block diagram or in front panel displays a positioning tool. The cursor becomes an arrow that you can use to select, position, and resize objects. When one move the cursor over the terminal of an object on the block diagram a wiring tool appears. The cursor will act as a spool and you can easily make the connections afterwards.
Running and stopping a VI:
Running a VI using the run button shown in the figure below or by pressing Ctrl+R executes the solution of the VI. During runtime the run button on the block diagram changes to a darkened arrow. Using the stop button the execution can be stopped during runtime, this button will stop running the VI after completing its current iteration. Using the pause button will pause the execution of the code after the completion of current iteration and pressing the pause button again will start the execution from where it was being paused.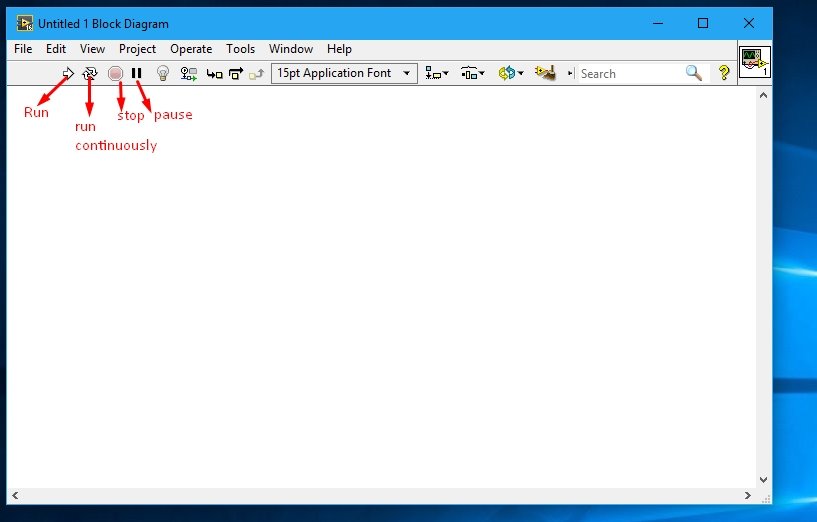
Figure 6: Run stop
Documentation Resources:
If you are stuck at any point while working with LabView just click on the Help key at title bar of the block diagram or control panel.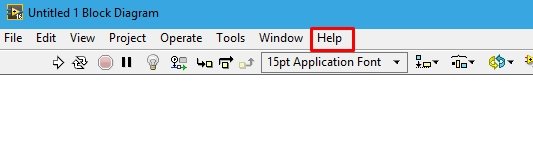
Figure 7: Help key
Help key will provide you with all the information about the programming concept of LabView and gives point to point instruction ans reference information about the VI, function palettes, methods of implementation dialog boxes etc. In this help menu you can also avail the online documentation resources of LabView provided by National Instrumentals. Click te help button in the configuration dialog box in order to avail help while configuring Express VI. Help can also be availed by simply right-clicking a VI or a function in the block diagram.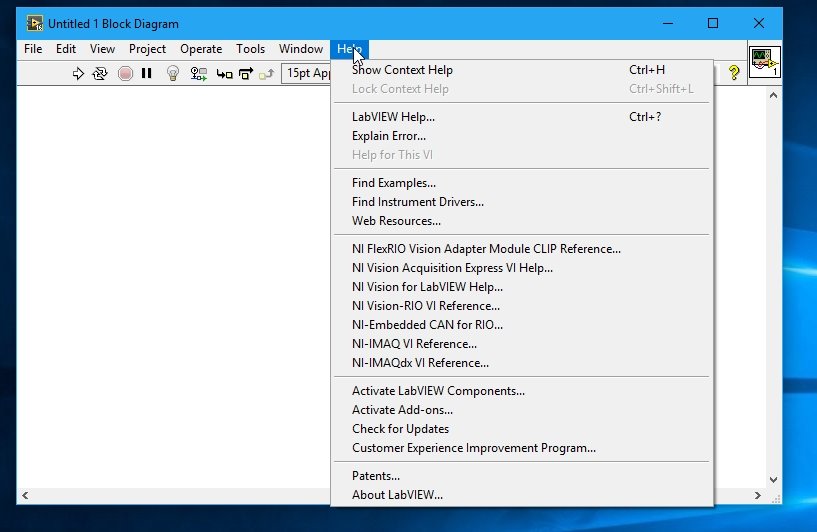
Figure 8: LabView Help
Shortcut keys:
| Shortcut | Function |
| Ctrl+R | Run a VI |
| Ctrl+Z | Undo last action |
| Ctrl+E | Switch between B.D and F.P window |
| Ctrl+S | Save the VI |
B.D = Block diagram
F.P = Front Panel