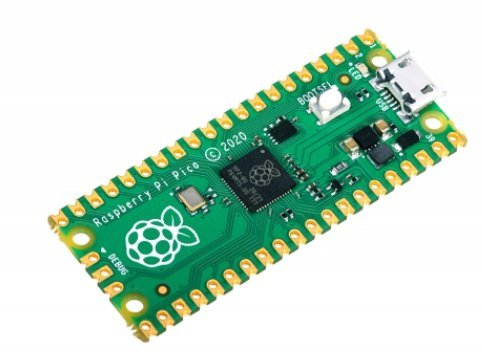
In this post, we will learn how to use dual core of Raspberry Pi Pico using MicroPython. We are going to discuss how to do Raspberry Pi Pico dual core programming. Raspberry Pi Pico is a low-cost, high-performance board based on the Raspberry Pi RP2040 microcontroller chip. RP2040 chip contains a dual-core cortex M0+ microcontroller which can operate up to 133MHz. This chip offers 26 multi-function GPIO pins and 2MB of onboard Flash memory.
Prerequisites Raspberry Pi Pico GPIO Programming
In order to start, make sure you have performed the following procedures already:
- Downloaded and installed the latest version of Python 3 on your PC.
- Downloaded and installed the latest version of Thonny IDE.
- Set up MicroPython in Raspberry Pi Pico.
If you want to know how to perform above steps, you can follow this step by step guide:
If you are using uPyCraft IDE, you can check this getting started guide:
RP2040 Dual Core Processor
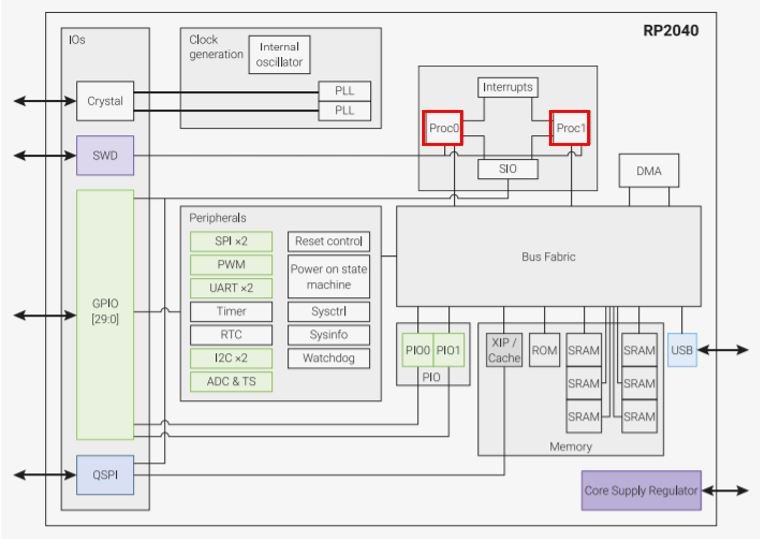
The RP2040 chip in Raspberry Pi Pico has dual M0+ processor cores as shown in the system overview of the RP2040 chip below, taken from its datasheet.
Core
A core is a functional unit on the processor capable of executing program code. By having multiple cores on a processor we can execute multiple segments of the code simultaneously. For Raspberry Pi Pico, by default, core0 executes the code whenever we program our board, whereas the second core is on standby. Using the second core enables us to make our Raspberry Pi Pico projects more powerful by completely using a separate thread of execution.
In the figure below you can see the depiction of the two cores.
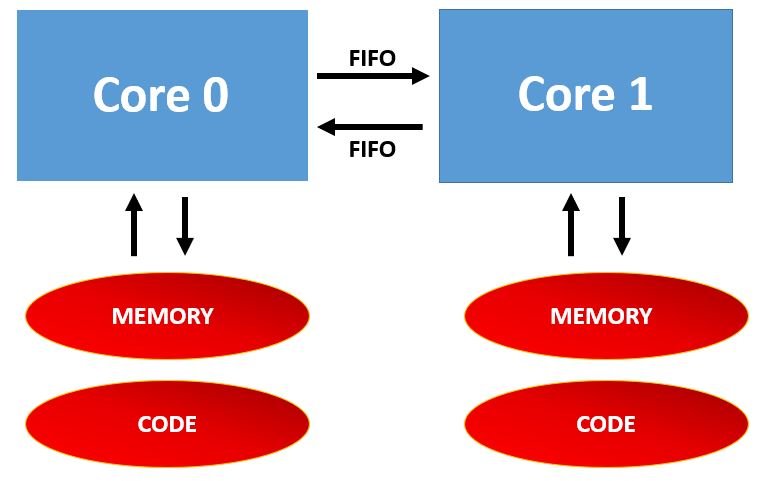
Each core separately runs its own code independently. Both have separate program code and memory space. However, there are cases where the cores can share program code and memory space. Sharing code is not troublesome because fetching code is a read instruction and it does not create a race condition. However, sharing the same location for data is problematic as it creates a possibility for a race condition to exist where mutual accesses to the memory is not assured. So the cores should not share memory directly. In order for the cores to communicate with each other, the Raspberry Pi Pico board has two separate FIFOs (First In First Out) structures. They act as a mechanism for communicating between the cores. Only one FIFO is writable by core0 and only one FIFO is writable by core1. This way no core is writing to the same location at the same time.
Raspberry Pi Pico Dual Core Programming Example
Now we will start our project in which we will use both the cores of Raspberry Pi Pico in MicroPython with the help of Thonny IDE.
We will use the dual core of Raspberry Pi Pico to control two LEDs. This will be achieved by using multithreading. We will control multiple programs simultaneously using this technique (one thread per core).
In order to perform this project, we need the following equipment:
- Breadboard
- Two LEDs
- Two 220 ohm resistor
- Connecting Wires
- Raspberry Pi Pico board
LEDs Connection with Raspberry Pi Pico
Connect the components as shown in the schematic diagram below:
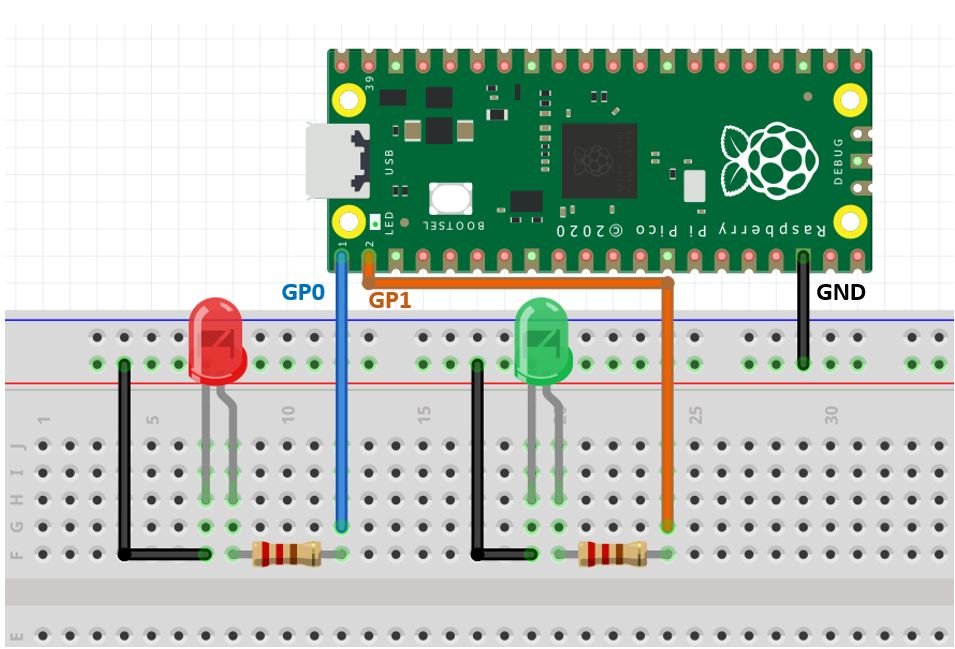
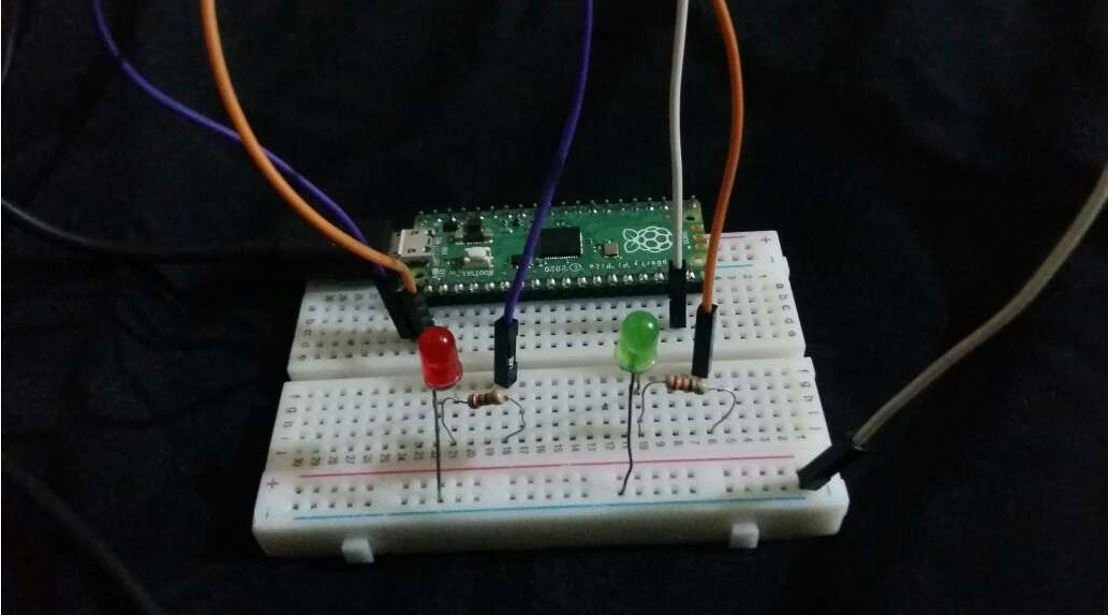
Now make connections of Raspberry Pi Pico with the two LEDs. Connect GP0 of Raspberry Pi Pico with the red LED’s anode terminal through a 220-ohm current limiting resistor. Also, make sure to connect the cathode terminal of the red LED with the ground pin of the board. Similarly, connect GP1 of Raspberry Pi Pico with the green LED’s anode terminal through a 220-ohm current limiting resistor. Also, make sure to connect the cathode terminal of the green LED with the ground pin of the board.
Dual Core Programming MicroPython Script
First, create a new file by clicking on File > New in Thonny IDE.
Copy this code to the new opened untitled window:
import machine
import _thread
from time import sleep

led_red = machine.Pin(0, machine.Pin.OUT)
led_green = machine.Pin(1, machine.Pin.OUT)

sLock = _thread.allocate_lock()

def CoreTask():
    while True:
        sLock.acquire()
        print("Enter second Thred")
        sleep(1)
        led_green.high()
        print("Green LED is turned ON")
        sleep(2)
        led_green.low()
        print("Green LED is turned OFF")
        sleep(1)
        print("Exit second Thread")
        sleep(1)
        sLock.release()
_thread.start_new_thread(CoreTask, ())

while True:
    sLock.acquire()
    print("Enter main Thread")
    led_red.toggle()
    sleep(0.15)
    print("Red LED toggling...")
    sleep(1)
    print("Exit main Thread")
    sleep(1)
    sLock.release()
How Code Works?
In this section, we will see how codes work.
Importing MicroPython GPIO and Time Libraries
In MicroPython, a machine module contains classes of different peripherals of a microcontroller such as GPIO, ADC, PWM, I2C, SPI, etc. In this tutorial, we are using GPIO pins of Raspberry Pi Pico. Therefore, we will import GPIO class from a machine module. Hence, here we import the Pin class from the machine module. We can create multiple instances of the Pin class to configure different GPIO pins of Raspberry Pi Pico.
The time module in MicroPython contains different methods such as delay, sleep, etc. For example, we can use a sleep() method to insert delays into our MicroPython script.
Moreover, we will import the _thread module as we have to use dual cores of Raspberry Pi Pico.
import machine
import _thread
from time import sleep
We create two instances of the Pin object: “led_red” and “led_green”.
led_red = machine.Pin(0, machine.Pin.OUT)
led_green = machine.Pin(1, machine.Pin.OUT)
Here the Pin() class takes in two parameters:
- First is the pin number to which we want to configure in different modes such as input, output, etc.
- Second is the pin mode such as digital input (Pin.IN), digital output (Pin.OUT), open-drain (OPEN_DRAIN).
The following function returns a new lock object that we have specified as ‘sLock’. Initially the lock is unlocked. This function will be responsible to be provide a semaphore lock to both the threads.
sLock = _thread.allocate_lock()Next we define a function called CoreTask(). This function will be run in a different core with a single thread. First, we will gain the semaphore lock using the acquire() method on the sLock object. Then we will turn the green LED on for two seconds and then turn it off. Meanwhile, we will print relevant messages in the Thonny shell terminal indicating us the status of the process. After the thread gets completed the semaphore lock is released using the release() method on the sLock object.
def CoreTask():
    while True:
        sLock.acquire()
        print("Enter second Thred")
        sleep(1)
        led_green.high()
        print("Green LED is turned ON")
        sleep(2)
        led_green.low()
        print("Green LED is turned OFF")
        sleep(1)
        print("Exit second Thread")
        sleep(1)
        sLock.release()
_thread.start_new_thread(CoreTask, ())
Moreover, we will call the _thread.start_new_thread() function to start a new thread. It will take in two parameters. The first parameter is the function that we defined and the second parameter is the arguments which are none in our case.
_thread.start_new_thread(CoreTask, ())Inside the while loop, we will again acquire another semaphore lock and then toggle the red LED. After that, the lock will be released. Notice that the main thread will keep on running till it gets finished.
while True:
    sLock.acquire()
    print("Enter main Thread")
    led_red.toggle()
    sleep(0.15)
    print("Red LED toggling...")
    sleep(1)
    print("Exit main Thread")
    sleep(1)
    sLock.release()
Demonstration
After copying the code to a new file in Thonny, click on the “Save” icon. This gives two options to save this file either to your computer or directly to your devices such as Raspberry Pi Pico. That means we can also directly upload files to a device. But for now, save it on your computer. You can select any location in your computer where you want to save this file. Save it as blink.py
You can use any other name as well just make sure it ends in .py
Now click on the “Run” button to upload code to Raspberry Pi Pico. Before uploading code make sure the correct board is selected.
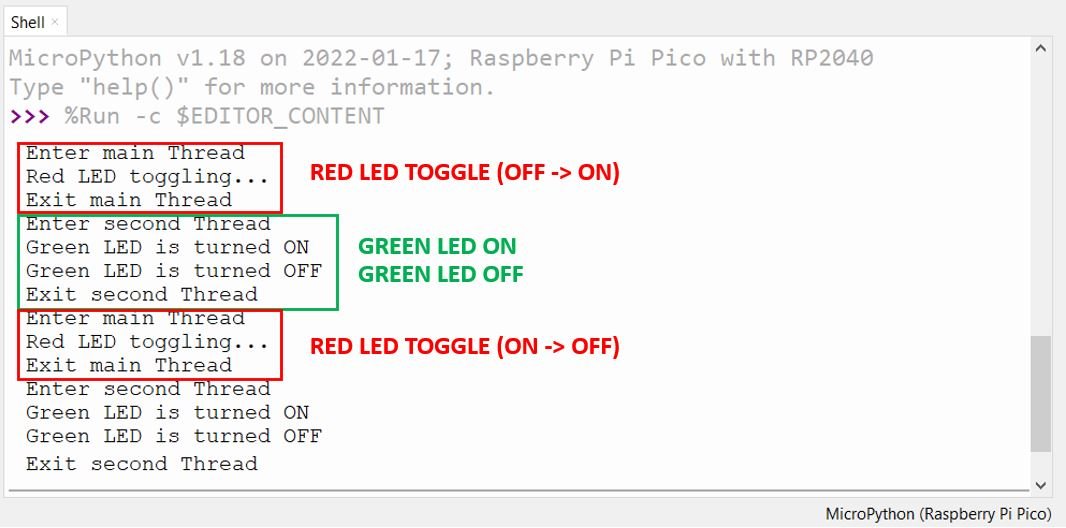
The Thonny shell terminal will display all the processes currently occurring:
Watch the video below for the LEDs demonstration:
You may also like to read other Raspberry Pi Pico tutorials:
- 28BYJ-48 Stepper Motor with Raspberry Pi Pico using MicroPython
- Servo Motor with Raspberry Pi Pico using MicroPython
- HC-05 Bluetooth Interfacing with Raspberry Pi Pico – Control Outputs
- Control DC Motor using L298N Driver with Raspberry Pi Pico and MicroPython
- DS18B20 Temperature Sensor with Raspberry Pi Pico using MicroPython
- DHT11 DHT22 with Raspberry Pi Pico using MicroPython
- HC-SR04 Ultrasonic Sensor with Raspberry Pi Pico using MicroPython
- I2C LCD Interfacing with Raspberry Pi Pico Display Text and Custom Characters
- MPU6050 with Raspberry Pi Pico (Accelerometer, Gyroscope, and Temperature)
- BME280 with Raspberry Pi Pico using MicroPython


Hi, can you help me create a code for using MPU6050 and BMP280. I want 2 types using: 2 core – same time using and a core – using 2 modules in 1 core. I would be glad, if you help me.
Thanks for your very clear description.
There are a couple of things I don’t understand.
One thing I don’t get is semaphore lock.
The lock seems to be on for the entire duration of both loops.
So will one process simply wait for the other every loop?
Also I thought this process is how we would run two threads on the the same core. What is the difference when running two threads on the same core?
I have to echo David. If the semaphore is always locked by one core or the other, aren’t we just using one core at a time? If so we don’t gain anything. I’m sure the semaphore is a valuable tool, and I’m glad you demonstrated it, but I don’t know when it is useful or needed.
Perhaps you could define what can run independently and what cannot. For example, I’m sure both cores can do math independently with no semaphores needed. Can they both print to the shell terminal? Can one access the WiFi while the other works with the GPIO pins? Can they switch different pins? The same pin?
Thanks!
I am new to microcontrollers, but not to concurrent programming. IMHO, both thread could be running at the same time without locking: they aren’t sharing resources.
A more didactical use for semaphores would be to share a variable, let’s say one that keeps the count of the times that any led has been turned on.
That could lead to race conditions: an operation as count++ reads the current value of the variable count, then adds 1 to it and writes it over. Race conditions happens when both threads tries to update and they read the same value (let’s say it is 0). Then, thread A will write count=1 and thread B will write count=1, so the final value would be 1 instead of 2.
To prevent that, you make the operation atomic by locking the execution:
sLock.acquire()
count += 1
sLock.release()
Of course, that code can (and, as a good practice, also should) be put in a separate function to be called whenever the counter is updated.
Just my 2cents. I hope it helps to clarify the use of semaphores.