In this user guide, we will create Wi-Fi manager web server Raspberry Pi Pico W and MicroPython. This Wi-Fi manager let us connect Raspberry Pi Pico W to a WiFi network without having to hardcode network credentials in a script. We will be using a previous example when we learned how to build a web server (Raspberry Pi Pico W Web Server Control LED) and include the wi-fi manager in it for better functionality and ease of performing Wi-Fi provisioning.

Recommended Components
The following components are used in this project or are helpful for getting started with Raspberry Pi Pico development.
| Component | How it’s used in this project | Buy on Amazon |
|---|---|---|
| Raspberry Pi Pico W | The Wi-Fi-enabled RP2040 board running the Wi-Fi manager web server. | Check Price |
| Micro USB Cable | Data cable to connect the Pico W to your computer and upload code. | Check Price |
| Breadboard | Handy for prototyping circuits as you extend the project. | Check Price |
As an Amazon Associate we earn from qualifying purchases. Prices and availability are accurate as of the date/time indicated and are subject to change.
We have a similar guide for ESP32 and ESP8266:
- Create a Wi-Fi Manager for ESP32 using AsyncWebServer library
- MicroPython: Wi-Fi Manager with ESP32 and ESP8266
Prerequisites
Before we start this tutorial, make sure you are familiar with and have the latest version Python 3 in your system, have set up MicoPython in Raspberry Pi Pico, and have a running Integrated Development Environment(IDE) in which we will be doing the programming. We will be using the same Thonny IDE as we have done previously in the getting started guide. If you have not followed our previous tutorial, you check here:
Introducing Wi-Fi Manager Web Server
With the addition of the Wi-fi manager library in MicroPython, we no longer have to separately provide the SSID and password of the local network. No hard coding would be required. We will be able to connect through other networks (Access Points) with Raspberry Pi Pico W board automatically without any hassle of manually entering the network credentials every time. Multiple SSID connections, as well as additional custom variables, can also be implemented through this.
The Process of Integrating Wi-Fi Manager
The following flow chart taken from https://github.com/tayfunulu/WiFiManager shows the process behind the execution of wi-fi managers with Raspberry Pi Pico W boards in MicroPython.

- Initially, Raspberry Pi Pico W will be set up as an Access Point when it starts.
- Next, to connect to your Raspberry Pi Pico W which acts as an AP, we will go to the IP address 192.164.4.1.
- A web page containing different network will be shown from which we will choose the one which we want to configure.
- These network credentials of the network we chose, will get saved in Raspberry Pi Pico W.
- Then we will set up a new SSID and password for our selected network. The Raspberry Pi Pico W will restart and now will be able to connect with the network we selected. In this phase the Pic W board acts in the Station mode.
- If the connection is not successful, Pico W board goes back to AP mode and we will set the SSID and password again.
Wi-Fi Manager Library in MicroPython
MicroPython does not contain the library for the wi-fi manager so we will need to upload it ourselves. We will learn how to do this by using two different IDE for MicroPython:
import network
import socket
import ure
import time
ap_ssid = "WifiManager"
ap_password = "tayfunulu"
ap_authmode = 3 # WPA2
NETWORK_PROFILES = 'wifi.dat'
wlan_ap = network.WLAN(network.AP_IF)
wlan_sta = network.WLAN(network.STA_IF)
server_socket = None
def get_connection():
"""return a working WLAN(STA_IF) instance or None"""
# First check if there already is any connection:
if wlan_sta.isconnected():
return wlan_sta
connected = False
try:
# ESP connecting to WiFi takes time, wait a bit and try again:
time.sleep(3)
if wlan_sta.isconnected():
return wlan_sta
# Read known network profiles from file
profiles = read_profiles()
# Search WiFis in range
wlan_sta.active(True)
networks = wlan_sta.scan()
AUTHMODE = {0: "open", 1: "WEP", 2: "WPA-PSK", 3: "WPA2-PSK", 4: "WPA/WPA2-PSK"}
for ssid, bssid, channel, rssi, authmode, hidden in sorted(networks, key=lambda x: x[3], reverse=True):
ssid = ssid.decode('utf-8')
encrypted = authmode > 0
print("ssid: %s chan: %d rssi: %d authmode: %s" % (ssid, channel, rssi, AUTHMODE.get(authmode, '?')))
if encrypted:
if ssid in profiles:
password = profiles[ssid]
connected = do_connect(ssid, password)
else:
print("skipping unknown encrypted network")
else: # open
connected = do_connect(ssid, None)
if connected:
break
except OSError as e:
print("exception", str(e))
# start web server for connection manager:
if not connected:
connected = start()
return wlan_sta if connected else None
def read_profiles():
with open(NETWORK_PROFILES) as f:
lines = f.readlines()
profiles = {}
for line in lines:
ssid, password = line.strip("\n").split(";")
profiles[ssid] = password
return profiles
def write_profiles(profiles):
lines = []
for ssid, password in profiles.items():
lines.append("%s;%s\n" % (ssid, password))
with open(NETWORK_PROFILES, "w") as f:
f.write(''.join(lines))
def do_connect(ssid, password):
wlan_sta.active(True)
if wlan_sta.isconnected():
return None
print('Trying to connect to %s...' % ssid)
wlan_sta.connect(ssid, password)
for retry in range(100):
connected = wlan_sta.isconnected()
if connected:
break
time.sleep(0.1)
print('.', end='')
if connected:
print('\nConnected. Network config: ', wlan_sta.ifconfig())
else:
print('\nFailed. Not Connected to: ' + ssid)
return connected
def send_header(client, status_code=200, content_length=None ):
client.sendall("HTTP/1.0 {} OK\r\n".format(status_code))
client.sendall("Content-Type: text/html\r\n")
if content_length is not None:
client.sendall("Content-Length: {}\r\n".format(content_length))
client.sendall("\r\n")
def send_response(client, payload, status_code=200):
content_length = len(payload)
send_header(client, status_code, content_length)
if content_length > 0:
client.sendall(payload)
client.close()
def handle_root(client):
wlan_sta.active(True)
ssids = sorted(ssid.decode('utf-8') for ssid, *_ in wlan_sta.scan())
send_header(client)
client.sendall("""\
<html>
<h1 style="color: #5e9ca0; text-align: center;">
<span style="color: #ff0000;">
Wi-Fi Client Setup
</span>
</h1>
<form action="configure" method="post">
<table style="margin-left: auto; margin-right: auto;">
<tbody>
""")
while len(ssids):
ssid = ssids.pop(0)
client.sendall("""\
<tr>
<td colspan="2">
<input type="radio" name="ssid" value="{0}" />{0}
</td>
</tr>
""".format(ssid))
client.sendall("""\
<tr>
<td>Password:</td>
<td><input name="password" type="password" /></td>
</tr>
</tbody>
</table>
<p style="text-align: center;">
<input type="submit" value="Submit" />
</p>
</form>
<p> </p>
<hr />
<h5>
<span style="color: #ff0000;">
Your ssid and password information will be saved into the
"%(filename)s" file in your ESP module for future usage.
Be careful about security!
</span>
</h5>
<hr />
<h2 style="color: #2e6c80;">
Some useful infos:
</h2>
<ul>
<li>
Original code from <a href="https://github.com/cpopp/MicroPythonSamples"
target="_blank" rel="noopener">cpopp/MicroPythonSamples</a>.
</li>
<li>
This code available at <a href="https://github.com/tayfunulu/WiFiManager"
target="_blank" rel="noopener">tayfunulu/WiFiManager</a>.
</li>
</ul>
</html>
""" % dict(filename=NETWORK_PROFILES))
client.close()
def handle_configure(client, request):
match = ure.search("ssid=([^&]*)&password=(.*)", request)
if match is None:
send_response(client, "Parameters not found", status_code=400)
return False
# version 1.9 compatibility
try:
ssid = match.group(1).decode("utf-8").replace("%3F", "?").replace("%21", "!")
password = match.group(2).decode("utf-8").replace("%3F", "?").replace("%21", "!")
except Exception:
ssid = match.group(1).replace("%3F", "?").replace("%21", "!")
password = match.group(2).replace("%3F", "?").replace("%21", "!")
if len(ssid) == 0:
send_response(client, "SSID must be provided", status_code=400)
return False
if do_connect(ssid, password):
response = """\
<html>
<center>
<br><br>
<h1 style="color: #5e9ca0; text-align: center;">
<span style="color: #ff0000;">
ESP successfully connected to WiFi network %(ssid)s.
</span>
</h1>
<br><br>
</center>
</html>
""" % dict(ssid=ssid)
send_response(client, response)
try:
profiles = read_profiles()
except OSError:
profiles = {}
profiles[ssid] = password
write_profiles(profiles)
time.sleep(5)
return True
else:
response = """\
<html>
<center>
<h1 style="color: #5e9ca0; text-align: center;">
<span style="color: #ff0000;">
ESP could not connect to WiFi network %(ssid)s.
</span>
</h1>
<br><br>
<form>
<input type="button" value="Go back!" onclick="history.back()"></input>
</form>
</center>
</html>
""" % dict(ssid=ssid)
send_response(client, response)
return False
def handle_not_found(client, url):
send_response(client, "Path not found: {}".format(url), status_code=404)
def stop():
global server_socket
if server_socket:
server_socket.close()
server_socket = None
def start(port=80):
global server_socket
addr = socket.getaddrinfo('0.0.0.0', port)[0][-1]
stop()
wlan_sta.active(True)
wlan_ap.config(essid=ap_ssid, password=ap_password)
wlan_ap.active(True)
server_socket = socket.socket()
server_socket.bind(addr)
server_socket.listen(1)
print('Connect to WiFi ssid ' + ap_ssid + ', default password: ' + ap_password)
print('and access the Pic W via your favorite web browser at 192.168.4.1.')
print('Listening on:', addr)
while True:
if wlan_sta.isconnected():
return True
client, addr = server_socket.accept()
print('client connected from', addr)
try:
client.settimeout(5.0)
request = b""
try:
while "\r\n\r\n" not in request:
request += client.recv(512)
except OSError:
pass
print("Request is: {}".format(request))
if "HTTP" not in request: # skip invalid requests
continue
# version 1.9 compatibility
try:
url = ure.search("(?:GET|POST) /(.*?)(?:\\?.*?)? HTTP", request).group(1).decode("utf-8").rstrip("/")
except Exception:
url = ure.search("(?:GET|POST) /(.*?)(?:\\?.*?)? HTTP", request).group(1).rstrip("/")
print("URL is {}".format(url))
if url == "":
handle_root(client)
elif url == "configure":
handle_configure(client, request)
else:
handle_not_found(client, url)
finally:
client.close()Uploading Wi-Fi Manager library to Raspberry Pi Pico W
Create a file in Thonny IDE with the name of wifimgr.py and copy the above MicroPython script to that file:

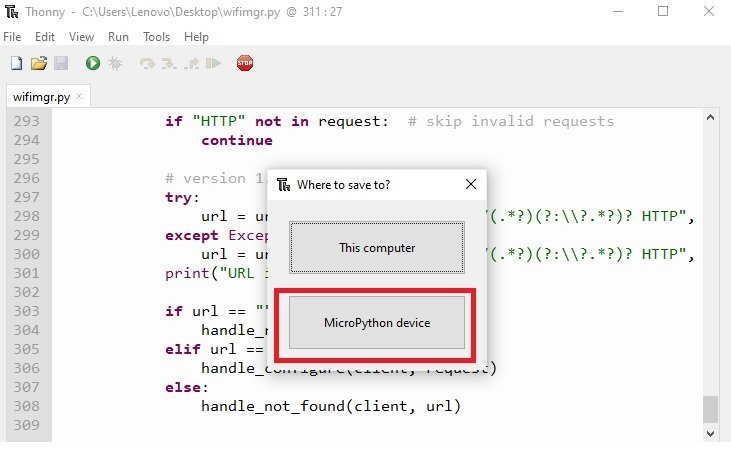
Click the play button to save wifimgr.py file to Raspberry Pi Pico W.
You can also save library to Pic W by using save button. Click on the Save button and set the file name as wifimgr.py

When you click on the save button, you will see the following window will appear. Select, MicroPython device to upload the library to Raspberry Pi Pico W.
Note: The Device options in the menu bar to upload scripts are available in the previous versions of Thonny IDE.
After following these steps, we have successfully installed the Wi-Fi manager library in Thonny IDE.
Raspberry Pi Pico W Wi-Fi Manager MicroPython Script
As we have set up the wi-fi manager library in our respective IDEs, we can now see how to configure the wi-fi manager with Raspberry Pi Pico W. We will be using a previous example where we created a webpage that controlled the output GPIO pins of Raspberry Pi Pico W. You can view that tutorial here.
The web page contains an ON and an OFF button indicating the status of an LED connected to the GPIO of the Raspberry Pi Pico W. Instead of manually hard coding the network credentials, we will provide the SSID and password of our WiFi router to our board with the wi-fi manager instead.
MicroPython Script
We will first open a new file and save it as main.py. Save it in the same directory as wifimgr.py. Now copy the code which is given below in your main.py file.
import wifimgr     # importing the Wi-Fi manager library
from time import sleep
import machine
import gc
try:
  import usocket as socket
except:
  import socket
#machine.reset()
led = machine.Pin(2, machine.Pin.OUT)
wlan = wifimgr.get_connection()        #initializing wlan
if wlan is None:
    print("Could not initialize the network connection.")
    while True:
        pass
print(" Raspberry Pi Pico W OK")
led_state = "OFF"
def web_page():
    html = """<html>

<head>
    <meta name="viewport" content="width=device-width, initial-scale=1">
    <link rel="stylesheet" href="https://use.fontawesome.com/releases/v5.7.2/css/all.css"
     integrity="sha384-fnmOCqbTlWIlj8LyTjo7mOUStjsKC4pOpQbqyi7RrhN7udi9RwhKkMHpvLbHG9Sr" crossorigin="anonymous">
    <style>
        html {
            font-family: Arial;
            display: inline-block;
            margin: 0px auto;
            text-align: center;
        }

        .button {
            background-color: #ce1b0e;
            border: none;
            color: white;
            padding: 16px 40px;
            text-align: center;
            text-decoration: none;
            display: inline-block;
            font-size: 16px;
            margin: 4px 2px;
            cursor: pointer;
        }

        .button1 {
            background-color: #000000;
        }
    </style>
</head>

<body>
    <h2> Raspberry Pi Pico Web Server</h2>
    <p>LED state: <strong>""" + led_state + """</strong></p>
    <p>
        <i class="fas fa-lightbulb fa-3x" style="color:#c81919;"></i>
        <a href=\"?led_2_on\"><button class="button">LED ON</button></a>
    </p>
    <p>
        <i class="far fa-lightbulb fa-3x" style="color:#000000;"></i>
        <a href=\"?led_2_off\"><button class="button button1">LED OFF</button></a>
    </p>
</body>

</html>"""
    return html


s = socket.socket(socket.AF_INET, socket.SOCK_STREAM)
s.bind(('', 80))
s.listen(5)

while True:
    try:
        if gc.mem_free() < 102000:
            gc.collect()
        conn, addr = s.accept()
        conn.settimeout(3.0)
        print('Received HTTP GET connection request from %s' % str(addr))
        request = conn.recv(1024)
        conn.settimeout(None)
        request = str(request)
        print('GET Rquest Content = %s' % request)
        led_on = request.find('/?led_2_on')
        led_off = request.find('/?led_2_off')
        if led_on == 6:
            print('LED ON -> GPIO2')
            led_state = "ON"
            led.on()
        if led_off == 6:
            print('LED OFF -> GPIO2')
            led_state = "OFF"
            led.off()
        response = web_page()
        conn.send('HTTP/1.1 200 OK\n')
        conn.send('Content-Type: text/html\n')
        conn.send('Connection: close\n\n')
        conn.sendall(response)
        conn.close()
    except OSError as e:
        conn.close()
        print('Connection closed')
similarly, create a main.py file and save the above MicroPython script to that file:

How the Code works?
The web server part of this code is taken from our previously published project here (Raspberry Pi Pico W Web Server Control LED). You can refer to that for a code explanation of the web server part.
We will be importing the Wi-Fi manager library in the main.py file so that we will be able to use the wi-fi manager functionality.
import wifimgrThen, we will be handling the Wi-fi manager by initializing WLAN. This will automatically set Raspberry Pi Pico W board in the station mode as it uses the instance ‘network.WLAN(STA_IF).’ The get_connection() function waits for the user to enter the ssid and password of your network.
wlan = wifimgr.get_connection()
if wlan is None:
    print("Could not initialize the network connection.")
    while True:
        pass
We will be using try and except statements so that we are not left with an open socket. This occurs when the Raspberry Pi Pico W boots initially. Next, we will bind the socket to an IP address and a port number. This is achieved by using the bind() method. In our case, we will pass an empty string followed by ’80’ to the bind() function. The empty string portrays the default IP address of Raspberry Pi Pico W board and ’80’ specifies the port number set for the web servers.
try:
  s = socket.socket(socket.AF_INET, socket.SOCK_STREAM)
  s.setsockopt(socket.SOL_SOCKET, socket.SO_REUSEADDR, 1)
  s.bind(('', 80))
  s.listen(5)
The Raspberry Pi Pico W board would reset if there is a failure and we get an OS error. This shows that there was an open socket left. With the help of the reset() function, the open socket would be deleted.
except OSError as e:
machine.reset()
Once we set the network credentials using the Wifi manager, the Raspberry Pi Pico W sets as a station instead of an access point and connects through the wi-fi manager.
MicroPython Wi-Fi Manager Demo
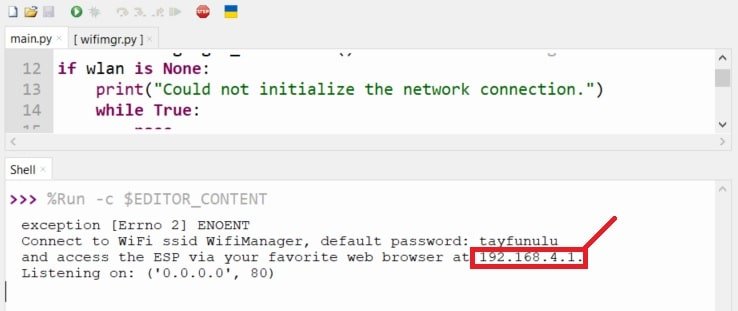
To see Wi-Fi manager demo, after upload wifimgr.py and main.py files to Raspberry Pi Pico W, run main.py script by clicking on run current script button in Thonny IDE:
After that, you will see this message on shell console. Thats means Raspberry Pi Pico W board has setup as a access point and started broadcasting WifiManager ssid.
Now connect to soft access point using either your desktop computer or mobile phone. Open Wi-Fi settings in your mobile and you will see WifiManager as wireless connection.

On laptop:
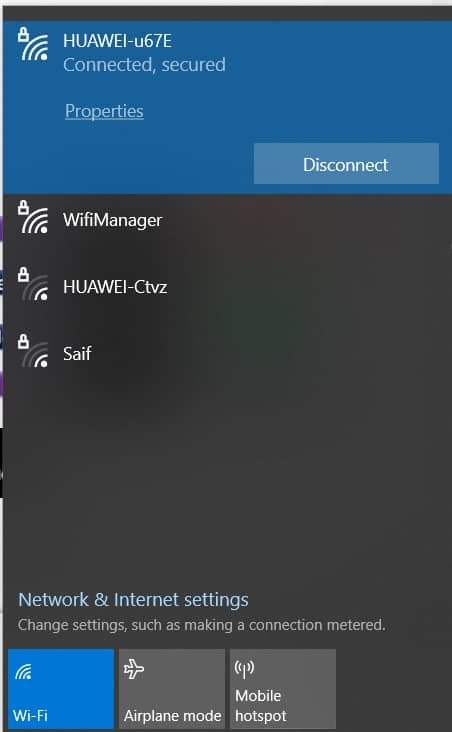
Connect to Wi-Fi manager by using a default password tayfunulu.

After successfully connecting with WiFiManager, open any web browser and type the IP address 192.168.4.1. You will see the following page of Wi-Fi manage which shows SSIDs of all near by access points. You can choose the one which belongs to your router and enter password to connect.
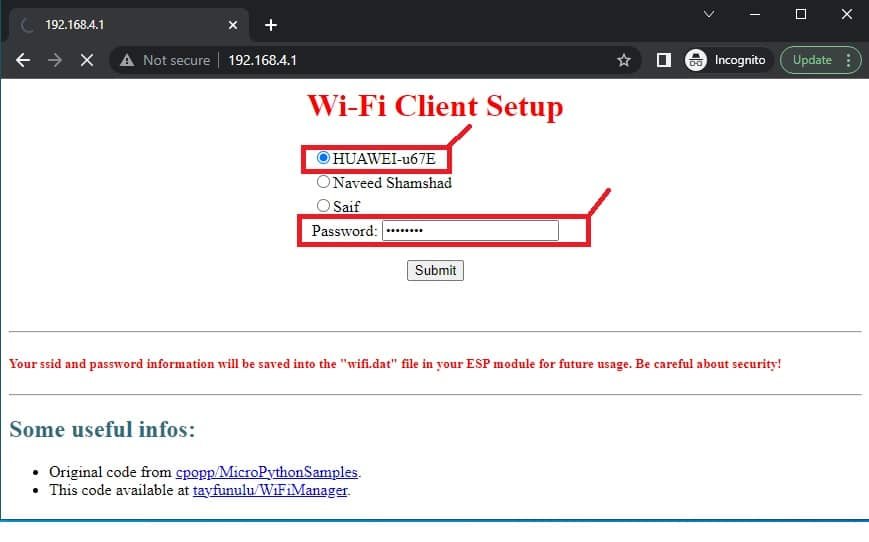
Select your network and enter the password in password window. After that press enter button. You will get the message that the Raspberry Pi Pico W has successfully connected to a Wi-Fi network.

That means our Raspberry Pi Pico W board has successfully connected to Wi-Fi network and it has setup in station mode. Now Raspberry Pi Pico W will work in station mode.

Now again connect your desktop computer or mobile phone with your local network that is router and paste the IP address in your web browser.
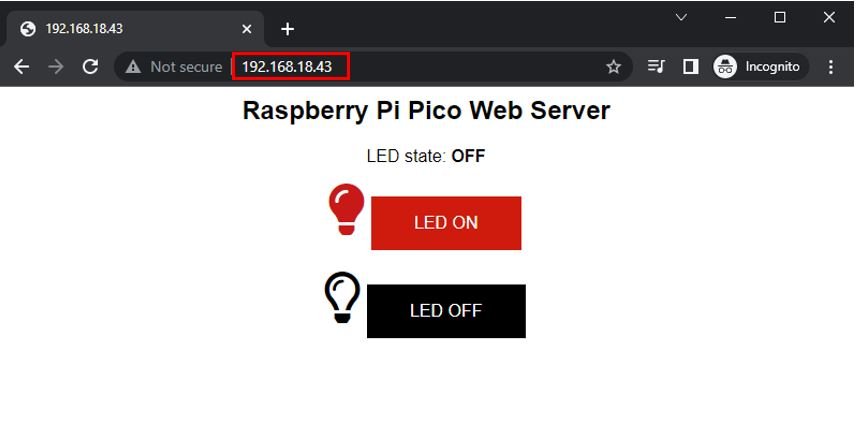
You will see this web page in your web browser which control GPIO25 of Raspberry Pi Pico W.
Video demo:
In summary
By using the Wi-Fi manager library, we do not have to hardcode our WIFI credentials in MicroPython script. WiFi-Manager library sets the Raspberry Pi Pico W in soft access point mode and displays available network connections on a web page. It will let you select your network and connect to it using its name and password. Once your Raspberry Pi Pico W board connected to the network, it will automatically work in station mode.
If you find this tutorial useful, you can read our MicroPython web server project here:
On a Pi Pico W I get this error message:
>>> %Run -c $EDITOR_CONTENT
exception [Errno 2] ENOENT
Traceback (most recent call last):
File “”, line 12, in
File “wifimgr.py”, line 61, in get_connection
File “wifimgr.py”, line 267, in start
ValueError: unknown config param
>>>
What did I do wrong?
From this line remove authmode=ap_authmode and try again
wlan_ap.config(essid=ap_ssid, password=ap_password, authmode=ap_authmode)
Thanks, now I can access the 192.168.4.1 Wi-Fi Client Setup web page. My router also appears, but after entering the password I always get this message:
“ESP could not connect to WiFi network”
Where am I making a mistake?
Thonny outputs this message:
exception [Errno 2] ENOENT
Connect to WiFi ssid WifiManager, default password: tayfunulu
and access the Pic W via your favorite web browser at 192.168.4.1.
Listening on: (‘0.0.0.0’, 80)
client connected from (‘192.168.4.16′, 59105)
Request is: b’GET / HTTP/1.1\r\nHost: 192.168.4.1\r\nConnection: keep-alive\r\nCache-Control: max-age=0\r\nUpgrade-Insecure-Requests: 1\r\nUser-Agent: Mozilla/5.0 (Windows NT 10.0; Win64; x64) AppleWebKit/537.36 (KHTML, like Gecko) Chrome/108.0.0.0 Safari/537.36\r\nAccept: text/html,application/xhtml+xml,application/xml;q=0.9,image/avif,image/webp,image/apng,*/*;q=0.8,application/signed-exchange;v=b3;q=0.9\r\nAccept-Encoding: gzip, deflate\r\nAccept-Language: de-DE,de;q=0.9,en-US;q=0.8,en;q=0.7\r\n\r\n’
URL is
client connected from (‘192.168.4.16’, 59106)
Request is: b’GET /favicon.ico HTTP/1.1\r\nHost: 192.168.4.1\r\nConnection: keep-alive\r\nUser-Agent: Mozilla/5.0 (Windows NT 10.0; Win64; x64) AppleWebKit/537.36 (KHTML, like Gecko) Chrome/108.0.0.0 Safari/537.36\r\nAccept: image/avif,image/webp,image/apng,image/svg+xml,image/*,*/*;q=0.8\r\nReferer: http://192.168.4.1/\r\nAccept-Encoding: gzip, deflate\r\nAccept-Language: de-DE,de;q=0.9,en-US;q=0.8,en;q=0.7\r\n\r\n’
URL is favicon.ico
client connected from (‘192.168.4.16’, 59113)
Request is: b’POST /configure HTTP/1.1\r\nHost: 192.168.4.1\r\nConnection: keep-alive\r\nContent-Length: 51\r\nCache-Control: max-age=0\r\nUpgrade-Insecure-Requests: 1\r\nOrigin: http://192.168.4.1\r\nContent-Type: application/x-www-form-urlencoded\r\nUser-Agent: Mozilla/5.0 (Windows NT 10.0; Win64; x64) AppleWebKit/537.36 (KHTML, like Gecko) Chrome/108.0.0.0 Safari/537.36\r\nAccept: text/html,application/xhtml+xml,application/xml;q=0.9,image/avif,image/webp,image/apng,*/*;q=0.8,application/signed-exchange;v=b3;q=0.9\r\nReferer: http://192.168.4.1/\r\nAccept-Encoding: gzip, deflate\r\nAccept-Language: de-DE,de;q=0.9,en-US;q=0.8,en;q=0.7\r\n\r\nssid=FRITZ%21Box+7490&password=49650940463438741703′
URL is configure
Trying to connect to FRITZ!Box+7490…
……………………………………………………………………………………….
Failed. Not Connected to: FRITZ!Box+7490
client connected from (‘192.168.4.16’, 59114)
Request is: b”
Can you check which version of MicroPython you loaded to Pico W. Because old versions have issues. Can you try with latest one?
I have this with the latest Micropython version: rp2-pico-w-20221220-unstable-v1.19.1-782-g699477d12.uf2
Tried it got the same error message
Hey Konrad, I know its been a while. But did you ever figure our this issue?
The code still has issues with special characters in SSIDs and passwords, which – unfortunately – makes it unusable in mose secure environments, where special characters are used for SSIDs and keys.
There are some other issues, too, but character handling is the most annoying…
Hi,
Your sample code uses the following to define the LED pin on the PICO W:
led = machine.Pin(2, machine.Pin.OUT)
That did not work for me. I used the following code which worked to turn the LED on:
led = machine.Pin(“LED”, machine.Pin.OUT)
Thank you for publishing such a wonderful article. I am a beginner, but I plan to try it out next week!