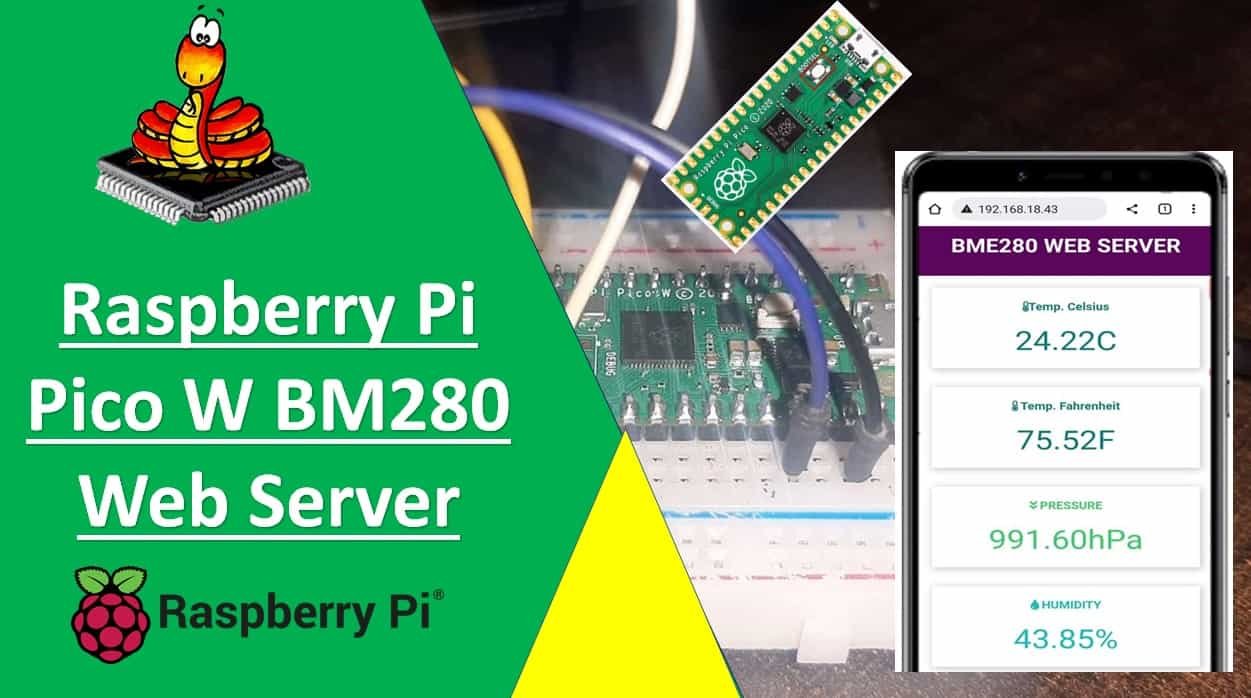
In this tutorial, we will create a Raspberry Pi Pico W web server using a BME280 sensor and MicroPython. BME280 is used to measure temperature in Celsius, the temperature in Fahrenheit, humidity, and Pressure. This web server will act as a weather station as it will show temperature, humidity, and pressure readings on the web page using MicroPython.
Recommended Components
The following components are used in this project or are helpful for getting started with Raspberry Pi Pico development.
| Component | How it’s used in this project | Buy on Amazon |
|---|---|---|
| Raspberry Pi Pico W | The Wi-Fi-enabled RP2040 board serving the weather web page. | Check Price |
| BME280 Sensor | Temperature, humidity, and pressure sensor shown on the web page. | Check Price |
| Breadboard | Solderless breadboard for wiring the sensor to the board. | Check Price |
| Jumper Wires | Connecting wires for the I2C and power connections. | Check Price |
As an Amazon Associate we earn from qualifying purchases. Prices and availability are accurate as of the date/time indicated and are subject to change.
We will use MicroPython firmware to build a responsive Raspberry Pi Pico W web server that can be accessed through any device which has a web browser, and the device should be connected to your local area network. That means the device should be connected to the same network to which the board is connected.
We have a similar guide with Raspberry Pi Pico and ESP8266:
Prerequisites
Before we start this tutorial, make sure you are familiar with and have the latest version Python 3 in your system, have set up MicoPython in Raspberry Pi Pico, and have a running Integrated Development Environment(IDE) in which we will be doing the programming. We will be using the same Thonny IDE as we have done previously in the getting started guide. If you have not followed our previous tutorial, you check here:
Getting Started with Raspberry Pi Pico W Wireless
BME280 Introduction
The BME280 sensor is used to measure readings regarding ambient temperature, barometric pressure, and relative humidity. It is mostly used in web and mobile applications where low power consumption is key. This sensor uses I2C or SPI to communicate data with the micro-controllers. Although there are several different versions of BME280 available in the market, the one we will be studying uses I2C communication protocol.
I2C means Inter-Integrated Circuit and works on the principle of the synchronous, multi-master multi-slave system. With BME280 and the microcontroller, the Raspberry Pi Pico W acts as a master, and the BME280 sensor as a slave because it is an external device, acts as a slave. The Raspberry Pi Pico W communicates with the BME280 sensor through the I2C protocol to give temperature, barometric pressure, and relative humidity readings.
Pinout Diagram
The figure below shows the BME280 sensor and its pinout.
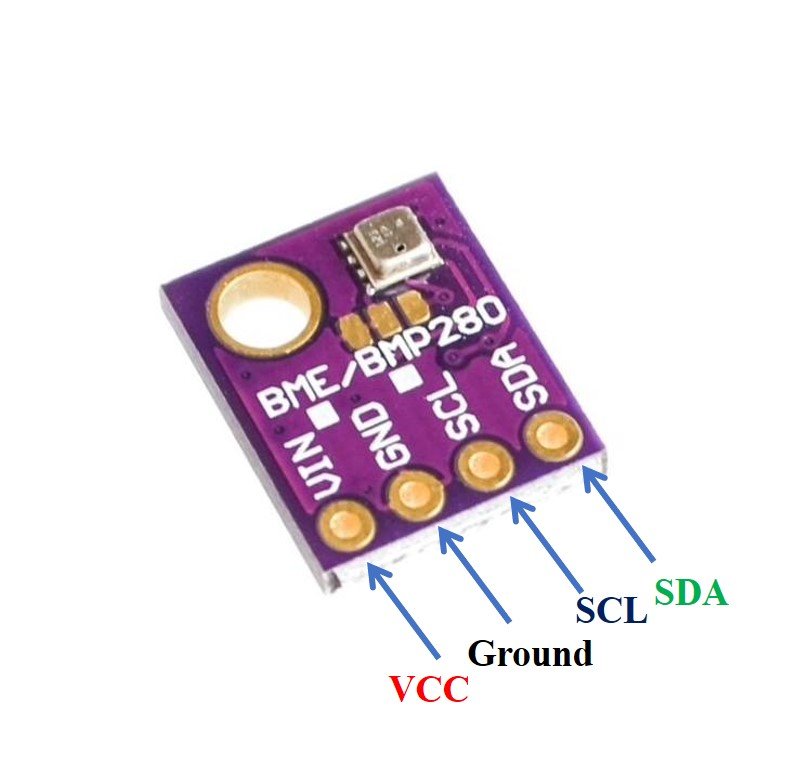
- VCC: connected with 3.3V
- SCL: used to generate the clock signal
- SDA: used in sending and receiving data
Interfacing Raspberry Pi Pico W with BME280
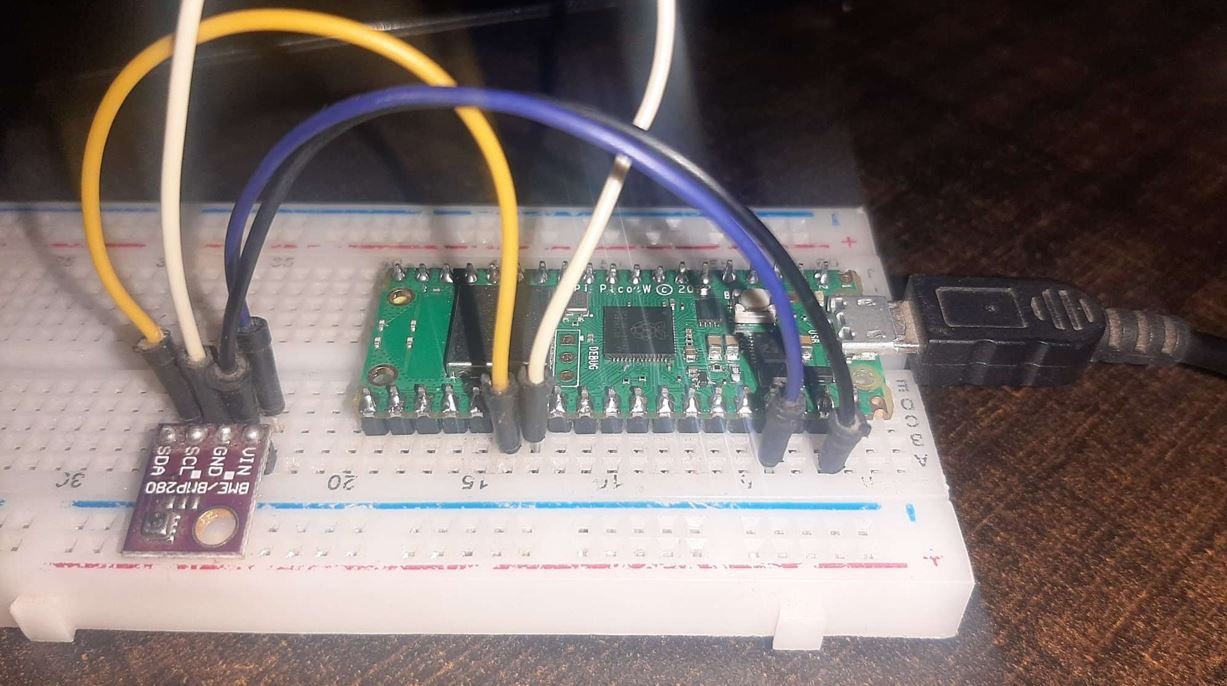
This section shows how to connect Raspberry Pi Pico with BME280 sensor.
We will require the following components:
- Raspberry Pi Pico
- BME280 Sensor
- Connecting Wires
- Breadboard
The connection of BME280 with the Raspberry Pi Pico W is very simple. We have to connect the VCC terminal with 3.3V, ground with the ground (common ground), SCL of the sensor with SCL of the board, and SDA of the sensor with the SDA pin of the board.
Raspberry Pi Pico W I2C Pins
Raspberry Pi Pico W has two I2C controllers. Both I2C controllers are accessible through GPIO pins of Raspberry Pi Pico. The following table shows the connection of GPIO pins with both I2C controllers. Each connection of the controller can be configured through multiple GPIO pins as shown in the figure. But before using an I2C controller, you should configure in software which GPIO pins you want to use with a specific I2C controller.
| I2C Controller | GPIO Pins |
| I2C0 – SDA | GP0/GP4/GP8/GP12/GP16/GP20 |
| I2C0 – SCL | GP1/GP5/GP9/GP13/GP17/GP21 |
| I2C1 – SDA | GP2/GP6/GP10/GP14/GP18/GP26 |
| I2C1 – SCL | GP3/GP7/GP11/GP15/GP19/GP27 |
The connections between the two devices which we are using can be seen below.
| BME280 | Raspberry Pi Pico W |
| VCC | 3.3V |
| SDA | GP20 (I2C0 SDA) |
| SCL | GP21 (I2C0 SCL) |
| GND | GND |
We have used the same connections as specified in the table above. However, you can use other combinations of SDA/SCL pins as well but remember to change them in the MicroPython script.
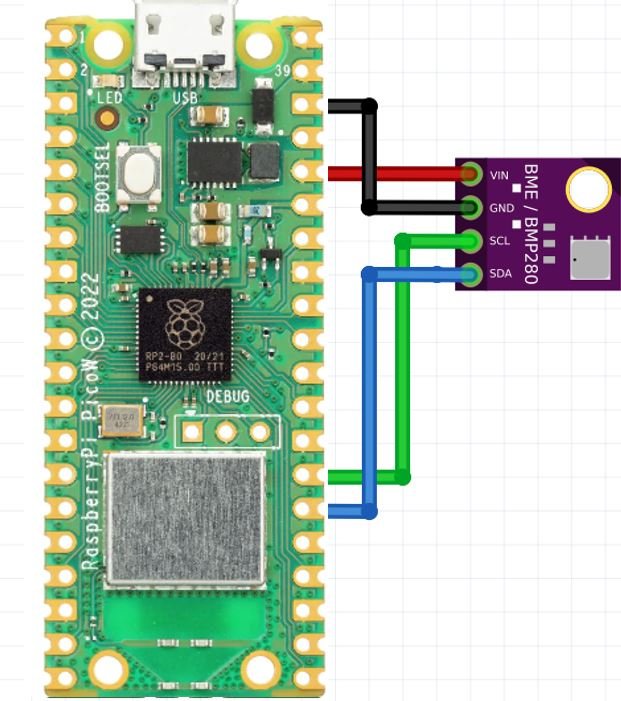
Connection Diagram Raspberry Pi Pico W with BME280
We have used the same connections as given in the tables above. All devices will be commonly grounded and will be powered with the same 3.3V pin of Raspberry Pi Pico W.
The diagram below shows the connection diagram of Raspberry Pi Pico W with BME280 sensor.
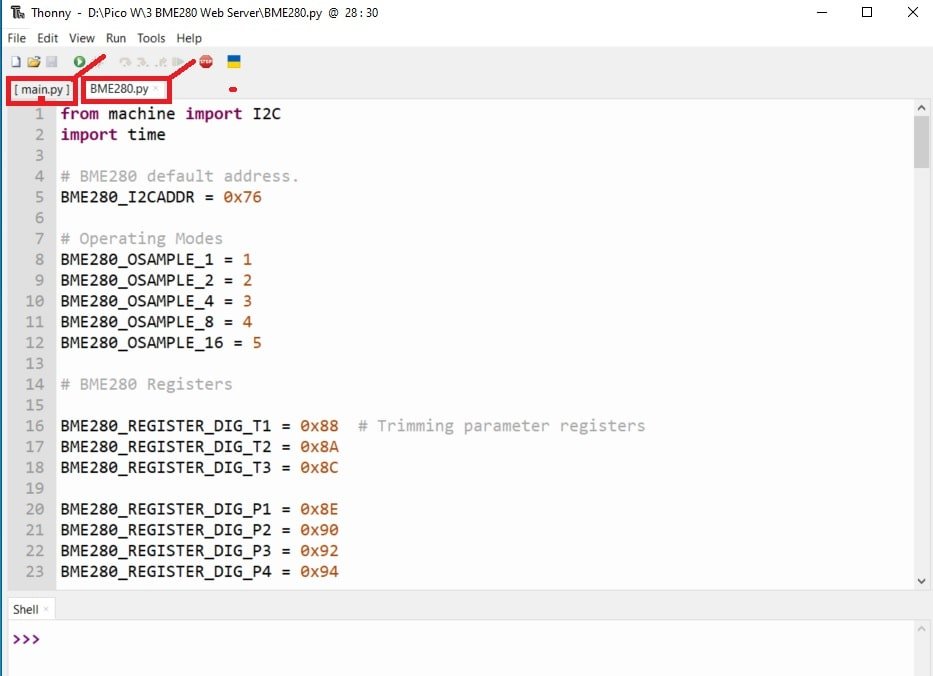
BME280 MicroPython Library
Create a file with name of BME280.py in Thonny IDE and copy following code to that file. This is a MicroPython library to get temperature, pressure and humidity readings from BME280.
from machine import I2C
import time

# BME280 default address.
BME280_I2CADDR = 0x76

# Operating Modes
BME280_OSAMPLE_1 = 1
BME280_OSAMPLE_2 = 2
BME280_OSAMPLE_4 = 3
BME280_OSAMPLE_8 = 4
BME280_OSAMPLE_16 = 5

# BME280 Registers

BME280_REGISTER_DIG_T1 = 0x88  # Trimming parameter registers
BME280_REGISTER_DIG_T2 = 0x8A
BME280_REGISTER_DIG_T3 = 0x8C

BME280_REGISTER_DIG_P1 = 0x8E
BME280_REGISTER_DIG_P2 = 0x90
BME280_REGISTER_DIG_P3 = 0x92
BME280_REGISTER_DIG_P4 = 0x94
BME280_REGISTER_DIG_P5 = 0x96
BME280_REGISTER_DIG_P6 = 0x98
BME280_REGISTER_DIG_P7 = 0x9A
BME280_REGISTER_DIG_P8 = 0x9C
BME280_REGISTER_DIG_P9 = 0x9E

BME280_REGISTER_DIG_H1 = 0xA1
BME280_REGISTER_DIG_H2 = 0xE1
BME280_REGISTER_DIG_H3 = 0xE3
BME280_REGISTER_DIG_H4 = 0xE4
BME280_REGISTER_DIG_H5 = 0xE5
BME280_REGISTER_DIG_H6 = 0xE6
BME280_REGISTER_DIG_H7 = 0xE7

BME280_REGISTER_CHIPID = 0xD0
BME280_REGISTER_VERSION = 0xD1
BME280_REGISTER_SOFTRESET = 0xE0

BME280_REGISTER_CONTROL_HUM = 0xF2
BME280_REGISTER_CONTROL = 0xF4
BME280_REGISTER_CONFIG = 0xF5
BME280_REGISTER_PRESSURE_DATA = 0xF7
BME280_REGISTER_TEMP_DATA = 0xFA
BME280_REGISTER_HUMIDITY_DATA = 0xFD


class Device:
  """Class for communicating with an I2C device.

  Allows reading and writing 8-bit, 16-bit, and byte array values to
  registers on the device."""

  def __init__(self, address, i2c):
    """Create an instance of the I2C device at the specified address using
    the specified I2C interface object."""
    self._address = address
    self._i2c = i2c

  def writeRaw8(self, value):
    """Write an 8-bit value on the bus (without register)."""
    value = value & 0xFF
    self._i2c.writeto(self._address, value)

  def write8(self, register, value):
    """Write an 8-bit value to the specified register."""
    b=bytearray(1)
    b[0]=value & 0xFF
    self._i2c.writeto_mem(self._address, register, b)

  def write16(self, register, value):
    """Write a 16-bit value to the specified register."""
    value = value & 0xFFFF
    b=bytearray(2)
    b[0]= value & 0xFF
    b[1]= (value>>8) & 0xFF
    self.i2c.writeto_mem(self._address, register, value)

  def readRaw8(self):
    """Read an 8-bit value on the bus (without register)."""
    return int.from_bytes(self._i2c.readfrom(self._address, 1),'little') & 0xFF

  def readU8(self, register):
    """Read an unsigned byte from the specified register."""
    return int.from_bytes(
        self._i2c.readfrom_mem(self._address, register, 1),'little') & 0xFF

  def readS8(self, register):
    """Read a signed byte from the specified register."""
    result = self.readU8(register)
    if result > 127:
      result -= 256
    return result

  def readU16(self, register, little_endian=True):
    """Read an unsigned 16-bit value from the specified register, with the
    specified endianness (default little endian, or least significant byte
    first)."""
    result = int.from_bytes(
        self._i2c.readfrom_mem(self._address, register, 2),'little') & 0xFFFF
    if not little_endian:
      result = ((result << 8) & 0xFF00) + (result >> 8)
    return result

  def readS16(self, register, little_endian=True):
    """Read a signed 16-bit value from the specified register, with the
    specified endianness (default little endian, or least significant byte
    first)."""
    result = self.readU16(register, little_endian)
    if result > 32767:
      result -= 65536
    return result

  def readU16LE(self, register):
    """Read an unsigned 16-bit value from the specified register, in little
    endian byte order."""
    return self.readU16(register, little_endian=True)

  def readU16BE(self, register):
    """Read an unsigned 16-bit value from the specified register, in big
    endian byte order."""
    return self.readU16(register, little_endian=False)

  def readS16LE(self, register):
    """Read a signed 16-bit value from the specified register, in little
    endian byte order."""
    return self.readS16(register, little_endian=True)

  def readS16BE(self, register):
    """Read a signed 16-bit value from the specified register, in big
    endian byte order."""
    return self.readS16(register, little_endian=False)


class BME280:
  def __init__(self, mode=BME280_OSAMPLE_1, address=BME280_I2CADDR, i2c=None,
               **kwargs):
    # Check that mode is valid.
    if mode not in [BME280_OSAMPLE_1, BME280_OSAMPLE_2, BME280_OSAMPLE_4,
                    BME280_OSAMPLE_8, BME280_OSAMPLE_16]:
        raise ValueError(
            'Unexpected mode value {0}. Set mode to one of '
            'BME280_ULTRALOWPOWER, BME280_STANDARD, BME280_HIGHRES, or '
            'BME280_ULTRAHIGHRES'.format(mode))
    self._mode = mode
    # Create I2C device.
    if i2c is None:
      raise ValueError('An I2C object is required.')
    self._device = Device(address, i2c)
    # Load calibration values.
    self._load_calibration()
    self._device.write8(BME280_REGISTER_CONTROL, 0x3F)
    self.t_fine = 0

  def _load_calibration(self):

    self.dig_T1 = self._device.readU16LE(BME280_REGISTER_DIG_T1)
    self.dig_T2 = self._device.readS16LE(BME280_REGISTER_DIG_T2)
    self.dig_T3 = self._device.readS16LE(BME280_REGISTER_DIG_T3)

    self.dig_P1 = self._device.readU16LE(BME280_REGISTER_DIG_P1)
    self.dig_P2 = self._device.readS16LE(BME280_REGISTER_DIG_P2)
    self.dig_P3 = self._device.readS16LE(BME280_REGISTER_DIG_P3)
    self.dig_P4 = self._device.readS16LE(BME280_REGISTER_DIG_P4)
    self.dig_P5 = self._device.readS16LE(BME280_REGISTER_DIG_P5)
    self.dig_P6 = self._device.readS16LE(BME280_REGISTER_DIG_P6)
    self.dig_P7 = self._device.readS16LE(BME280_REGISTER_DIG_P7)
    self.dig_P8 = self._device.readS16LE(BME280_REGISTER_DIG_P8)
    self.dig_P9 = self._device.readS16LE(BME280_REGISTER_DIG_P9)

    self.dig_H1 = self._device.readU8(BME280_REGISTER_DIG_H1)
    self.dig_H2 = self._device.readS16LE(BME280_REGISTER_DIG_H2)
    self.dig_H3 = self._device.readU8(BME280_REGISTER_DIG_H3)
    self.dig_H6 = self._device.readS8(BME280_REGISTER_DIG_H7)

    h4 = self._device.readS8(BME280_REGISTER_DIG_H4)
    h4 = (h4 << 24) >> 20
    self.dig_H4 = h4 | (self._device.readU8(BME280_REGISTER_DIG_H5) & 0x0F)

    h5 = self._device.readS8(BME280_REGISTER_DIG_H6)
    h5 = (h5 << 24) >> 20
    self.dig_H5 = h5 | (
        self._device.readU8(BME280_REGISTER_DIG_H5) >> 4 & 0x0F)

  def read_raw_temp(self):
    """Reads the raw (uncompensated) temperature from the sensor."""
    meas = self._mode
    self._device.write8(BME280_REGISTER_CONTROL_HUM, meas)
    meas = self._mode << 5 | self._mode << 2 | 1
    self._device.write8(BME280_REGISTER_CONTROL, meas)
    sleep_time = 1250 + 2300 * (1 << self._mode)

    sleep_time = sleep_time + 2300 * (1 << self._mode) + 575
    sleep_time = sleep_time + 2300 * (1 << self._mode) + 575
    time.sleep_us(sleep_time)  # Wait the required time
    msb = self._device.readU8(BME280_REGISTER_TEMP_DATA)
    lsb = self._device.readU8(BME280_REGISTER_TEMP_DATA + 1)
    xlsb = self._device.readU8(BME280_REGISTER_TEMP_DATA + 2)
    raw = ((msb << 16) | (lsb << 8) | xlsb) >> 4
    return raw

  def read_raw_pressure(self):
    """Reads the raw (uncompensated) pressure level from the sensor."""
    """Assumes that the temperature has already been read """
    """i.e. that enough delay has been provided"""
    msb = self._device.readU8(BME280_REGISTER_PRESSURE_DATA)
    lsb = self._device.readU8(BME280_REGISTER_PRESSURE_DATA + 1)
    xlsb = self._device.readU8(BME280_REGISTER_PRESSURE_DATA + 2)
    raw = ((msb << 16) | (lsb << 8) | xlsb) >> 4
    return raw

  def read_raw_humidity(self):
    """Assumes that the temperature has already been read """
    """i.e. that enough delay has been provided"""
    msb = self._device.readU8(BME280_REGISTER_HUMIDITY_DATA)
    lsb = self._device.readU8(BME280_REGISTER_HUMIDITY_DATA + 1)
    raw = (msb << 8) | lsb
    return raw

  def read_temperature(self):
    """Get the compensated temperature in 0.01 of a degree celsius."""
    adc = self.read_raw_temp()
    var1 = ((adc >> 3) - (self.dig_T1 << 1)) * (self.dig_T2 >> 11)
    var2 = ((
        (((adc >> 4) - self.dig_T1) * ((adc >> 4) - self.dig_T1)) >> 12) *
        self.dig_T3) >> 14
    self.t_fine = var1 + var2
    return (self.t_fine * 5 + 128) >> 8

  def read_pressure(self):
    """Gets the compensated pressure in Pascals."""
    adc = self.read_raw_pressure()
    var1 = self.t_fine - 128000
    var2 = var1 * var1 * self.dig_P6
    var2 = var2 + ((var1 * self.dig_P5) << 17)
    var2 = var2 + (self.dig_P4 << 35)
    var1 = (((var1 * var1 * self.dig_P3) >> 8) +
            ((var1 * self.dig_P2) >> 12))
    var1 = (((1 << 47) + var1) * self.dig_P1) >> 33
    if var1 == 0:
      return 0
    p = 1048576 - adc
    p = (((p << 31) - var2) * 3125) // var1
    var1 = (self.dig_P9 * (p >> 13) * (p >> 13)) >> 25
    var2 = (self.dig_P8 * p) >> 19
    return ((p + var1 + var2) >> 8) + (self.dig_P7 << 4)

  def read_humidity(self):
    adc = self.read_raw_humidity()
    # print 'Raw humidity = {0:d}'.format (adc)
    h = self.t_fine - 76800
    h = (((((adc << 14) - (self.dig_H4 << 20) - (self.dig_H5 * h)) +
         16384) >> 15) * (((((((h * self.dig_H6) >> 10) * (((h *
                          self.dig_H3) >> 11) + 32768)) >> 10) + 2097152) *
                          self.dig_H2 + 8192) >> 14))
    h = h - (((((h >> 15) * (h >> 15)) >> 7) * self.dig_H1) >> 4)
    h = 0 if h < 0 else h
    h = 419430400 if h > 419430400 else h
    return h >> 12

  @property
  def temperature(self):
    "Return the temperature in degrees."
    t = self.read_temperature()
    ti = t // 100
    td = t - ti * 100
    return "{}.{:02d}C".format(ti, td)

  @property
  def pressure(self):
    "Return the temperature in hPa."
    p = self.read_pressure() // 256
    pi = p // 100
    pd = p - pi * 100
    return "{}.{:02d}hPa".format(pi, pd)

  @property
  def humidity(self):
    "Return the humidity in percent."
    h = self.read_humidity()
    hi = h // 1024
    hd = h * 100 // 1024 - hi * 100
    return "{}.{:02d}%".format(hi, hd)
MicroPython Script Raspberry Pi Pico BME280 Web Server
similarly, create main.py file and save following code into that file.
try:
  import usocket as socket
except:
  import socket

from time import sleep

from machine import Pin, I2C
import network

import gc
gc.collect()

import BME280

i2c = I2C(0,sda=Pin(20), scl=Pin(21), freq=400000)    #initializing the I2C method

ssid = 'HUAWEI-u67E'
password = '4uF77R2n'

station = network.WLAN(network.STA_IF)

station.active(True)
station.connect(ssid, password)

while station.isconnected() == False:
  pass

print('Connection successful')
print(station.ifconfig())

def web_page():
  bme = BME280.BME280(i2c=i2c)

  html = """<html>
<head>
  <title>BME280 Web Server</title>
  <meta http-equiv="refresh" content="10">
  <meta name="viewport" content="width=device-width, initial-scale=1">
  <link rel="stylesheet" href="https://use.fontawesome.com/releases/v5.7.2/css/all.css" integrity="sha384-fnmOCqbTlWIlj8LyTjo7mOUStjsKC4pOpQbqyi7RrhN7udi9RwhKkMHpvLbHG9Sr" crossorigin="anonymous">
  <link rel="icon" href="data:,">
  <style>
    html {font-family: Arial; display: inline-block; text-align: center;}
    p {  font-size: 1.2rem;}
    body {  margin: 0;}
    .topnav { overflow: hidden; background-color: #5c055c; color: white; font-size: 1.7rem; }
    .content { padding: 20px; }
    .card { background-color: white; box-shadow: 2px 2px 12px 1px rgba(140,140,140,.5); }
    .cards { max-width: 700px; margin: 0 auto; display: grid; grid-gap: 2rem; grid-template-columns: repeat(auto-fit, minmax(300px, 1fr)); }
    .reading { font-size: 2.8rem; }
    .card.temperature { color: #0e7c7b; }
    .card.humidity { color: #17bebb; }
    .card.pressure { color: #3fca6b; }
  </style>
</head>
<body>
  <div class="topnav">
    <h3>BME280 WEB SERVER</h3>
  </div>
  <div class="content">
    <div class="cards">
      <div class="card temperature">
        <h4><i class="fas fa-thermometer-half"></i>Temp. Celsius</h4><p><span class="reading">""" + str(bme.temperature) + """</p>
      </div>
      <div class="card temperature">
        <h4><i class="fas fa-thermometer-half"></i> Temp. Fahrenheit</h4><p><span class="reading">""" + str(round((bme.read_temperature()/100.0) * (9/5) + 32, 2))  + """F</p>
      </div>
      <div class="card pressure">
        <h4><i class="fas fa-angle-double-down"></i> PRESSURE</h4><p><span class="reading">""" + str(bme.pressure) + """</p>
      </div>
      <div class="card humidity">
        <h4><i class="fas fa-tint"></i> HUMIDITY</h4><p><span class="reading">""" + str(bme.humidity) + """</p>
      </div>
    </div>
  </div>
</body>

</html>"""
  return html

s = socket.socket(socket.AF_INET, socket.SOCK_STREAM)
s.bind(('', 80))
s.listen(5)

while True:
  try:
    if gc.mem_free() < 102000:
      gc.collect()
    conn, addr = s.accept()
    conn.settimeout(3.0)
    print('Got a connection from %s' % str(addr))
    request = conn.recv(1024)
    conn.settimeout(None)
    request = str(request)
    print('Content = %s' % request)
    response = web_page()
    conn.send('HTTP/1.1 200 OK\n')
    conn.send('Content-Type: text/html\n')
    conn.send('Connection: close\n\n')
    conn.sendall(response)
    conn.close()
  except OSError as e:
    conn.close()
    print('Connection closed')
Note: Make sure to change the Wi-Fi name and password to the one you are currently using.
How the Code Works?
In this section, we will discuss the working of the MicroPython script to build the BME280 web server.
In this code, we first import all the modules and from the modules, we import the necessary classes. After that, we define the I2C pins for Raspberry Pi Pico W board. We have set the default I2C GPIO pins. Next, we will connect to the network.
Import MicroPython Libraries
First, we will use sockets and the socket API of Python to develop our web server. Hence, we will import the socket library first.
try:
  import usocket as socket
except:
  import socket
Now, we will import the sleep class from the time module to include delays. We will also import I2C and Pin class from the machine module.
from time import sleep
from machine import Pin, I2C
In these lines, we are calling the garbage collector. Object memories which are no longer used by the system are reclaimed through this.
import gc.
gc.collect()Defining Raspberry Pi Pico W GPIO Pins for BME280
Next, we will initialize the I2C GPIO pins for SCL and SDA respectively. We have used the I2C0 SCL and I2C0 SDA pins.
We have created an I2C() method which takes in four parameters. The first parameter is the I2C channel that we are using. The second parameter specifies the I2C GPIO pin of the board which is connected to the SDA line. The third parameter specifies the I2C GPIO pin of the board which is connected to the SCL line. The last parameter is the frequency connection.
We are setting the SCL on pin 21 and the SDA on pin 20.
i2c = I2C(0,sda=Pin(20), scl=Pin(21), freq=400000)Connect to Wi-Fi Network
Make sure you enter your Wi-Fi name in SSID and your wi-fi password as well so that your Pico W board connects with your local network.
ssid = 'Enter your SSID name'
password = 'Enter your password here'
In these lines, we are setting our Pico W as a Wi-Fi station.
station = network.WLAN(network.STA_IF)In order to activate our Wi-Fi station, we write the following line:
station.active(True)These next lines, authenticate our Wi-Fi and password and only proceeds with the program code when the Raspberry Pi Pico W board is connected to the Wi-Fi network.
station.connect(ssid, password)
while station.isconnected() == False:
pass
Create Web Page to Display BM280 Sensor Readings
The main part of our MicroPython script starts with defining a web_page(). In order to build our web page, we have to create an HTML document that sets up the web page. This HTML variable is returned through the web_page function which we will discuss later.
def web_page():Inside the web_page() function, we create an object of the BME280 method named bme and specify the I2C communication protocol to read data from a sensor.
bme = BME280.BME280(i2c=i2c)HTML and CSS File
In this HTML document, we use cards, paragraphs, links, icons, headings and title tags to create a web page. This web page displays temperature, humidity and pressure readings of BME280 sensor.
  html = """<html>
<head>
  <title>BME280 Web Server</title>
  <meta http-equiv="refresh" content="10">
  <meta name="viewport" content="width=device-width, initial-scale=1">
  <link rel="stylesheet" href="https://use.fontawesome.com/releases/v5.7.2/css/all.css" integrity="sha384-fnmOCqbTlWIlj8LyTjo7mOUStjsKC4pOpQbqyi7RrhN7udi9RwhKkMHpvLbHG9Sr" crossorigin="anonymous">
  <link rel="icon" href="data:,">
  <style>
    html {font-family: Arial; display: inline-block; text-align: center;}
    p {  font-size: 1.2rem;}
    body {  margin: 0;}
    .topnav { overflow: hidden; background-color: #5c055c; color: white; font-size: 1.7rem; }
    .content { padding: 20px; }
    .card { background-color: white; box-shadow: 2px 2px 12px 1px rgba(140,140,140,.5); }
    .cards { max-width: 700px; margin: 0 auto; display: grid; grid-gap: 2rem; grid-template-columns: repeat(auto-fit, minmax(300px, 1fr)); }
    .reading { font-size: 2.8rem; }
    .card.temperature { color: #0e7c7b; }
    .card.humidity { color: #17bebb; }
    .card.pressure { color: #3fca6b; }
  </style>
</head>
<body>
  <div class="topnav">
    <h3>BME280 WEB SERVER</h3>
  </div>
  <div class="content">
    <div class="cards">
      <div class="card temperature">
        <h4><i class="fas fa-thermometer-half"></i>Temp. Celsius</h4><p><span class="reading">""" + str(bme.temperature) + """</p>
      </div>
      <div class="card temperature">
        <h4><i class="fas fa-thermometer-half"></i> Temp. Fahrenheit</h4><p><span class="reading">""" + str(round((bme.read_temperature()/100.0) * (9/5) + 32, 2))  + """F</p>
      </div>
      <div class="card pressure">
        <h4><i class="fas fa-angle-double-down"></i> PRESSURE</h4><p><span class="reading">""" + str(bme.pressure) + """</p>
      </div>
      <div class="card humidity">
        <h4><i class="fas fa-tint"></i> HUMIDITY</h4><p><span class="reading">""" + str(bme.humidity) + """</p>
      </div>
    </div>
  </div>
</body>

</html>"""
This meta-tag http-equiv provides attributes to HTTP header. The http-equiv attribute takes many values or information to simulate header response. In this example, we use the http-equiv attribute to refresh the content of the web page after every specified time interval. Users aren’t required to refresh the web page to get updated sensor values. This line forces the HTML page to refresh itself after every 10 seconds.
<meta http-equiv="refresh" content="10">We have explained rest of the HTML and CSS part of in our previously published articles. You can read these articles here:
- ESP32/ESP8266 MicroPython Web Server – Control Outputs
- MicroPython: DHT11/DHT22 Web Server with ESP32/ESP8266
- MicroPython: DS18B20 Web Server with ESP32/ESP8266(Weather Station)
Web Server with MicroPython Socket API
In these lines of code, we create a socket object called ‘s’. This is formed by creating a socket and stating its type.
s = socket.socket(socket.AF_INET, socket.SOCK_STREAM)By using the bind() method, we will bind the socket with an address. We are passing two parameters. The first one is an empty string ‘ ‘, which specifies our microcontroller and the second parameter is the port which we have stated as ’80’.
s.bind(('', 80))Now we are creating a socket used for listening. We have passed ‘5’ as the parameter which means that 5 is the maximum number of queued connections.
s.listen(5)Next, we use an infinite loop through which we will check when a user connects to the web server. In order to accept the connection, the accept() method is used. A new socket object is saved in the conn variable and it also saves the address there.
while True:
  try:
    if gc.mem_free() < 102000:
      gc.collect()
    conn, addr = s.accept()
    conn.settimeout(3.0)
    print('Got a connection from %s' % str(addr))
By using send() and recv() methods, we exchange the data between the user and the web server. A request variable is created which saves it in the newly created socket.
request = conn.recv(1024)
conn.settimeout(None)
request = str(request)
Prints whatever data is present in the request variable.
print('Content = %s' % request)The variable ‘response’ contains the HTML text
response = web_page()By using send() and sendall() methods, we will be sending the response to the socket user.
    conn.send('HTTP/1.1 200 OK\n')
    conn.send('Content-Type: text/html\n')
    conn.send('Connection: close\n\n')
    conn.sendall(response)
This line closes the connection with the socket which was created.
conn.close()
except OSError as e:
conn.close()
print('Connection closed')
In summary, we created a web server with Raspberry Pi Pico W which could handle HTTP requests from a web client. Whenever the Pico W board received a request on its IP address, the program code creates a socket which in turn responds to the client request with an HTML page to display the current readings on the BME280 sensor regarding temperature, humidity, and pressure.
Raspberry Pi Pico W BME280 MicroPython Web Server Demo
After you have copied the above codes onto a BME280.py and main.py files, click the ‘Save’ icon to save your program code on your PC. Firstly save BME280.py and then save main.py. After that click on run button.
After you have saved the code, press the Run button to upload the code to your board. Before uploading code make sure the correct board is selected.
In the shell terminal of your IDE, you will be able to view the IP address after a successful connection gets established:

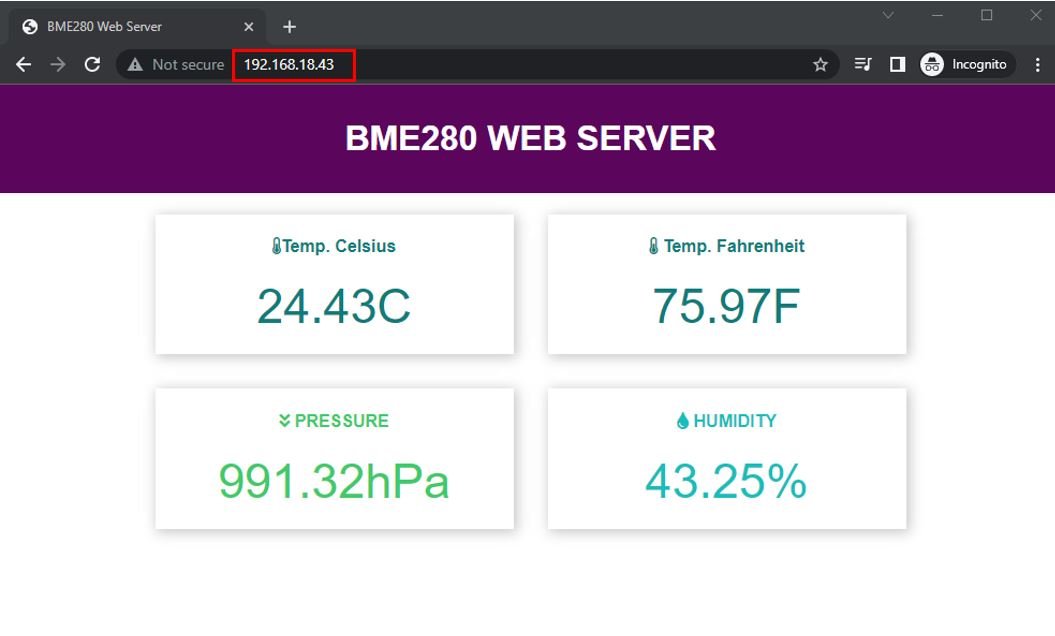
Now, open your web browser either on your laptop or mobile and type the IP address which we have found in the last step. As soon as you type the IP address on your web browser and hit enter, the Raspberry Pi Pico web server will receive an HTTP request.

You will see the web page with the latest temperature values in your web browser:
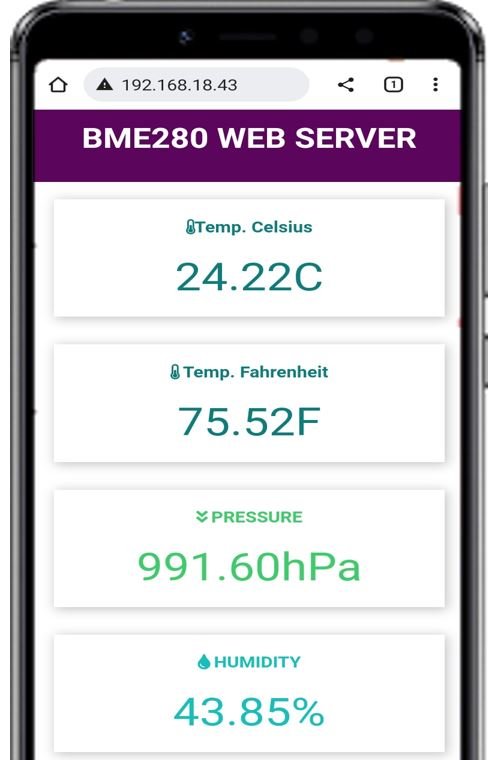
The web page viewed from a cell phone will look like this:
Video demo:
You may also like to read:
Den prøver jeg at lave. Har lavet med display og termometer. Men har ikke fået temperaturen på den html side jeg har lavet. !!!
Please check if BME280 is responding correctly.
Mange tak for svar. Jeg var lidt kortfattet. Jeg har lavet Pico w med webserver den tænder en led. samtidig samtidig kører en one vire temp føler men kan ikke få den vist på websiden. Jeg har bestilt et par BME280 og prøver den når den kommer fra Kina. jeg prøver at lave jeres tutoriel. Se min webside link til wejret.
Mhv. glædelig Jul fra Steen