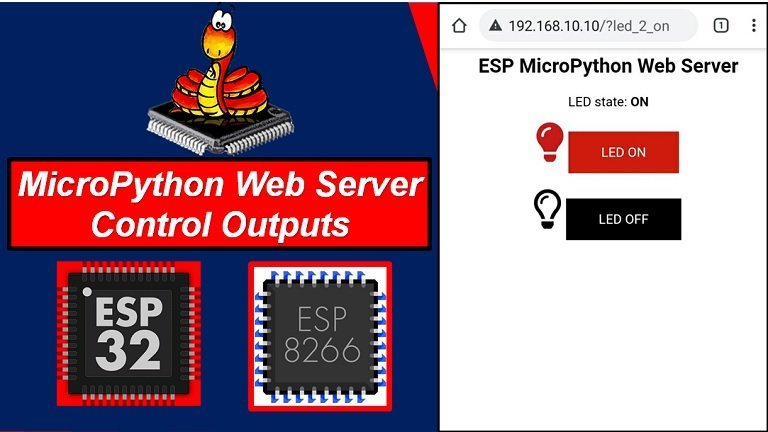
Learn to make a web server with MicroPython to control outputs using ESP32 and ESP8266 GPIO pins. In this tutorial, we will create a web server which contains an ON and OFF button. The ON and OFF button controls the LED connected to one of the GPIO pins of ESP32 or ESP8266. Furthermore, we will use the Socket and Networking API of MicroPython to create web server. MicroPython contains a sub implementation of related Python’s Socket and Network API.
Prerequisites
Before we start this lesson make sure you are familiar with and have the latest version of MicroPython firmware installed in your ESP boards and have a running Integrated Development Environment(IDE) in which we will be doing the programming. We will be using the same uPyCraft IDE as we have done previously when we learned how to blink and chase LEDs in microPython.
- Getting Started with MicroPython on ESP32 and ESP8266
- ESP32 and ESP8266 GPIO Programming with MicroPython – LED Blinking Example
If you are using Thonny IDE, you can check this getting started guide:
We will cover the following content in this MicroPython tutorial:
- How to create a web server using ESP32/ESP8266 and MicroPython
- Serving HTML and CSS based files to clients from ESP32/ESP8266 web server
- Control outputs from a web server with ESP32 and ESP8266
Create Web Server with ESP32/ESP8266 and MicroPython
To create a web server with ESP32 and ESP8266, we can use either soft access point or station mode as follows:
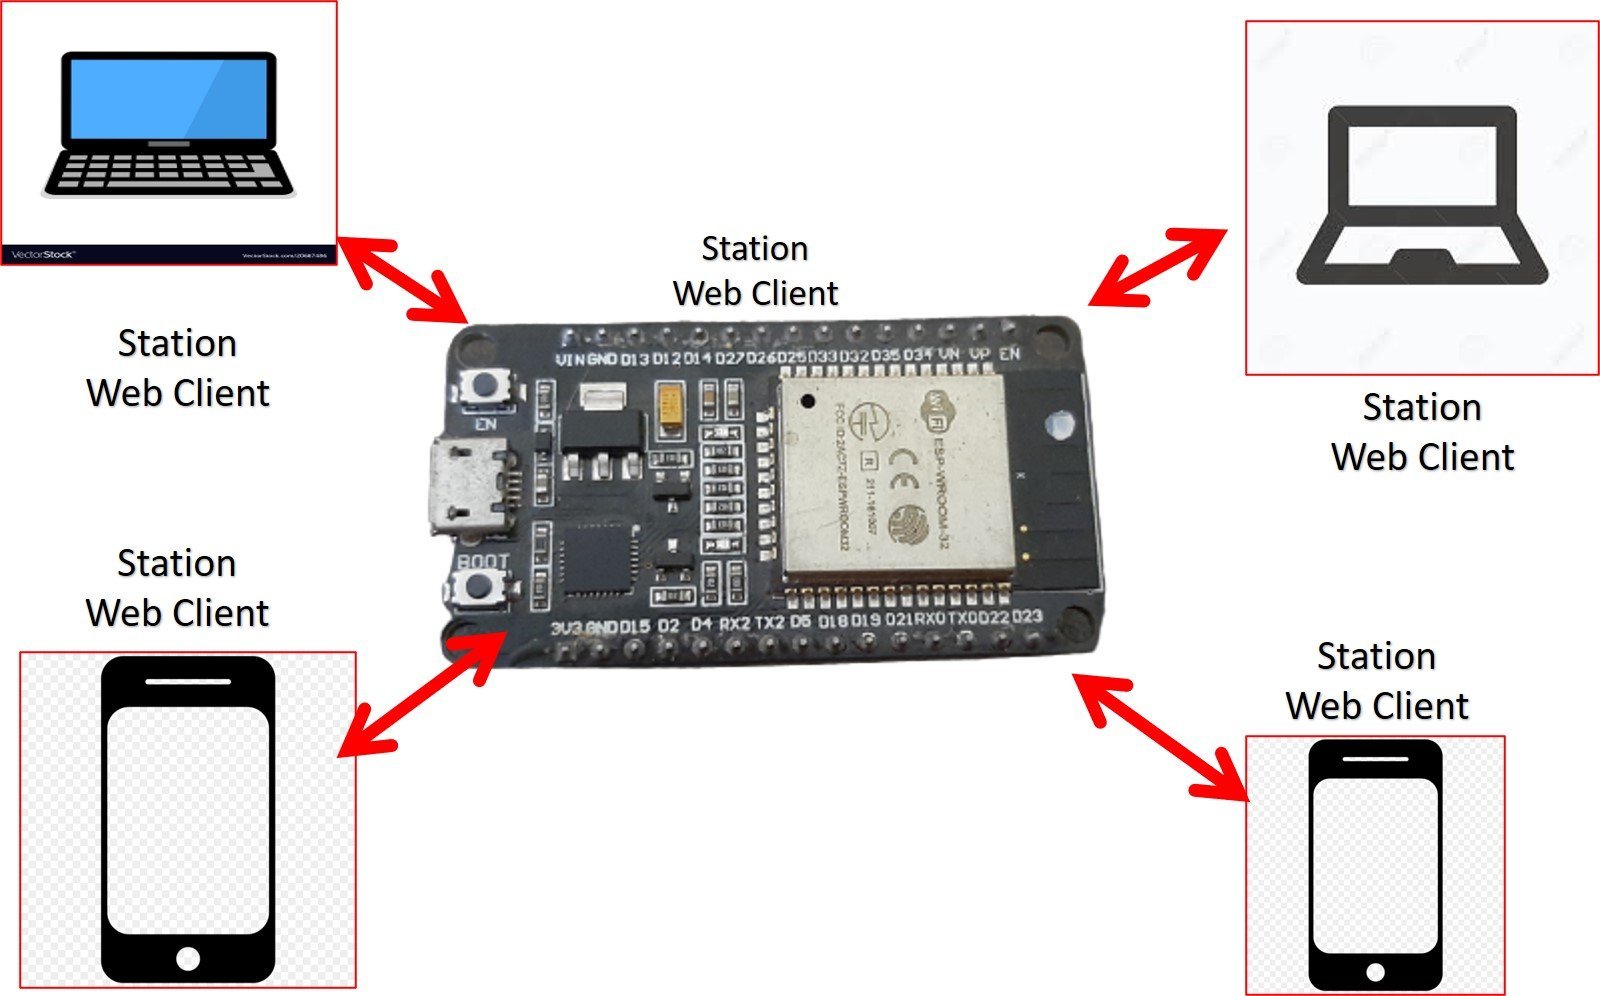
Station mode or STA
In this mode, ESP32 board connects to your WiFi network through a router. Therefore, the medium of communication between the web client (web browser) and ESP32/ESP8266 (web server) is the router. ESP32 boards get the IP address from the Wifi router. With this IP address, web clients can access the Web server through an existing local network.
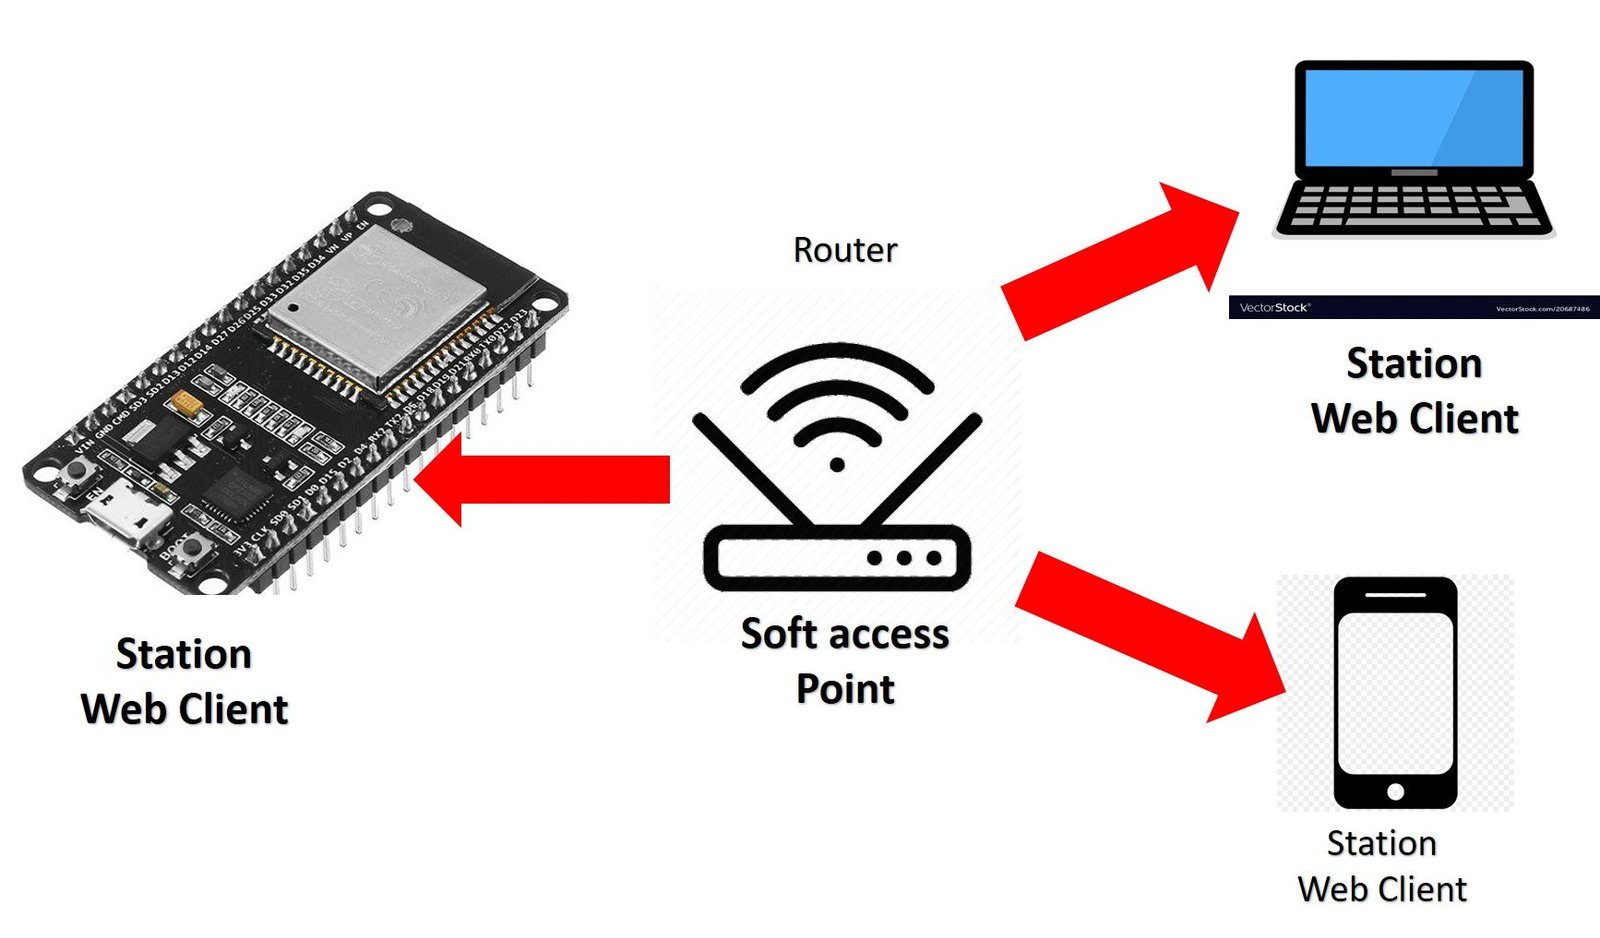
Soft Access Point mode
In this mode, ESP32/ESP8266 creates its own wireless WiFi network similar to your existing WiFi router. In this mode, we do not need to connect ESP32/ESP8266 to the WiFi network. Any user who wants to access the web server should first connect to this wireless WiFi network for ESP32 and ESP8266. Up to 5 devices can connect to this Wifi network created by ESP boards.
In this tutorial, we will use station mode to create a web server.
Creating Files for MicroPython Web Server
To create a web server with ESP32/ESP8266 using MicroPython, we need to create two MicroPython files such as boot.py and main.py. The boot.py file is a microPython script which runs once ESP32/ESP8266 boots.
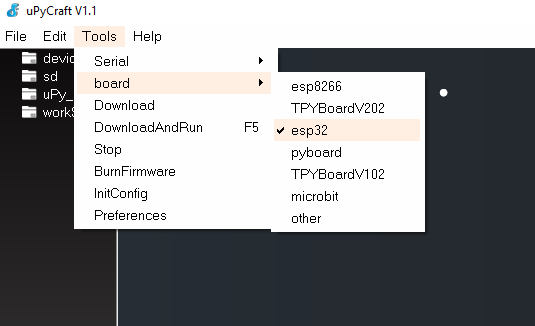
First connect ESP32 or ESP8266 boards with your computer. Select the serial port in uPyCraft IDE and go to Tools>Serial and select the COM port to which ESP32/ESP8266 board is connected.
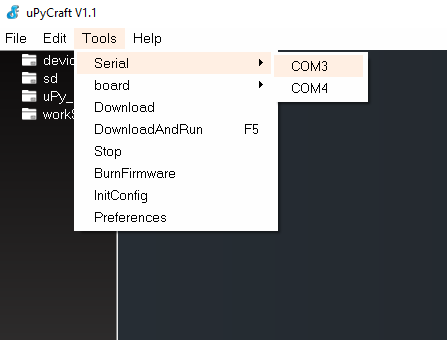
Besides serial port, you should also select the module, go to Tools>Board and select ESP32/ESP8266. Here you can see that two serial ports are showing in my case. Because we have connected both ESP32 and ESP8266 boards with my computer.
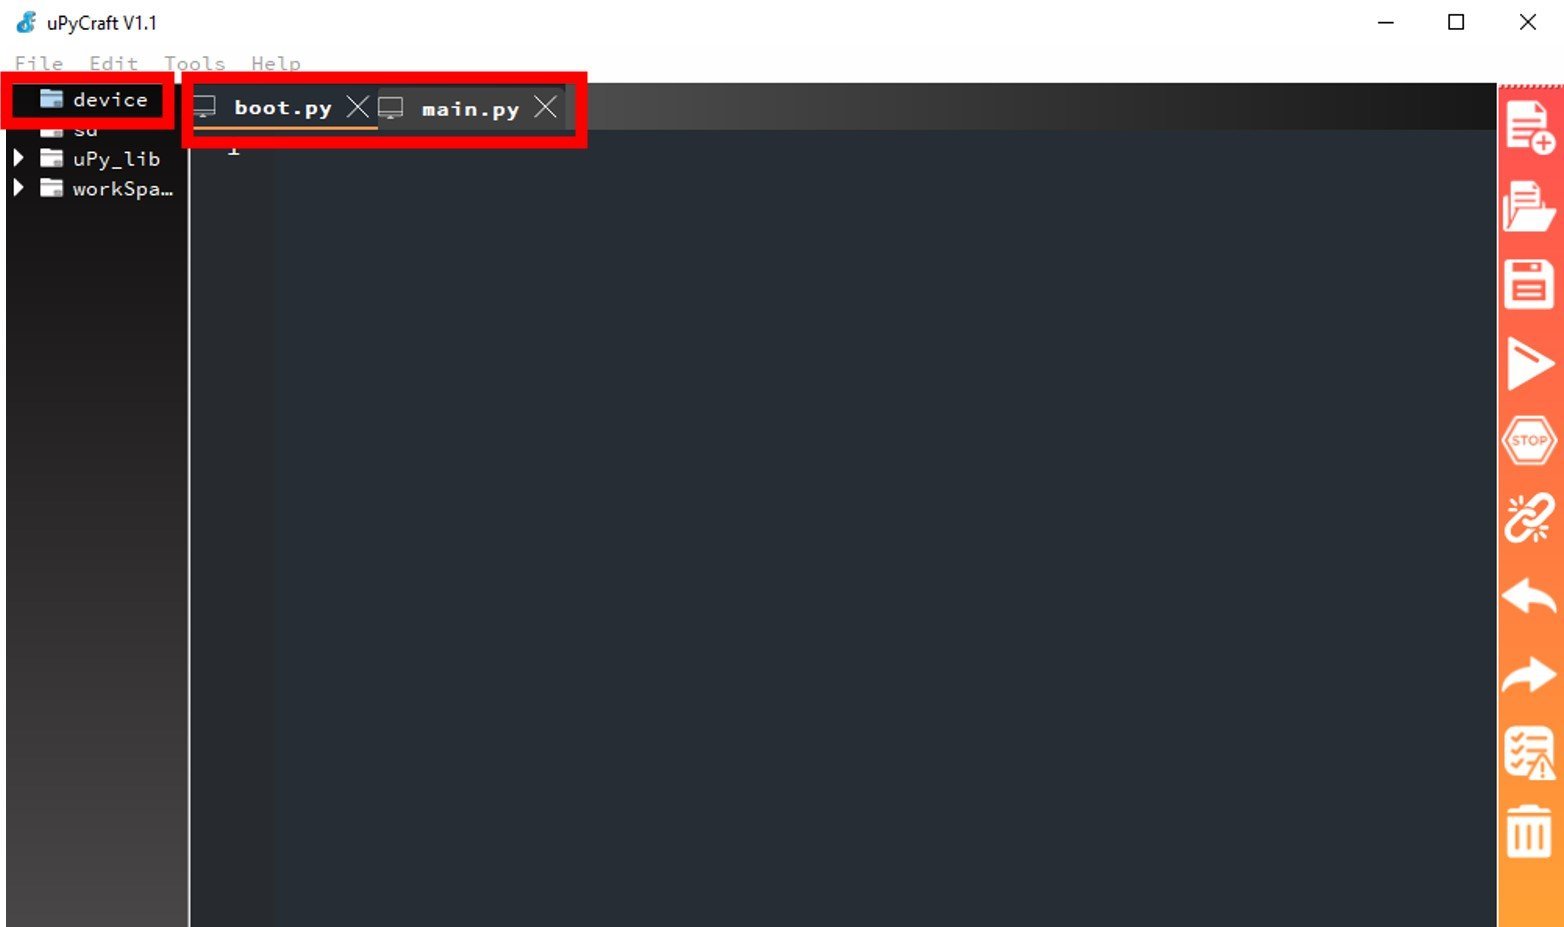
Create a new file in UpyCraft IDE and click on the “Save file” button to save the file on your computer. When you click on the “Save file” button, A new window as shown below will open. Save this file with the name of boot.py.

Similarly, Create one more file and give it the name of main.py. Copy the content of main.py to this file given in the next section.
Boot.py File
Copy the following code to “boot.py” file.
try:
  import usocket as socket
except:
  import socket

from machine import Pin
import network

import esp
esp.osdebug(None)

import gc
gc.collect()

ssid = 'Bilal'
password = 'mominmomin'

station = network.WLAN(network.STA_IF)

station.active(True)
station.connect(ssid, password)

while station.isconnected() == False:
  pass

print('Connection successful')
print(station.ifconfig())

led = Pin(2, Pin.OUT)In the boot.py file, we will include MicroPython socket programming methods to connect ESP32/ESP8266 to the WiFi network. Furthermore, we will also import Pin class from the machine module of MicroPython to configure GPIO 2 pin as a digital output pin.
Importing Socket Module
Sockets provides end-to-end communication between a server and a client on a connection oriented barrier. That means a server and a client needs to establish a connection before transferring data between to each other.
We will use the sockets library of MicroPython to create a slider switch web server. MicroPython socket API is a subset of corresponding Python Socket module. First, we should import the socket module as follows:
try:
  import usocket as socket
except:
  import socket
Importing Network Library
To use the socket module, we need to connect ESP32 and ESP8266 with our local WiFi network. For that purpose, we use a network library. Micropython’s network API provides methods to connect ESP32/ESP8266 modules to a WiFi network and to perform routing configuration and settings. Import the network library as follows:
import network Disabling Debug Output
By default, ESP32/ESP8266 boards print debugging output on the serial console. Debug output is already disabled on some official MicroPython boards. But, in the case of ESP32 and ESP8266, we will have to disable debug output manually by adding the following lines to the MicroPython code of our project. It is recommended to add these lines to the boot.py file.
import esp
esp.osdebug(None)
Like python, MicroPython is also an object-oriented programming language. All modules contain classes of different peripherals and other libraries such as socket, network, Pins, ADC, PWM, etc. We create objects of these classes to use in our MicroPython code. MicroPython provides a module to perform automation memory management of created objects. The “gc” module is a garbage collector API provided in MicroPython which is a subset of corresponding Python implementation. The collect() method automatically reclaim memory occupied by objects which are no longer required by the MicroPython program. To use the “gc” module in your application, first import the “gc” module. After that call collect() method as follows:
import gc     #Import garbage collector module
gc.collect()   #Perform garbage collection
MicroPython: Connecting to a WiFi Network
As discussed earlier, we use a network module to connect to a WiFi router. The network module provides two WiFi interfaces. One for the station, when the ESP32/ESP8266 connects to a router. Similarly, one for the access point that is for other devices to connect to the ESP8266/ESP32. Because we want to connect ESP32 and ESP8266 to a WiFi router. Therefore, we will use the station mode interface. We create an instance of this object using the station interface (network.STA_IF).
station = network.WLAN(network.STA_IF)The network.WLAN() is used to create a.WLAN network interface object.
Supported interfaces ar:
- network.STA_IF (station mode)
- network.AP_IF (Soft access point mode)
After that, activate the station by passing the “True” argument to the sta_if.active() method. Here station is an instance of the object which we created in the last step. We will use the same instance to access all methods of network class.
station .active(True)We define two variables that hold the name and password of your WiFi network. The following variables hold your network credentials:
ssid= 'Enter_Your_WiFI_Name_Here'
password = 'Enter_Your_WiFI_Passoword_Here'
You must enter your WiFi credentials such as network SSID and password in the above two variables before uploading this code to ESP32 and ESP8266. Furthermore, make sure to write the correct SSID and password. Otherwise, your ESP boards will not connect to the WiFi router.
The connect() method is used to connect to the specified wireless network using the specified WiFi name and password.
station.connect(ssid, password)
In station mode, isconnected() method returns “True” if ESP32/PES8266 successfully connects to a WiFi network and a device also assigned a valid IP address. Otherwise, it returns “False”. This statement checks if the ESP device connects to the WiFi or not. The code does not move to the next step till the ESP board is not connected to the WiFi network.
while station.isconnected() == False:
 pass
After a WiFi connection is established on ESP boards with a WiFi router, an IP address has already been assigned to ESP devices. The ifconfig() method provides an IP address assigned to the ESP32/ESP8266 device. In this statement, we print the IP address using the ifconfig() method on the sta_if object which we created previously. .
print('Connection successful')
print(sta_if.ifconfig())
In this tutorial, we will control on board LED of ESP32 and ESP8266 which is connected GPIO2 of both boards. Therefore, we want to use the pin class to configure our led as an output we will import it as well and initialize the ‘led’ as an output on GPIO2.
from machine import Pin
led = Pin(2, Pin.OUT)
MicroPython Web Server Main.py File
Copy the following code to main.py which we created earlier.
# For more details and step by step guide visit: Microcontrollerslab.com
led_state = "OFF"
def web_page():
    html = """<html>

<head>
    <meta name="viewport" content="width=device-width, initial-scale=1">
    <link rel="stylesheet" href="https://use.fontawesome.com/releases/v5.7.2/css/all.css"
     integrity="sha384-fnmOCqbTlWIlj8LyTjo7mOUStjsKC4pOpQbqyi7RrhN7udi9RwhKkMHpvLbHG9Sr" crossorigin="anonymous">
    <style>
        html {
            font-family: Arial;
            display: inline-block;
            margin: 0px auto;
            text-align: center;
        }

        .button {
            background-color: #ce1b0e;
            border: none;
            color: white;
            padding: 16px 40px;
            text-align: center;
            text-decoration: none;
            display: inline-block;
            font-size: 16px;
            margin: 4px 2px;
            cursor: pointer;
        }

        .button1 {
            background-color: #000000;
        }
    </style>
</head>

<body>
    <h2>ESP MicroPython Web Server</h2>
    <p>LED state: <strong>""" + led_state + """</strong></p>
    <p>
        <i class="fas fa-lightbulb fa-3x" style="color:#c81919;"></i>
        <a href=\"?led_2_on\"><button class="button">LED ON</button></a>
    </p>
    <p>
        <i class="far fa-lightbulb fa-3x" style="color:#000000;"></i>
        <a href=\"?led_2_off\"><button class="button button1">LED OFF</button></a>
    </p>
</body>

</html>"""
    return html


s = socket.socket(socket.AF_INET, socket.SOCK_STREAM)
s.bind(('', 80))
s.listen(5)

while True:
    try:
        if gc.mem_free() < 102000:
            gc.collect()
        conn, addr = s.accept()
        conn.settimeout(3.0)
        print('Received HTTP GET connection request from %s' % str(addr))
        request = conn.recv(1024)
        conn.settimeout(None)
        request = str(request)
        print('GET Rquest Content = %s' % request)
        led_on = request.find('/?led_2_on')
        led_off = request.find('/?led_2_off')
        if led_on == 6:
            print('LED ON -> GPIO2')
            led_state = "ON"
            led.on()
        if led_off == 6:
            print('LED OFF -> GPIO2')
            led_state = "OFF"
            led.off()
        response = web_page()
        conn.send('HTTP/1.1 200 OK\n')
        conn.send('Content-Type: text/html\n')
        conn.send('Connection: close\n\n')
        conn.sendall(response)
        conn.close()
    except OSError as e:
        conn.close()
print('Connection closed')In the main.py file, create a variable which holds the state of LED. Because, we are also displaying the current state of LED on the web page. Hence, we will save the state of the LED in the led_state variable. Initially, we set the led_state value to OFF.
led_state = "OFF"We will add the led_state variable into our web page using the “+” sign. The “+” sign is used to concatenate strings in Python.
Create Web page ( HTML+CSS)
The main part of our MicroPython script starts with defining a web_page(). The function serves HTML and CSS files to create a web page for the ESP32/ESP8266 web server to control outputs.
Note: We can also create a variable to hold an HTML file instead of creating a function. But using a function to serve web pages provides support to serve dynamic web pages where HTML code may change according to different operations that we perform inside the microPython script.
Now let’s go through each line of HTML code to understand how it builds the web page.
HTML Introduction
HTML is a hypertext markup language which is used to build web pages. All web browsers understand this language and can read web pages which are based on HTML language.
In HTML, we place all the content of a web page between <html> and </html> tags. The <html> tag shows the beginning of a web page and the </html> indicates the end of a web page.
HTML code mainly includes two parts such as head and body. The head part contains CSS, scripts, meta tags, links of external resources, and styling codes. It is placed between <head> and </head> tags.
Note: Whatever code or data, we place inside the head tags will not be visible to the user. It is only used to enhance the functionality of a web page such as scripts and styles, etc.
Inside head tags, create a <meta> tag to make the web page responsive in any web browser.
<meta name="viewport" content="width=device-width, initial-scale=1">In our web page, we also use icons of lamps to show ON and OFF states. This link tag loads the icons used in the webpage from fontawesome.
<link rel="stylesheet" href="https://use.fontawesome.com/releases/v5.7.2/css/all.css"
     integrity="sha384-fnmOCqbTlWIlj8LyTjo7mOUStjsKC4pOpQbqyi7RrhN7udi9RwhKkMHpvLbHG9Sr" crossorigin="anonymous">
CSS Styling Web Page
CSS is used to give styles to a web page. To add CSS files in head tags, we use <style></style> tags.
<style>
        html {
            font-family: Arial;
            display: inline-block;
            margin: 0px auto;
            text-align: center;
        }

        .button {
            background-color: #ce1b0e;
            border: none;
            color: white;
            padding: 16px 40px;
            text-align: center;
            text-decoration: none;
            display: inline-block;
            font-size: 16px;
            margin: 4px 2px;
            cursor: pointer;
        }

        .button1 {
            background-color: #000000;
        }
    </style>
This CSS code sets the display text and font type to Arial without margin. It also aligns the content of the web page to the center.
 html {
            font-family: Arial;
            display: inline-block;
            margin: 0px auto;
            text-align: center;
        }
In this MicroPython web server example, we use two buttons to control outputs of ESP32 and ESP8266. HTML supports default buttons. To give styles to these default buttons, we can use CSS. This code performs basic styling of buttons. The .button sets the color of the ON button to red and .button1 sets the color of the OFF button to black.
.button {
            background-color: #ce1b0e;
            border: none;
            color: white;
            padding: 16px 40px;
            text-align: center;
            text-decoration: none;
            display: inline-block;
            font-size: 16px;
            margin: 4px 2px;
            cursor: pointer;
        }

        .button1 {
            background-color: #000000;
        }
HTML Web Page Body
The second most important part of an HTML document is the body which goes inside the tags <body> and </body>. The body part includes the main content of the web page such as headings, images, buttons, icons, tables, charts, etc. For example, in this microPython based web server, the body part includes icons, heading, and buttons.
In HTML h2 tag inserts heading to the web page and different levels of headings can be added such as h1,h2, h3,h4, h5, h6. Here h1 is a top most level heading and h6 is lowest level heading. In this example, we add the text “ESP MicroPython Web Server” heading of level 2. But you can add any other text as per your requirement.
<h2>ESP MicroPython Web Server</h2>Next, there are three HTML paragraphs in our web page. The <p> and </p> tags are used to insert paragraphs in the HTML body.
Indicate LED Status
First paragraph indicates the status of LED. Here, we used a variable “led_state”. Because LED state changes so is the value of led_state variable. Moreover, “+” sign is used to concatenate the led status variable with other text of the paragraph. The <strong> and </strong> tags make the text bold.
<p>LED state: <strong>""" + led_state + """</strong></p>Display Icons and Buttons
The second paragraph displays the lamp icon and LED ON button. We use the icons from Font Awesome Icons website. Besides this when a user clicks the LED ON button, you will be redirected to /?led_2_on URL.
To Create font, we will use the fontawesome.com website. Go this link (fontawesome) and type light in search bar as shown below:
You will see many icons for light bulbs. You can select any one of them to be used in your MicroPython web server. We use the first and second lamp icons in this tutorial. After that click on the selected icon.
You will see this window which contains the link tag. Copy this link tag and use it on your HTML page as follows:
<p>
     <i class="fas fa-lightbulb fa-3x" style="color:#c81919;"></i>
     <a href=\"?led_2_on\"><button class="button">LED ON</button></a>
</p>
Similarly, in the third paragraph of a web page, we display the lamp icon and LED off button. when a user clicks the LED OFF button, you will be redirected to /?led_2_off URL.
<p>
    <i class="far fa-lightbulb fa-3x" style="color:#000000;"></i>
    <a href=\"?led_2_off\"><button class="button button1">LED OFF</button></a>
</p>
Create Web Server with MicroPython Socket API
So far we have created a web page but we also need to create a socket server to listen to incoming HTTP GET requests from web clients or web browsers. In response, ESP32/ESP8266 web server sends HTML documents. The web client receives an HTML document and displays the web page.
MicroPython Socket API Introduction
The following diagram shows how a server and client can exchange messages with each other through sockets.
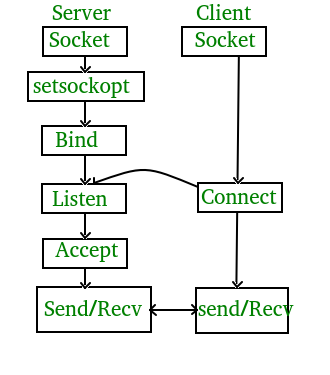
Socket allows connection-oriented network-connected client server applications to communicate with each other. They support different protocols for communication such as HTTP, HTTPS, e-mail, telnet, etc. But we will use HTTP POST and GET requests for communication through sockets. A socket can also be defined as
Socket = IP Address + Port
To establish a socket using MicroPython on the server side which is ESP32 or ESP8266, we need to perform the following steps:
Create a socket
We can create a socket using the socket.socket() function available in the socket module of MicroPython. General syntax to create a socket object is as follows:
s = socket.socket (socket_family, socket_type, protocol=0)For this example, we create a socket object with a socket family of AF_INET transport mechanism and socket type of SOCK_STREAM. The SOCK_STREAM is used for end-to-end communication between two points using connection-oriented protocols. Because we want to perform end-to-end communication between Server(ESP32/ESP8266) and a web client. Therefore, we select steam TCP socket type as follows:
s = socket.socket(socket.AF_INET, socket.SOCK_STREAM)Bind the socket to an address on the host machine
Once we have a socket object, the next step is to bind the socket to an ip address and a port number using bind() method. The input arguments to bind() method are IP address and a port number. As you can see the hostname, we passed to bind() is an empty string. This is because by default the empty string means the local host IP address which is ESP32 and ESP8266 in our case. Furthermore, we pass the port number 80 which is a reserve port for ESP32/ESP8266 web server service.
s.bind(('', 80))Note: If you don’t want to pass an empty string to bind() method, you can get the host name by using socket.gethostname() method.
host = socket.gethostname()Listen for Connections
The next step is to create a listening socket which can listen to incoming http get requests from a web client. In response to these requests from web clients, a micropython web server can send web pages. The input argument to listen() method is the number of queued requests from a web client that a web server can handle. The maximum number is 5.
s.listen(5)Accept a Connection
Inside the while loop, we listen to HTTP requests from web clients. When a web client makes a request, the web server listens to it and accepts the connection request through accept() method. The accept() method passively accepts the client connection and remains in a blocking state until the connection arrives. Upon successful connection, it returns an object conn which is used to send and receive data. It also provides the address of the client (addr).
conn, addr = s.accept()Use printf() method to print the address of a client which saved in the addr variable in last line.
print('Received HTTP GET connection request from %s' % str(addr))Socket Send and receive data Methods
The send() and recv() methods of the socket module transmit and receive TCP messages between client and server.
Upon successful connection with the socket client, we can receive the data from a client socket using the conn variable which we created earlier and recv() method. The input argument to the recv() method is the maximum amount of data to be received from a socket client in a single request.
The following line receives the data from a socket client and saves it to a request variable to be used later on.
request = conn.recv(1024)The print() method prints the data that was received from a socket client.
print('Content = %s' % str(request))Control Output ESP32 and ESP8266
After receiving a request from a socket client, we use find() method on request variable to check if the request contains ‘/?led_2_on’ or ‘/?led_2_off’ strings.
led_on = request.find('/?led_2_on')
led_off = request.find('/?led_2_off')
Note: The find() method returns -1 if the string we are looking for is not found in the request string. If it is found, it will return the lowest index of the sub-string.
If you see the content of the request string, the substrings ‘/?led_2_on’ or ‘/?led_2_off’ are always on the 6th index as shown in the figure below:

We can use any if statement to see if one of these substrings are part of the request string. If the led_on variable is equal to 6. That means we received /?led_2_on in request. Therefore, we will turn on the onboard LED of ESP32 or ESP8266 and also update the status of the LED indication variable to ON.
if led_on == 6:
     print('LED ON -> GPIO2')
     led_state = "ON"
     led.on()
Similarly, if the led_off variable is equal to 6. That means we received /?led_2_off in request. Therefore, we will turn off the onboard LED of ESP32 or ESP8266 and also update the status of the LED indication variable to OFF.
if led_off == 6:
    print('LED OFF -> GPIO2')
    led_state = "OFF"
    led.off()
To send HTML documents to a socket client in response to a request, create a response variable and provide the reference of the web_page() function to the response variable.
response = web_page()At the end send the web page content to a socket client using the send() and sendall() methods and close the connection using close method.
conn.send('HTTP/1.1 200 OK\n')
conn.send('Content-Type: text/html\n')
conn.send('Connection: close\n\n')
conn.sendall(response)
conn.close()
except OSError as e:
conn.close()
print('Connection closed')
MicroPython Web Server Demo
To test MicroPython web server with ESP32 and ESP8266, upload both boot.py and main.py files to ESP boards one by one. First, upload boot.py file and after that upload main.py file.

After uploading MicroPython scripts, click on Enable/Reset button of ESP32:

Some time later, your ESP board will make a connection with your WiFi router and shows “successful connection” message and also prints the IP address on the MicroPython shell as follows:
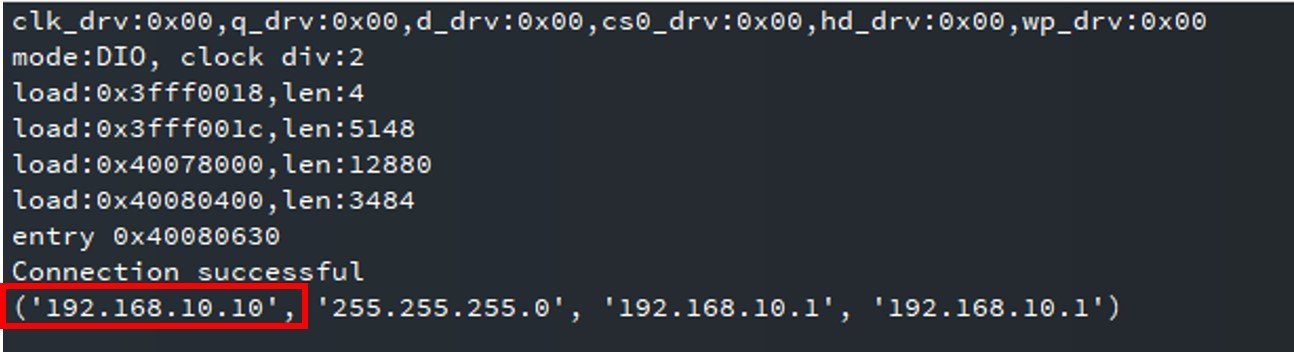
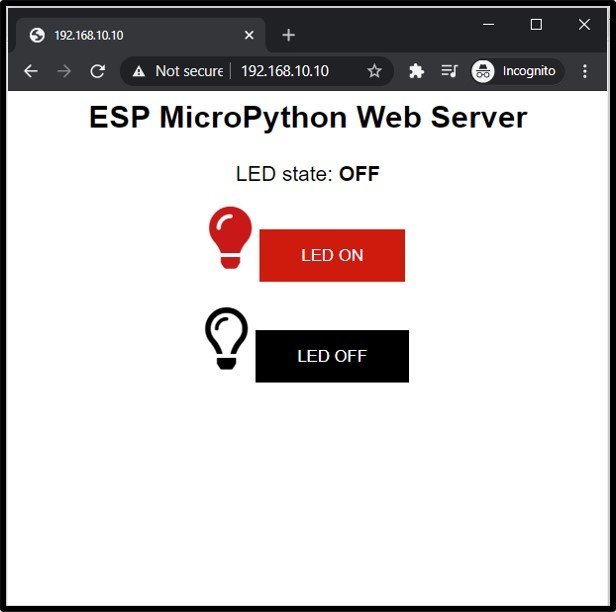
Now, open your web browser either on your laptop or mobile and type the IP address which we have found in the last step. You will see the web page on web browser as follows:
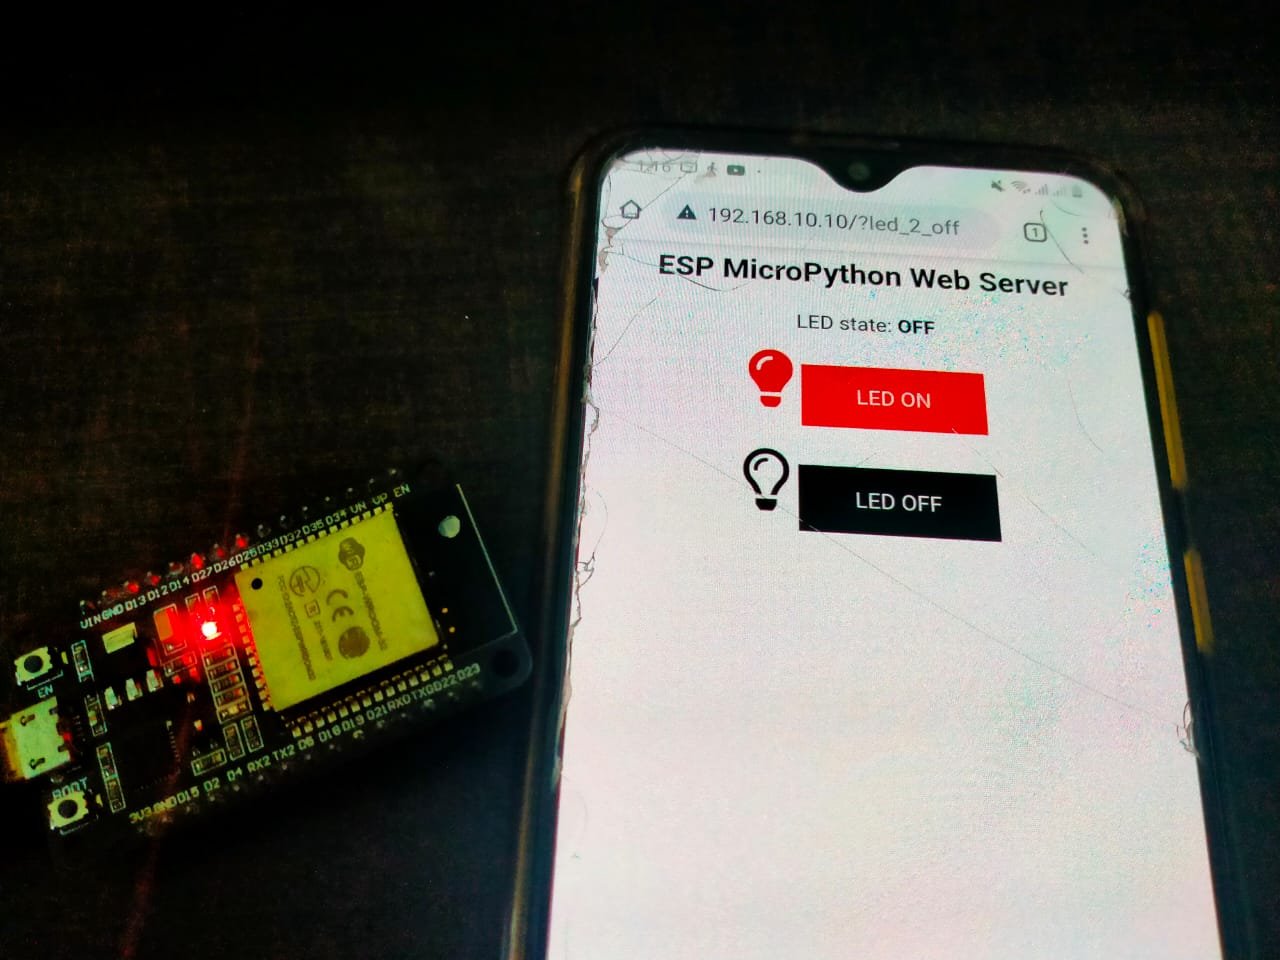
On Mobile, you will see web page like this:

To see demo, if you press the ON LED Button, web browser which is acting as an socket client makes HTTP POST request to ESP32 or ESP8266 web server IP address including this string /?led_2_on’. The onboard LED of ESP32/ESP8266 will turn on. Furthermore, the GPIO state will also update to ON state as shown below:

Similarly, if you press the OFF LED Button, a web browser that is acting as a socket client makes an HTTP POST request to ESP32 or ESP8266 web server IP address including this string /?led_2_off’. The onboard LED of ESP32/ESP8266 will turn off. Furthermore, the GPIO state will also update to OFF state as shown below:
Demo Video:
You can also control any other GPIO pin of ESP32 and ESP8266 by changing the pin number in Pin class as follows:
led = Pin(2, Pin.OUT)In summary:
In this tutorial, we have learned to create ESP32 and ESP8266 web server to control outputs using MicroPython firmware and socket API of Python. But if you want to create ESP32 and ESP8266 web servers using Arduino IDE, you can read these articles:
Other web server related tutorials with MicroPython:
- MicroPython: DHT11/DHT22 Web Server with ESP32/ESP8266
- MicroPython: DS18B20 Web Server with ESP32/ESP8266
More MicroPython tutorials:
Thank you for the tutorial. I have tweaked your script to open/close garage doors and it is working very well. To make it better, I’d like to embed a livestream video of the garage doors so I know what they’re doing. Any suggestions on how to embed an RTSP into an ESP8266 micropython script? Thanks again.
We have a plan to make one tutorial on ESP8266 live streaming using MicroPython.
Hello, thanks for this excellent tutorial. I am retired and trying to get my hands on micropython on ESP-07 board. This tutorial will definitely help.
Have you been able to generate another tutorial on video streaming yet?
Regards
A M Morawala
Having to enter in a browser the IP address assigned to STA.IF devices may be difficult or impossible in some applications. The WLAN class has a dhcp_host_name feature that lets us use a meaningful name in browser.
I have been unable to get this to work and would like to know if it works for you.
Thanks for the excellent tutorial.
We have a situation where obtaining the IP address is not possible.
The dhcp_host_name feature would seem to be helpful here, but we cannot get it to work.
Have you ever gotten the dhcp_host_name feature to work? How?
How would you troubleshoot this on a Windows PC?
Thanks!