In this tutorial, we will explore the process of designing a VI (Virtual Instrument) that calculates the factorial of a given natural number. A VI is a powerful tool in LabVIEW that allows users to create custom applications for data acquisition, signal processing, and control systems. Through a step-by-step guide, we will create a VI that takes user input, utilizes a ‘for’ loop, and displays the calculated factorial. By understanding the concepts of input controls, shift registers, and output indicators, readers will gain the necessary skills to implement complex computational tasks in LabVIEW. So let’s dive in and unlock the potential of LabVIEW as we learn to design and test our factorial calculation VI.
What is Factorial?
Factorial is a mathematical operation that calculates the product of all positive integers from 1 to a given number. It is denoted by the symbol “!”. For example, the factorial of 5 is calculated as 5! = 5 x 4 x 3 x 2 x 1 = 120. Factorial is commonly used in various fields, such as mathematics, statistics, and computer science, to solve problems involving permutations, combinations, and recursive algorithms.
LabView Factorial Example
The VI takes a number as input from the user and returns the factorial of that number as the output. For instance, if the user enters 3 as the input value, the VI will calculate and display the factorial as 1 * 2 * 3 = 6 in the indicator. We will be using a ‘for’ loop to achieve this.
Let’s dive into the steps to design the VI:
Create a new VI by following the steps outlined in Tutorial 1. Make sure to save the VI for future use.
In this tutorial, I will guide you through the process of designing a VI (Virtual Instrument) that calculates the factorial of a given natural number. The VI takes a number as input from the user and returns the factorial of that number as the output. For instance, if the user enters 3 as the input value, the VI will calculate and display the factorial as 1 * 2 * 3 = 6 in the indicator. We will be using a ‘for’ loop to achieve this.
Let’s dive into the steps to design the VI:
Step 1: Create a new VI
Create a new VI by following the steps outlined in Tutorial 1. Make sure to save the VI for future use.
Step 2: Add the input control
On the front panel, click on the control palette and select ‘Numeric’. Then, choose ‘Control’ to add a numeric control that will take user input. This control will serve as the input for the factorial calculation.

Step 3: Add the for loop
Switch to the block diagram window. From the function palette, select ‘Structures’ and then choose ‘For Loop’.

Step 4: Connect the input control
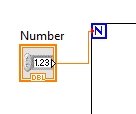
Connect the numeric control, which stores the user input, to the ‘N’ (number of loops) terminal of the for loop.
Step 5: Add shift registers
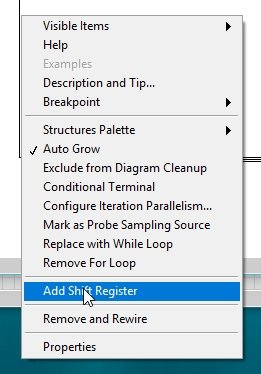
To store the previous product value during each iteration, we will use a shift register. Right-click on the boundary of the for loop and select ‘Add Shift Register’.
Step 6: Initialize the shift register
As we discussed in a previous tutorial, it’s important to initialize the shift register. From the function palette, select ‘Numeric’ and then choose ‘Constant’.

Place the numeric constant adjacent to the shift register and set its value to 1.

Step 7: Add the multiple block
To perform the multiplication task, add a multiply block. From the function palette, select ‘Numeric’ and then choose ‘Multiply’.

Connect the right shift register to one of the inputs of the multiply block, and connect the output of this block back to the right shift register. This connection ensures that the value of the product from the previous iteration is passed to the left shift register in the next iteration.
Step 8: Increment the iteration
To increment the iteration, connect the iterative index of the while loop to the input of an increment block. From the function palette, select ‘Numeric’ and then choose ‘Increment’.

Connect the output of the increment block to the remaining input of the multiply block. This connection ensures that the multiplication occurs from 1 onwards, as the number of iterations starts from 0.
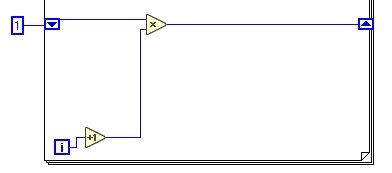
The resulting block diagram for calculating the factorial will look as shown in Figure 9:
Step 9: Add the output indicator
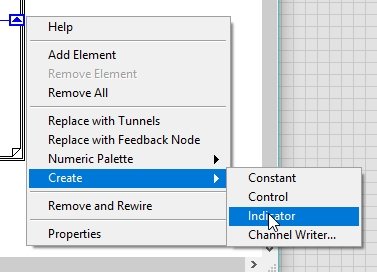
Right-click on the right shift register and select ‘Create’ followed by ‘Indicator’. This will create an output indicator to display the factorial result.
The complete block diagram for the factorial VI is illustrated in Figure 11:

Step 10: Test the VI
Test the VI by running it multiple times with different input values. For example, input the number 3, and the output indicator should display 6, as shown in Figure 12:

Repeat the testing process for other numbers, such as 5, and the output indicator should display 120, as shown in Figure 13:

Exercise
Now, as an exercise, I challenge you to design a VI that takes two input integers and calculates the product of the natural numbers between those two integers.
Conclusion
In this tutorial, we explored the process of designing a VI (Virtual Instrument) that calculates the factorial of a given natural number. By following the step-by-step guide, we created a VI that takes user input, utilizes a ‘for’ loop, and displays the calculated factorial. Through the use of input controls, shift registers, a multiply block, and an output indicator, we were able to successfully implement the factorial calculation functionality. We also learned how to test the VI with different input values to ensure its accuracy. As an exercise, the tutorial challenged readers to design a VI that calculates the product of natural numbers between two input integers. With the knowledge gained from this tutorial, readers can now create advanced VIs to tackle various computational tasks.