In this tutorial, we will explore the fascinating world of LabVIEW programming and learn how to design a Virtual Instrument (VI) that calculates the sum of natural numbers up to a given input. LabVIEW, short for Laboratory Virtual Instrument Engineering Workbench, is a powerful graphical programming language widely used in scientific and industrial applications. With its intuitive interface and versatile functionalities, LabVIEW allows users to create sophisticated virtual instruments and automate complex processes. By following the step-by-step instructions provided in this tutorial, we will not only understand the fundamental concepts of LabVIEW programming but also develop a practical VI that showcases the power and versatility of this remarkable tool. So, let’s dive in and embark on this exciting journey into the realm of LabVIEW programming!
For example, if the user enters 3 as an input value to the VI, then the output of the VI will return 1+2+3 = 6 in the indicator. We will be using a ‘while’ loop to accomplish this. At the end of the tutorial, you are provided with an exercise to do on your own. In the next tutorials, I will assume that you have completed those exercises and will not explain the concepts related to them again.
Explanation using a VI
First, let’s create a VI by following the steps described in Tutorial 1. Ensure that you save the VI for future use.
Step 1: Placing the Numeric Control
On the front panel, right-click and select ‘Numeric’ from the control palette. Then, choose ‘Control’ as shown in the figure below:

Figure 1: Numeric control placement
Step 2: Adding the While Loop
Switch to the block diagram window. From the function palette, select ‘Structures’ and then choose ‘While Loop’ as shown in the figure below:
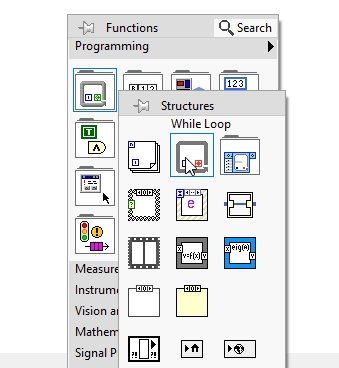
Figure 2: While loop placement
Step 3: Implementing Shift Registers
To access the previous value of the sum within the loop, we will use shift registers. Right-click on the boundary of the while loop and select ‘Add Shift Register’ from the drop-down menu. Refer to the figure below:

Figure 3: Adding shift registers
Step 4: Initializing the Shift Register
As mentioned in a previous tutorial, it is necessary to initialize the shift register. From the function palette, select ‘Numeric’ and then choose ‘Constant’ as shown below:

Figure 4: Creating numeric constant
Place this numeric constant next to the shift register and set its value to 0, as shown in the figure below:

Figure 5: Shift register constant
Step 5: Adding an Addition Block
To perform the addition task, place an addition block on the block diagram. From the function palette, select ‘Numeric’ and then choose ‘Add’ as shown below:

Figure 6: Add block placement
Connect the right shift register to one of the inputs of the add block, and connect the output of this block back to the right shift register. This configuration allows the right shift register to store the sum from the previous iteration and pass it to the left shift register in the next iteration. Refer to the figure below:
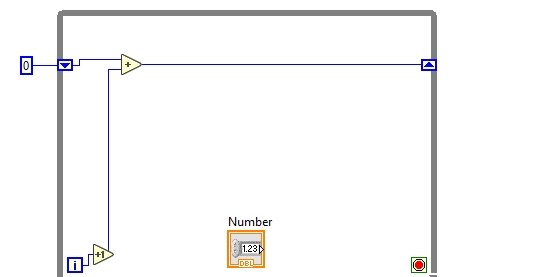
Figure 7: Adding condition
Step 6: Handling the Termination Condition
To set the termination condition for the while loop, we need to compare the incremented iterative index with the input number provided by the user. From the function palette, select ‘Comparison’ and then choose ‘Greater Than or Equal’ as shown below:

Figure 8: Greater than or equal block
Connect the increment iterative index to the upper input of this block and connect the numeric control (the input number provided by the user) to the lower input. Connect the output of the greater than or equal block to the loop condition button, as shown below:
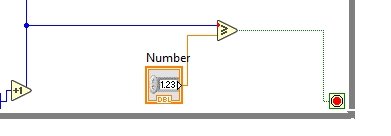
Figure 9: Termination condition
This continuous testing of the incremented iterative index ensures that the loop will exit when the index reaches or exceeds the input number.
Step 7: Adding an Output Indicator
Finally, right-click on the right shift register and select ‘Create’ from the drop-down menu. Then, choose ‘Indicator’ to create an output indicator for displaying the sum. Refer to the figure below:
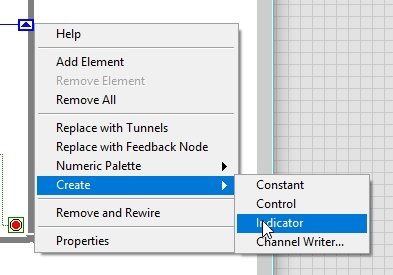
Figure 10: Output indicator
The complete block diagram is shown in the figure below:
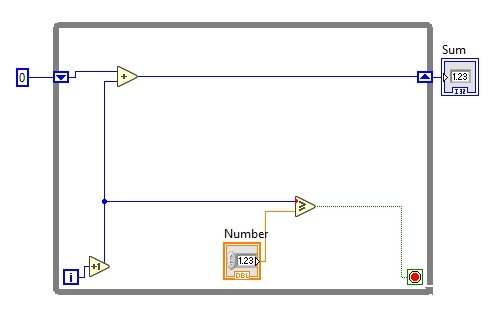
Figure 11: Complete block diagram
You can run the VI by entering a number, such as 3, in the input number constant. The output indicator will display the sum, which in this case is 6:

Figure 12: Output 1
You can test the system with different numbers, such as 5. The sum will now be 15, as shown below:
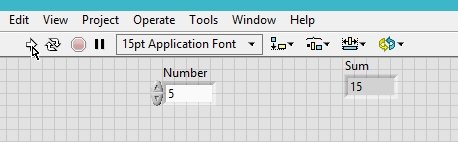
Figure 13: Output 2
Exercise
Design a VI that takes two input integers and calculates the sum of natural numbers between those two integers.
Conclusion
In this tutorial, we have learned how to design a VI in LabVIEW that takes a number as input from the user and calculates the sum of natural numbers up to that number. By using a ‘while’ loop, we were able to iterate through the numbers and continuously add them to a running sum. The VI was successfully created by following the step-by-step instructions, including placing a numeric control, adding a while loop, implementing shift registers, initializing the shift register, adding an addition block, handling the termination condition, and adding an output indicator. We also tested the VI with different input numbers and observed the correct results displayed in the output indicator.
To further practice our skills, an exercise was provided to design a VI that calculates the sum of natural numbers between two input integers. These exercises are essential to reinforce the concepts learned in this tutorial and prepare for future tutorials that assume their completion.
LabVIEW is a powerful and versatile tool for creating virtual instruments and automating various processes. By mastering the fundamentals covered in this tutorial, we are now equipped to tackle more complex tasks and deepen our understanding of LabVIEW programming.