In this user guide, we will learn how to log temperature and humidity readings acquired from DHT22 sensor to a microSD card using Arduino and Arduino IDE. We will create a .txt file in our microSD card through programming our Arduino board and consequently log temperature and humidity readings to that file after every 20 seconds. Users can use this tutorial, to learn how to acquire data from the DHT22 sensor and store it in a microSD card using Arduino.
For a getting started guide to microSD card with Arduino, read the article: Micro SD Card Interfacing with Arduino using MicroSD Module
This article is divided into these sections:
- Introduction to DHT22 sensor and its connection with the Arduino UNO and the microSD card module
- Formatting the microSD card
- Setting up Arduino IDE for DHT22 data logging to microSD card (installing libraries, Arduino sketch and demonstration)
DHT22 Introduction
The DHT22 is an inexpensive sensor which measures relative humidity and temperature. It provides a calibrated digital output with a 1-wire protocol. It measures temperature and humidity with higher accuracy and supports a wider range as compared to DHT11.
DHT sensors are pre-calibrated. We can directly connect them with our Arduino UNO board to obtain sensor output reading. They are internally composed of a humidity sensing sensor and a thermistor. These two components measure humidity and temperature.
DHT22 Pinout
The following figure shows the pinout diagram of DHT sensors. DHT sensor consists of four pins. But on DHT modules only three pins are exposed to the pinout of the module and the 10k ohm pull-up resistor is internally connected to pin 2.
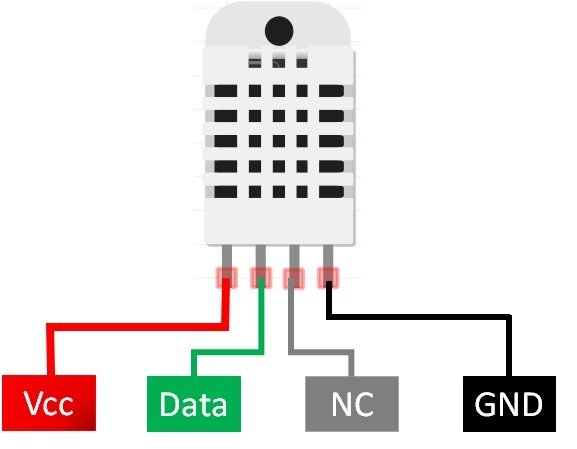
The following lists the pinout of the DHT sensor and their brief description. Pin number starts from left to right when you hold the sensor from the front end. It also shows how these pins will be connected with the ESP32 board.
| DHT22 Pins | Arduino UNO |
|---|---|
| 1 (VCC) | This is the power supply pin (3.3V-5V). We will connect with 5V. |
| 2 (Data) | Any digital pin of Arduino board along with 10k ohm pull-up resistor. We will use GPIO2 |
| 3 (NC) | Not used |
| 4 (GND) | Ground |
- VCC is the power supply pin. Apply voltage in a range of 3.3 V to 5.0 V to this pin.
- Data Out is the digital output pin. It sends out the value of measured temperature and humidity in the form of serial data
- N/C is not connected
- GND: Connect the GND pin
Arduino Connection Diagram with DHT22 and microSD card module
This section shows how to connect Arduino UNO with DHT22 sensor and the microSD card module.
The DHT22 sensor has 4 terminals which we will connect with the Arduino board. As it is 5V tolerant, hence we will connect the VCC terminal with 5V of the Arduino UNO. The data out pin will be connected with GPIO2 with 10k ohm pull-up resistor. The resistor is not required if you re using the DHT22 module instead. You can also choose any other appropriate digital pin to connect with data out. The third pin is not used.
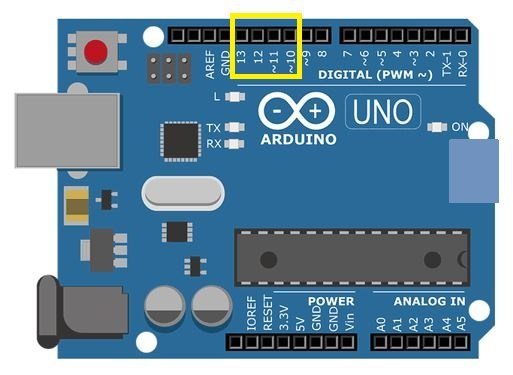
Additionally, we will connect the VCC terminal of microSD card module with 5V of Arduino UNO. Both grounds will be common. The default SPI GPIO pins of Arduino UNO are being used to connect with each of the remaining SPI terminals of the microSD card module. The figure below shows the default SPI pins of Arduino Uno.
The table below shows the connections between Arduino UNO and the microSD card module:
| Arduino UNO | MicroSD card Module |
| GND | GND |
| 5V | VCC |
| GPIO10 | CS |
| GPIO11 | MOSI |
| GPIO13 | SCK |
| GPIO12 | MISO |
Now follow the connections between the three devices and connect them accordingly. We have used the same connections as specified above. All devices will have their power supply and grounds in common.
Schematic


Now, as we know how to interface the microSD card module, DHT22 sensor and the Arduino Uno together let us learn how to prepare the microSD card for file handling in Arduino IDE.
Formatting the MicroSD card
As we have to use our microSD card in Arduino IDE so we would have to format it as FAT32. We will have to follow a series of steps to accomplish it successfully.
- First, insert your microSD card in your laptop/computer. Now go to ‘This PC’ and click on SD card icon. Then click on Format by right clicking the SD card icon.
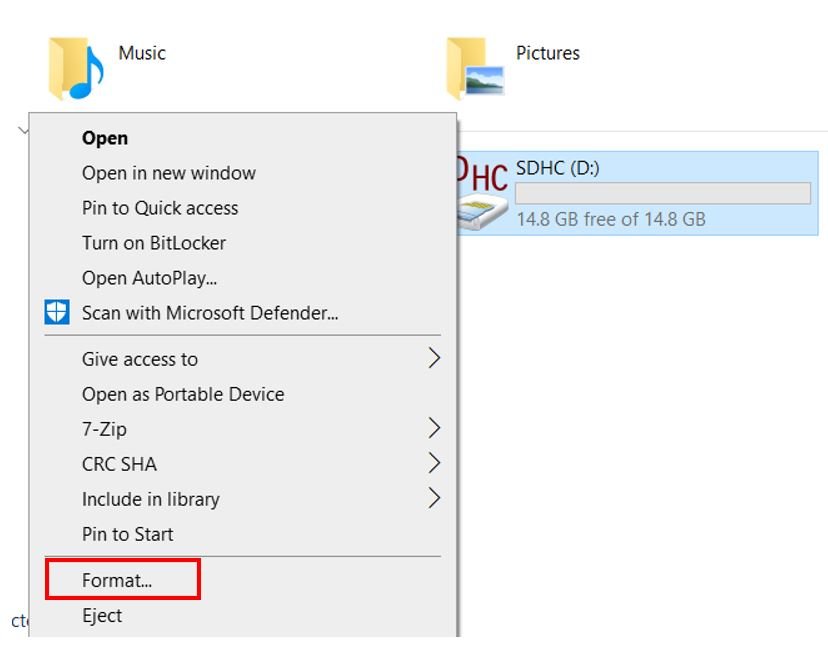
- The following window will appear. Select FAT32 from the dialog box of ‘File System’ and click on ‘START.’

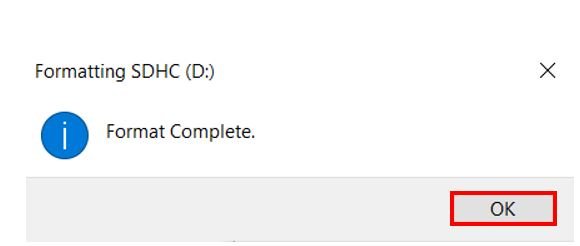
- You will receive a warning message that formatting will erase all previous data saved on the microSD card. Click ‘OK.’

- After a few moments, your microSD card will be formatted successfully. Click ‘OK.’
Setting up Arduino IDE for DHT22 Data Logger
We will use Arduino IDE to program our Arduino UNO. To program our Arduino UNO with DHT22 we will require DHT library.
Installing DHT Library
Open Arduino IDE and click on Sketch > Library > Manage Libraries
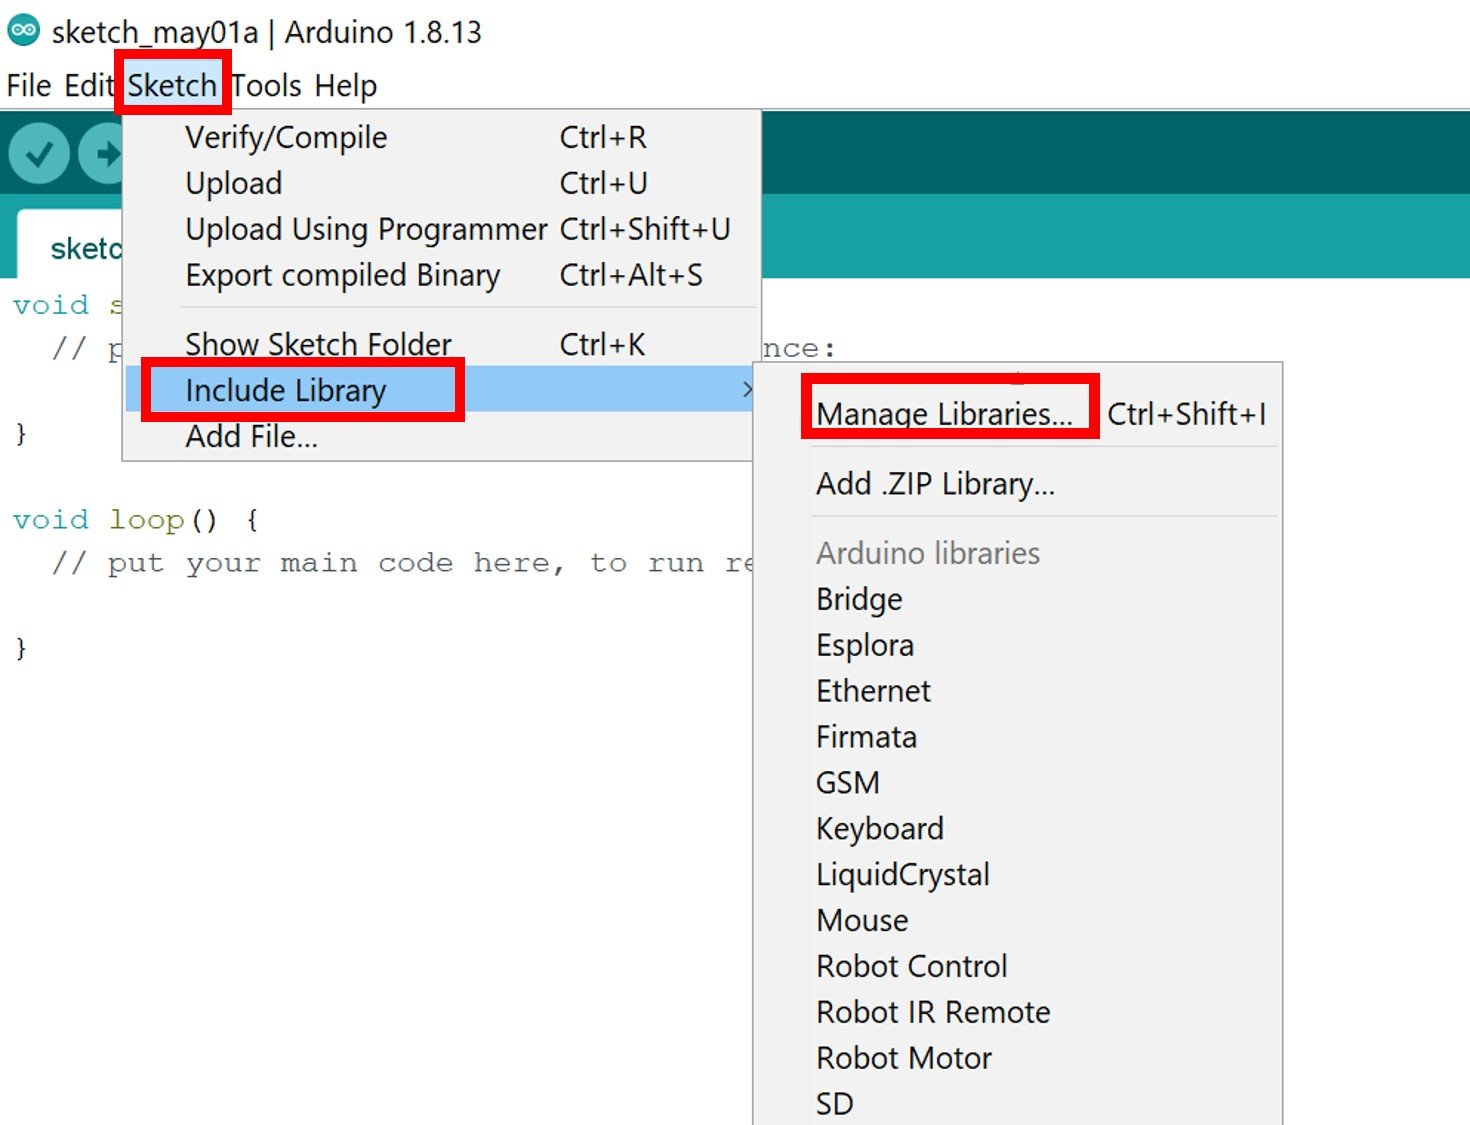
The following window will open up.

Type ‘DHT sensor’ in the search tab and install the DHT sensor library.

After installing the libraries, restart your IDE.
Arduino Sketch – DHT22 Data Logger with Arduino
Open your Arduino IDE and go to File > New to open a new file. Copy the code given below in that file.
This sketch will acquire sensor data from the DHT22 and save it in a .txt file on the micro SD card. The sensor data will consist of current temperature in Celsius and humidity in percentage. New readings will be added after every 20 seconds.
#include "SD.h"
#include <SPI.h>
#include "DHT.h"

 #define DHTPIN 2
 #define DHTTYPE DHT22
 DHT dht (DHTPIN, DHTTYPE) ;

File myFile;
String Temperature, Humidity, Data;

void setup() {
  Serial.begin(115200);
  dht.begin (  ) ;

  Serial.print("Initializing SD card...");
  if (!SD.begin(10)) {
    Serial.println("initialization failed!");
    while (1);
  }
  Serial.println("initialization done.");
  myFile = SD.open("data.txt", FILE_WRITE);
  if (myFile) {
    myFile.println( "Temperature(°C), Humidity(%) \r\n");
    myFile.close();
  }
  else {
    Serial.println("error opening data.txt");
  }
}

void loop() {
   if ( isnan (dht.readTemperature ( ) ) || isnan (dht.readHumidity ( ) ) )
   {
     Serial.println ("DHT22 Sensor not working!") ;
   }
 else
{
  data_logging();
 }
delay(20000);
}

void data_logging()
{
  String Temperature = String(dht.readTemperature ( ), 2);
  String Humidity = String(dht.readHumidity ( ), 2);
  Data = Temperature + "," + Humidity;

  Serial.print("Save data: ");
  Serial.println(Data);

  myFile = SD.open("data.txt", FILE_WRITE);
  if (myFile) {
    Serial.print("Writing to data.txt...");
    myFile.println(Data);
    myFile.close();
    Serial.println("done.");
  } else {
    Serial.println("error opening data.txt");
  }
  Serial.println();
}
How the Code Works?
Now let us understand how each part of the code works.
Including Libraries
The first step is to include all the libraries that are necessary for this project. The SD library will be used for the microSD card functionality and the SPI library will be used as we are using SPI communication protocol between the Arduino Uno board and the microSD card module. Additionally, we will also include the DHT library that we installed previously for the DHT sensor functionality.
#include "SD.h"
#include <SPI.h>
#include "DHT.h"
Defining DHT Sensor
The following lines of code will specify the type of DHT sensor and the GPIO pin of the Arduino UNO board which we will connect with the data pin of the sensor. We are using GPIO2 that will be connected with the data pin of the DHT sensor. You can use any appropriate digital pin.
 #define DHTPIN 2
 #define DHTTYPE DHT22
 DHT dht (DHTPIN, DHTTYPE) ;
Creating File Object
Secondly, we will create an object of File and name it ‘myFile.’ This is the object which we will use later to write GPS data to our .txt file in the microSD card.
File myFile;Defining Variables
Next, we will define string variables that we will use later on in the sketch to save the useful data.
String Temperature, Humidity, Data;
setup()
Inside the setup() function, we will open a serial connection at a baud rate of 115200. Additionally, we will initiate the connection with the DHT sensor as well by using the begin() method on the dht object.
 Serial.begin(115200);
  dht.begin (  ) ;
We will then initialize the microSD card. sing the begin() function on the SD filesystem using SD.begin(). The begin() function takes in the CS Pin as an argument which we have stated as ’10.’ Thus, it will start the SPI communication using the default SPI CS pin that is GPIO10. To change the SPI CS pin you can pass the pin number as an argument inside the begin() function.
  Serial.print("Initializing SD card...");

  if (!SD.begin(10)) {
    Serial.println("initialization failed!");
    while (1);
  }
  Serial.println("initialization done.");
Next, we will open the data.txt file on the microSD card using SD.open(). If the file does not exist, it will get created.
Using the println() function on the myFile object we will write ‘Temperature(°C), Humidity(%)’ as the heading in the data.txt file. After that, we will close the file using myFile.close(). This will ensure that the data written on the file gets saved as well. If the file is unable to open the serial monitor will display an error message.
myFile = SD.open("data.txt", FILE_WRITE);
  if (myFile) {
    myFile.println( "Temperature(°C), Humidity(%) \r\n");
    myFile.close();
  }
  else {
    Serial.println("error opening data.txt");
  }
loop()
Inside the loop() function, we will first check if the connection between the Arduino and the DHT sensor is correct or not or the values are being accessed properly or not. This is done through an if() statement. If the readings are not proper then an error message will be printed. This will help us in debugging our circuit or a possible issue in the initialization of the sensor. If the DHT22 sensor is working properly then we will call the data_logging() function. This function will acquire the sensor readings and log them in the data.txt file in the microSD card.
void loop() {
   if ( isnan (dht.readTemperature ( ) ) || isnan (dht.readHumidity ( ) ) )
   {
     Serial.println ("DHT22 Sensor not working!") ;
   }
 else
{
  data_logging();
 }
delay(20000);
}
data_logging()
The data_logging() function will first access the temperature readings through dht.readTemperature() and convert the value to a string using the String() function. We are passing dht.readTemperature() as the first parameter and ‘2’ as the second parameter which corresponds to the number of decimal places of the temperature reading. Likewise, we will access the humidity reading similarly using the dht.readHumidity() function and save it as a string as well.
void data_logging()
{
  String Temperature = String(dht.readTemperature ( ), 2);
  String Humidity = String(dht.readHumidity ( ), 2);
  Data = Temperature + "," + Humidity;

  Serial.print("Save data: ");
  Serial.println(Data);

  myFile = SD.open("data.txt", FILE_WRITE);
  if (myFile) {
    Serial.print("Writing to data.txt...");
    myFile.println(Data);
    myFile.close();
    Serial.println("done.");
  } else {
    Serial.println("error opening data.txt");
  }
  Serial.println();
}
These readings will then get linked together and saved in a string variable named ‘Data.’ We will save the contents of this variable in our data.txt file after every 20 seconds.
Data = Temperature + "," + Humidity;We will open our data.txt file using SD.open() and set it up in FILE_WRITE mode. Then we will use myFile.println() and pass the ‘Data’ variable inside it to be written on the .txt file. After that, we will close the file using myFile.close(). This will ensure that the data written on the file gets saved as well.
myFile = SD.open("data.txt", FILE_WRITE);
  if (myFile) {
    Serial.print("Writing to data.txt...");
    myFile.println(Data);
    myFile.close();
    Serial.println("done.");
  } else {
    Serial.println("error opening data.txt");
  }
  Serial.println();
Demonstration
To see the demonstration of the above code, upload the code to Arduino. But, before uploading code, make sure to select the Arduino board from Tools > Board and also select the correct COM port to which the Arduino board is connected from Tools > Port.

Once the code is uploaded to Arduino, open the serial monitor and set the baud rate to 115200. Instantly the serial monitor will first initialize the microSD card and then start displaying the temperature and humidity. We will be able to see them successfully getting saved in our data.txt file.

After a few minutes, take the microSD card out of its module and insert it in your system to view the data.txt file.

Inside the file you will be able to view the sensor readings consisting of Temperature in degree Celsius followed by humidity in percentage.

Conclusion
In conclusion, we learned how to create a data logger to log sensor readings to Micro SD card using Arduino and DHT22 sensor. We used the DHT22 sensor to obtain temperature and humidity readings and logged them on our micro SD card.
For more data logging articles follow the links below:
Very well done tutorial. You go to great lengths to explain everything.
For my particular needs, I wanted to have the DHT-22 record the data to SD card, but be able to retrieve that data remotely (meaning another room in a home perhaps 75 feet away via WiFi from the Arduino to my WiFi router then from there via Local Area Network to a computer in my network. Right now my Arduino based DHT-22 is sending a reading every 5 minutes directly to a local database server that collects the data then creates a real time graph of the data. In reality, the WiFi router is not always 100% stable and occasionally needs rebooting. During that time readings are dropped. Recording to the SD card provides a backup for those times the WiFi router drops out. recording to the card also allows me to stop the direct WiFi real time connection for times when I need to server offline for whatever reason. Excellent and useful tutorial. Thanks!
Very nice tutorial, thanks! It will be possible to pair every record collected by the sensor with time and day of recording? Thank you for helping 🙂
Yes, you can add an RTC module such as DS1307 or DS3231 and save timestamps along with sensor readings. You can refer to these RTC guides:
https://microcontrollerslab.com/real-time-clock-ds1307-interfacing-arduino/
https://microcontrollerslab.com/ds3231-rtc-module-pinout-interfacing-with-arduino-features/
Thank you for the quick and useful reply 🙂
HI. What do i do if i get initiation fail
format card in correct format
What are other possible issues besides the format? I still keep on getting initialisation failed.