In this tutorial, we will learn how to perform BLE server client communication between two ESP32 boards using Bluetooth Low Energy. In other words, we will learn to exchange data between two ESP32 boards over BLE. The communication between server and client will be through BLE where one ESP32 board acts as a BLE server and sends sensor readings to the ESP32 client that will receive them and display them in an OLED display.
We will connect a DHT22 sensor with an ESP32 server that will transfer sensor data to the ESP32 client. Any appropriate sensor can be used such as DS18B20, DHT22, LM35, and MPU6050 but for this project, we will use a DHT22 sensor which is used to measure temperature and humidity.
This article is divided into the following sections:
- Project Overview
- Prerequisites (Installing Libraries)
- Setting ESP32 as server (Schematic, Arduino Sketch and demonstration)
- Setting ESP32 as client (Schematic, Arduino Sketch and demonstration)
- Conclusion
ESP32 BLE Server Client Communication Overview
The ESP32 server will be connected with a DHT sensor whereas the ESP32 client will be connected with a 0.96 inch OLED display.
Our aim is to send sensor readings from ESP32 server to ESP32 client via Bluetooth Low energy (BLE) connection.
In BLE, there are two types of devices known as the server (Peripheral) and the client (Central). A client can have many simultaneous connections with multiple servers. But a server can have only one connection at a time. Therefore, BLE communication can be either one-to-one or one-to-many communication. We will follow one-to one commination.
We will first prepare the ESP32 server by uploading it with the Arduino server sketch. Likewise, we will also create an Arduino client sketch and upload it to the ESP32 client connected with the OLED.
- The BLE server will announce its presence by sending radio advertising packets and ready to accept connection from a client.
- The BLE client will discover it and listen to the BLE server that is advertising. That means the BLE client will initiate the process of establishing a connection to the BLE server.
Recommended Reading: ESP32 Bluetooth Low Energy (BLE) using Arduino IDE
Prerequisites
Before we start this project make sure you are familiar with and have the latest version of Arduino IDE installed and also have ESP32 add-on installed in Arduino IDE:
Install ESP32 add-on in Arduino IDE
Installing Libraries
For this project we will require three libraries:
- Adafruit SSD 1306 library (To use the OLED display in our project this library will be required)
- DHT sensor library (As we are connecting the DHT22 sensor with ESP32 so we will have to use this library)
Open Arduino IDE and click on Sketch > Library > Manage Libraries
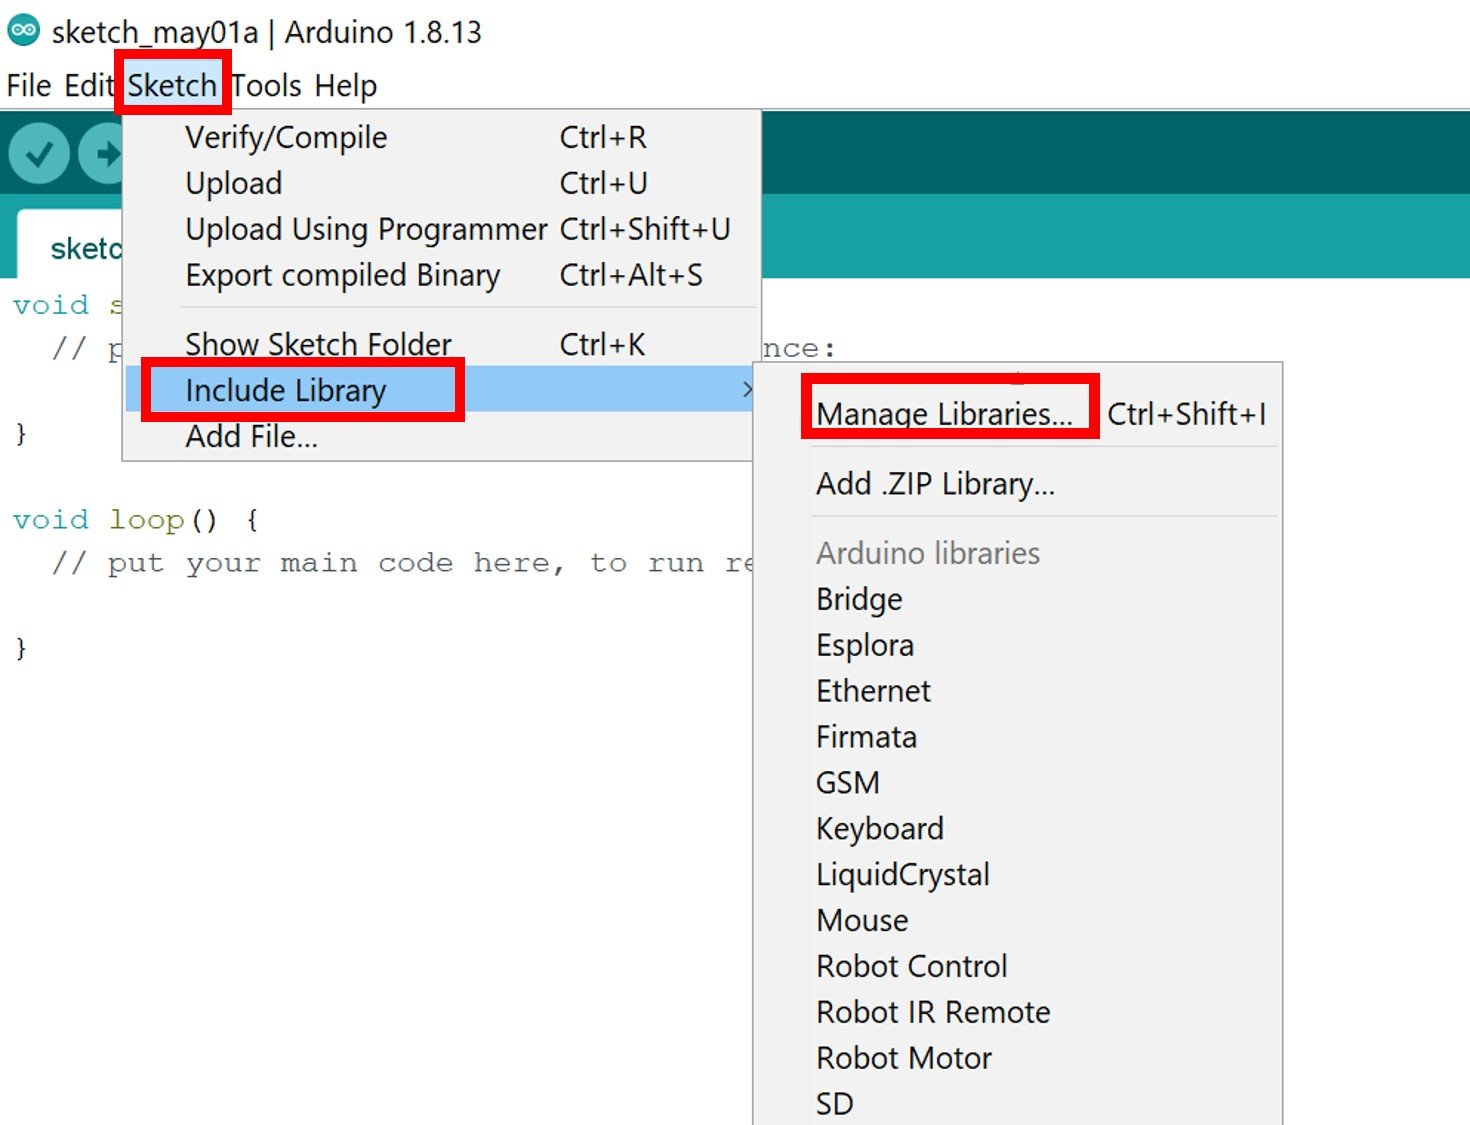
The following window will open up.

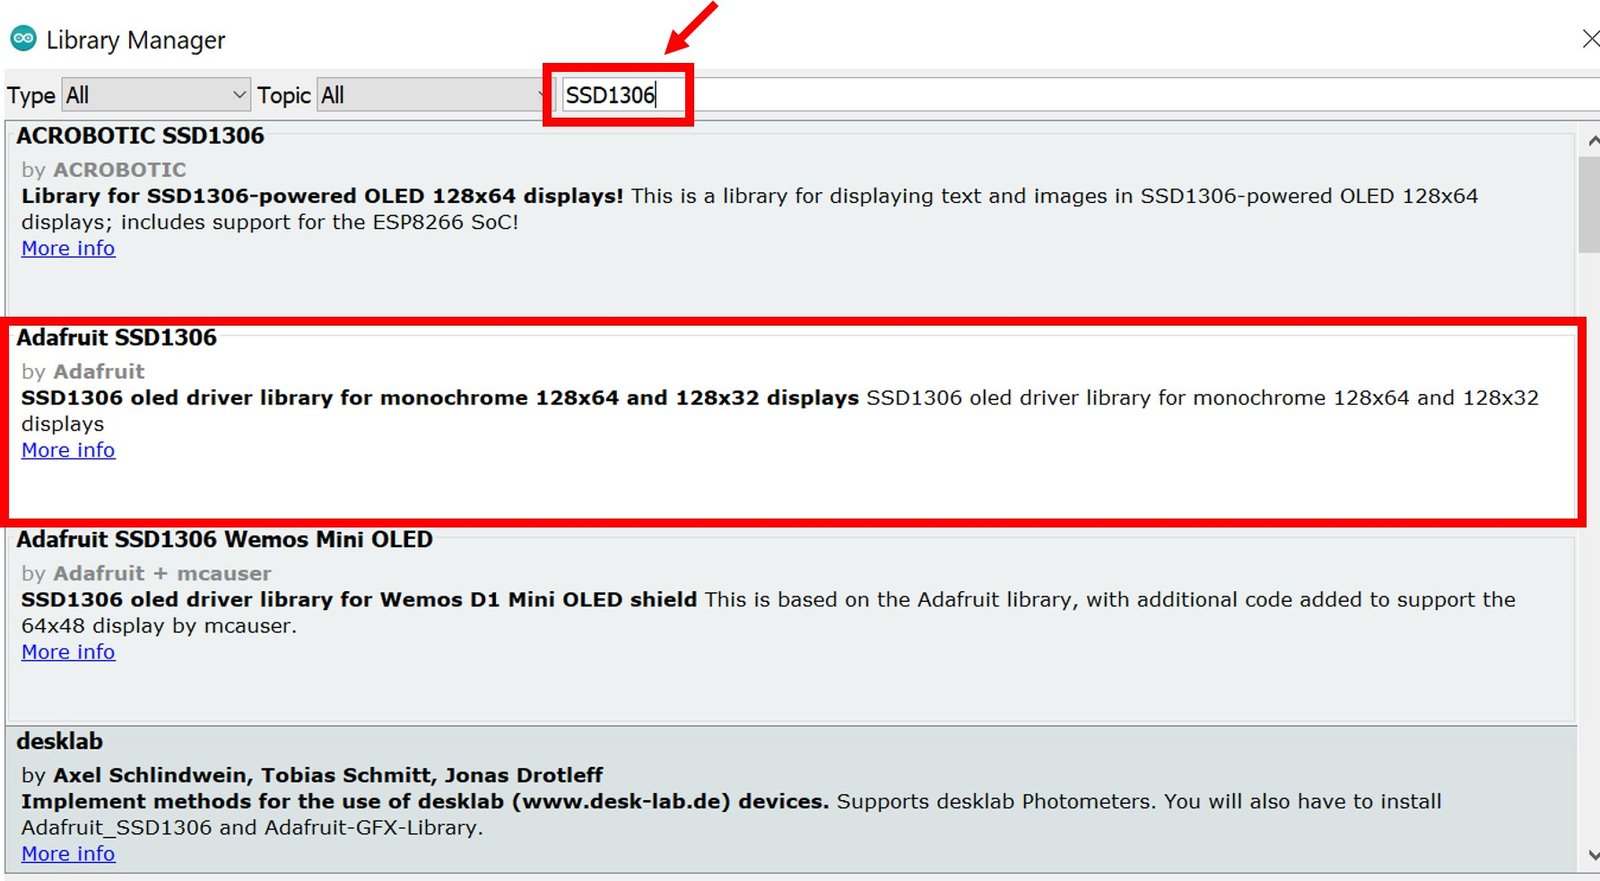
Type ‘SSD1306’ in the search tab and install the Adafruit SSD1306 OLED library.
Now, search for ‘DHT sensor’ and install it.

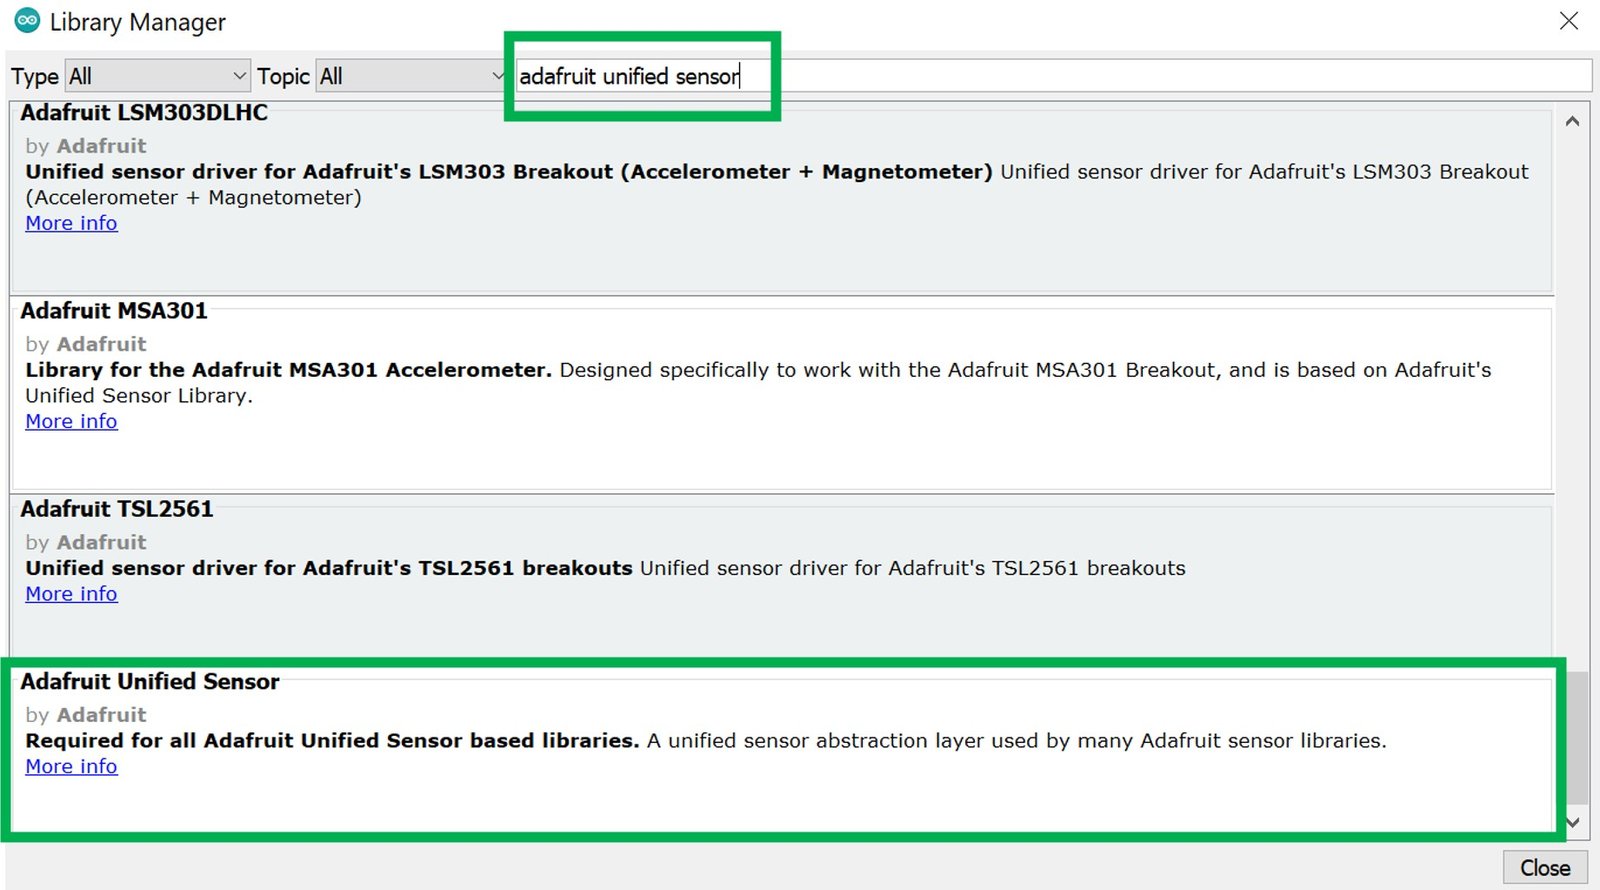
Lastly, search for ‘Adafruit Unified Sensor’ and install it as well.
After installing the libraries, restart your IDE.
Setting ESP32 BLE Server
We will first set up the ESP32 server. As you already know we will connect it with a DHT22 sensor. The DHT22 is an inexpensive sensor which measures relative humidity and temperature. It provides a calibrated digital output with a 1-wire protocol. It measures temperature and humidity with higher accuracy and supports a wider range as compared to DHT11. DHT sensors are pre-calibrated. We can directly connect them with ESP32 board to obtain sensor output reading. They are internally composed of a humidity sensing sensor and a thermistor. These two components measure humidity and temperature.
DHT22 Pinout
The following figure shows the pinout diagram of DHT22 sensor. DHT22 sensor consists of four pins. But on DHT22 modules only three pins are exposed to the pinout of the module and the 10k ohm pull-up resistor is internally connected to pin 2.
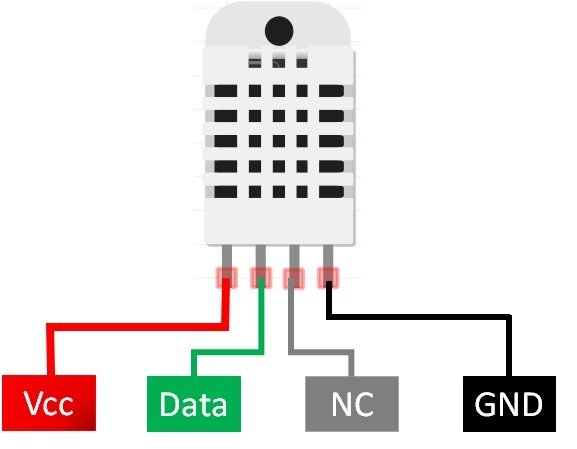
The following lists the pinout of the DHT sensor and their brief description. Pin number starts from left to right when you hold the sensor from the front end. It also shows how these pins will be connected with the ESP32 board.
| DHT22 Pins | ESP32 |
|---|---|
| 1 (VCC) | 3.3V |
| 2 (Data) | Any GPIO pin of ESP32 board along with 10k ohm pull-up resistor |
| 3 (NC) | Not used |
| 4 (GND) | Ground |
- VCC is the power supply pin. Apply voltage in a range of 3.3 V to 5.0 V to this pin
- Data Out is the digital output pin. It sends out the value of measured temperature and humidity in the form of serial data
- N/C is not connected
- GND: Connect the GND pin
Connecting DHT22 with ESP32
This section shows how to connect the ESP32 board with DHT22 sensor.
Required Components:
- ESP32 development board
- DHT22 sensor
- Connecting wires
- 10k pull up resistor (if using DHT22 sensor module then not required)
- Breadboard
Connect the DHT22 to ESP32 along with a 10K ohm pull-up resistor. Follow the connections as described in the table above.
The connection diagram is shown in the picture below.
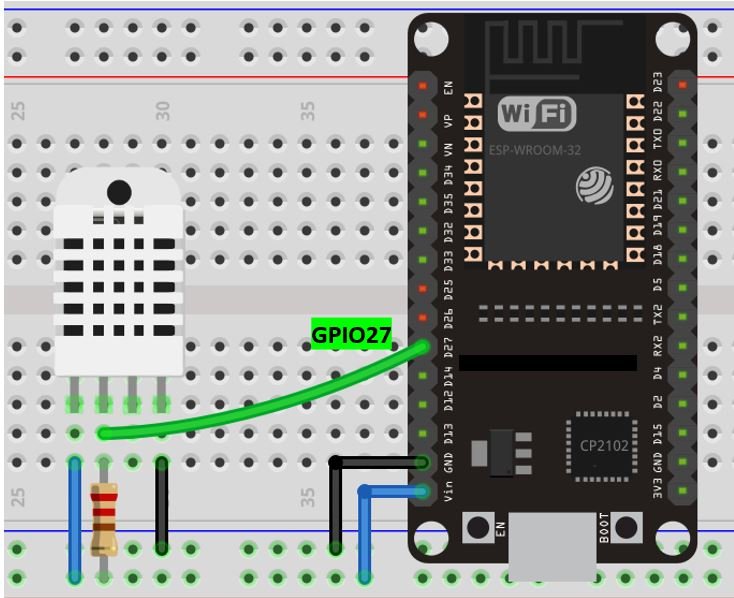
- The first pin is the power supply (VCC) pin. Connect it with the 3.3 volt pin of ESP32.
- Data out is the pin through which we get temperature and humidity samples from the DHT sensor. Connect this pin with GPIO27 of ESP32 and also connect the data pin with a 10k pull-up resistor. You can also use any appropriate digital pin of ESP32.
A Pull-up resistor is used to keep the data pin high for proper communication between the microcontroller and sensor. You can check the datasheet of DHT11 and DHT22 to get more information about it. DHT22 is also known by the name of AM2302.
- Third pin is not used.
- Connect the fourth pin (GND) to the ground pin of the ESP32 board

Arduino Sketch ESP32 server
Open your Arduino IDE and go to File > New. A new file will open. Copy the code given below in that file and save it.
#include <BLEDevice.h>
  #include <BLEServer.h>
  #include <BLEUtils.h>
  #include <BLE2902.h>
  #include "DHT.h"

  #define temperatureCelsius
  #define BLE_server "ESP32_Server"

  #define DHTTYPE DHT22

  const int DHTPin = 27;
  DHT dht(DHTPin, DHTTYPE);

  #define SERVICE_UUID "91bad492-b950-4226-aa2b-4ede9fa42f59"

  #ifdef temperatureCelsius
  BLECharacteristic dhtTemperatureCelsiusCharacteristics("cba1d466-344c-4be3-ab3f-189f80dd7518", BLECharacteristic::PROPERTY_NOTIFY);
  BLEDescriptor dhtTemperatureCelsiusDescriptor(BLEUUID((uint16_t)0x2902));
  #else
  BLECharacteristic dhtTemperatureFahrenheitCharacteristics("f78ebbff-c8b7-4107-93de-889a6a06d408", BLECharacteristic::PROPERTY_NOTIFY);
  BLEDescriptor
  dhtTemperatureFahrenheitDescriptor(BLEUUID((uint16_t)0x2901));
  #endif

  BLECharacteristic dhtHumidityCharacteristics("ca73b3ba-39f6-4ab3-91ae-186dc9577d99", BLECharacteristic::PROPERTY_NOTIFY);
  BLEDescriptor dhtHumidityDescriptor(BLEUUID((uint16_t)0x2903));


  bool device_connected = false;

  class MyServerCallbacks: public BLEServerCallbacks {
  void onConnect(BLEServer* pServer) {
  device_connected = true;
  };

  void onDisconnect(BLEServer* pServer) {
  device_connected = false;
  }
  };

  void setup() {

  dht.begin();
  Serial.begin(115200);

  BLEDevice::init(BLE_server);
  BLEServer *pServer = BLEDevice::createServer();
  pServer->setCallbacks(new MyServerCallbacks());
  BLEService *dhtService = pServer->createService(SERVICE_UUID);

  #ifdef temperatureCelsius
  dhtService->addCharacteristic(&dhtTemperatureCelsiusCharacteristics);
  dhtTemperatureCelsiusDescriptor.setValue("DHT Temperature (Celsius)");
  dhtTemperatureCelsiusCharacteristics.addDescriptor(new BLE2902());
  #else
  dhtService-
>addCharacteristic(&dhtTemperatureFahrenheitCharacteristics);
  dhtTemperatureFahrenheitDescriptor.setValue("DHT Temperature in (Fahrenheit)");
  dhtTemperatureFahrenheitCharacteristics.addDescriptor(new BLE2902());
  #endif

  dhtService->addCharacteristic(&dhtHumidityCharacteristics);
  dhtHumidityDescriptor.setValue("DHT humidity");
  dhtHumidityCharacteristics.addDescriptor(new BLE2902());
  dhtService->start();
  pServer->getAdvertising()->start();
  Serial.println("Waiting for ESP32 client connection...");
  }
  void loop() {
  if (device_connected) {
  float temp = dht.readTemperature();
  float f = dht.readTemperature(true);
  float hum = dht.readHumidity();

  if (isnan(hum) || isnan(temp) || isnan(f)) {
  Serial.println("Failed to read from DHT sensor! Check connections");
  return;
  }

  #ifdef temperatureCelsius
  static char temperature_celsius[7];
  dtostrf(temp, 6, 2, temperature_celsius);
  dhtTemperatureCelsiusCharacteristics.setValue(temperature_celsius);
  dhtTemperatureCelsiusCharacteristics.notify();
  Serial.print("Temperature Celsius: ");
  Serial.print(temp);
  Serial.print(" *C");
  #else
  static char temperature_Fahrenheit[7];
  dtostrf(f, 6, 2, temperature_Fahrenheit);
  dhtTemperatureFahrenheitCharacteristics.setValue(temperature_Fahrenheit);
  dhtTemperatureFahrenheitCharacteristics.notify();
  Serial.print("Temperature Fahrenheit: ");
  Serial.print(f);
  Serial.print(" *F");
  #endif

  static char humidity[7];
  dtostrf(hum, 6, 2, humidity);
  dhtHumidityCharacteristics.setValue(humidity);
  dhtHumidityCharacteristics.notify();
  Serial.print("  Humidity: ");
  Serial.print(hum);
  Serial.println(" %");
  delay(10000);
  }
  }
How the Code Works?
The code starts off by including all the libraries which are necessary for the BLE server communication, connection and advertisement. We are also including the DHT library that we installed before for the proper functionality of the DHT sensor.
  #include <BLEDevice.h>
  #include <BLEServer.h>
  #include <BLEUtils.h>
  #include <BLE2902.h>
  #include "DHT.h"
Next, we will define the BLE server name that we have specified as ‘ESP32_Server.’ This will be the name of our server that will be identified by the client at the time of connection. Additionally, we will set the temperature values in Celsius.
  #define temperatureCelsius
  #define BLE_server "ESP32_Server"
The following lines of code will specify the type of DHT sensor and the GPIO pin of the ESP32 board which we will connect with the data pin of the sensor. We are using GPIO27 that will be connected with the data pin of the DHT22 sensor. You can use any appropriate GPIO pin.
 #define DHTTYPE DHT22
 const int DHTPin = 27;
 DHT dht(DHTPin, DHTTYPE);
The BLE service and characteristic have a unique UUID so the next lines define that. The UUIDs which are defined below are the ones that were set in default. You can keep them as it is or generate your own. To obtain a unique UUID go to the online website UUIDGenerator.
#define SERVICE_UUID "91bad492-b950-4226-aa2b-4ede9fa42f59"

#ifdef temperatureCelsius
  BLECharacteristic dhtTemperatureCelsiusCharacteristics("cba1d466-344c-4be3-ab3f-189f80dd7518", BLECharacteristic::PROPERTY_NOTIFY);
  BLEDescriptor dhtTemperatureCelsiusDescriptor(BLEUUID((uint16_t)0x2902));
  #else
  BLECharacteristic dhtTemperatureFahrenheitCharacteristics("f78ebbff-c8b7-4107-93de-889a6a06d408", BLECharacteristic::PROPERTY_NOTIFY);
  BLEDescriptor
  dhtTemperatureFahrenheitDescriptor(BLEUUID((uint16_t)0x2901));
  #endif

  BLECharacteristic dhtHumidityCharacteristics("ca73b3ba-39f6-4ab3-91ae-186dc9577d99", BLECharacteristic::PROPERTY_NOTIFY);
  BLEDescriptor dhtHumidityDescriptor(BLEUUID((uint16_t)0x2903));
We will create the following class for server callbacks. They consist of two functions. onConnect() and onDisconect(). These will be called when a client will log in and when the client will log out respectively. The device_connected variable will be set to either true or false accordingly.
  class MyServerCallbacks: public BLEServerCallbacks
{
  void onConnect(BLEServer* pServer)
 {
  device_connected = true;
  };

  void onDisconnect(BLEServer* pServer)
 {
  device_connected = false;
  }
};
setup()
In the setup() function, serial.begin() is used to establish the serial connection between the development board at a baud rate of 115200. Moreover, we will initiate the connection with the DHT sensor as well by using the begin() method on the dht object.
  dht.begin();
  Serial.begin(115200);
Next, specify the BLE server name in the init command.
BLEDevice::init(BLE_server);Then create a server by using the createServer() function for the ESP32 board which we specified before and assign the callbacks we defined earlier to it.
  BLEServer *pServer = BLEDevice::createServer();
  pServer->setCallbacks(new MyServerCallbacks());
Next, we will create a service called (dhtService) on the server by using createService() and passing the service UUID defined earlier as a parameter inside it.
BLEService *dhtService = pServer->createService(SERVICE_UUID);After that, we will add the temperature and humidity Characteristic on our server (ESP32). We have specified characteristics for both Celsius temperature and Fahrenheit temperature. It will choose whether we have defined our temperature in Celsius or Fahrenheit.
#ifdef temperatureCelsius
  dhtService->addCharacteristic(&dhtTemperatureCelsiusCharacteristics);
  dhtTemperatureCelsiusDescriptor.setValue("DHT Temperature (Celsius)");
  dhtTemperatureCelsiusCharacteristics.addDescriptor(new BLE2902());
  #else
  dhtService->addCharacteristic(&dhtTemperatureFahrenheitCharacteristics);
  dhtTemperatureFahrenheitDescriptor.setValue("DHT Temperature in (Fahrenheit)");
  dhtTemperatureFahrenheitCharacteristics.addDescriptor(new BLE2902());
  #endif

 dhtService->addCharacteristic(&dhtHumidityCharacteristics);
  dhtHumidityDescriptor.setValue("DHT humidity");
  dhtHumidityCharacteristics.addDescriptor(new BLE2902());
We will launch the server, using the start() command.
After the service has started, we will use getAdvertising() to initiate the advertising process so that nearby devices would be able to spot our server and connect with it.
dhtService->start();
pServer->getAdvertising()->start();
Serial.println("Waiting for ESP32 client connection...");
loop()
Inside the loop() function we will cater to what happens after a client connects with the ESP32 BLE server.
First, after the client has connected with the server we will obtain the sensor readings. Through dht.readHumidity(), the humidity reading will get saved in the variable ‘hum.’ Likewise, for temperature, the sensor reading will get saved in the variable ‘temp.’ Additionally, if the connection between the ESP32 board and the DHT sensor is incorrect or the values are not being accessed properly then an error message will be printed. This will help us in debugging our circuit or a possible issue in the initialization of the sensor.
if (device_connected) {
  float temp = dht.readTemperature();
  float f = dht.readTemperature(true);
  float hum = dht.readHumidity();

  if (isnan(hum) || isnan(temp) || isnan(f)) {
  Serial.println("Failed to read from DHT sensor! Check connections");
  return;
  }
Then , we will store the temperature value in the variable ‘temperature_celsius’ or ‘temperature_Fahrenheit’ according to the unit that was previously defined. This will get updated in its respective characteristic and sent to the connected client.
#ifdef temperatureCelsius
  static char temperature_celsius[7];
  dtostrf(temp, 6, 2, temperature_celsius);
  dhtTemperatureCelsiusCharacteristics.setValue(temperature_celsius);
  dhtTemperatureCelsiusCharacteristics.notify();
  Serial.print("Temperature Celsius: ");
  Serial.print(temp);
  Serial.print(" *C");
  #else
  static char temperature_Fahrenheit[7];
  dtostrf(f, 6, 2, temperature_Fahrenheit);
  dhtTemperatureFahrenheitCharacteristics.setValue(temperature_Fahrenheit);
  dhtTemperatureFahrenheitCharacteristics.notify();
  Serial.print("Temperature Fahrenheit: ");
  Serial.print(f);
  Serial.print(" *F");
  #endif
Similarly, humidity characteristic will also get updated and sent to the client. This loop() will repeat after every 10 seconds.
static char humidity[7];
  dtostrf(hum, 6, 2, humidity);
  dhtHumidityCharacteristics.setValue(humidity);
  dhtHumidityCharacteristics.notify();
  Serial.print("  Humidity: ");
  Serial.print(hum);
  Serial.println(" %");
delay(10000);
Testing ESP32 BLE Server with an Android App
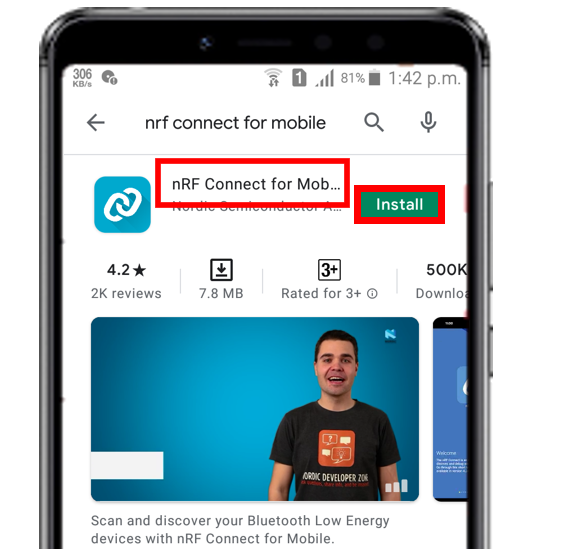
To perform this testing functionality of the ESP32 BLE server, we will first test it on a cell phone. We will need a phone which supports BLE connection. After you have got your hands on one, open the Play Store and search for ‘nRF Connect for Mobile.’ This is a free app that will help us to check for the connection. Install the app on your cell phone.
Before proceeding further, make sure to change your Bluetooth settings by enabling the Bluetooth adapter in your cell phone as shown in the figure.

Press the ENABLE button on your ESP32 board. Now, open the nRF Connect for Mobile application and tap the Scan button. This will scan for all the devices which are close to the cell phone. Thus, our ESP32 will also get scanned and you will be able to see ‘ESP32_Server’ written among the scanned devices as shown below:

Tap the Connect button and the following appears on the cell phone screen.
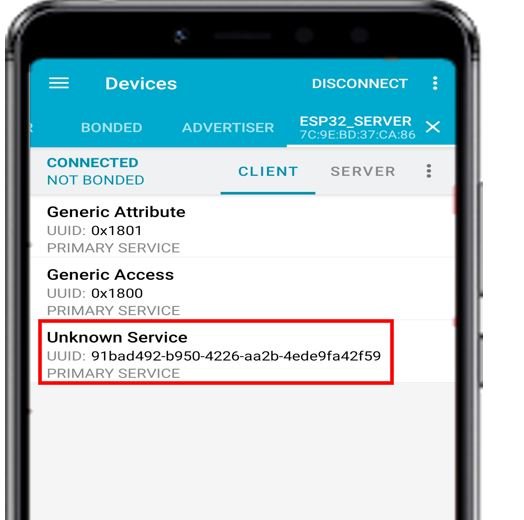
Click the service. You will be able to find two characteristics for this service. One is for humidity and the other is for temperature. Click the boxes highlighted in red for both to start the notify process.

You will be able to view the sensor readings in each of the characteristic. The first characteristic shows a value of 52.00 that corresponds to humidity value. Likewise, the second characteristic shows a value of 29.60 that corresponds to temperature value in Celsius. These readings will update to new ones after every 10 seconds.

Setting ESP32 BLE Client
Now, let us move to the next part and set up our ESP32 client.
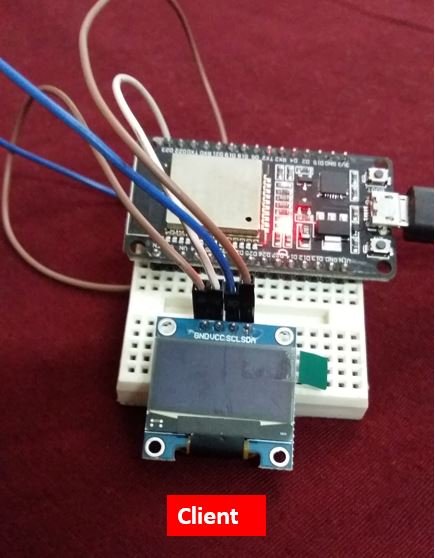
The ESP32 client will connect with the ESP32 via BLE. As you already know we will connect it with an OLED display. The sensor data from ESP32 server will get displayed on the OLED screen on the client side.
Connecting SSD1306 OLED Display with ESP32
SSD1306 OLED Pinout
Let us take a look at the OLED display which we will be using in this article. It is called SSD 1306 0.96-inch OLED display which has 128×64 pixels and communicates only via I2C protocol with the ESP development boards. It is cheap and readily available in the market.
Below you can see the pinout of this OLED Display.
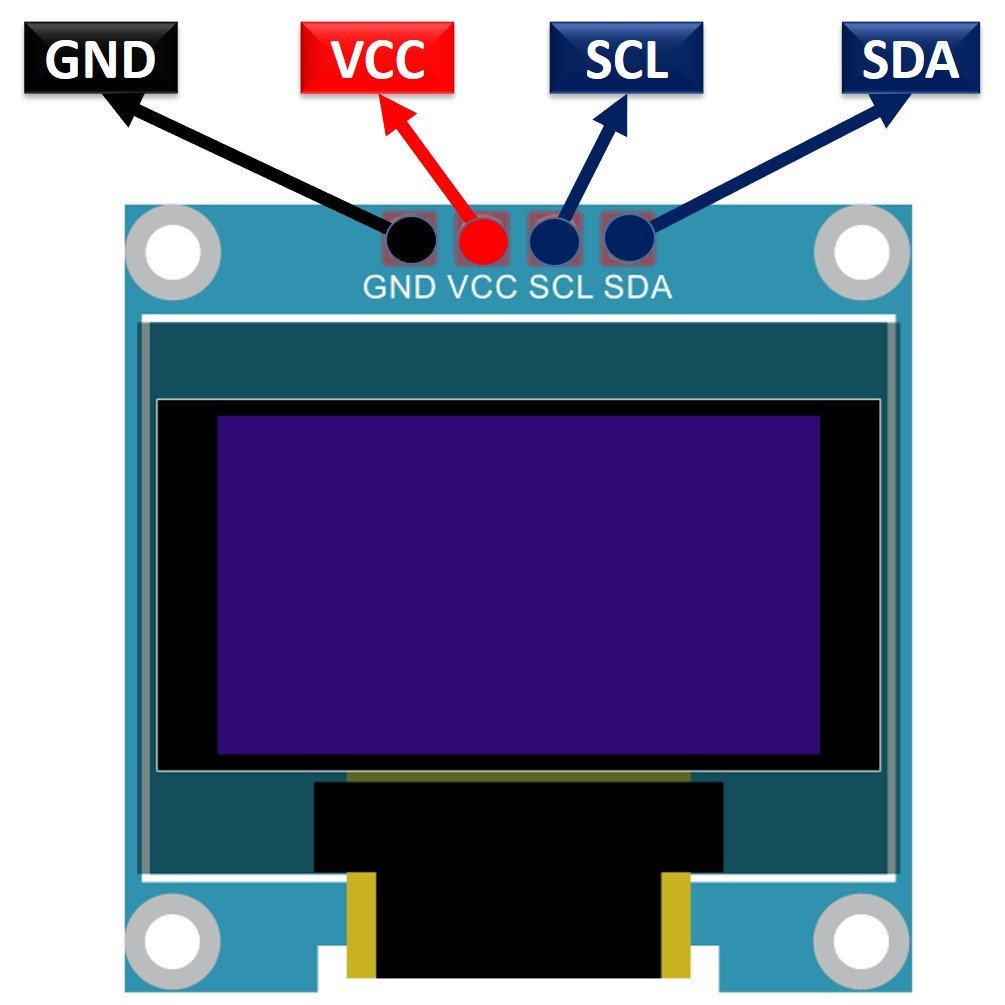
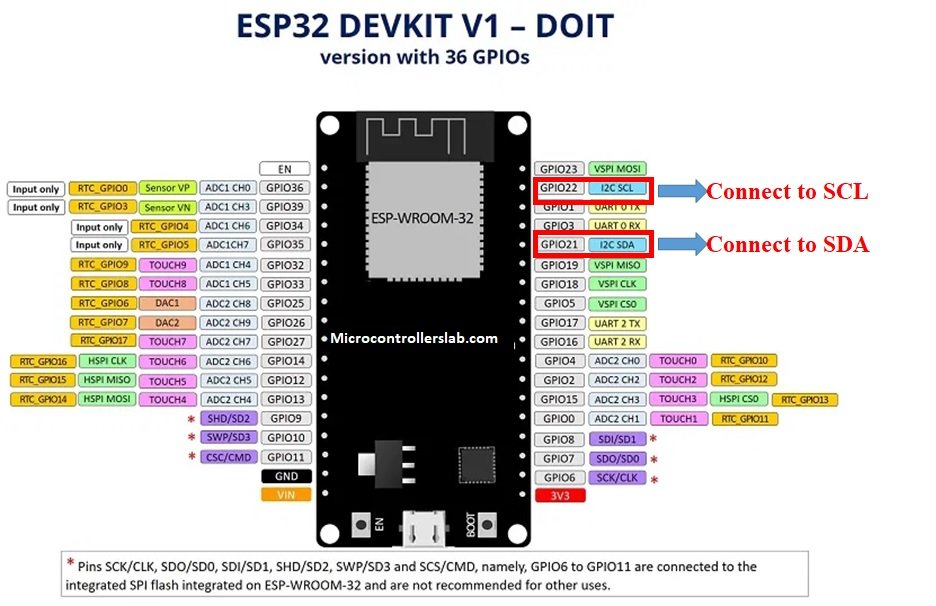
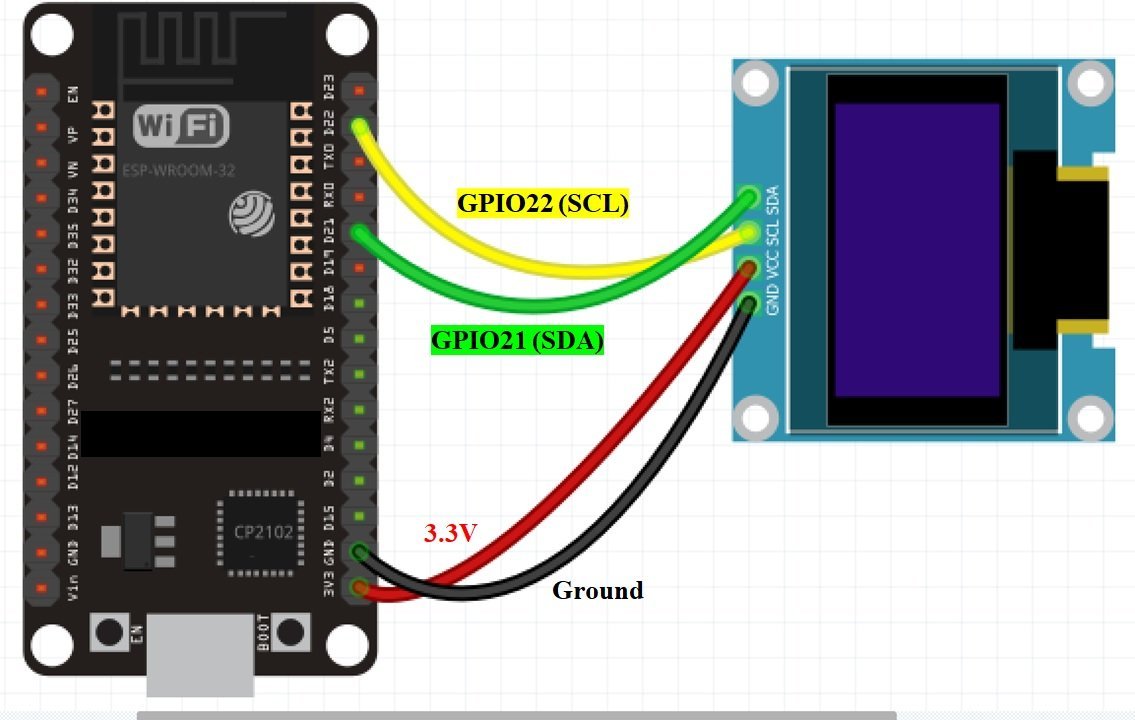
The OLED display has 4 terminals which we will connect with the ESP32 board. As the OLED display requires an operating voltage in the range of 3.3-5V hence we will connect the VCC terminal with 3.3V which will be in common with the ESP32 board. SCL of the display will be connected with the SCL pin of the module and the SDA of the display will be connected with the SDA of the module. By default, the I2C pin in ESP32 for SDA is GPIO21, and for SCL is GPIO22. The connections between the two devices can be seen below.
| ESP32 board | SSD1306 OLED Display |
|---|---|
| VCC=3.3V | VCC |
| GPIO21(I2C SDA) | SDA |
| GPIO22(I2C SCL) | SCL |
| GND | GND |
The I2C pins stated above are set in default. If you want to use any GPIO pins for I2C, you will have to set it in code using SoftI2C().
ESP32 I2C Pins
The I2C pins stated above are set in default. If we want to change the GPIO pins we have to set them in code. The diagram below shows the pinout for the ESP32.
Components Required:
We will need the following components to connect our ESP32 board with the OLED Display.
- ESP32 board
- SSD1306 OLED Display
- Connecting Wires
- Breadboard
Schematic ESP32 with OLED
Follow the schematic diagram below for the ESP32 module and connect them accordingly.
You may like to read:
OLED Display Interfacing with ESP32 – Display Text, Draw shapes and Images
Arduino Sketch ESP32 BLE Client
Open your Arduino IDE and go to File > New. A new file will open. Copy the code given below in that file and save it.
#include "BLEDevice.h"
  #include <Wire.h>
  #include <Adafruit_SSD1306.h>

  #define temperatureCelsius
  #define BLE_server "ESP32_Server"

  static BLEUUID dhtServiceUUID("91bad492-b950-4226-aa2b-4ede9fa42f59");
  #ifdef temperatureCelsius
  static BLEUUID temperatureCharacteristicUUID("cba1d466-344c-4be3-ab3f-189f80dd7518");
  #else
  static BLEUUID temperatureCharacteristicUUID("f78ebbff-c8b7-4107-93de-889a6a06d408");
  #endif
  static BLEUUID humidityCharacteristicUUID("ca73b3ba-39f6-4ab3-91ae-186dc9577d99");

  static boolean doConnect = false;
  static boolean connected = false;

  static BLEAddress *pServerAddress;
  static BLERemoteCharacteristic* temperatureCharacteristic;
  static BLERemoteCharacteristic* humidityCharacteristic;

  const uint8_t notificationOn[] = {0x1, 0x0};
  const uint8_t notificationOff[] = {0x0, 0x0};

  #define SCREEN_WIDTH 128
  #define SCREEN_HEIGHT 64
  Adafruit_SSD1306 display(SCREEN_WIDTH, SCREEN_HEIGHT, &Wire, -1);

  bool connectToServer(BLEAddress pAddress) {
  BLEClient* pClient = BLEDevice::createClient();

  pClient->connect(pAddress);
  Serial.println(" - Connected successfully to server");

  BLERemoteService* pRemoteService = pClient->getService(dhtServiceUUID);

  if (pRemoteService == nullptr) {
  Serial.print("Failed to find our service UUID: ");
  Serial.println(dhtServiceUUID.toString().c_str());
  return (false);
  }

  temperatureCharacteristic = pRemoteService->getCharacteristic(temperatureCharacteristicUUID);
  humidityCharacteristic = pRemoteService->getCharacteristic(humidityCharacteristicUUID);

  if (temperatureCharacteristic == nullptr || humidityCharacteristic ==nullptr) {
  Serial.print("Failed to find our characteristic UUID");
  return false;
  }
  Serial.println(" Characteristics Found!");

  temperatureCharacteristic->registerForNotify(temperatureNotifyCallback);
  humidityCharacteristic->registerForNotify(humidityNotifyCallback);
  }

  class MyAdvertisedDeviceCallbacks: public BLEAdvertisedDeviceCallbacks {
  void onResult(BLEAdvertisedDevice advertisedDevice) {
  if (advertisedDevice.getName() == BLE_server) {
  advertisedDevice.getScan()->stop();
  pServerAddress = new BLEAddress(advertisedDevice.getAddress());

  doConnect = true;
  Serial.println("Device found. Connecting!");
  }
  }
  };

  static void temperatureNotifyCallback(BLERemoteCharacteristic*pBLERemoteCharacteristic, uint8_t* pData, size_t length, bool isNotify)
  {
  display.setCursor(34,10);
  display.print((char*)pData);
  Serial.print("Temperature: ");
  Serial.print((char*)pData);
  #ifdef temperatureCelsius
  display.print(" *C");
  Serial.print(" *C");
  #else
  display.print(" *F");
  Serial.print(" *F");
  #endif
  display.display();
  }

  static void humidityNotifyCallback(BLERemoteCharacteristic* pBLERemoteCharacteristic, uint8_t* pData, size_t length, bool isNotify) {
  display.setCursor(34,20);
  display.print((char*)pData);
  display.print(" %");
  display.display();
  Serial.print(" Humidity: ");
  Serial.print((char*)pData);
  Serial.println(" %");
  }

  void setup()
  {
  Serial.begin(115200);
  if(!display.begin(SSD1306_SWITCHCAPVCC, 0x3C)) {
    Serial.println(F("SSD1306 allocation failed"));
    for(;;);
  }
  display.clearDisplay();
  display.setTextSize(1);
  display.setTextColor(WHITE);
  display.setCursor(30,0);
  display.print("DHT22 Readings");
  display.display();
  Serial.println("Starting Arduino BLE Client application...");
  BLEDevice::init("");

  BLEScan* pBLEScan = BLEDevice::getScan();
  pBLEScan->setAdvertisedDeviceCallbacks(new
  MyAdvertisedDeviceCallbacks());
  pBLEScan->setActiveScan(true);
  pBLEScan->start(30);
  }
  void loop() {
  if (doConnect == true) {
  if (connectToServer(*pServerAddress)) {
  Serial.println("We are now connected to the BLE Server.");
  temperatureCharacteristic->getDescriptor(BLEUUID((uint16_t)0x2902))->writeValue((uint8_t*)notificationOn, 2, true);
  humidityCharacteristic->getDescriptor(BLEUUID((uint16_t)0x2902))->writeValue((uint8_t*)notificationOn, 2, true);
  connected = true;
  } else {
  Serial.println("Failed to connect to server!");
  }
  doConnect = false;
  }
  delay(1000);
  }
How the Code Works?
We will start by including the relevant libraries for the ESP32 client. This includes the BLE library, Wire.h for I2C communication between ESP32 and OLED and Adafruit_SSD1306 for the OLED functionality.
#include "BLEDevice.h"
#include <Wire.h>
#include <Adafruit_SSD1306.h>
Next, we will define the BLE server name that we have specified as ‘ESP32_Server.’ This will be the name of our server that will be identified by the client at the time of connection. Additionally, we will set the temperature values in Celsius.
Make sure both of these are same as defined in the ESP32 server sketch.
 #define temperatureCelsius
 #define BLE_server "ESP32_Server"
The BLE service and characteristic have a unique UUID so the next lines define that. The UUIDs which are defined below are the ones that were set in default.
Make sure the UUIDs are the same as you defined in the ESP32 server sketch.
 static BLEUUID dhtServiceUUID("91bad492-b950-4226-aa2b-4ede9fa42f59");
  #ifdef temperatureCelsius
  static BLEUUID temperatureCharacteristicUUID("cba1d466-344c-4be3-ab3f-189f80dd7518");
  #else
  static BLEUUID temperatureCharacteristicUUID("f78ebbff-c8b7-4107-93de-889a6a06d408");
  #endif
  static BLEUUID humidityCharacteristicUUID("ca73b3ba-39f6-4ab3-91ae-186dc9577d99");
We will define two boolean variables that we will use later on in the sketch. Both of them are set to false.
static boolean doConnect = false;
static boolean connected = false;
Additionally, we will define some variables that will be used later on in the sketch. These include the server address pointer, the BLE remote characteristic for temperature and humidity and notification arrays.
  static BLEAddress *pServerAddress;
  static BLERemoteCharacteristic* temperatureCharacteristic;
  static BLERemoteCharacteristic* humidityCharacteristic;
  const uint8_t notificationOn[] = {0x1, 0x0};
  const uint8_t notificationOff[] = {0x0, 0x0};
Next will define the width and height of our OLED display in pixels. We are using a 128×64 display hence the width will be 128 and the height will be 64. Next, we will initialize the display by creating an object of Adafruit_SSD1306 and specifying the width, height, I2C instance (&Wire), and -1 as parameters inside it.’ -1′ specifies that the OLED display which we are using does not have a RESET pin. If you are using the RESET pin then specify the GPIO through which you are connecting it with your development board.
 #define SCREEN_WIDTH 128
  #define SCREEN_HEIGHT 64
  Adafruit_SSD1306 display(SCREEN_WIDTH, SCREEN_HEIGHT, &Wire, -1);
Callback Functions
The following callback will be responsible for finding the correct BLE server i.e. our ESP32_Server. After our ESP32 server is successfully found, the Boolean variable we defined earlier ‘doConnect’ will be set to true. We will also be able to see in our serial monitor that the correct device has been found.
  class MyAdvertisedDeviceCallbacks: public BLEAdvertisedDeviceCallbacks {
  void onResult(BLEAdvertisedDevice advertisedDevice) {
  if (advertisedDevice.getName() == BLE_server) {
  advertisedDevice.getScan()->stop();
  pServerAddress = new BLEAddress(advertisedDevice.getAddress());

  doConnect = true;
  Serial.println("Device found. Connecting!");
  }
  }
  };
Now after finding the correct server, we will connect to it using the following lines of code. The connectToServer() function will be responsible for that. It will maintain the connection between the server and the client. Additionally, the callback functions for temperature notify and humidity notify are also assigned.
  bool connectToServer(BLEAddress pAddress) {
  BLEClient* pClient = BLEDevice::createClient();

  pClient->connect(pAddress);
  Serial.println(" - Connected successfully to server");

  BLERemoteService* pRemoteService = pClient->getService(dhtServiceUUID);

  if (pRemoteService == nullptr) {
  Serial.print("Failed to find our service UUID: ");
  Serial.println(dhtServiceUUID.toString().c_str());
  return (false);
  }

  temperatureCharacteristic = pRemoteService->getCharacteristic(temperatureCharacteristicUUID);
  humidityCharacteristic = pRemoteService->getCharacteristic(humidityCharacteristicUUID);

  if (temperatureCharacteristic == nullptr || humidityCharacteristic ==nullptr) {
  Serial.print("Failed to find our characteristic UUID");
  return false;
  }
  Serial.println(" Characteristics Found!");

  temperatureCharacteristic->registerForNotify(temperatureNotifyCallback);
  humidityCharacteristic->registerForNotify(humidityNotifyCallback);
  }
Then, we have the notify callback functions for temperature and humidity. They are responsible for obtaining the current temperature reading in the case of temperatureNotifyCallback() and the current humidity reading in the case of humidityNotifyCallback() whenever a new reading is received by the client. Then, these readings are displayed on the OLED display.
  static void temperatureNotifyCallback(BLERemoteCharacteristic*pBLERemoteCharacteristic, uint8_t* pData, size_t length, bool isNotify)
  {
  display.setCursor(35,10);
  display.print((char*)pData);
  Serial.print("Temperature: ");
  Serial.print((char*)pData);
  #ifdef temperatureCelsius
  display.print(" *C");
  Serial.print(" *C");
  #else
  display.print(" *F");
  Serial.print(" *F");
  #endif
  display.display();
  }
static void humidityNotifyCallback(BLERemoteCharacteristic* pBLERemoteCharacteristic, uint8_t* pData, size_t length, bool isNotify) {
  display.setCursor(35,20);
  display.print((char*)pData);
  display.print(" %");
  display.display();
  Serial.print(" Humidity: ");
  Serial.print((char*)pData);
  Serial.println(" %");
  }
setup()
Inside the setup() function, we will open a serial connection at a baud rate of 115200. Moreover, we will also initialize the OLED display by using display.begin(). Make sure you specify the correct address of your display. In our case, it is 0X3C.
Serial.begin(115200);

if(!display.begin(SSD1306_SWITCHCAPVCC, 0x3C)) {
    Serial.println(F("SSD1306 allocation failed"));
    for(;;);
  }
We will display ‘DHT22 Readings’ on the OLED display. We will set the text size, colour and cursor position. Call the display() function on the display object so that the text displays on the OLED.
display.clearDisplay();
  display.setTextSize(1);
  display.setTextColor(WHITE);
  display.setCursor(30,0);
  display.print("DHT22 Readings");
  display.display();
Next, we will initialize the ESP32 board for BLE functionality.
BLEDevice::init("");Now, we will scan for the nearby devices using the following lines of code.
BLEScan* pBLEScan = BLEDevice::getScan();
  pBLEScan->setAdvertisedDeviceCallbacks(new
  MyAdvertisedDeviceCallbacks());
  pBLEScan->setActiveScan(true);
  pBLEScan->start(30);
loop()
Inside the loop() function, we will check if the client is connected with the ESP32 server, the notify property is activated for both the characteristics. This is achieved by using the writeValue() method. The respective temperature and humidity readings will then be displayed in the OLED after every 10 seconds. Otherwise, an error message ‘Failed to connect to server!’ will be displayed in the serial monitor.
 void loop() {
  if (doConnect == true) {
  if (connectToServer(*pServerAddress)) {
  Serial.println("We are now connected to the BLE Server.");
  temperatureCharacteristic->getDescriptor(BLEUUID((uint16_t)0x2902))->writeValue((uint8_t*)notificationOn, 2, true);
  humidityCharacteristic->getDescriptor(BLEUUID((uint16_t)0x2902))->writeValue((uint8_t*)notificationOn, 2, true);
  connected = true;
  } else {
  Serial.println("Failed to connect to server!");
  }
  doConnect = false;
  }
  delay(1000);
  }
ESP32 BLE Server-Client Demonstration
Now let us demonstrate our project. Make sure both the ESP32 server and ESP32 client boards are powered on and their respective codes uploaded on them.

To see the demonstration, upload the above code to Arduino. Before uploading the code, make sure to select the ESP32 board from Tools > Board.

Also, select the correct COM port to which the ESP32 client board is connected from Tools > Port. Once the code is uploaded to the ESP32 client, open its serial monitor. You will be able to see the sensor readings being obtained from the server side after every 10 seconds. In the OLED display, new readings for temperature and humidity keep updating after every 10 seconds.
Conclusion
In conclusion, we have learned how to perform communication between ESP32 BLE server and ESP32 BLE client using Arduino IDE. We send sensor readings from one ESP32 board to another via BLE server and client. This was achieved by using two ESP32 boards one that acted as a server and the other that acted as the client using Bluetooth. For this BLE Client-Server communication, we used DHT22 sensor readings but this project can be implemented with any type of data transmission between the two boards.
hello, I applied the code above on my two ESP32 with OLED and DHT22 sensor, but I noticed a problem with the display on the screen, the values are displayed, but I have a problem of interference between the two lines (humidity and temperature)
how can I solve this problem ?
How do one to many communication works? Can you please post blog on that.
thanks in advance