In this tutorial, we will learn how to use Bluetooth Low Energy (BLE) on the ESP32 microcontroller using the Arduino IDE. We will establish communication between the ESP32 as a BLE server and an Android BLE application, enabling the transmission and reception of data between the two devices. First, we will configure ESP32 in both BLE server and scanner modes allowing it to transmit data, and as a scanner, enabling it to receive data from other BLE devices.
Next, we will see a practical example of BLE communication where we establish a connection between the ESP32 BLE server and a BLE mobile application. This example will demonstrate the transmission and reception of data, showcasing the full potential of BLE on the ESP32.
The ESP32 chip is a powerful microcontroller that offers more than just WiFi capabilities. It also includes built-in support for both Bluetooth and Bluetooth Low Energy (BLE). Bluetooth is a widely used wireless data transfer protocol that facilitates seamless communication between various devices. It is employed by a diverse range of gadgets, such as wireless headphones, smartphones, laptops, and smartwatches, enabling them to exchange data effortlessly.
The ESP32 chip’s Bluetooth support aligns with the standards defined by the Bluetooth Special Interest Group (SIG), which oversees and maintains two main Bluetooth specifications: Classic Bluetooth and Bluetooth Low Energy. These specifications cater to different application scenarios, making the ESP32 a versatile platform for wireless communication needs in a wide array of IoT and connected device projects.
You may like to read ESP32 Bluetooth Classic tutorial:
Link to article: Use ESP32 Bluetooth Classic with Arduino IDE
Recommended Components
The following components are used in this project or are helpful for building it with the ESP32.
| Component | How it’s used in this project | Buy on Amazon |
|---|---|---|
| ESP32 Development Board (DevKit V1) | Runs the Bluetooth Low Energy (BLE) example sketch. | Check Price |
| Micro USB Cable | Connects the board to your computer to upload the sketch and power it. | Check Price |
| Breadboard | Holds the board and components together while you wire up the project. | Check Price |
| Jumper Wires | Make the connections between the board and any external parts. | Check Price |
As an Amazon Associate we earn from qualifying purchases. Prices and availability are accurate as of the date/time indicated and are subject to change.
Bluetooth Low Energy (BLE)
Bluetooth Low Energy (BLE) is a wireless communication technology designed to be a low-power alternative to classic Bluetooth. Unlike classic Bluetooth, which emphasizes high data rates, BLE prioritizes reduced energy consumption, making it ideal for battery-operated devices, fitness trackers, smartwatches, and IoT applications.
One of the main advantages of BLE is its significantly lower power consumption compared to classic Bluetooth. BLE devices activate their radio only when transmitting or receiving data, spending most of the time in a power-saving standby mode. This efficiency allows BLE devices to achieve longer battery life, making them suitable for use in devices that require extended operation without frequent battery replacements.
While BLE is suitable for transferring smaller amounts of data over shorter distances, classic Bluetooth can handle higher data rates at the cost of higher power consumption. This distinction makes BLE an excellent choice for applications that prioritize power efficiency over data throughput.
To further illustrate the differences between classic Bluetooth and BLE in terms of electrical specifications, refer to the table below:
| Audio streaming or files transfer | Bluetooth Low Energy / BLE | |
|---|---|---|
| Data Transfer Rate | 2-3 Mbps | 1 Mbps |
| Range | ~10-100m | ~50m |
| Operating Frequency | 79 RF | 40 RF |
| Peak Current Consumption | ~30mA | <15mA |
| Power Consumption | 1W | 0.01-0.5W |
| Total time to send data | 100ms | 3ms |
| Applications | Audio straming or files transfer | Sensor data, Control commands, etc |
BLE operates at 2.4 GHz ISM (Industrial, Scientific, and Medical) band and is designed to target applications that need to run on batteries for longer periods of time—months and even years.
Key features
- Low Power consumption
- Cost-Effective
- Faster connection
- Compact size
- Secure & Reliable
BLE Server and Client
In Bluetooth Low Energy (BLE), communication involves two types of devices: the server (Peripheral) and the client (Central).
BLE Server
A BLE Server, also known as a Peripheral, is a device that offers data or services to other devices, known as Clients. The BLE Server advertises its presence and capabilities through advertising packets, which are periodically broadcasted. When a BLE Client (Central) detects the advertising packets, it can initiate a connection with the BLE Server. Once the connection is established, the BLE Server can provide data or services to the Client.
For example, in a BLE-enabled heart rate monitor, the monitor acts as the BLE Server. It advertises its heart rate measurement service, and when a BLE-enabled smartphone comes into range, it can connect to the heart rate monitor as a Client and retrieve heart rate data from the Server.
BLE Client
A BLE Client, also known as a Central, is a device that scans for nearby BLE Servers and can initiate connections with them. Once a connection is established, the Client can read, write, or receive notifications from the Services and Characteristics offered by the Server.
Continuing with the heart rate monitor example, the BLE-enabled smartphone acts as the BLE Client. It scans for nearby BLE devices and detects the advertising packets sent by the heart rate monitor. When the smartphone connects to the heart rate monitor as a Client, it can request and receive heart rate data from the Server.
A client can establish multiple simultaneous connections with various servers, while a server can only maintain one connection at a time. Therefore, BLE communication can be either one-to-one or one-to-many, allowing for versatile data exchange.
Connection Types
In addition to point-to-point communication, BLE supports mesh networks and broadcast mode. In broadcast mode, multiple devices connect to a single server, enabling one-to-many data communication. On the other hand, a mesh network involves multiple interconnected devices, facilitating many-to-many or multipoint-to-multipoint communication.
As illustrated in the figure below, one ESP32 device acts as the client (Central), while other ESP32 boards serve as servers (Peripherals).
The BLE server announces its presence by broadcasting radio advertising packets, indicating it is ready to accept connections from clients.
On the other hand, the BLE client scans and listens for BLE devices advertising nearby. It initiates the process of establishing a connection to the BLE servers.
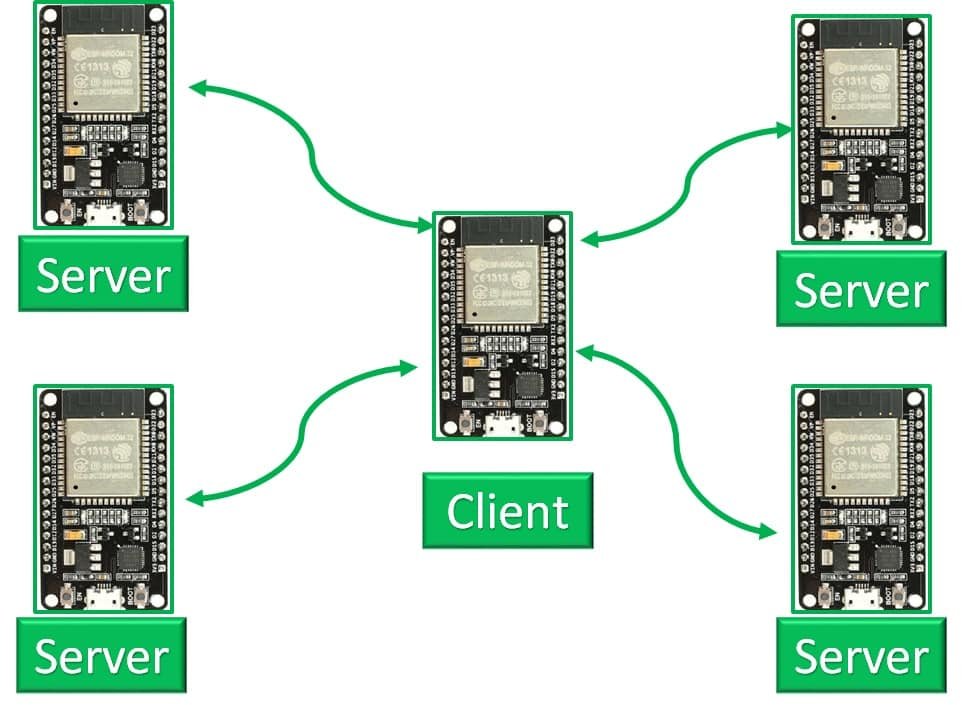
It’s essential to note that ESP32 can function as both a server and a client, and the BLE client can hold connections with multiple servers simultaneously.
The client operates in two modes: scanning and connected, while the server has two modes: advertising and connected.
How does BLE Server and Client Establish a Connection?
Let’s explore how the BLE server and client establish a connection through advertising, scanning, and connecting steps:
Advertising: The server advertises on radio frequency by broadcasting connectable advertisement packets containing its device name and unique UUID. It does so while hopping frequencies to reduce interference from reflected signals or other devices.
Scanning: The client listens to incoming advertisements on the same radio frequency, scanning nearby devices. An advertising event from a server may consist of multiple events. When a client finds a connectable event in an advertising packet, it sends a connection request to the server with a CONNECT_IND packet.
Connecting: BLE clients connect to a server by performing several handshaking steps.
During the connection, the server may not connect to any other device as long as it is connected to the client.
BLE GATT Protocol
BLE clients and servers devices transmit and receive data through Generic Attribute Profile (GATT). In this protocol, the central devices act as clients, and any peripheral device is the server. The server has Characteristics, Services, and a particular ATT table that is used in the transmission and reception of data. The GATT protocol consists of a hierarchy in which there are different sections known as Profiles, Services, and Characteristics. The figure below shows these different sections in their particular order and positions.
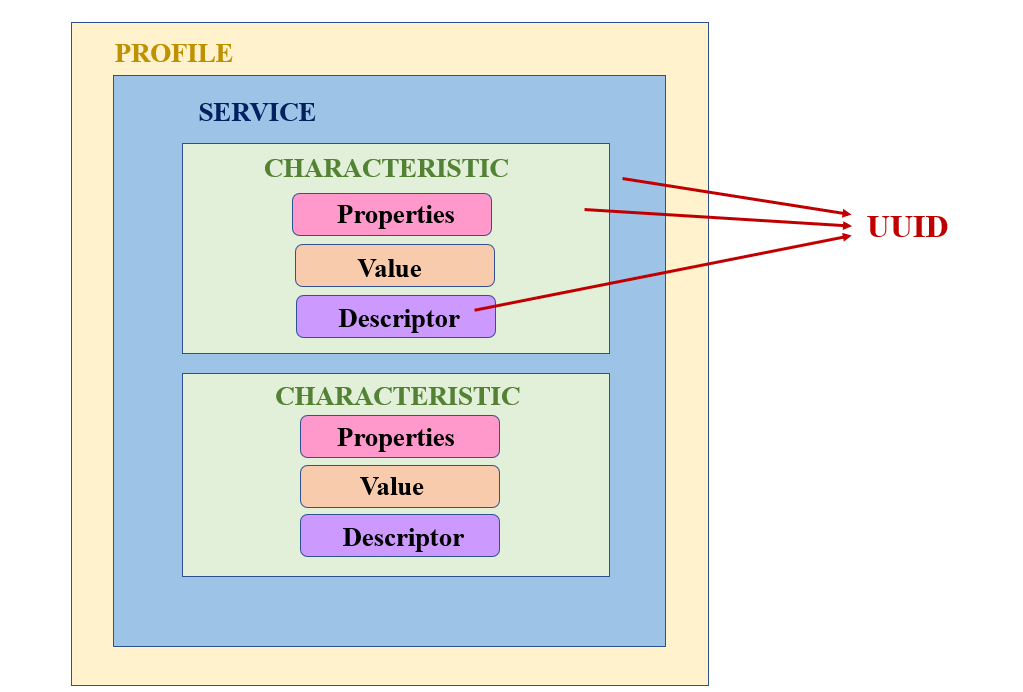
Profile
At the top of the hierarchy, you can find the Profile which consists of one or more Services. These are the set of Services that are defined by the designers or by the Bluetooth Special Interest Group (SIG).
Services
These are sets of simple data for example readings from a sensor and are divided into subcategories known as Characteristics. Pre-defined Services by Bluetooth SIG are available such as reading heart rate, Weight Scale, Blood pressure, etc. To view all the official services, click here.
UUID or Universally Unique Identifier is the unique ID code of a particular Service. It can be 16 or 128 bits depending on the service. We can use the preset UUIDs or customize our own for a particular service. To obtain a unique UUID go to the online website UUIDGenerator.
An example of a UUID obtained from this generator is: c31cb7af-34e2-42eb-8e7e-198230848b4a
Characteristics
Every service has its own Characteristics. These are broken down into a single Characteristic or several Characteristics. They also have unique UUIDs consisting of 16/128 bits. These contain all the useful information in their ‘value’ section and declaration which supplies metadata.
The descriptor is optional and is used in describing the Characteristic value. They contain a different type of metadata through which they expand the Characteristic. The Properties exercise the role of permitting operations including read, notify, write, indicate, or broadcast. These are the functions of a particular value that is defined by property. This property is then linked with a particular Characteristic.
ESP32 BLE using Arduino IDE
Apart from Wi-Fi which is one of the major features, ESP32 also supports Bluetooth as a dual-mode system. This means that we can configure both the classic Bluetooth as well as the low energy Bluetooth (BLE) in the ESP32 board. In BLE mode, the ESP32 can act as a server as well as a client. Let us look at a few examples in Arduino IDE in either case. Arduino IDE already comes up with the built-in BLE library after we install the ESP32 module in the IDE.
In your Arduino IDE, click on File > Examples > ESP32 BLE Arduino
This will open up several examples to choose from for example BLE_client, BLE_notify, BLE_server, etc.

In this article, we will discuss the examples: BLE_server and then BLE_scan. First, we will set up our ESP32 as a server using the BLE_server example and then we will use the BLE_scan example sketch to detect the scanner.
ESP32 BLE Server
In your Arduino IDE, click Tools > Board and select ESP32. Then click Tools > Port and select the port number through which the ESP32 board is connected. Now go to File > Examples > ESP32 BLE Arduino. You will find a list of examples. Select BLE_server. A new file will open up named ‘BLE_server’ which will contain the program code. I am copying that code down below so that we can understand it step by step.
#include <BLEDevice.h>
#include <BLEUtils.h>
#include <BLEServer.h>

// See the following for generating UUIDs:
// https://www.uuidgenerator.net/

#define SERVICE_UUID        "4fafc201-1fb5-459e-8fcc-c5c9c331914b"
#define CHARACTERISTIC_UUID "beb5483e-36e1-4688-b7f5-ea07361b26a8"

void setup() {
  Serial.begin(115200);
  Serial.println("Starting BLE work!");

  BLEDevice::init(""Microcontrollerslab ESP32"");
  BLEServer *pServer = BLEDevice::createServer();
  BLEService *pService = pServer->createService(SERVICE_UUID);
  BLECharacteristic *pCharacteristic = pService->createCharacteristic(
                                         CHARACTERISTIC_UUID,
                                         BLECharacteristic::PROPERTY_READ |
                                         BLECharacteristic::PROPERTY_WRITE
                                       );

  pCharacteristic->setValue("Hello World says Neil");
  pService->start();
  // BLEAdvertising *pAdvertising = pServer->getAdvertising();  // this still is working for backward compatibility
  BLEAdvertising *pAdvertising = BLEDevice::getAdvertising();
  pAdvertising->addServiceUUID(SERVICE_UUID);
  pAdvertising->setScanResponse(true);
  pAdvertising->setMinPreferred(0x06);  // functions that help with iPhone connections issue
  pAdvertising->setMinPreferred(0x12);
  BLEDevice::startAdvertising();
  Serial.println("Characteristic defined! Now you can read it in your phone!");
}

void loop() {
  // put your main code here, to run repeatedly:
  delay(2000);
}
Working Process
This example sketch will follow a series of steps in order which is shown in the process diagram below:

How the Code Works?
The code starts off by including all the libraries which are necessary for the BLE server communication, connection and advertisement.
#include <BLEDevice.h>
#include <BLEUtils.h>
#include <BLEServer.h>
As we already know, the BLE service and characteristic have a unique UUID so the next lines define that. The UUIDs which are defined below are the ones that were set in default. You can keep them as it is or generate your own by using the website which was mentioned above.
#define SERVICE_UUID "4fafc201-1fb5-459e-8fcc-c5c9c331914b"
#define CHARACTERISTIC_UUID "beb5483e-36e1-4688-b7f5-ea07361b26a8"
In the setup() function, serial.begin() is used to establish the serial connection between the development board at a baud rate of 115200.
Serial.begin(115200);Next, define your ESP32 as the BLE device by replacing “Long name works now” with “Microcontrollerslab ESP32” or the name of your choice in the init command.
BLEDevice::init("Microcontrollerslab ESP32"); //Replace with any nameThen create a server by using the createServer() function for the ESP32 board which we specified before.
BLEService *pService = pServer->createService(SERVICE_UUID);After that, we will create the Characteristic on our server (ESP32). In the createCharacteristic(), we will pass the properties which are PROPERTY_READ and PROPERTY_WRITE. This will grant access to the client connected to the server to read and write the characteristic.
BLECharacteristic *pCharacteristic = pService->createCharacteristic(
                                     CHARACTERISTIC_UUID,
                                     BLECharacteristic::PROPERTY_READ |
                                     BLECharacteristic::PROPERTY_WRITE
                                     );
By using the setValue() method, we will set the ‘Value’ of the characteristic with the text: “Hello World says Neil.” You can change this value according to your liking.
pCharacteristic->setValue("Hello World says Neil");We will launch the server, using the start() command as shown below.
pService->start();After the service has started, we will use getAdvertising() to initiate the advertising process so that nearby devices would be able to spot our server and connect with it.
BLEAdvertising *pAdvertising = pServer->getAdvertising();
pAdvertising->start();
In this example code, the loop() function is left empty as we are just initializing the ESP32 as a server and starting its advertising process. Further code can be added inside the loop() function to cater to what happens after a client connects with the ESP32 BLE server.
Upload the above code to first ESP32 board and open serial monitor of Arduino IDE. After that, click enable button of ESP32. You will see that BLE server will start advertising:

ESP32 BLE Scanner
A BLE scanner is a device that listens for advertising packets transmitted by BLE devices (Peripherals) in its vicinity. It is a crucial component of Bluetooth Low Energy (BLE) communication, enabling other devices (Centrals) to discover and connect to nearby BLE peripherals.
When a BLE peripheral device broadcasts advertising packets, the BLE scanner captures and decodes these packets to gather information about the peripheral’s presence, services, and characteristics. The scanner can identify the unique identifiers (UUIDs) of the advertised services and characteristics, helping the central device understand the capabilities offered by the peripheral.
BLE scanners are commonly found in devices like smartphones, tablets, laptops, and dedicated Bluetooth scanning tools. These devices use the scanner to search for and establish connections with BLE peripherals for various applications, such as syncing fitness trackers, connecting to IoT devices, or pairing with smartwatches.
ESP32 BLE Scanner Code
After we have seen how to set up the ESP32 module as a BLE server. Let’s go a little further and see how to scan for nearby BLE server devices with ESP32 BLE scanner. Again, we will use a sample example code from the ESP32 BLE Arduino library.
Click on File > Examples > ESP32 BLE Arduino. You will find a list of examples. Select BLE_scan. A new file will open up named as ‘BLE_server’ which will contain the program code. You can view the code down below:
#include <BLEDevice.h>
#include <BLEUtils.h>
#include <BLEScan.h>
#include <BLEAdvertisedDevice.h>

int scanTime = 5; //In seconds
BLEScan* pBLEScan;

class MyAdvertisedDeviceCallbacks: public BLEAdvertisedDeviceCallbacks {
    void onResult(BLEAdvertisedDevice advertisedDevice) {
      Serial.printf("Advertised Device: %s \n", advertisedDevice.toString().c_str());
    }
};

void setup() {
  Serial.begin(115200);
  Serial.println("Scanning...");

  BLEDevice::init("");
  pBLEScan = BLEDevice::getScan(); //create new scan
  pBLEScan->setAdvertisedDeviceCallbacks(new MyAdvertisedDeviceCallbacks());
  pBLEScan->setActiveScan(true); //active scan uses more power, but get results faster
  pBLEScan->setInterval(100);
  pBLEScan->setWindow(99);  // less or equal setInterval value
}

void loop() {
  // put your main code here, to run repeatedly:
  BLEScanResults foundDevices = pBLEScan->start(scanTime, false);
  Serial.print("Devices found: ");
  Serial.println(foundDevices.getCount());
  Serial.println("Scan done!");
  pBLEScan->clearResults();   // delete results fromBLEScan buffer to release memory
  delay(2000);
}
Demonstration
In this example code, we will be requiring two ESP32 development boards. One acts as the server and the other device acts as the client. We initialize the first ESP32 as a BLE server which is uploaded with BLE_server code which we discussed above.
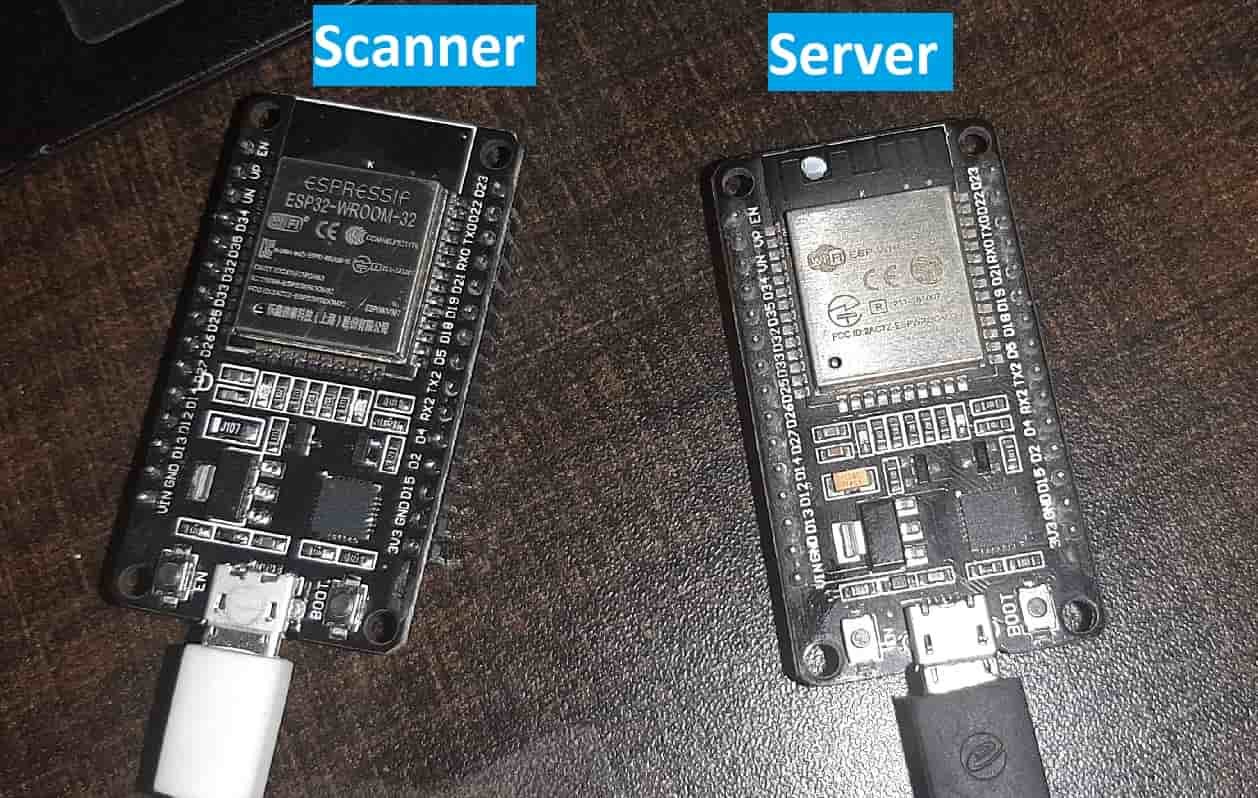
The second ESP32 module is uploaded with the BLE_scan code. Make sure both of your ESP32 boards are powered on and each has a separate sketch uploaded on it. This can be achieved by powering the boards separately. Now, press the ENABLE button on the second ESP32 board which has BLE_scan uploaded to it. It will scan for all the devices which are close by. After a few moments, you will see the following devices which it scanned printed on the serial monitor below:

Testing ESP32 BLE Server with an Android App
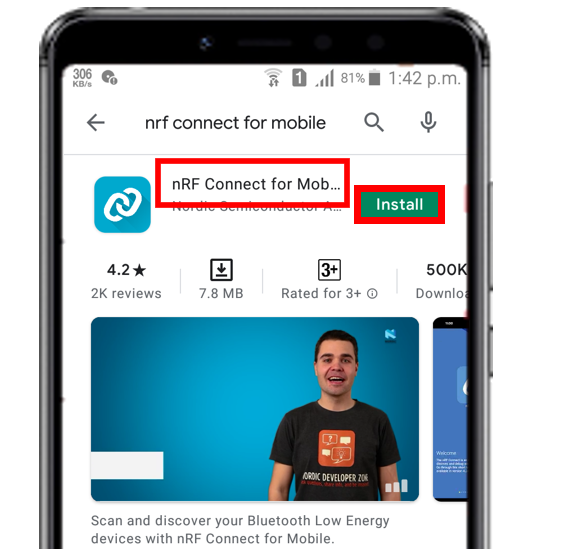
To perform this testing functionality of the ESP32 BLE server on a cell phone we will need a phone which supports BLE connection. After you have got your hands on one, open the Play Store and search for ‘nRF Connect for Mobile.’ This is a free app that will help us to check for the connection. Install the app on your cell phone.
Before proceeding further, make sure to change your Bluetooth settings by enabling the Bluetooth adapter in your cell phone as shown in the figure.

Press the ENABLE button on your ESP32 board and open the serial monitor.
In this case, the cell phone acts as the client and the ESP32 board which has the BLE_server uploaded on it is the server.

Now, open the nRF Connect for Mobile application and tap the Scan button. This will scan for all the devices which are close to the cell phone. Thus, our ESP32 will also get scanned and you will be able to see ‘Microcontrollerslab ESP32’ written among the scanned devices as shown below:

Now, tap the Connect button and the following appears on the cell phone screen.

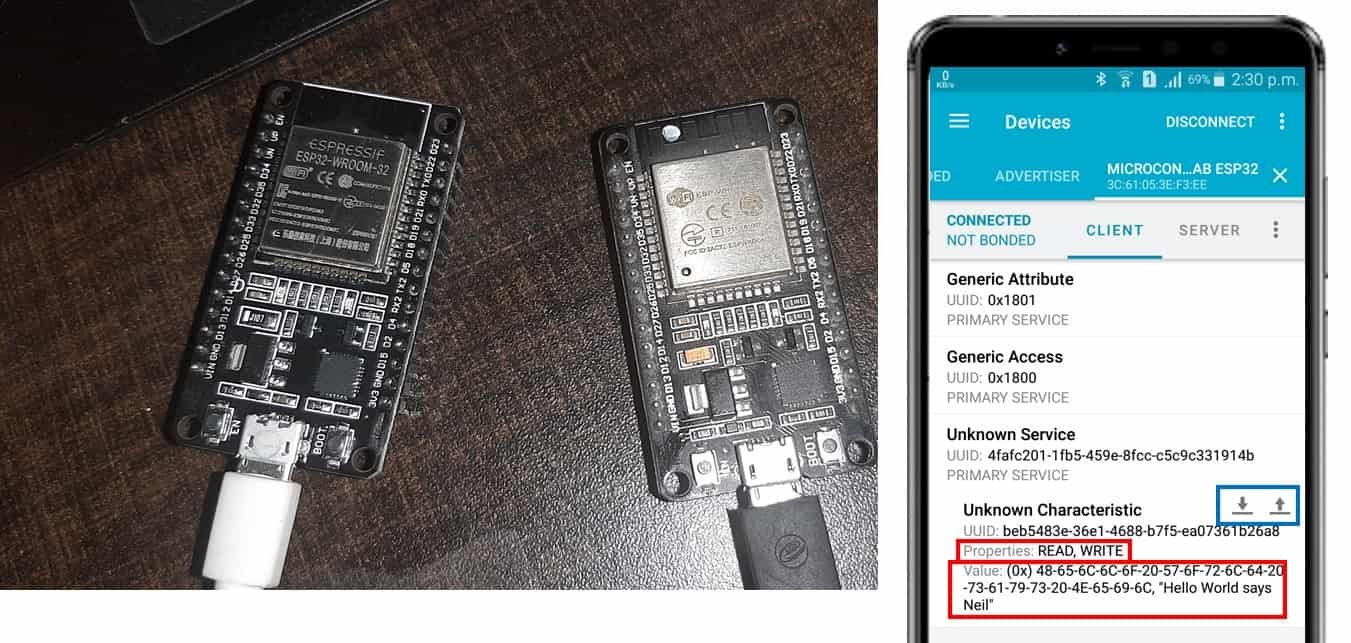
The Service and the Characteristics which we had defined in the program code can be viewed here. It displays “Hello World says Neil” which we set as our characteristic value and both the service and the characteristic UUIDs are also visible with the properties which we set to Read and Write (highlighted in the blue rectangle) in the BLE_server example code.
We can write any message as shown below:

Conclusion
Through this article, we have learned about the BLE on ESP32 Bluetooth Low Energy and some simple examples in Arduino IDE to get us started with BLE in ESP32.
If you find this ESP32 tutorial useful, you may like to check our other projects and tutorials:
- ESP32 Web Server in Arduino IDE: Control LEDs
- Displaying Images in ESP32 and ESP8266 Web Server
- Reconnect ESP32 to WIFI after Lost Connection (Solved)
- ESP32/ESP8266 Web Server to Control Outputs with a Timer (Pulse Width)
- Save Data to ESP32 Flash Permanently using Preferences Library
- HTTP GET using ESP32 and Arduino IDE (OpenWeatherMap.org and ThingSpeak)
- ESP32 HTTP POST using Arduino IDE (ThingSpeak and IFTTT)
- ESP32 WebSocket Server using Arduino IDE – Control GPIOs and Relays
Hello, excellent site, I would like to read on my Windows PC the values sent from 2 potentiometers and 1 switch on a web page, I found some examples but I am stuck for several data thanks in advance