In this ESP32-CAM tutorial, we will use machine learning techniques to build an image classification project using ESP32 CAM. The ESP32-CAM will be used to capture an image which will then be identified using a trained Machine learning model. For this project, we will use Clarifai’s image recognition AI models.
Recommended Components
The following components are used in this project or are helpful for building it with the ESP32.
| Component | How it’s used in this project | Buy on Amazon |
|---|---|---|
| ESP32 Development Board | Used to flash and prototype before deploying to the ESP32-CAM module. | Check Price |
| Micro USB Cable | Programs the ESP32 and powers it during testing. | Check Price |
| Breadboard | Holds the wiring between the programmer and the camera board. | Check Price |
| Jumper Wires | Connect the FTDI programmer to the ESP32-CAM for uploading code. | Check Price |
| ESP32-CAM board | Captures the image that is classified by the machine-learning model. | Check Price |
| FTDI / USB-TTL programmer | USB-to-TTL adapter required to program the ESP32-CAM, which has no USB port. | Check Price |
As an Amazon Associate we earn from qualifying purchases. Prices and availability are accurate as of the date/time indicated and are subject to change.
Connecting ESP32-CAM with FTDI programmer
We will require the following components for this project:
- ESP32-CAM development board
- FTDI Programmer/ USB Serial to TTL Converter
- Connecting Wires
- External 5V power supply (optional)
Unlike the ESP32 development board, the ESP32-CAM does not come with a USB port attached to it. So to upload a program sketch to the ESP32-CAM, we will need to use an FTDI programmer (USB to TTL Serial converter).
You can learn more about this FTDI cable here:
The table shows the connections between the ESP32-CAM and FTDI programmer:
| ESP32-CAM | FTDI Programmer |
|---|---|
| 5V | VCC |
| UOR (GPIO3) | TX |
| UOT (GPIO1) | RX |
| GND | GND |
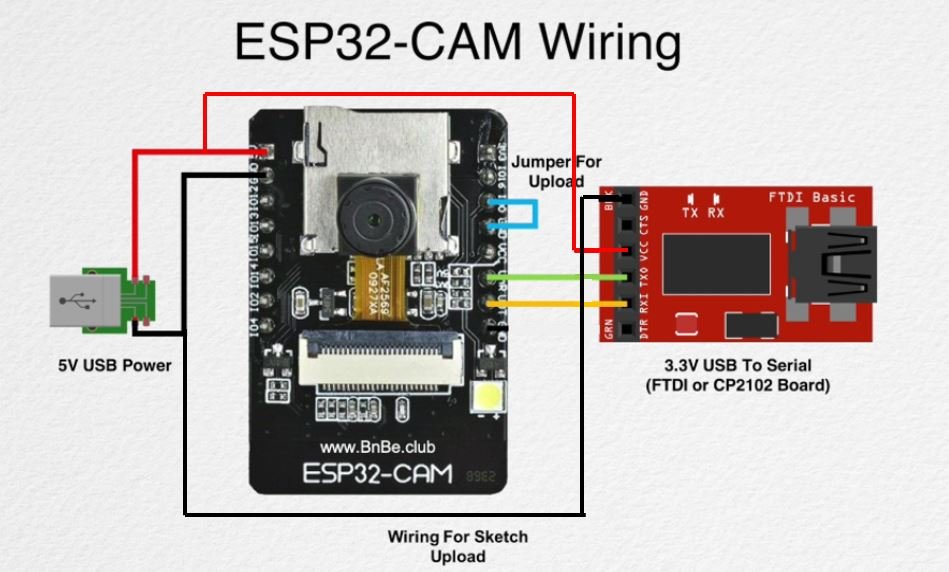
Connect the 5V pin of ESP32-CAM with the VCC pin of the FTDI programmer to power up. Both grounds of the two devices will be connected in common. The TX pin of the FTDI programmer will be connected with UOR (GPIO3) of ESP32-CAM. Likewise, the RX pin will be connected with the UOT (GPIO1) of the ESP32-CAM module.
Additionally, you will need to connect GPIO0 with GND to enable the ESP32-CAM module to go in flashing mode. Remove this connection after uploading the program sketch to the module.
On some ESP32-CAM boards, you will get a brown-out detector error which is due to the insufficient voltage provided by the FTDI cable. In that case, you should connect an external 5V power supply to ESP32 as shown below:
Connecting with Clarifai
“Clarifai Inc. is an artificial intelligence company that specializes in computer vision and uses machine learning and deep neural networks to identify and analyze images and videos.”
We will use Clarifai, a free-to-use cloud machine learning platform to be able to identify the images we take from our ESP32-CAM. We will simply create a free account by following this link (https://www.clarifai.com/).
Select ‘Start now for free and set up your account.

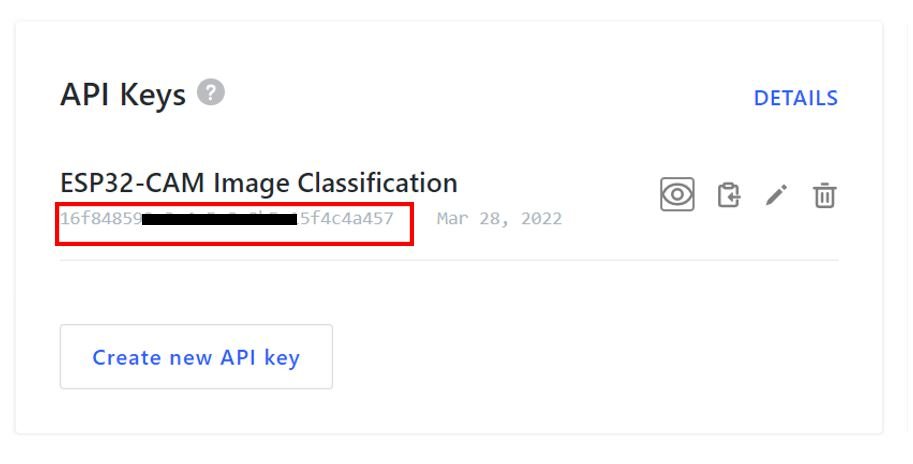
After successfully setting up your free account, obtain the API key that we will use while programming our ESP32-CAM to successfully connect with the Clarifai platform.
Head over to API Keys section and click ‘Create new API key’ to generate a new key and note it down.
Setting up Arduino IDE
Before we proceed further, you should make sure that you have the latest version of Arduino IDE installed on your system. Moreover, you should also install an ESP32 add-on in Arduino IDE. If your IDE does not have the plugin installed you can visit the link below:
Installing ArduinoJSON Library
You will have to install the ArduinoJSON library by Benoit Blanchon as we will be dealing with JSON script. Open your Arduino Library Manager by clicking Sketch > Include Library > Manage Libraries. Type ‘ArduinoJSON’ in the search tab and press enter. Install the library version 6.17.2 which is highlighted below.

ESP32-CAM Image Classification Arduino Sketch
Open your Arduino IDE and go to File > New to open a new file. Copy the code given below in that file. For this code to work with your ESP32-CAM board you will have to replace the Wi-Fi network credentials and the API key from Clarifai.
#include "Arduino.h"
#include "esp_camera.h"
#include <HTTPClient.h>
#include <ArduinoJson.h>
#include <base64.h>
#include <WiFi.h>

const char* ssid = "PTCL-BB";
const char* password = "44332211";

#define CAMERA_MODEL_AI_THINKER // Has PSRAM

#define PWDN_GPIO_NUM     32
#define RESET_GPIO_NUM    -1
#define XCLK_GPIO_NUM      0
#define SIOD_GPIO_NUM     26
#define SIOC_GPIO_NUM     27

#define Y9_GPIO_NUM       35
#define Y8_GPIO_NUM       34
#define Y7_GPIO_NUM       39
#define Y6_GPIO_NUM       36
#define Y5_GPIO_NUM       21
#define Y4_GPIO_NUM       19
#define Y3_GPIO_NUM       18
#define Y2_GPIO_NUM        5
#define VSYNC_GPIO_NUM    25
#define HREF_GPIO_NUM     23
#define PCLK_GPIO_NUM     22


void setup() {
  Serial.begin(115200);
  Serial.setDebugOutput(true);
  Serial.println();

  WiFi.begin(ssid, password);
  while (WiFi.status() != WL_CONNECTED) {
    delay(500);
    Serial.print(".");
  }
  Serial.println("");
  Serial.println("WiFi Connected!");

  camera_config_t config;
  config.ledc_channel = LEDC_CHANNEL_0;
  config.ledc_timer = LEDC_TIMER_0;
  config.pin_d0 = Y2_GPIO_NUM;
  config.pin_d1 = Y3_GPIO_NUM;
  config.pin_d2 = Y4_GPIO_NUM;
  config.pin_d3 = Y5_GPIO_NUM;
  config.pin_d4 = Y6_GPIO_NUM;
  config.pin_d5 = Y7_GPIO_NUM;
  config.pin_d6 = Y8_GPIO_NUM;
  config.pin_d7 = Y9_GPIO_NUM;
  config.pin_xclk = XCLK_GPIO_NUM;
  config.pin_pclk = PCLK_GPIO_NUM;
  config.pin_vsync = VSYNC_GPIO_NUM;
  config.pin_href = HREF_GPIO_NUM;
  config.pin_sscb_sda = SIOD_GPIO_NUM;
  config.pin_sscb_scl = SIOC_GPIO_NUM;
  config.pin_pwdn = PWDN_GPIO_NUM;
  config.pin_reset = RESET_GPIO_NUM;
  config.xclk_freq_hz = 20000000;
  config.pixel_format = PIXFORMAT_JPEG;

  // if PSRAM IC present, init with UXGA resolution and higher JPEG quality
  //                      for larger pre-allocated frame buffer.
  if(psramFound()){
    config.frame_size = FRAMESIZE_QVGA;
    config.jpeg_quality = 10;
    config.fb_count = 2;
  } else {
    config.frame_size = FRAMESIZE_QVGA;
    config.jpeg_quality = 12;
    config.fb_count = 1;
  }

  esp_err_t err = esp_camera_init(&config);
  if (err != ESP_OK) {
    Serial.printf("Camera init failed with error 0x%x", err);
    return;
  }
  classify();
  Serial.println("\n Going to Sleep…");
  esp_deep_sleep_start();

}

void loop(){
}

void classify() {

   camera_fb_t * fb = NULL;
   fb = esp_camera_fb_get();

   if(!fb) {
    Serial.println("Camera capture failed");
    return;
   }

  size_t size = fb->len;
  String buffer = base64::encode((uint8_t *) fb->buf, fb->len);
  String payload = "{\"inputs\": [{ \"data\": {\"image\": {\"base64\": \"" + buffer + "\"}}}]}";

  buffer = "";
  // Uncomment this if you want to show the payload
  Serial.println(payload);

  esp_camera_fb_return(fb);

    String model_id = "aaa03c23b3724a16a56b629203edc62c";  //General Model
  //String model_id = "bd367be194cf45149e75f01d59f77ba7";  //Food Model

  HTTPClient http;
  http.begin("https://api.clarifai.com/v2/models/" + model_id + "/outputs");
  http.addHeader("Content-Type", "application/json");
  http.addHeader("Authorization", "Key 16f848599c3c4c5e8c8b5c15f4c4a457");

  int response_code = http.POST(payload);
  String response;

  if(response_code >0){
  Serial.print(response_code );
  Serial.print("Returned String: ");
  response = http.getString();
  Serial.println(response);
 }
else {
 Serial.print("POST Error: ");
 Serial.print(response_code);
return;
}

const int jsonSize = 2*JSON_ARRAY_SIZE(0) + JSON_ARRAY_SIZE(1) + JSON_ARRAY_SIZE(20) + 4*JSON_OBJECT_SIZE(0) + 7*JSON_OBJECT_SIZE(1) + 5*JSON_OBJECT_SIZE(2) + JSON_OBJECT_SIZE(3) + 21*JSON_OBJECT_SIZE(4) + JSON_OBJECT_SIZE(5) + JSON_OBJECT_SIZE(6) + JSON_OBJECT_SIZE(7) + JSON_OBJECT_SIZE(18)+ 3251;
DynamicJsonDocument doc(jsonSize);
deserializeJson(doc, response );

for (int i=0; i < 10; i++) {
  const String name = doc["outputs"][0]["data"]["concepts"][i]["name"];
  const float prob = doc["outputs"][0]["data"]["concepts"][i]["value"];

  Serial.println("________________________");
  Serial.print("Name:");
  Serial.println(name);
  Serial.print("Probability:");
  Serial.println(prob);
  Serial.println();
}

}
How the Code Works?
Now, let us understand how each part of the code works.
Including Libraries
Firstly, we will include the relevant libraries which are necessary for this project.
WiFi.h library is used to connect our ESP32 module with the local WIFI network. The ArduinoJSON.h will be used for the JSON script. Arduino.h and esp_camera will be require to initialzse the ESP32-CAM. Moreover, we will require base64.h to encode the image to Base64 format and HTTPClient.h for the successful connection with the machine learning paltform
#include "Arduino.h"
#include "esp_camera.h"
#include <HTTPClient.h>
#include <ArduinoJson.h>
#include <base64.h>
#include <WiFi.h>
Next, we will create two global variables, one for the SSID and another for the password. These will hold our network credentials which will be used to connect to our wireless router. Replace both of them with your network credentials to ensure a successful connection.
const char* ssid = "YOUR_SSID";
const char* password = "YOUR_PASSWORD";
The following definitions are for OV2640 camera module pins. We are using CAMERA_MODEL_AI_THINKER.
#define CAMERA_MODEL_AI_THINKER // Has PSRAM

#define PWDN_GPIO_NUM     32
#define RESET_GPIO_NUM    -1
#define XCLK_GPIO_NUM      0
#define SIOD_GPIO_NUM     26
#define SIOC_GPIO_NUM     27

#define Y9_GPIO_NUM       35
#define Y8_GPIO_NUM       34
#define Y7_GPIO_NUM       39
#define Y6_GPIO_NUM       36
#define Y5_GPIO_NUM       21
#define Y4_GPIO_NUM       19
#define Y3_GPIO_NUM       18
#define Y2_GPIO_NUM        5
#define VSYNC_GPIO_NUM    25
#define HREF_GPIO_NUM     23
#define PCLK_GPIO_NUM     22
setup()
Inside the setup() function, we will open a serial connection at a baud rate of 115200.
Serial.begin(115200)The following section of code will connect our ESP32-CAM board with the local network whose network credentials we already specified above. We will use the WiFi.begin() function. The arguments will be the SSID and the password which we defined earlier in the code. After a successful connection is established, “WiFi Connected!” gets displayed on the serial monitor.
WiFi.begin(ssid, password);
  while (WiFi.status() != WL_CONNECTED) {
    delay(500);
    Serial.print(".");
  }
  Serial.println("");
  Serial.println("WiFi Connected!");
The following code sets the OV2640 camera module and the settings required for the photo capturing.
camera_config_t config;
  config.ledc_channel = LEDC_CHANNEL_0;
  config.ledc_timer = LEDC_TIMER_0;
  config.pin_d0 = Y2_GPIO_NUM;
  config.pin_d1 = Y3_GPIO_NUM;
  config.pin_d2 = Y4_GPIO_NUM;
  config.pin_d3 = Y5_GPIO_NUM;
  config.pin_d4 = Y6_GPIO_NUM;
  config.pin_d5 = Y7_GPIO_NUM;
  config.pin_d6 = Y8_GPIO_NUM;
  config.pin_d7 = Y9_GPIO_NUM;
  config.pin_xclk = XCLK_GPIO_NUM;
  config.pin_pclk = PCLK_GPIO_NUM;
  config.pin_vsync = VSYNC_GPIO_NUM;
  config.pin_href = HREF_GPIO_NUM;
  config.pin_sscb_sda = SIOD_GPIO_NUM;
  config.pin_sscb_scl = SIOC_GPIO_NUM;
  config.pin_pwdn = PWDN_GPIO_NUM;
  config.pin_reset = RESET_GPIO_NUM;
  config.xclk_freq_hz = 20000000;
  config.pixel_format = PIXFORMAT_JPEG;

  // if PSRAM IC present, init with UXGA resolution and higher JPEG quality
  //                      for larger pre-allocated frame buffer.
  if(psramFound()){
    config.frame_size = FRAMESIZE_QVGA;
    config.jpeg_quality = 10;
    config.fb_count = 2;
  } else {
    config.frame_size = FRAMESIZE_QVGA;
    config.jpeg_quality = 12;
    config.fb_count = 1;
  }
Initializing ESP32-CAM:
  esp_err_t err = esp_camera_init(&config);
  if (err != ESP_OK) {
    Serial.printf("Camera init failed with error 0x%x", err);
    return;
Next, we will call the classify() function that will be responsible for image classification
classify();
Additionally, we will keep the ESP32-CAM in deep sleep mode afterwards and it will wake up after a RESET.
  Serial.println("\n Going to Sleep…");
  esp_deep_sleep_start();
Image Classification
The classify() function will first capture the image, encode it in base64 and then apply image recognition to it.
void classify() {

   camera_fb_t * fb = NULL;
   fb = esp_camera_fb_get();

   if(!fb) {
    Serial.println("Camera capture failed");
    return;
   }

  size_t size = fb->len;
  String buffer = base64::encode((uint8_t *) fb->buf, fb->len);
  String payload = "{\"inputs\": [{ \"data\": {\"image\": {\"base64\": \"" + buffer + "\"}}}]}";
  buffer = "";
  Serial.println(payload);

  esp_camera_fb_return(fb);


  String model_id = "aaa03c23b3724a16a56b629203edc62c";  //General Model


  //String model_id = "bd367be194cf45149e75f01d59f77ba7";  //Food Model

  HTTPClient http;
  http.begin("https://api.clarifai.com/v2/models/" + model_id + "/outputs");
  http.addHeader("Content-Type", "application/json");
  http.addHeader("Authorization", "Key 16f848599c3c4c5e8c8b5c15f4c4a457");

  int response_code = http.POST(payload);
  String response;

  if(response_code >0){
  Serial.print(response_code );
  Serial.print("Returned String: ");
  response = http.getString();
  Serial.println(response);
 }
else {
 Serial.print("POST Error: ");
 Serial.print(response_code);
return;
}

const int jsonSize = 2*JSON_ARRAY_SIZE(0) + JSON_ARRAY_SIZE(1) + JSON_ARRAY_SIZE(20) + 4*JSON_OBJECT_SIZE(0) + 7*JSON_OBJECT_SIZE(1) + 5*JSON_OBJECT_SIZE(2) + JSON_OBJECT_SIZE(3) + 21*JSON_OBJECT_SIZE(4) + JSON_OBJECT_SIZE(5) + JSON_OBJECT_SIZE(6) + JSON_OBJECT_SIZE(7) + JSON_OBJECT_SIZE(18)+ 3251;
DynamicJsonDocument doc(jsonSize);
deserializeJson(doc, response );

for (int i=0; i < 10; i++) {
  const String name = doc["outputs"][0]["data"]["concepts"][i]["name"];
  const float prob = doc["outputs"][0]["data"]["concepts"][i]["value"];

  Serial.println("________________________");
  Serial.print("Name:");
  Serial.println(name);
  Serial.print("Probability:");
  Serial.println(prob);
  Serial.println();
}

}
We will first capture an image with ESP32-CAM by using esp_camera_fb_get() method. The following lines enable us to do that.
   camera_fb_t * fb = NULL;
   fb = esp_camera_fb_get();

   if(!fb) {
    Serial.println("Camera capture failed");
    return;
   }
Then we encode the image in base64 format:
  size_t size = fb->len;
  String buffer = base64::encode((uint8_t *) fb->buf, fb->len);

  String payload = "{\"inputs\": [{ \"data\": {\"image\": {\"base64\": \"" + buffer + "\"}}}]}";
  buffer = "";
  Serial.println(payload);
After that, we will connect to the Clarifai platform to use its pre-trained model for image recognition.
Here we have specified the general model ID taken from Clarifai for Image Recognition AI (https://www.clarifai.com/models/image-recognition-ai). This will enable us to classify 11,000 different concepts including objects, themes, and much more.
String model_id = "aaa03c23b3724a16a56b629203edc62c"; //General ModelMoreover, you can use other pre-trained models provided by Clarifai as well including food models, face detection models, and much more. (https://www.clarifai.com/developers/pre-trained-models). Just define the model ID.
For example, if classifying foods you can use the model ID associated with the Food Model:
//String model_id = "bd367be194cf45149e75f01d59f77ba7"; //Food ModelNow initiate the connection between the Clarifai platform by providing your API key and the model ID.
HTTPClient http;
  http.begin("https://api.clarifai.com/v2/models/" + model_id + "/outputs");
  http.addHeader("Content-Type", "application/json");
  http.addHeader("Authorization", "Key 16f84859*******e8c8b5c15f4c4a457");
Moreover, transfer the base64 encoded image now stored in payload to the cloud machine learning platform.
int response_code = http.POST(payload);
  String response;

  if(response_code >0){
  Serial.print(response_code );
  Serial.print("Returned String: ");
  response = http.getString();
  Serial.println(response);
 }
else {
 Serial.print("POST Error: ");
 Serial.print(response_code);
return;
}
Next we will use JSON library to manage the concepts extracted from the image. These will include different labels that have been identified for the image with a certain value of probability. We will display these in the serial monitor in order to classify the image.
const int jsonSize = 2*JSON_ARRAY_SIZE(0) + JSON_ARRAY_SIZE(1) + JSON_ARRAY_SIZE(20) + 4*JSON_OBJECT_SIZE(0) + 7*JSON_OBJECT_SIZE(1) + 5*JSON_OBJECT_SIZE(2) + JSON_OBJECT_SIZE(3) + 21*JSON_OBJECT_SIZE(4) + JSON_OBJECT_SIZE(5) + JSON_OBJECT_SIZE(6) + JSON_OBJECT_SIZE(7) + JSON_OBJECT_SIZE(18)+ 3251;
DynamicJsonDocument doc(jsonSize);
deserializeJson(doc, response );

for (int i=0; i < 10; i++) {
  const String name = doc["outputs"][0]["data"]["concepts"][i]["name"];
  const float prob = doc["outputs"][0]["data"]["concepts"][i]["value"];

  Serial.println("________________________");
  Serial.print("Name:");
  Serial.println(name);
  Serial.print("Probability:");
  Serial.println(prob);
  Serial.println();
}
ESP32 CAM Image Classification Demo
Now, we are ready to compile and upload the code to our ESP32-CAM. Make sure the FTDI programmer is properly connected with the module and GPIO0 is grounded as well.
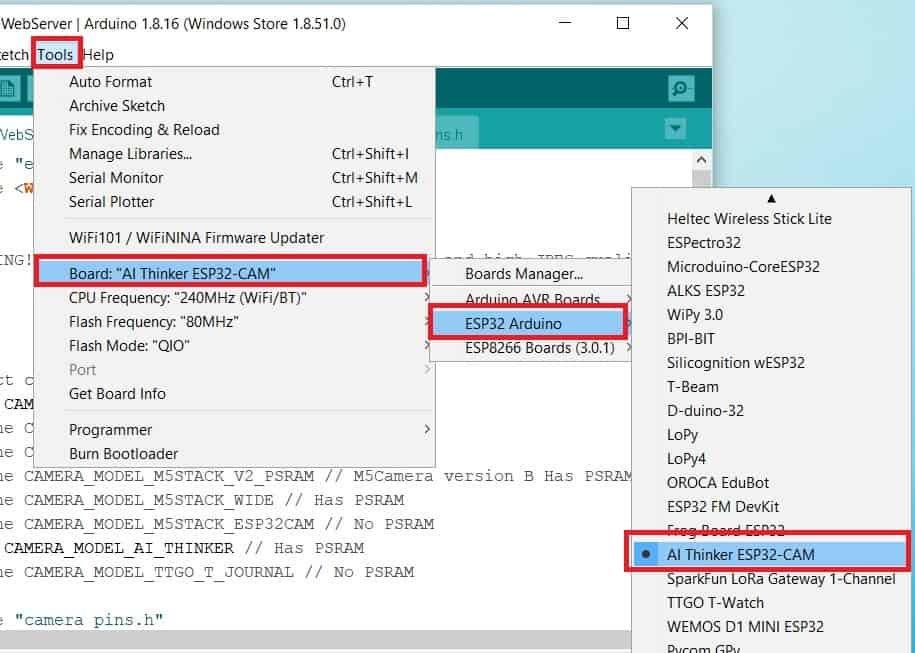
Choose the correct board and COM port before uploading your code to the ESP32-CAM board. Go to Tools > Board and select ESP32 AI Thinker.
Next, go to Tools > Port and select the appropriate port through which your board is connected.
Click on the upload button to upload the code into the ESP32-CAM board.
If you view Connecting….._____….._____….. in the error window, press the RESET button present on the ESP32-CAM as shown below:

After you have successfully uploaded your code to the board, remove the connecting wire from GPIO0 and GND.
Now open the serial monitor. In a few moments, the Wi-Fi will get connected, and the image will get captured, encoded, and then sent to the Clarifai platform.
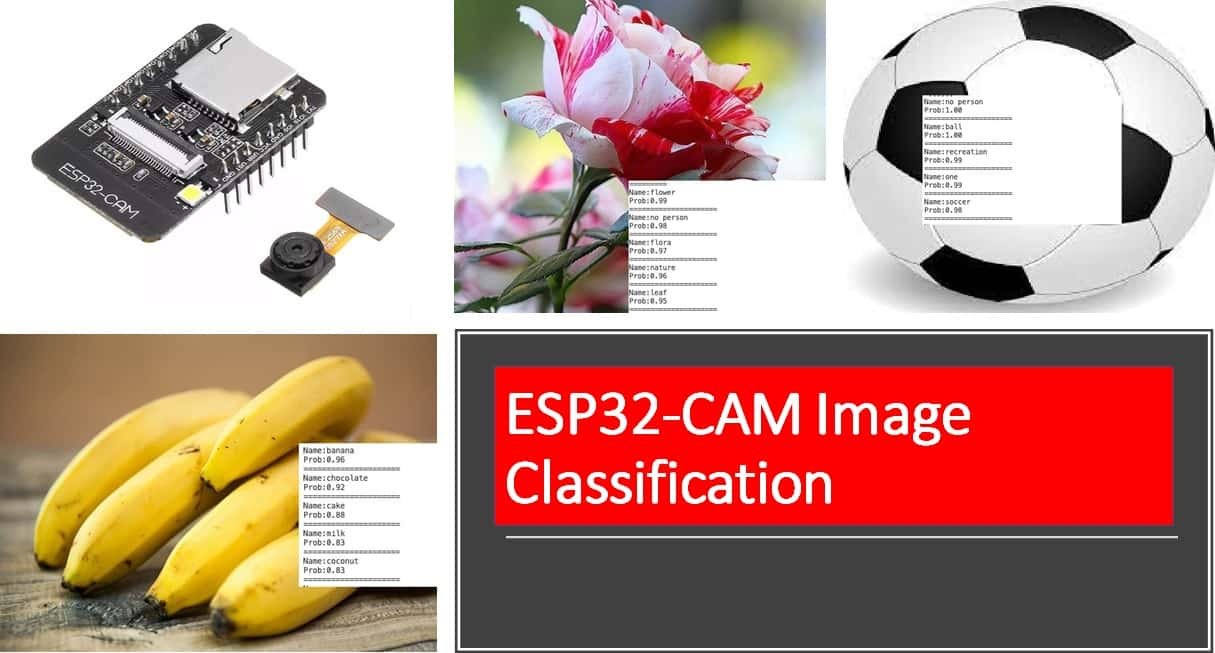
Here we have captured the image of a fish in water, thus the pre-trained model identified the following concepts with the highest probability for fish and no person.

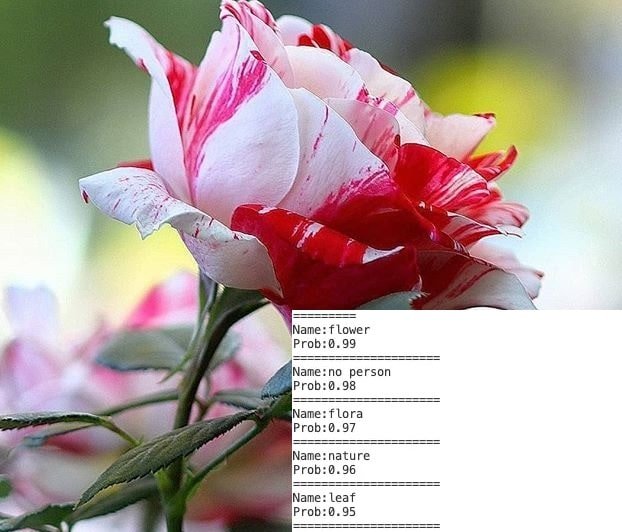
Here we captured a picture of flowers in a photo frame:
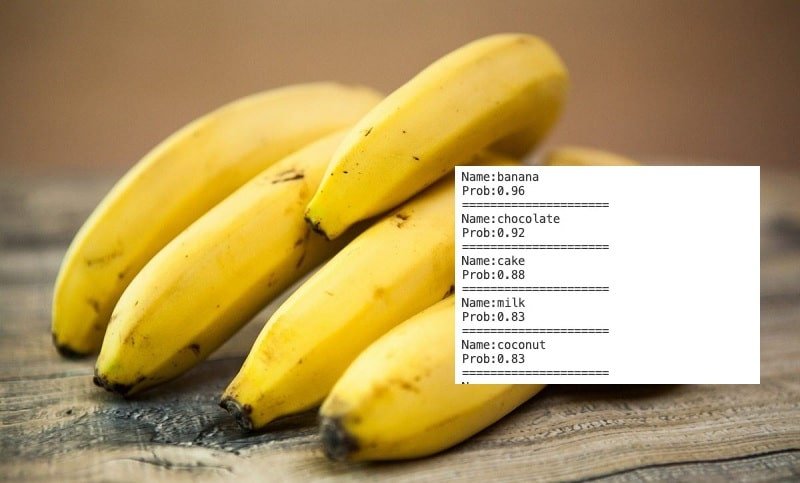
Here we captured a photo of bananas:
Here we captured a photo of a ball:

Likewise, you can use other pre-trained models available at Clarifai to build great computer vision projects.
You may also like to read: