In this tutorial, we will show you how to install a file system uploader plugin in Arduino IDE to upload files to ESP32 SPI flash file system (SPIFFS). By default, there is no support in Arduino IDE to upload files to ESP32. But we can install a plugin to add a file uploading feature in Arduino IDE.

We have a similar guide with ESP8266 NodeMCU LittleFS filesystem:
Recommended Components
The following components are used in this project or are helpful for building it with the ESP32.
| Component | How it’s used in this project | Buy on Amazon |
|---|---|---|
| ESP32 Development Board (DevKit V1) | The main board that runs the project firmware. | Check Price |
| Micro USB Cable | Connects the board to your computer to upload code and power it. | Check Price |
| Breadboard | Holds the board and components together while you wire up the project. | Check Price |
| Jumper Wires | Make the connections between the board and any external parts. | Check Price |
As an Amazon Associate we earn from qualifying purchases. Prices and availability are accurate as of the date/time indicated and are subject to change.
SPIFFS Filesystem Introduction
ESP32 supports the SPI flash file system or Serial Peripheral Interface Flash File System (SPIFFS). It is a file system created by partitioning the SPI NOR flash of ESP32 into binary file region and file system region. We can use SPIFFS to store files in SPI flash without having to use any external memory with ESP32.
SPIFFS allows users to read and write files to/from the flash memory of microcontrollers. But write operation is not recommended to use frequently due to the limited number of write cycles of flash memory. Nevertheless, we can use it to read, write, delete and close files saved on SPIFFS.
Flat Structure
Unlike the file system in Linux, ESP32 SPIFFS does not support directories. Instead, it produces a flat structure. If SPIFFS is mounted under /spiffs, then creating a file with the path /spiffs/tmp/myfile.txt will create a file called /tmp/myfile.txt in SPIFFS, instead of myfile.txt in the directory /spiffs/tmp.
Applications
The use of SPIFFS with ESP32 becomes very handy in various applications such as follows:
- Saving mesh and network configuration settings in permanent memory without any SD card
- While using ESP32 as a Bluetooth mesh Node, its provisioning and configuration data must be stored in permanent memory.
- In the case of the ESP32 web server, server HTML and CSS files from SPIFFS
- Saving look-up tables to perform queries and retrieve data from the PHP database
In many of our ESP32 web server projects, we include HTML and CSS files within our Arduino sketches. To do this, we convert these HTML documents into strings and save them inside the sketch. When a web client sends an HTTP request, we respond by sending this string as a web page. This allows us to easily serve dynamic content to clients using the ESP32 web server. If you have any specific requirements or questions about web server projects with ESP32, feel free to ask!
On the contrary, by using SPIFFS, we can store HTML, CSS, and JavaScript files in the ESP32 flash file system. This allows us to seamlessly serve these files directly from SPIFFS whenever a web client makes an HTTP request. This approach offers a convenient way to manage and deliver web content on the ESP32 platform.
Related Projects: ESP32 Web Server with SPIFFS (SPI Flash File System
Installing File System Uploader Plugin in Arduino IDE
ESP32 SPIFFS allows us to write files to flash. We can write our own code to upload files from the file system. However, by doing so, we have to write the code ourselves and include it in our application. Additionally, it will increase the actual size of our application.
Hence, we can use a plugin available for Arduino IDE to upload files. This plugin allows users to upload files to SPIFFS directly from their computers. It will make the whole process easier and let us work with files easily.
Installing ESP32 Arduino IDE
Before starting with the file system uploader plugin installation process, you should make sure that you have the latest version of Arduino IDE installed on your system. Moreover, you should also install an ESP32 add-on in Arduino IDE. You can check this tutorial:
Download File Uploader Plugin
(1) First, download the file uploader plugin for Arduino IDE. Go to this link and click on the ESP32FS-1.0.zip folder. When you click on the zip folder, it will download it to your selected location.

(2) After that, extract the zip folder and you will find ESP32FS folder inside ESP32FS-1.0.zip.

(3) Copy the ESP32FS folder and paste it to the tools folder in your Arduino IDE installation folder. The tools folder is available inside the Arduino IDE installation folder. In our case, it is available at:
C:\Program Files (x86)\Arduino\tools

(4) You have successfully added the ESP32 file uploader plugin to Arduino IDE. You just need to restart your Arduino IDE.
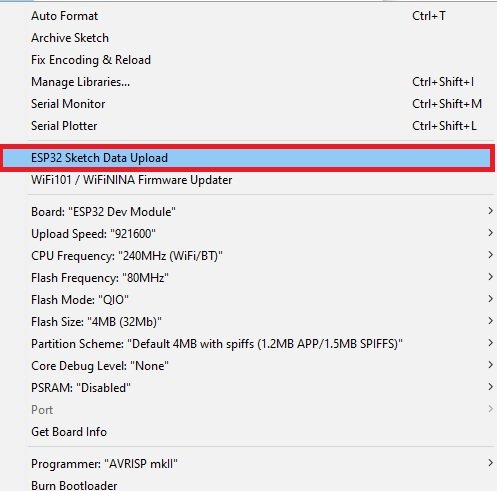
In order to check if the ESP32 FileSystem plugin has been installed correctly, open your Arduino IDE. After that, go to tools. You will find the “ESP32 Sketch Data Upload” option there.
Upload File to ESP32 using the Filesystem Uploader
In this section, let’s see an example to upload an example file to ESP32 SPIFFS using the plugin we have just installed. Follow these step by step instructions:
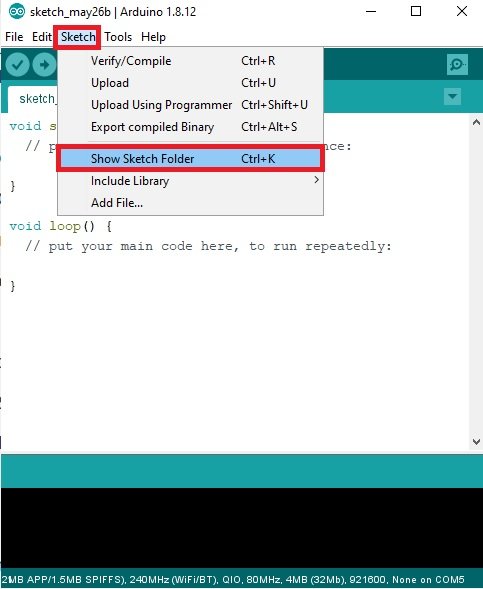
First, open Arduino IDE and open the sketch folder. To open the sketch folder, go to sketch>>Show Sketch Folder. It will open the default folder where your sketch is being saved.
Inside the sketch folder, you will find two a sample Arduino sketch and a data folder. In case your sketch folder does not have a data folder. You should create one because we put the files inside the data folder, which we want to upload to ESP32 SPIFFS.

Create a sample text file with any name. But you should use the same name in the Arduino sketch while reading a file. For example, we have created a text file with the name of “example.”

Copy this example.txt file inside the data folder.

Finally, we can upload the file saved in the data folder to the filesystem of ESP32. To upload a file, go to tools and select ESP32 from tools>boards, and after that press “Tools > ESP32 Sketch Data Upload“.
Note: Make sure to select the ESP32 board before uploading the file. Otherwise, you will get this error SPIFFS Not Supported on avr.
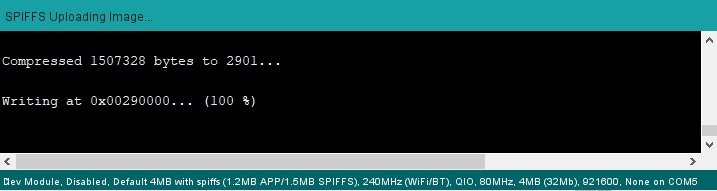
As soon as you click the ESP32 Sketch Data Upload” option, Arduino IDE will start uploading SPIFFS files image to ESP32 as follows:
Note: If you see the Connecting …….____……” message in your Arduino console. That means Arduino IDE is trying to connect with ESP32. But in some versions of ESP32 boards you need to press and hold the BOOT button on ESP2 board when you see the Connecting …….____……” message.
After some time, you will see the message “SPIFFS Image Uploaded. “ That means files are uploaded successfully to ESP32 SPIFFS.

In this example, we are using only one file. But you can save more than one file in the data folder inside the sketch folder. It will upload all files to the ESP32 filesystem.
Example Sketch to Read SPIFFS File
Let’s see an example sketch to read the example.txt file, which we just uploaded to the ESP32 filesystem, and print its content on the Arduino serial monitor.
This code demonstrates how to read the content of a file named “example.txt” stored in the SPIFFS (SPI Flash File System) of an ESP32 board.
#include "SPIFFS.h"

void setup() {
  Serial.begin(115200);

  if(!SPIFFS.begin(true)){
    Serial.println("An Error has occurred while mounting SPIFFS");
    return;
  }

  File file = SPIFFS.open("/example.txt");
  if(!file){
    Serial.println("Failed to open file for reading");
    return;
  }

  Serial.println("File Content:");
  while(file.available()){
    Serial.write(file.read());
  }
  file.close();
}

void loop() {

}
This line includes the SPIFFS library, which provides functions to work with the SPI Flash File System on the ESP32.
include "SPIFFS.h"The setup() function is called once when the ESP32 execution starts.
void setup(){}This line initializes the Serial communication at a baud rate of 115200, allowing the ESP32 to communicate with the Arduino IDE via the Serial monitor.
Serial.begin(115200);This line attempts to mount the SPIFFS file system. The SPIFFS.begin(true) function is used to format the SPIFFS if it is not already formatted. If mounting fails, an error message is printed, and the program exits the setup.
if(!SPIFFS.begin(true))This line opens the file named “example.txt” from the SPIFFS. The SPIFFS.open() function returns a File object that can be used to read or write data to the file.
File file = SPIFFS.open("/example.txt");This line checks if the file was successfully opened. If the file doesn’t exist or cannot be opened, an error message is printed, and the program exits the setup.
if(!file)This line prints a message to the Serial monitor indicating that the content of the file will be displayed.
Serial.println("File Content:");This line starts a loop that will read the content of the file as long as there is data available to read.
while(file.available())This line reads a single byte of data from the file using the file.read() function and sends it to the Serial monitor using Serial.write(). This effectively displays the content of the file byte by byte on the Serial monitor.
Serial.write(file.read());This line closes the file after reading its content to free up resources.
file.close();The loop() function is empty in this code and does nothing. The program will not execute any repetitive tasks after reading and displaying the file content. As a result, it will remain idle once the setup is completed.
void loop() { }Demonstration
Copy the following code to your .ino file of Arduino sketch and upload it to Arduino.
After uploading a sketch, open the serial monitor in Arduino IDE by going to Tools > Serial Monitor. Also, set the baud rate to 115200. Finally, press the enable button on the ESP32 board:

As soon as you press the enable button, it will print the content of example.txt file on the serial monitor as follows:

That means you have successfully uploaded the file to the ESP32 filesystem and are also able to read the file.
Summary
By using the file system uploader plugin, we can easily upload files to ESP32 SPI Flash. On top of that, we can also read, write, delete, and close files inside our Arduino sketch using the SPIFFS.h library available in Arduino IDE. You can check the following project to learn to serve HTML, and CSS files to a web client stored on the ESP32 file system:
- ESP32 Web Server with SPIFFS (SPI Flash File System)
- Upload Files to ESP32 SPIFFS FileSystem with VS Code and PlatformIO IDE
- ESP32 SHT31 Temperature and Humidity Web Server
- Display Sensor Readings in Gauges with ESP32 Web Server
More ESP32 tutorials and projects:
- Getting Epoch/Unix time with ESP8266 NodeMCU through NTP server using Arduino IDE
- ESP32 with MPU6050 Accelerometer, Gyroscope, and Temperature Sensor ( Arduino IDE)
- LM35 Temperature Sensor with ESP32 – Web Server
- ESP32 web server control relay and 220 volt lamp
- ADS1115 I2C external ADC with ESP32 in Arduino IDE
- ESP32 Web Server Control Servo motor with Arduino IDE
hello, i installed my arduino via the windows store and the tools folder is denying me access to put the required folder, I have tried changing permissions, but its to no success. Any help will be appreciated.
First, two comments about the blog…
#1, There is no date as to when this was written, also,
#2, There is no author.
These two pieces of information should be critical in ANY post in ANY blog.
I see one other comment posted in Sep 2021, so the blog must be older then that.
Now on to the tool. It is a great first cut, it seems to work as advertised. However, it seems this is a ONE WAY TOTAL FILE REPLACEMENT tool. I think, under the hood, the tool packs all files in the data folder (in your sketch folder) into an image, then uploads and replaces the SPIFFS image in the ESP.
It’s kinda like formatting the drive before storing new data there. (This is something that would have been nice to know before I ran the tool. Perhaps the author could make this quirk clear early in the above blog.)
This effectively removes all files that were in the SPIFFS file system including user data files you may have created, any log files that have been created, and any dynamic data configuration goes away.
It would be nice if the tool had the option of downloading the files to a different data folder (in the sketch folder.) This could be accomplished with a second entry in the Tools menu, or, when running the tool it could ask the user which way to go.
Also, it would be nice if the tool popped up a warning that it was going to destroy all existing files on the target.
Mark.