In this tutorial, You will learn to use capacitive touch sensor pins of ESP32 development board using the Arduino IDE framework. Additionally, we will also see how to use these capacitive touch sensors as a push button to read external events. It will eliminate the need to connect an external push button. We can use these to create touch-based light switches, etc.
ESP32 Capacitive Touch Sensor Pins
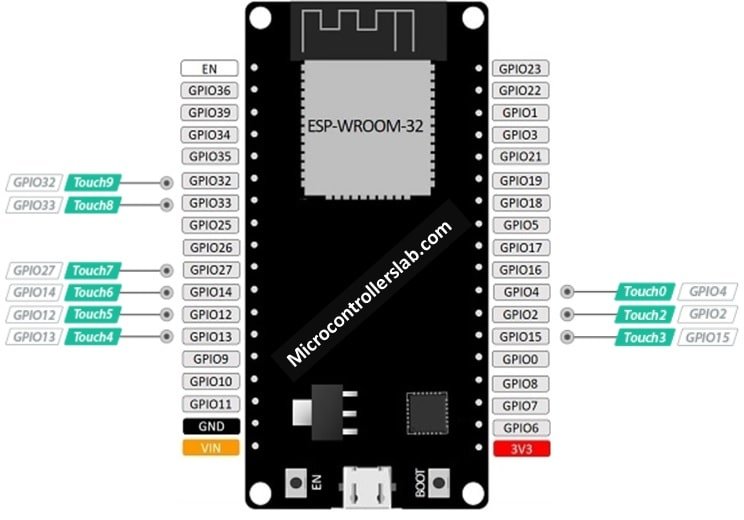
ESP32 chip provides ten capacitive touch sensors. These touch sensor pins are shared with other GPIO pins of ESP32. ESP32 Pin mapping for these touch pins with GPIO pins is shown below for 36 pin ESP32 dev kit version.
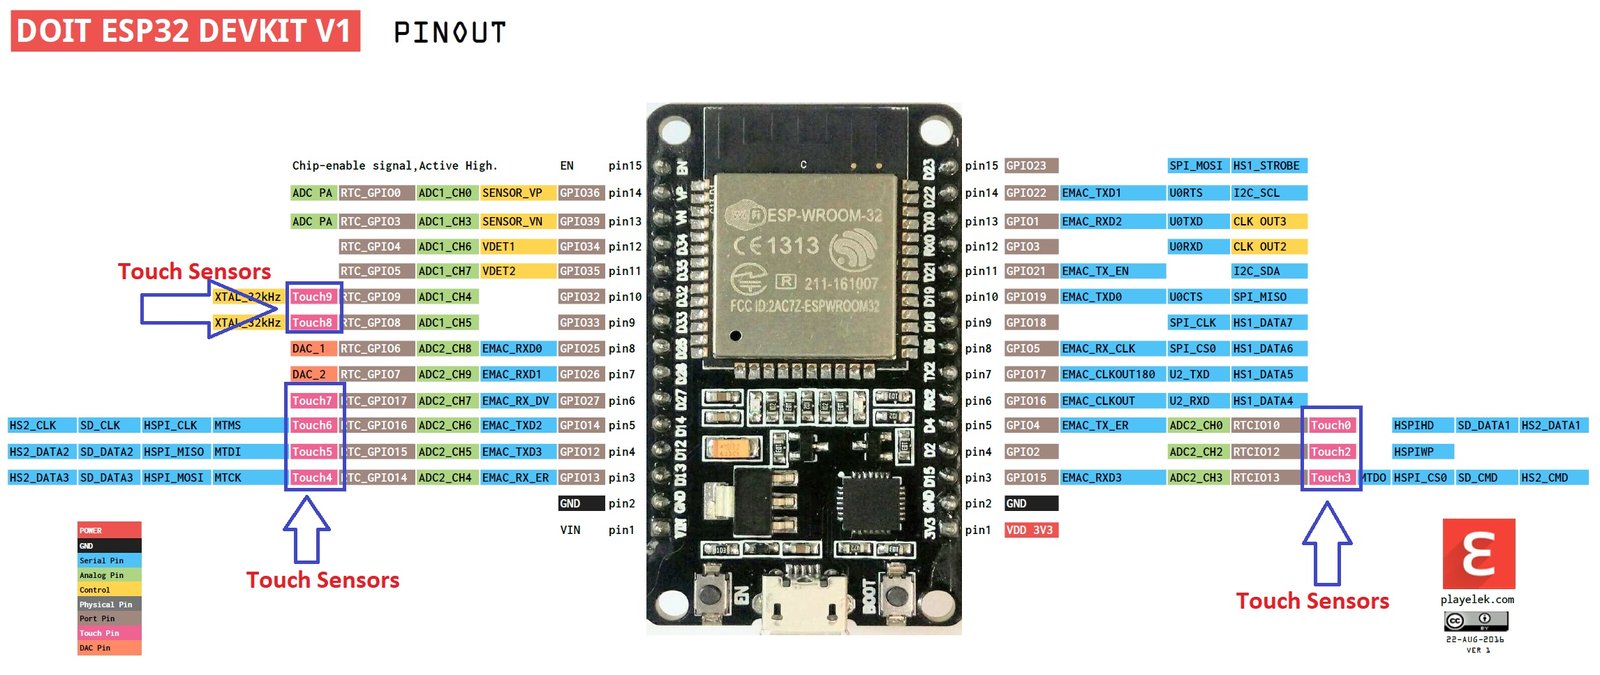
This pin mapping for 30 pins ESP32 Devkit version is shown below. But you can check the pinout image of other types of ESP32 development boards. Devkit supports 9 touch pins out of a total of 10 touch pins available on the ESP32 WROOM chip. Touch1 is not available on this version of ESP32. Because Touch1 is shared with GPIO0 and it is not available on the ESP32 Devkit board.
- Touch0 >> GPIO4
- Touch1 >> Not available on Devkit 30-pin version but available on Devkit 36-pin version
- Touch2 >> GPIO2
- Touch3 >> GPIO15
- Touch4 >> GPIO13
- Touch5 >> GPIO12
- Touch6 >> GPIO14
- Touch7 >> GPIO27
- Touch8 >> GPIO33
- Touch9 >> GPIO32
How Capacitive Touch Sensors Work?
Capacitive sensors work by detecting electrical charge value variation on GPIO pins. For example, if you touch any of these pins, the GPIO pin will produce output according to the electrical charge on your finger. Because the human body also holds some electrical charge. Therefore, these touch sensors are also known as capacitive sensors. This electrical capacitance variation produces an analog signal. Two internal successive approximation ADCs (SAR ADCs) of ESP32 sample this analog signal and outputs an equivalent digital value.
ULP processor of ESP32 manages touch detection. Hence, these pins can also be used to wake up ESP32 from deep sleep with touch pins as a wake-up source.
Now let’s see how to program touch sensor pins and read electrical changes on these pins. But before starting this tutorial, the following are the prerequisites for this tutorial:
- processing of installing of ESP32 library in Arduino IDE
- How to use GPIO pins of ESP32 as digital output
- How to use digital input pins of ESP32
- How to use analog to digital converter with ESP32 devkit board
Circuit Diagram
Now make this circuit diagram on the breadboard. Connect a cable to GPIO4 of ESP32 board and also connect any conductive material with another terminal of the wire such as aluminum foil, conductive cloth, conductive paint, etc. Now it will act as a touch sensor.

In the above circuit diagram touch0 is used which is mapped with GPIO4. Now let’s see how to write code to measure the touch sensor value and send this value on the serial monitor of Arduino IDE.
ESP32 Touch Sensor Example Code
To write code for the touch sensor, we use the touchRead() function. It is very easy to use the touchRead() function.
touchRead(touch_sensor_pin_number)
This function reads the value of the touch sensor value associated with the touch pin. You only need to pass the name of the touch pin to this function. For example, if you want to use touch pin zero, you will simply use this function like this touchRead(T0).
Now, let’s move to working part of this function. Below is a simple code for this tutorial.
int touch_sensor_value=0;
void setup()
{
Serial.begin(115200);
Serial.println("Touch sensor tutorial ESP32");
}

void loop()
{

touch_sensor_value = touchRead(T0);
Serial.print("Touch0 value is = ");
Serial.println( touch_sensor_value);
delay(1000);
}
In this code, the variable touch_sensor_value is used to store the output of touchRead function.
int touch_sensor_value=0;In the setup function, uart communication is initialized with a baud rate of 115200 and after that Serial.println() function is used to transmit string “Touch sensor tutorial ESP32” to serial monitor of Arduino IDE.
Serial.begin(115200);
Serial.println("Touch sensor tutorial ESP32");
Now comes the main part of this tutorial loop, in the loop part, touchRead(T0) function will read the value of the touch sensor on GPIO4 and will save its value in variable touch_sensor_value. So now the reading part has done. After that serial library function first sends a string “Touch0 value is = ” to serial monitor and after that, the value of the touch sensor will be sent. This process will repeat itself after every one second.
Without touching the pin with a finger, you will see higher values of touch sensor output on a serial monitor. After you touch the wire connected with GPIO four, you will notice that the values will start decreasing.
Now you need to upload this code to the ESP32 board and you will see the output like this:

How to use the touch sensor as a button in ESP32
Now, we will see an example of using ESP32 touch pins as a digital button. Instead of using an external button, you can use any touch pin as a digital input pin for button. But to do so, you need to find the threshold of the touch pin. By threshold, we mean what is the value without touching the wire and what is the highest value of the touch sensor after touching the wire. Note down this value and we will use it in our code to use touch pins as a digital button. You can find the threshold by simply uploading the same code given above. Just measure these values on the serial monitor of Arduino IDE and note down the threshold value.
For example in our case threshold is between 20-30.
- Without touching the wire, the output is around 60-80
- After touching the wire the output is between 20-30.
- So we can use a threshold of less than 30.
- we will turn on the LED if the threshold is less than or equal to 30.
- If the threshold is greater than 30, light emitting diode will remain off.
Following is a circuit diagram used to control LED with a touch pin as a button. Wire this circuit with the required components:
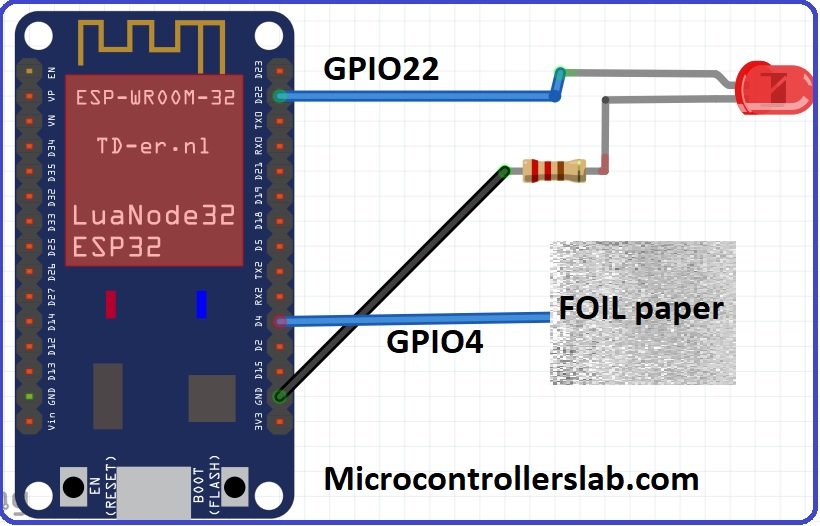
- In this circuit diagram, the touch sensor zero touch0 is used. You can use a silver color aluminum foil paper with a touch pin for better connection and output as shown in the picture.
- LED is connected with general purpose input output pin 22 through the 330ohm resistor.
- When we touch the foil, LED will glow otherwise LED will remain in the off state.
Program for this tutorial is given below.
- First three lines define a name to touch pin, led pin and define integer variables to store sensor value and threshold.
- VALUE_THRESHOLD variable is defined as a constant type because we do want to modify it in our program.
- Rest of the code is the same as above code except if else condition which checks threshold value and makes LED on and off
#define touch_pin_numer T0
const int LED_PIN_NUMBER = 22;
const int VALUE_THRESHOLD = 30;
int TOUCH_SENSOR_VALUE;
void setup()
{
delay(1000);
pinMode (LED_PIN_NUMBER, OUTPUT);
}
void loop(){
TOUCH_SENSOR_VALUE = touchRead(touch_pin_numer);
Serial.print(TOUCH_SENSOR_VALUE);
if(TOUCH_SENSOR_VALUE < VALUE_THRESHOLD)
{
digitalWrite(LED_PIN_NUMBER, HIGH);
}
else{
digitalWrite(LED_PIN_NUMBER, LOW);
}
}
The code for this example is the same as we used in the first example. except for the threshold variable and LED blinking part. I have already talked about LED blinking in previous tutorials.
You may also like to read:
Hi, thank you for the wonderful tutorials.
Will you be able to do a tutorial on LED light dimming with ESP32 and hi power transistor as the driver?
Hi
I will try to write on it. but you can check this Pulse width modulation control article where I provided an example of fix and variable PWM duty cycle generation using ESP32, you can use the same example of code but you will need to interface a current driver IC with PWM output pin.
http://microcontrollerslab.com/esp32-pwm-arduino-ide-led-fading-example/
Thank you
Multiplex a single touch input. When 10 touch sensors just are not enough!!
You can multiplex a single touch input to give you 128 touch buttons on one single input. You will need a CD7HC4067 Analog MUX, this will provide 16 touch options per chip (chain MUX´s for increasing as per your needs).
* This code prevents the touch wire triggering multiple times when touched.
* No DELAY used (non-blocking).
I hope it helps someone else
Here is the code:
#define TOUCH_timeSeconds 2
uint64_t now = millis();
unsigned long lastTrigger_TOUCH = 0;
bool startTimer_TOUCH = false;
bool buttonIsPressed = false;
int touch_sensor_value = 0;
//Mux control pins
int s0 = 26;
int s1 = 27;
int s2 = 14;
int s3 = 12;
//State array
int currentState ;
//Mux in “SIG” pin
int SIG_pin = 33; //is touch sensor
void setup()
{
pinMode(s0, OUTPUT);
pinMode(s1, OUTPUT);
pinMode(s2, OUTPUT);
pinMode(s3, OUTPUT);
digitalWrite(s0, LOW);
digitalWrite(s1, LOW);
digitalWrite(s2, LOW);
digitalWrite(s3, LOW);
Serial.begin(115200);
Serial.println(“Multiplexing 1 Touch sensor ESP32 using CD7HC4067 MUX”);
}
void loop() {
for (int i = 0; i < 16; i ++) {
currentState = readMux(i);
touch_sensor_value = touchRead(T9);
if ((touch_sensor_value (TOUCH_timeSeconds * 1000))) {
Serial.println(“2 Second LOCK OUT: No rapidly repeating readings”);
buttonIsPressed = false;
startTimer_TOUCH = false;
return;
}
//
}
// delay(1000);
}
int readMux(int channel) {
int controlPin[] = {s0, s1, s2, s3};
int muxChannel[16][4] = {
{0, 0, 0, 0}, //channel 0
{1, 0, 0, 0}, //channel 1
{0, 1, 0, 0}, //channel 2
{1, 1, 0, 0}, //channel 3
{0, 0, 1, 0}, //channel 4
{1, 0, 1, 0}, //channel 5
{0, 1, 1, 0}, //channel 6
{1, 1, 1, 0}, //channel 7
{0, 0, 0, 1}, //channel 8
{1, 0, 0, 1}, //channel 9
{0, 1, 0, 1}, //channel 10
{1, 1, 0, 1}, //channel 11
{0, 0, 1, 1}, //channel 12
{1, 0, 1, 1}, //channel 13
{0, 1, 1, 1}, //channel 14
{1, 1, 1, 1} //channel 15
};
//loop through the 4 sig
for (int i = 0; i < 4; i ++) {
digitalWrite(controlPin[i], muxChannel[channel][i]);
}
//read the value at the SIG pin
int val = analogRead(SIG_pin);
//return the value
return val;
}
thanks for sharing this
I think you could simplify this a bit.
You don’t need the array muxChannel.
Change controlPin to ={s3,s2,s1,s0}
and change the digitalWrite() in //loop through the 4 sig to:
digitalWrite(controlPin[i], Channel & (1 <> i) instead.
Typo, should be < <, the left shift operator
I really liked it, well done, congratulations.
eng. AlvaroLuiz – São Paulo – Brazil
Hello,
I don’t need that multiplex.
But what I’m very interested in is the
“This code prevents the touch wire triggering multiple times when touched.”
Can you help me to Implement this in my Code.
Thanks
Robi
This is my code, abbreviated to the essential
#define BUTTON_1 T7 // Button 1
int touch_value = 100;
…
void ReadButton() {
touch_value = touchRead(BUTTON_1);
Serial.println(touch_value);
delay(1000);
if (touch_value < 50)
{
client.print("I am Transmitterr"); // assuming te touch_value<60 = touch button
delay(200);
}
}
and
void doLEDEffect() {
touch_value = touchRead(BUTTON_1); // put your main code here, to run repeatedly:
if (touch_value < 50)
{
for(int blink=0; blink<blinkcount; blink++) {
for(int i=0; i<NUM_LEDS; i++) {
leds[i].setRGB(255,0,0);
FastLED.show();
delay(10);
}
….
// ESP32 Touch Test
// Just test touch pin – Touch0 is T0 which is on GPIO 4.
bool touchStarted = false;
unsigned long touchTime = 0;
//int threshold = 90;
int threshold = 15;
int touchMinDuration = 100;
int i;
void setup()
{
pinMode(22, OUTPUT); // Set GPIO22 as digital output pin
Serial.begin(115200);
delay(1000); // give me time to bring up serial monitor
Serial.println(“ESP32 Touch Test”);
}
void loop()
{
//digitalWrite(22, HIGH); touch 1 is gpio0
int t = touchRead(T0); // pin 15 is touch 3
//Serial.println(touchRead(T0)); // get value of Touch 0 pin = GPIO 4
if (t = threshold && touchStarted) { // untouched
if (millis() – touchTime > touchMinDuration)
touched();
touchStarted = false;
}
delay(10);
}
void touched()
{
Serial.println(“Touched”);
flashLed();
}
void flashLed()
{
digitalWrite(22, HIGH);
for (i = 0; i < 10; i++)
{
digitalWrite(22, HIGH);
delay(50);
digitalWrite(22, LOW);
delay(50);
}
}
/*
void loop() { // touch3 pin = GPIO 15
int i = 0;
Serial.println(touchRead(4)); // get value of Touch 0 pin = GPIO 4
delay(150);
if (touchRead(4)< 15)
{
for (i = 0; i < 10; i++)
{
digitalWrite(22, HIGH);
delay(50);
digitalWrite(22, LOW);
delay(50);
}
}
}
*/
Hi, is it possible to have a touch slider control in ESP32 ?
something like fading a LED based on swiping finger on aluminium foil(+an insulator on top of it if required)..?
It is possible, but it will require a special slider design. There are several ways this can be done, but it is not just a button or piece of aluminum foil.
What if static discharge happen when the user touches the “button”?
How ESP32 can be protected? Serial resistor? Close ground wire for discharge?
I’d like to know this too…
How can I use that as interrupt to differentiate long touch and short touch