In this tutorial, we will learn how to set ESP32 as a soft access point web server or How to use ESP32 in a soft AP. In all the previous projects on the ESP32 web server, we used the ESP32 in station mode. But, in this tutorial, we will not need to connect the ESP32 development board to a WiFi network through a router. However, the ESP32 will work as a router. It will serve as a WiFi network or hotspot for other devices to connect to.
Recommended Components
The following components are used in this project or are helpful for building it with the ESP32.
| Component | How it’s used in this project | Buy on Amazon |
|---|---|---|
| ESP32 Development Board (DevKit V1) | The main microcontroller board that runs the project code and controls all connected parts. | Check Price |
| Micro USB Cable | Connects the ESP32 to your computer to upload code and provide power. | Check Price |
| Breadboard | Lets you build the circuit and connect components without soldering. | Check Price |
| Jumper Wires | Used to wire the ESP32 to the other components on the breadboard. | Check Price |
As an Amazon Associate we earn from qualifying purchases. Prices and availability are accurate as of the date/time indicated and are subject to change.
ESP 32 Wi-Fi operating modes
The ESP32 can use two WiFi operating modes. These modes are listed below:
- Station Mode
- Soft Access Point Mode
However, ESP32 can also run both modes simultaneously, so it runs Station Mode and Soft Access Point Mode at the same time. In the last tutorial on creating an ESP32 web server, we used the ESP32 in station mode, where we connected it to a WiFi router and it got the IP address from the WiFi router. In this mode, the router acts as a soft access point because all web clients get web pages through the wireless router, as shown in the figure below.

But this method has one limitation. If we do not have a WiFi router available, we cannot use the ESP32 as a web server to access data through a local network. The solution to this query is a soft access point method. So let’s see what soft access point mode is and how to set this board in soft AP mode.
ESP32 in a Soft Access Point Mode
In simple terms, a soft access point refers to a hotspot. We can turn the ESP32 into a hotspot device. Every hotspot device acts like a network router, which we can use to transfer data between devices. Any laptop or mobile device with built-in WiFi can connect to this hotspot. Similarly, We can set the ESP32 in hotspot mode or Soft Access Point mode, where it acts like a WiFi router and computing devices can connect to it. As shown in the picture below, the ESP32 acts as a soft access point, and devices can connect to it through its WiFi credentials.
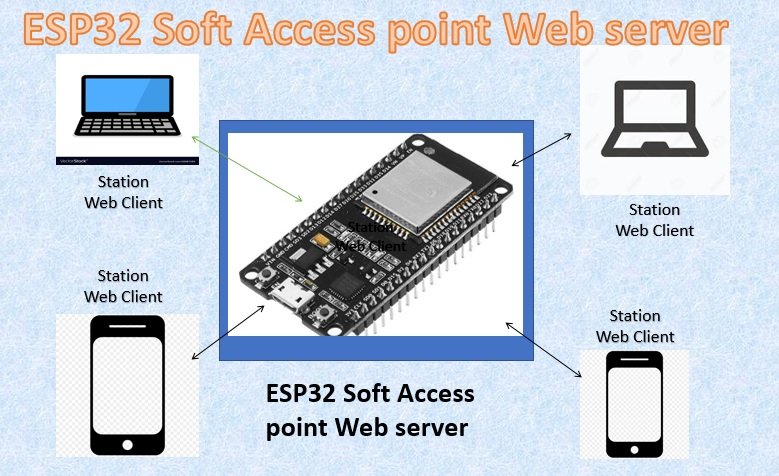
When set up as an access point, the ESP32 can create its own Wi-Fi network that other devices can connect to. This means that other devices, such as smartphones, laptops, or other IoT devices, can connect directly to the ESP32 without the need for an external Wi-Fi router.
By acting as an access point, the ESP32 enables device-to-device communication within its network. Other devices can connect to the ESP32 access point and communicate with it using standard network protocols, such as HTTP or MQTT, allowing for data exchange.
Features of ESP32 Soft AP
Here we have listed some of the features of ESP32 in Soft AP mode:
- The ESP32 enables its own WiFi network in soft access mode.
- All devices within the range of the ESP32 WiFi network can see and connect to this network.
- The devices connected to the ESP32 in soft access mode will act as stations.
- To connect to the ESP32 board, the devices will require the SSID and Password of the ESP32 in the soft access point. We will see how we can set this SSID and password for the ESP32 board.
- We will not need to connect the ESP32 board to any wireless or wired network.
Schematic Diagram:- Connecting LEDs to ESP32 Board
For demonstration purposes, we will control three LEDs from a web page. In the schematic diagram provided below, we have used three LEDs, and we will control these LEDs from a web page. GPIO pins 22, 23, and 15 will be controlled using a web server. Now we will make these connections on the breadboard using this schematic diagram.
In the circuit diagram, we can see that the ESP32 is connected to three LEDs. Each LED is connected to a current-limiting resistor to ensure that the correct amount of current flows through them.

Prerequisites
We have attached the links below that are prerequisites and whose knowledge is essential for this tutorial:
Required Components
We will be using these components for this tutorial:
- ESP32 Development Board
- Few jumper wires
- LEDs x3
- Resistors x3
ESP32 Soft Access Point Code Sketch in Arduino IDE
In this section, we have provided an Arduino sketch. We will use this to control the two LEDs for demonstration purposes. We will discuss below how we can use this sketch to control more LEDs. The instructions given in this example are also compatible with other ESP32 web servers. Now we will copy this sketch and upload it to the ESP32 using the Arduino IDE. This code sets the ESP32 in soft access point mode.
#include "WiFi.h"
#define LED0 23
#define LED1 22
const char* ssid = "ESP32-Soft-accessPoint";
const char* password = "microcontrollerslab";
WiFiServer server(80);
String html ="<!DOCTYPE html> \
<html> \
<body> \
<center><h1>ESP32 Soft access point</h1></center> \
<center><h2>Web Server</h2></center> \
<form> \
<button name=\"LED0\" button style=\"color:green\" value=\"ON\" type=\"submit\">LED0 ON</button> \
<button name=\"LED0\" button style=\"color=red\" value=\"OFF\" type=\"submit\">LED0 OFF</button><br><br> \
<button name=\"LED1\" button style=\"color:green\" value=\"ON\" type=\"submit\">LED1 ON</button> \
<button name=\"LED1\" button style=\"color:red\" value=\"OFF\" type=\"submit\">LED1 OFF</button> \
</form> \
</body> \
</html>";


void Connect_WiFi()
{
WiFi.begin(ssid, password);
while(WiFi.status() != WL_CONNECTED)
{
delay(100);
}
}

void setup()
{
Serial.begin(115200);
pinMode(LED0, OUTPUT);
pinMode(LED1, OUTPUT);
digitalWrite(LED0, LOW);
digitalWrite(LED1, LOW);
Serial.print("Setting soft access point mode");
WiFi.softAP(ssid, password);
IPAddress IP = WiFi.softAPIP();
Serial.print("AP IP address: ");
Serial.println(IP);
server.begin();
}


void loop()
{
WiFiClient client=server.available();
if(client)
{
String request = client.readStringUntil('\r');
if(request.indexOf("LED0=ON") != -1)digitalWrite(LED0, HIGH);
if(request.indexOf("LED0=OFF") != -1)digitalWrite(LED0, LOW);
if(request.indexOf("LED1=ON") != -1)digitalWrite(LED1, HIGH);
if(request.indexOf("LED1=OFF") != -1)digitalWrite(LED1, LOW);
client.print(html);
request="";
}
}
Code Explanation
The code used in this tutorial is almost identical to the code used in the esp32 web server tutorial, except for the configuration of the soft access point.
Setting up ESP32 Network Credentials
First, we need to define the “ssid” name and the “password”. This SSID and password will allow other devices to connect with the ESP32 board. We have set the name of the SSID as “ESP32-Soft-AccessPoint” and the password as “microcontrollerslab”. You can replace these according to your preferred credentials.
const char* ssid = "ESP32-Soft-accessPoint";
const char* password = "microcontrollerslab";
These lines establish the access point mode using the above-mentioned SSID and password. Make sure that the password is equal to or greater than 8 digits, as this can cause connection issues.
Initializing Soft Access Point Mode
Now, we have used the Serial.print() function to print the string “Setting soft access point mode” on the serial monitor of the Arduino IDE.
Serial.print("Setting soft access point mode");The WiFi.softAP() function is used to set up the Soft Access Point mode. This function has two input arguments. One is the name “ssid” and the other is the “password”, we have set in the above section for the ESP32 WiFi network.
WiFi.softAP(ssid, password);The WiFi.softAPIP() function is used to get the IP address of the ESP32, through which we will access the web server. This line saves the IP address value in a variable named “IPAddress.” After that, the Serial.print() function prints the value of the IP address on the serial monitor.
IPAddress IP = WiFi.softAPIP();
Serial.print("AP IP address: ");
Serial.println(IP);
So these functions will set the ESP32 up as a Soft AP. If we want to turn any existing ESP32-based web server project into soft access point mode, we only need to add these lines to our code.
Accessing Web server from any device

Now we will upload this code to our ESP32 board using the Arduino IDE. After the Arduino IDE is done uploading the code to the board, it will display a “Done Uploading” message. Now we will click on the Serial Monitor button to open the serial monitor. We will see this message on the serial monitor. It will show us the IP address of our ESP32 board; we need to note down this IP address. We will need it to access the web server.
How to connect to ESP32 Soft AP
Now, we will see how to connect to the ESP32 WiFi network. Before doing so, we need to make sure that our board is powered and that the sketch has been successfully uploaded to the board.
Establishing Connection with the ESP32 board
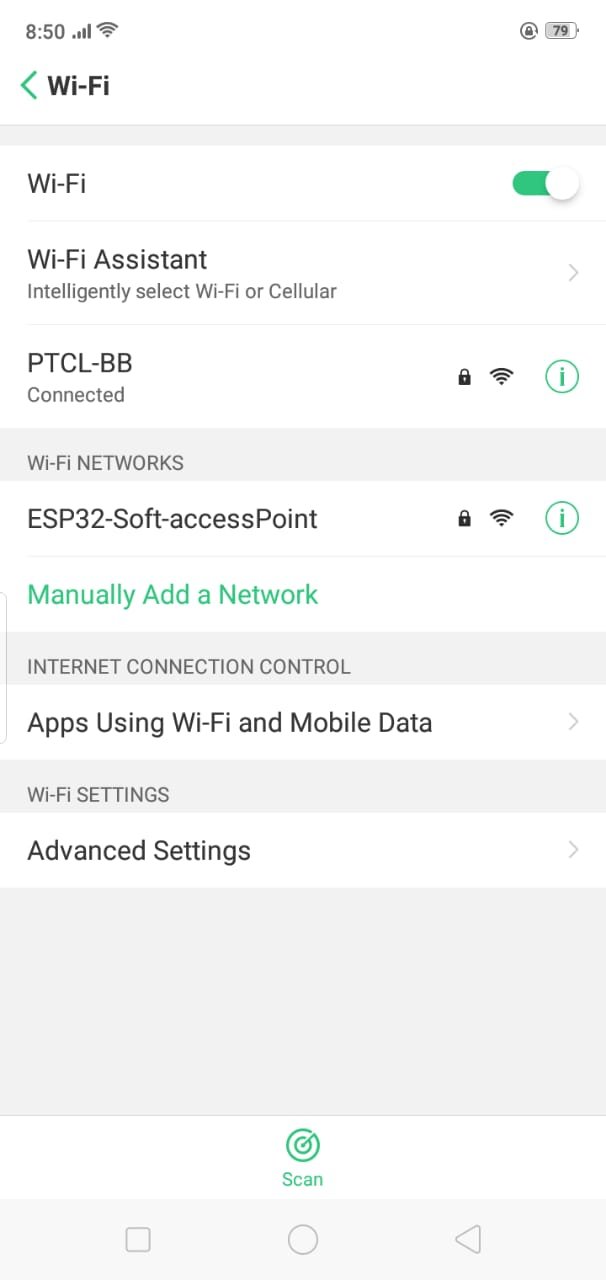
- To connect to the ESP32 soft AP, we will open up our mobile device’s WiFi option and search for the available WiFi networks. Here we will see the name “ESP32-Soft-accessPoint” as the SSID that we have given in the code. In case you have set the SSID according to your preference, that name will display here instead of “ESP32-Soft-accessPoint”.
- After that, we will click on this ESP32 WiFi SSID and enter the password we have set inside the ESP32 sketch, as shown in the picture.
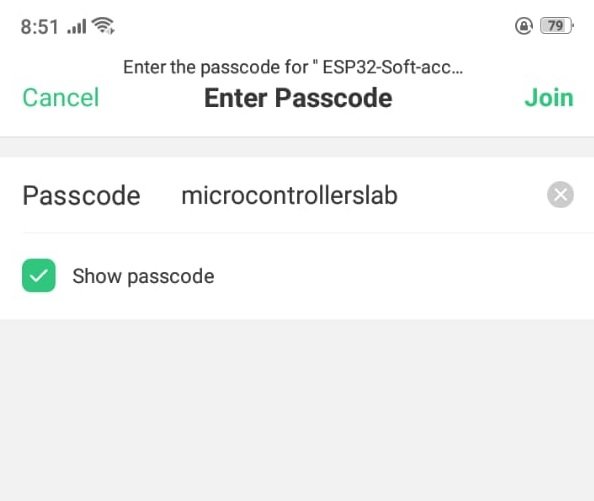
- Now we will click the join button to connect to this WiFi network.
Accessing the Web Page
- Once we have connected to the WiFi network of the ESP32, we can now go to the web browser of our mobile device and search for the IP address we noted before. We will see the following web page in the web browser:

- Now we will connect the LEDs to the ESP32 board and click on these buttons. We will be able to control LEDs connected to GPIO pins 22 and 23 through this web page.
- We can also connect to this access point through our laptop or computer. For this, we go to the network settings of our laptop or computer, and we will also see an “ESP32-Soft-accesspoint” WiFi option in the available networks.

So this is how we can easily convert the ESP32 to create a WiFi network of its own and use it to create a web server without any wireless router.
Conclusion
In summary, we have learned the following in this tutorial:
- What is a Soft Access Point.
- ESP32 WiFi Operating Modes.
- How to use ESP32 in Soft AP mode.
- How to control LEDs using ESP32 in the Soft AP mode.
The blog post explains how to create a web server using the ESP32 microcontroller in Arduino IDE, with the ESP32 configured as a Soft Access Point (SoftAP). This allows the ESP32 to act as its own Wi-Fi network that other devices can connect to.
Related Tutorial:
We have a similar guide with MicroPython for ESP32 and ESP8266:
Recent Projects:
you can also check our other interesting ESP32 projects, listed below :
For some reason it does not use the SSID/Password and starts an open AP named ESP_0AAB52
Arduino 1.8.9 and Wemos lolin32
Never mind, found out that password length has to be at least 8 to work as described here.
ok thanks for sharing Bert
I luckily choose password length greater than 8
Tested this but it runs incredibly slow.
Most of the time I can’t access the webserver from client.
Any ideas?
Hello,
Can i using this example to send a image like png or jpg? Please, can you help me?
Hallo from Germany,
thank you so much for your tutorial 🙂
I have one question I can’t figure out:
I build a smart control for my camper van. Basically its an Arduino controlling a relay block.
Now I want to update to an esp32 to have the possibility to control the camper via smartphone and have the Data send to the html. ( Battery voltage for example)
Everything works fine BUT 😀 I can’t figure out how to code a hardware switch additionally to the smartphone control using softap.
Turn on lights turn off lights from smartphone is nice to have but I need the possibility to turn it on and off in the van using a hardware switch.
Do you have any idea to find a solution for my problem?
Thank you and stay healthy.
– Johannes
can i use it to browse the web
No, it only sends out its OWN network with no connection to the outer world.
If you don’t add a server response with a “200 – OK” message, the server will not work most (if not all) of the time. I see this mistake a lot.
Add the lines below marked “Add this line” and the server responds perfectly.
———————————————————————————————
if(client) {
String request = client.readStringUntil(‘\r’);
if(request.indexOf(“LED0=ON”) != -1)digitalWrite(LED0, HIGH);
if(request.indexOf(“LED0=OFF”) != -1)digitalWrite(LED0, LOW);
if(request.indexOf(“LED1=ON”) != -1)digitalWrite(LED1, HIGH);
if(request.indexOf(“LED1=OFF”) != -1)digitalWrite(LED1, LOW);
client.println(“HTTP/1.1 200 OK”); // add this line
client.println(“Content-type:text/html”); // add this line
client.println(“Connection: close”); // add this line
client.println(); // add this line
client.print(html);
client.println(); // add this line
request=””;
}
———————————————————————————————
what is Connect_Wifi() for?