In this article, You will learn how to install ESP32 in Arduino IDE. It will be step-by-step instructions on installing ESP32 in Arduino IDE on Windows and Linux. After installing the library, start building your IoT projects using the popular ESP32 development board with confidence and ease.
If you are not familiar with this development board, I recommend you check these articles:
Before installing ESP32 package in Arduino IDE, it’s crucial to ensure that you have the latest version of Arduino IDE. ESP32 has been known to have compatibility issues with previous versions of Arduino IDE. Therefore, we recommend deleting any old versions and installing the latest ones to avoid any potential problems.
Install Arduino IDE on Windows, Linux, and macOS
Here is a step-by-step guide on how to install Arduino IDE on Windows, Linux, and macOS:
- Go to the official Arduino website at this link: https://www.arduino.cc/en/software.
- From the download options select the operating system which you are using.
- Click on the “Download” button to download the installer file.
- Select the appropriate version of the software for your system (32-bit or 64-bit) and click on the download link.
- Once the download is complete, open the installation file.
- Follow the installation wizard prompts, accept the license agreement, and choose the installation location.
- Choose the components you want to install, such as USB drivers, and click “Install”.
- Once the installation is complete, click “Close” to exit the wizard.
You have successfully installed Arduino IDE on your Windows system! You can now open the software and start using it for your projects.
Install on Linux from Command line
Open the terminal and run the following command to update the package list:
sudo apt-get update
Install the Arduino IDE package by running the following command:
sudo snap install arduino
If you encounter any issues, you may need to install additional dependencies. Run the following command to install them:
sudo apt-get install gcc-avr avr-libc
Once the installation is complete, you can launch the Arduino IDE from the applications menu or by running the following command in the terminal:
arduinoInstall ESP32 Library in Arduino IDE
After installing the latest version of Arduino IDE, Click on the Arduino IDE icon and open it.

After that click and files and go to preferences.
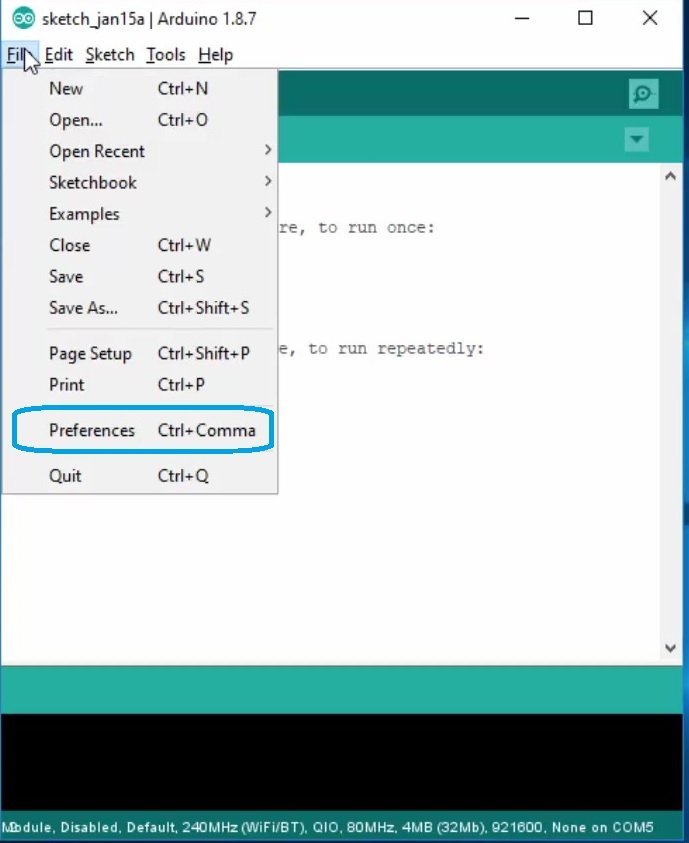
Paste this link in Additional board manager URL:
https://raw.githubusercontent.com/espressif/arduino-esp32/gh-pages/package_esp32_index.json
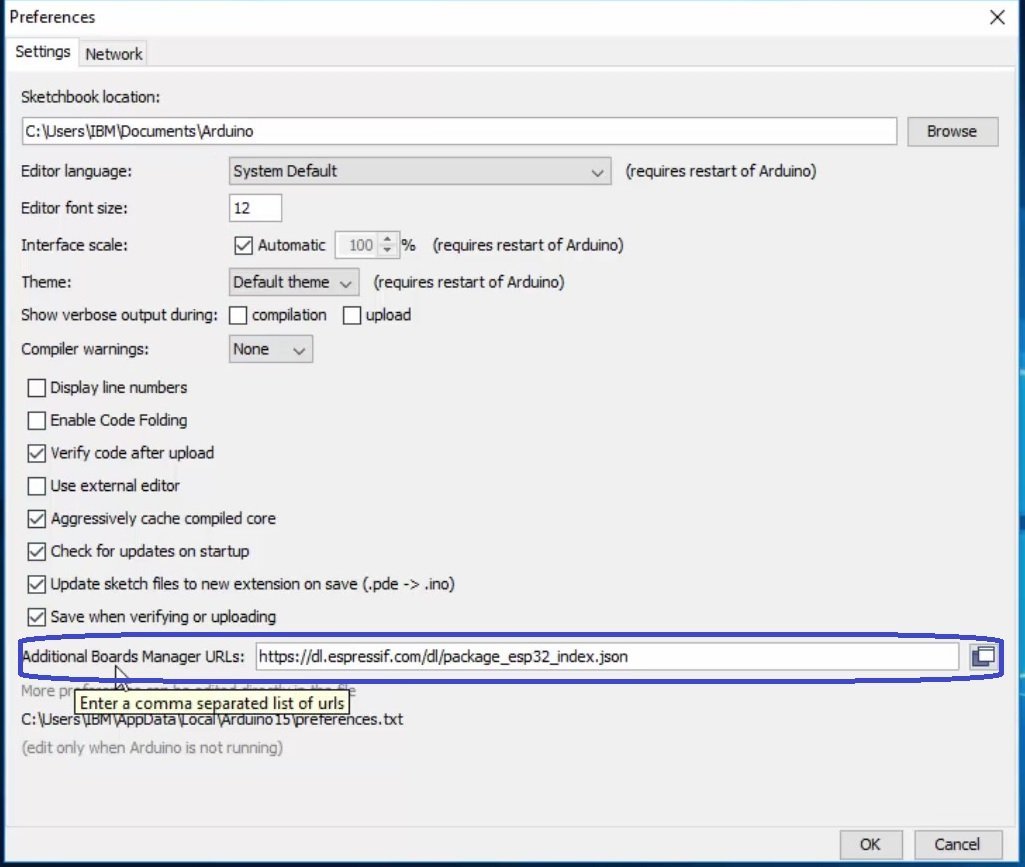
If you already have other boards in this additional board manager URLs, you can separate them by commas and you can use as many boards you want.

This link is a board support package of development board. After that click on Ok button.

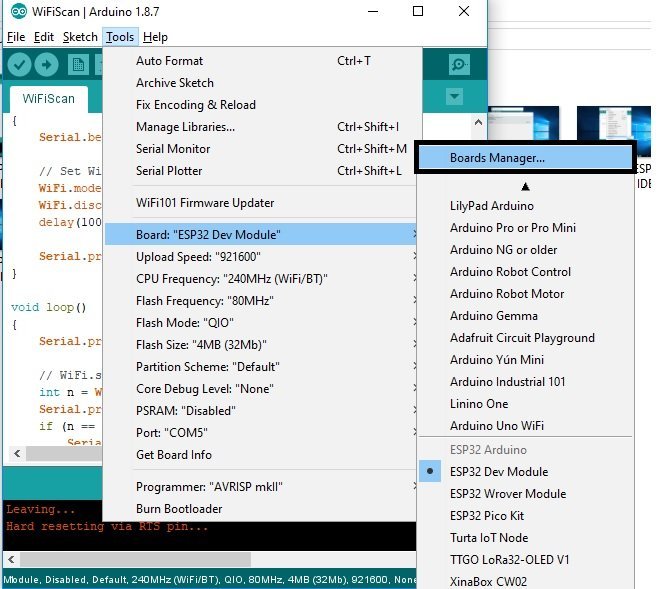
Now you need to install library of ESP32 in Arduino IDE. To install library of ESP32 in Arduino IDE, go to tools>>boards and click on board manager as shown:
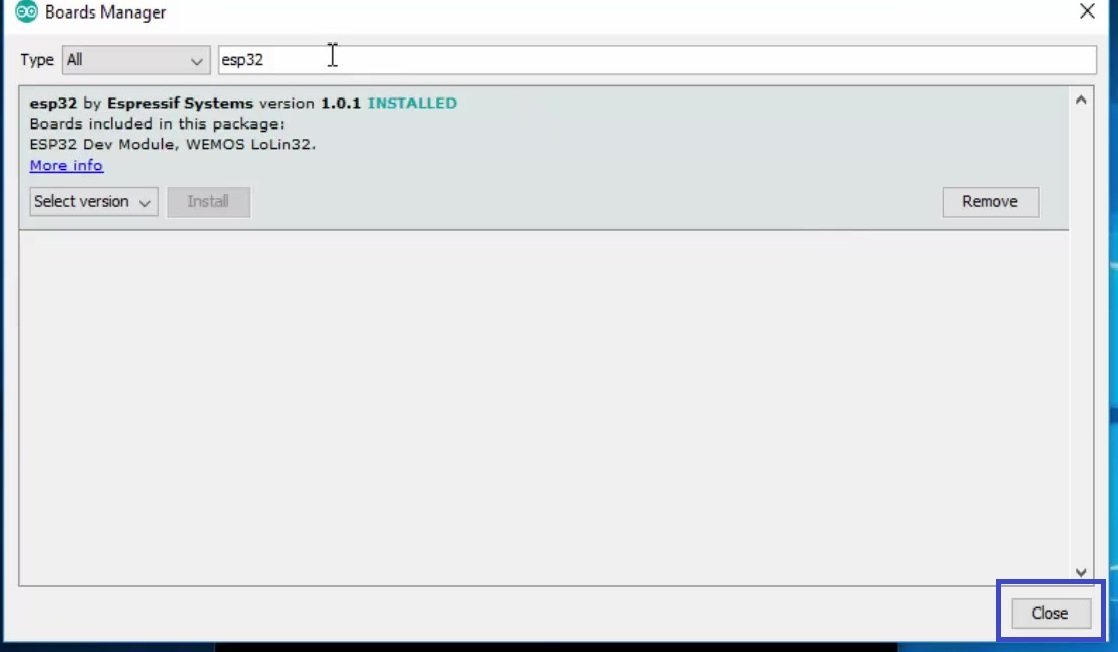
Now you will see a window of where you search for available boards. In search window write ESP32 and you will find of option of ESP32 by Expressif Systems. Click on install button and install library of ESP32. It will take some time to download the library of ESP32.

After you have done with installation click on Close button.
Now you have successfully installed the library of ESP32 development in Arduino IDE.
How to verify if ESP32 Library was installed successfully?
Now you have installed ESP32 in your Arduino, if you want to know either you want install ESP32 in Arduino IDE correctly or not. You can verify it using a simple example already available in Arduino IDE for ESP32 development board for internet of things. When you install ESP32 library in Arduino IDE, these examples are also installed. So to verify if you have correctly installed ESP32 or not follow these steps.
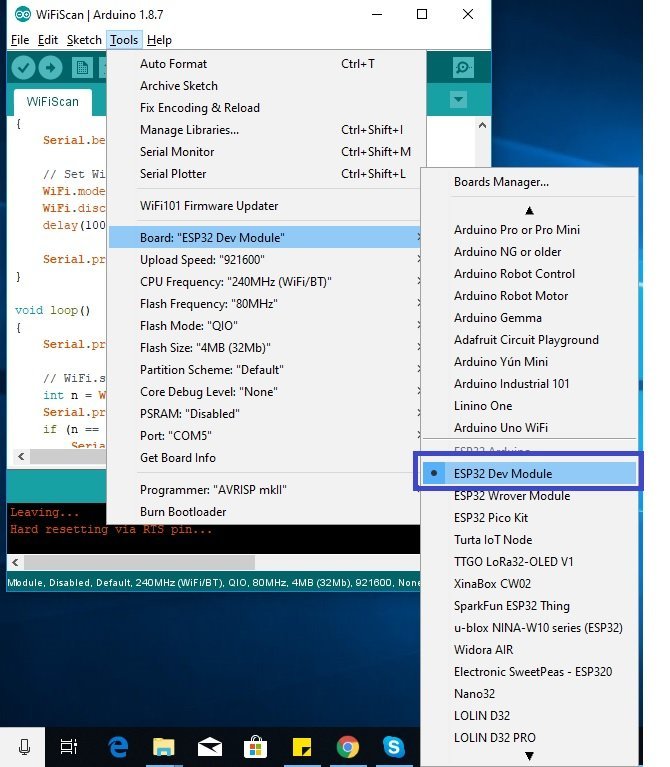
First, connect your board with a computer through a USB cable. After connecting the board with a computer, you select the board, you are using. There are many types of ESP32 boards available on market. But we are using the Dev kit in this tutorial. But you can use any board you want. To select board , go to tools>>Boards and click on Dev module as shown in picture below.
Now you need to select the COM port to which your development board is connected. To find it go to tools and click on port. Select a port to which board is connected.

Now we will upload a simple example to board and see it works or not.

If it works correctly, it means we have successfully installed this board in Arduino IDE.

We will use an example of a Wi-Fi scan. What this example will be do? It will scan the available wifi networks available in my area and print those available networks on serial monitor.
To open an example click on file>>Examples and find the example of Wifi scan as shown in the figure below:

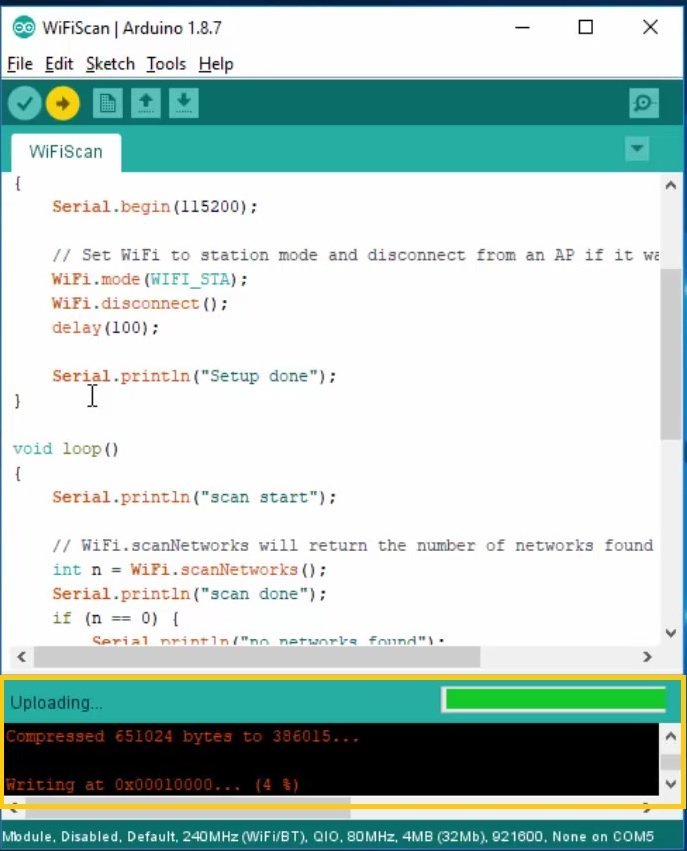
Now simply click on the Wifi scan example and open it. After that click on the upload button to upload this code to the board. As soon as you press the upload button, first, it will compile code. After compiling the code, it will start uploading code and you can find the message of uploading in Arduino IDE.
If you find difficulty in uploading code, you can hold the button of boot on esp32 and then click on upload button and once you find the message of uploading on Arduino IDE window release the button. Your issue will be resolved successfully and code will be uploaded without any issue.
After few seconds code will be uploaded successfully and you will see a message of done upload as shown below:
Now code has uploaded successfully. we need to check the output of the code. Click on tools and select the option of the serial monitor.

After opening serial monitor select a baud rate of 115200. After that you will see the message of Wifi scan on the serial monitor as shown in the figure below:

After it done with scanning of all available networks, it will display list of available networks as shown in picture below:

After some time it will again start scanning and display available wifi networks.

That’s how easy it is to install the ESP32 development board package in the Arduino IDE. We have verified the installation by running an example. If you encounter any issues during the installation or uploading of code, please let us know by sharing your problems.
How to Fix the issue while uploading Code to ESP32?
When you attempt to upload a new sketch to your ESP32 and you receive an error message that reads:
"A fatal error occurred: Failed to connect to ESP32: Timed out… Connecting…",This implies that your ESP32 is not in flashing or uploading mode. In order to resolve this issue, you need to ensure that you have selected the correct board name and COM port.
Once you have verified that the correct board name and COM port are selected, follow these steps:
- Locate the “BOOT” button on your ESP32 board.
- Press and hold down the “BOOT” button.
- While continuing to hold down the “BOOT” button, click on the “Upload” button in the Arduino IDE.
- Release the “BOOT” button once the upload process has begun.
- By following these steps, you should be able to successfully upload your sketch to your ESP32 board.
You can explore further by looking into these tutorials:
- ESP32 pinout – How to use GPIO pins?
- GPIO pins of ESP32 – LED Blinking example
- Push button with ESP32 – GPIO pins as digital input
- How to use ADC of ESP32
- Create ESP32 Web server in Arduino IDE
- ESP32 PWM with Arduino IDE
- I2C LCD interfacing with ESP32 and ESP8266
- Interface DhT11 DhT22 with ESP32 and display values on Web Server
- ESP32 Web Server Control Servo motor with Arduino IDE
Thank you for this expository step by step guide to install and test esp32. I followed the instruction to letter but discovered that Arduino IDE could not detect my ESP32 devkitv1 board (port selection was disabled). I am using windows 11 PC. However this has been resolved, from device manager, I could see that the board is not plug and play. the CP210x driver has not been installed.
I got one from https://www.silabs.com/developers/usb-to-uart-bridge-vcp-drivers, installed it and tested wifiscan example. It work like magic.
Keep up the good work.
Please I need esp32 cam Arduino library,I can’t be able to download from GitHub
when you install ESP32 library in Arduino IDE, it also includes esp32 cam library. Do not need to install it separately.
error: AsyncTCP.h: No such file or directory