In this tutorial, we will learn to make HTTPS requests with ESP32 (Hypertext Transfer Protocol Secure). We will briefly introduce you to HTTPS, SSL/TLS Certificates, how to obtain a server’s certificate and then finally program our ESP32 board to make HTTPS requests. We will show you two library examples for generating in Arduino IDE. These include WiFiClientSecure library and HTTPClient library.
In a previous article, we introduced you to HTTPS with SSL/TLS Encryption. This time however, our focus will be on making HTTPS requests with ESP32. If you are already familiar with how to generate HTTP requests with ESP32, generating HTTPS requests will be easier to understand. So lets start!
HTTPS Protocol
Unlike HTTP, which is the primary protocol responsible for exchanging data between a client and server, HTTPS is the secure alternative to HTTP. In this protocol, communication is encrypted using TLS ( transport layer security) or Secure Sockets Layer (SSL). That means HTTPS is equivalent to HTTP with added security layer of TLS/SSL.
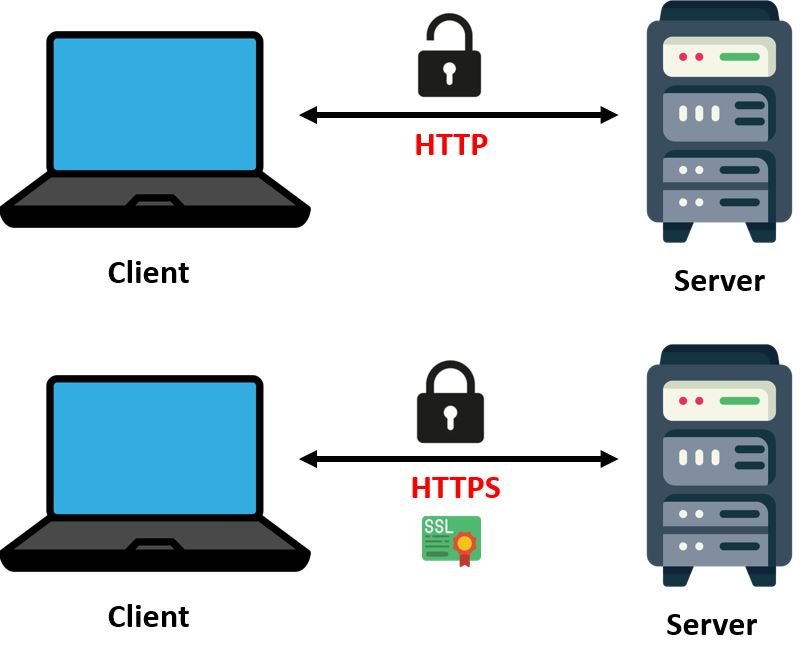
Known as Hypertext Transfer Protocol Secure, HTPPS provides secure communication over the network and is vastly used while accessing the internet. The message in this communication protocol is encrypted using Transport Layer Security (TLS) which was previously known as the Secure Sockets Layer(SSL). Fundamentally, it enhances the security of data while transferring data, encryption is used with HTTPS. This is extremely important for websites that require login details, cell phone numbers, addresses, and bank account numbers.
Importance of HTTPS
- HTTPS provides security and trust to users who need to send sensitive data between servers and web browsers
- HTTPS ensures data privacy and integrity and proper identification using SSL certificates
- Provides protection against different attacks such as man-in-the-middle (MitM) attacks that can easily be launched in the case of HTTP.
Although in recent years, many researchers introduced various attacks against different encryption algorithms which can compromise the HTTPS protocol also. But the chances and success of those attacks are very less as compared to HTTP and those attacks require specific conditions and made some assumptions.
TLS/SSL Certification
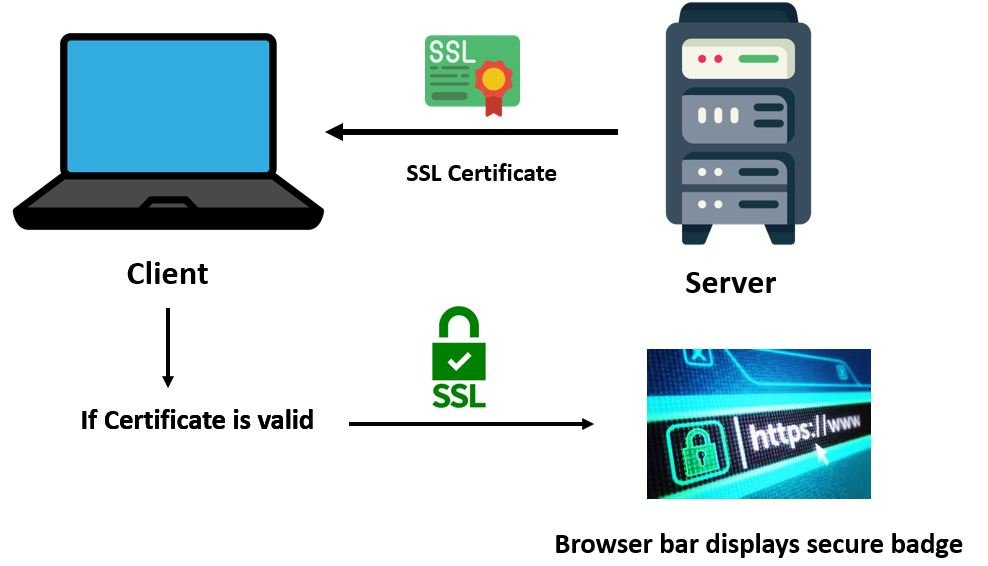
SSL certificates are very important in HTTPS client server communication. Whenever the client requests a session, the server responds back by sending the SSL certificate. This SSL certificate is then checked by the browser to determine its validity. Each SSL certificate is issued by proper Certificate Authorities (CA) such as LetsEncrypt, GeoTrust, Comodo etc. These authorities store, sign and issue digital Secure Sockets Layer certificates. They are responsible for providing the proof of validity of the certificate along with the identity of the owner of the certificate.
Whenever a certificate is provided by the CA, it contains the root certificate which is signed by the authority. This is very vital because when the browser checks for the validity of the SSL certificate, it in fact checks whether it contains the root certificate on the database of the trusted certificates (root store) or not. If it does, then a lock icon is seen on the browser bar.
One important point to note is that SSL certificates which have been expired cannot be used.
Similarly, when working with an ESP32 client, the trusted certificates are uploaded to the board to provide a secure connection with the server. Moreover, you can also upload a root store to your board as well.

One important point to note here is that in order to generate successful HTTPS requests with ESP32, make sure the certificates are not expired. The root certificate has a greater validity period (more than 5 years) hence it is better to use root certificates when programming for projects.
SSL Certificate Chain
Now lets discuss what a SSL certificate chain is. Firstly, There are two types of certificate authorities namely root certificate authority and intermediate certificate authority. A trusted SSL certificate is the one which is granted by a certificate authority which is part of the trusted store of the connecting device. A SSL certificate chain is therefore the list of the SSL certificates starting from the root certificate to the end user certificate. It includes the root certificate, intermediate certificate and the server certificate.
Lets understand each type of certificate first.
The root certificate is a self-signed certificate granted by a Certificate Authority and is present inside the trusted stores of the browsers. This certificate contains a private key which is used to sign the next certificate present in the order of the certificates.
The intermediate certificate comes after the root certificate in the hierarchy of certificates. Therefore, it is signed by the private key of the root certificate. After the intermediate certificate, comes the server certificate. The public key of the intermediate certificate is used to sign the server certificate. The server certificate is granted to a particular server or domain name.
In the case, the chain of certificates is trusted which ensures that the server certificate is valid, then the browser shows the secured lock icon. This ensures that the server has valid SSL certificates along with encryption. Therefore, the SSL/TSL certificates are issued in the order by the certificates authority whereby the intermediate certificates issue the server certificate (Root Certificate > Intermediate Certificate > Server Certificate). While programming your ESP32 board, any certificate present on the certificate chain can be used but make sure it is not expired. It is best to use the root certificate as it is valid for more years.
Obtain Server Certificate
In this section, we will show you how to get a server’s certificate. There are many ways to obtain it but we will show you how to obtain the root certificate of a server using Google Chrome browser which is commonly used.
Follow the steps below to successfully obtain the server’s certificate.
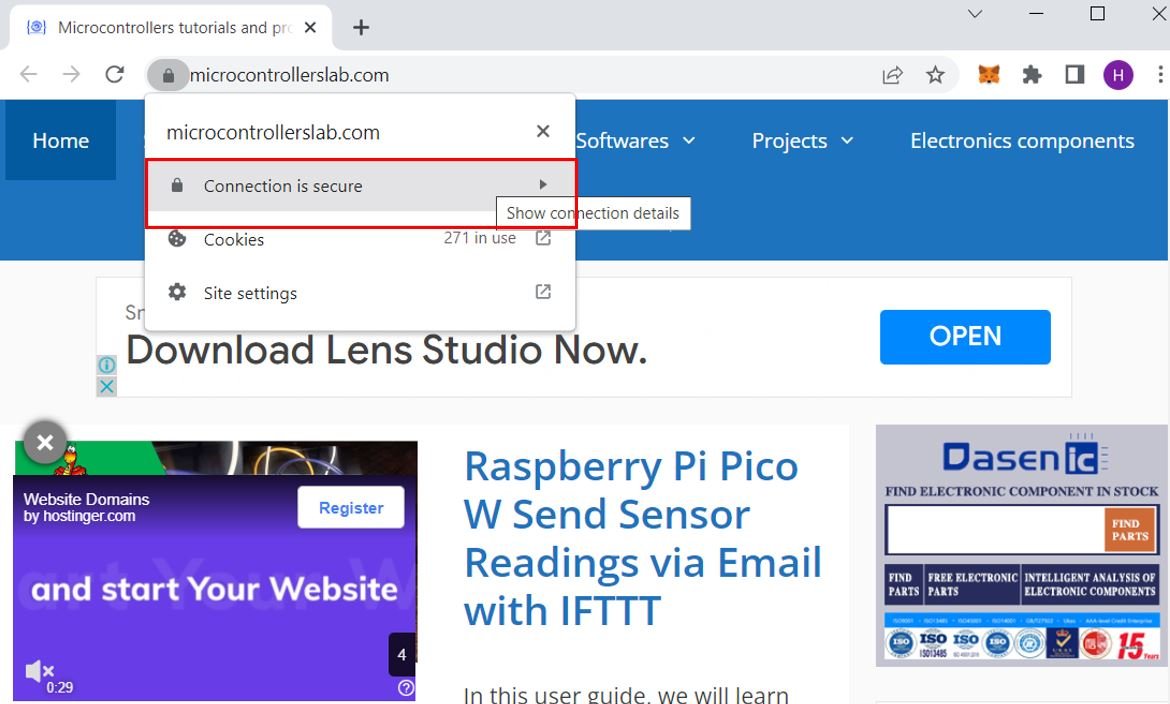
First of all open Google Chrome and enter the website whose certificate you want to access. For demonstration purposes, we are accessing the certificate of mircocontrollerslab.com website. Hence, open the web site and click the secured lock icon in the browser.

Click the lock icon and then click ‘Connection is secure.’
Click ‘Certificate is valid’ which opens a new tab.

Head over to the Details tab and click the root certificate option from the certificate hierarchy. Then click ‘Export.’

This downloads the root certificate in the Base64-encoded ASCII, single certificate (*.pem, .crt) format on your computer.

You can open the certificate in notepad to view it. It looks as shown below:

ESP32 HTTPS Requests using WiFiClientSecure Library

After learning about SSL/TLS certificates and how to obtain them using Google Chrome, let us program our ESP32 board in Arduino IDE for HTTPS requests. We will look at two different Arduino libraries to generate the HTTPS request. First, let us start with WiFiClientSecure library.
ESP32 HTTPS Requests using WiFiClientSecure with Certificate
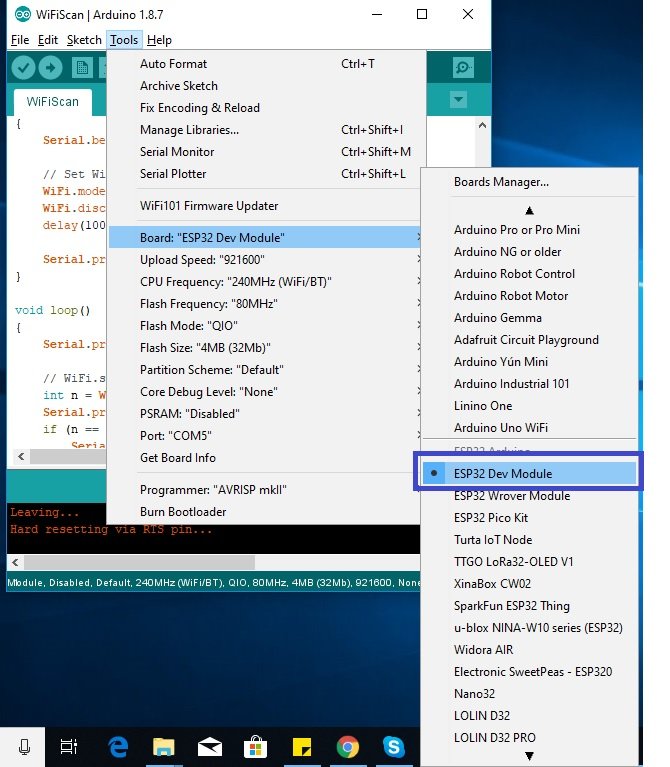
Open Arduino IDE and select ESP32 Dev Module from Tools > Board. Then go to File > Examples > WiFiClientSecure > WiFiClientSecure.
The following example sketch opens up. In this example sketch, the ESP32 makes a secure connection with the server www.howsmyssl.com and then displays the security of the connection by checking the certificate validity.
/*
  Wifi secure connection example for ESP32
  Running on TLS 1.2 using mbedTLS
  Suporting the following chipersuites:
  "TLS_ECDHE_ECDSA_WITH_AES_256_GCM_SHA384","TLS_ECDHE_RSA_WITH_AES_256_GCM_SHA384","TLS_DHE_RSA_WITH_AES_256_GCM_SHA384","TLS_ECDHE_ECDSA_WITH_AES_256_CCM","TLS_DHE_RSA_WITH_AES_256_CCM","TLS_ECDHE_ECDSA_WITH_AES_256_CBC_SHA384","TLS_ECDHE_RSA_WITH_AES_256_CBC_SHA384","TLS_DHE_RSA_WITH_AES_256_CBC_SHA256","TLS_ECDHE_ECDSA_WITH_AES_256_CBC_SHA","TLS_ECDHE_RSA_WITH_AES_256_CBC_SHA","TLS_DHE_RSA_WITH_AES_256_CBC_SHA","TLS_ECDHE_ECDSA_WITH_AES_256_CCM_8","TLS_DHE_RSA_WITH_AES_256_CCM_8","TLS_ECDHE_ECDSA_WITH_CAMELLIA_256_GCM_SHA384","TLS_ECDHE_RSA_WITH_CAMELLIA_256_GCM_SHA384","TLS_DHE_RSA_WITH_CAMELLIA_256_GCM_SHA384","TLS_ECDHE_ECDSA_WITH_CAMELLIA_256_CBC_SHA384","TLS_ECDHE_RSA_WITH_CAMELLIA_256_CBC_SHA384","TLS_DHE_RSA_WITH_CAMELLIA_256_CBC_SHA256","TLS_DHE_RSA_WITH_CAMELLIA_256_CBC_SHA","TLS_ECDHE_ECDSA_WITH_AES_128_GCM_SHA256","TLS_ECDHE_RSA_WITH_AES_128_GCM_SHA256","TLS_DHE_RSA_WITH_AES_128_GCM_SHA256","TLS_ECDHE_ECDSA_WITH_AES_128_CCM","TLS_DHE_RSA_WITH_AES_128_CCM","TLS_ECDHE_ECDSA_WITH_AES_128_CBC_SHA256","TLS_ECDHE_RSA_WITH_AES_128_CBC_SHA256","TLS_DHE_RSA_WITH_AES_128_CBC_SHA256","TLS_ECDHE_ECDSA_WITH_AES_128_CBC_SHA","TLS_ECDHE_RSA_WITH_AES_128_CBC_SHA","TLS_DHE_RSA_WITH_AES_128_CBC_SHA","TLS_ECDHE_ECDSA_WITH_AES_128_CCM_8","TLS_DHE_RSA_WITH_AES_128_CCM_8","TLS_ECDHE_ECDSA_WITH_CAMELLIA_128_GCM_SHA256","TLS_ECDHE_RSA_WITH_CAMELLIA_128_GCM_SHA256","TLS_DHE_RSA_WITH_CAMELLIA_128_GCM_SHA256","TLS_ECDHE_ECDSA_WITH_CAMELLIA_128_CBC_SHA256","TLS_ECDHE_RSA_WITH_CAMELLIA_128_CBC_SHA256","TLS_DHE_RSA_WITH_CAMELLIA_128_CBC_SHA256","TLS_DHE_RSA_WITH_CAMELLIA_128_CBC_SHA","TLS_ECDHE_ECDSA_WITH_3DES_EDE_CBC_SHA","TLS_ECDHE_RSA_WITH_3DES_EDE_CBC_SHA","TLS_DHE_RSA_WITH_3DES_EDE_CBC_SHA","TLS_DHE_PSK_WITH_AES_256_GCM_SHA384","TLS_DHE_PSK_WITH_AES_256_CCM","TLS_ECDHE_PSK_WITH_AES_256_CBC_SHA384","TLS_DHE_PSK_WITH_AES_256_CBC_SHA384","TLS_ECDHE_PSK_WITH_AES_256_CBC_SHA","TLS_DHE_PSK_WITH_AES_256_CBC_SHA","TLS_DHE_PSK_WITH_CAMELLIA_256_GCM_SHA384","TLS_ECDHE_PSK_WITH_CAMELLIA_256_CBC_SHA384","TLS_DHE_PSK_WITH_CAMELLIA_256_CBC_SHA384","TLS_PSK_DHE_WITH_AES_256_CCM_8","TLS_DHE_PSK_WITH_AES_128_GCM_SHA256","TLS_DHE_PSK_WITH_AES_128_CCM","TLS_ECDHE_PSK_WITH_AES_128_CBC_SHA256","TLS_DHE_PSK_WITH_AES_128_CBC_SHA256","TLS_ECDHE_PSK_WITH_AES_128_CBC_SHA","TLS_DHE_PSK_WITH_AES_128_CBC_SHA","TLS_DHE_PSK_WITH_CAMELLIA_128_GCM_SHA256","TLS_DHE_PSK_WITH_CAMELLIA_128_CBC_SHA256","TLS_ECDHE_PSK_WITH_CAMELLIA_128_CBC_SHA256","TLS_PSK_DHE_WITH_AES_128_CCM_8","TLS_ECDHE_PSK_WITH_3DES_EDE_CBC_SHA","TLS_DHE_PSK_WITH_3DES_EDE_CBC_SHA","TLS_RSA_WITH_AES_256_GCM_SHA384","TLS_RSA_WITH_AES_256_CCM","TLS_RSA_WITH_AES_256_CBC_SHA256","TLS_RSA_WITH_AES_256_CBC_SHA","TLS_ECDH_RSA_WITH_AES_256_GCM_SHA384","TLS_ECDH_RSA_WITH_AES_256_CBC_SHA384","TLS_ECDH_RSA_WITH_AES_256_CBC_SHA","TLS_ECDH_ECDSA_WITH_AES_256_GCM_SHA384","TLS_ECDH_ECDSA_WITH_AES_256_CBC_SHA384","TLS_ECDH_ECDSA_WITH_AES_256_CBC_SHA","TLS_RSA_WITH_AES_256_CCM_8","TLS_RSA_WITH_CAMELLIA_256_GCM_SHA384","TLS_RSA_WITH_CAMELLIA_256_CBC_SHA256","TLS_RSA_WITH_CAMELLIA_256_CBC_SHA","TLS_ECDH_RSA_WITH_CAMELLIA_256_GCM_SHA384","TLS_ECDH_RSA_WITH_CAMELLIA_256_CBC_SHA384","TLS_ECDH_ECDSA_WITH_CAMELLIA_256_GCM_SHA384","TLS_ECDH_ECDSA_WITH_CAMELLIA_256_CBC_SHA384","TLS_RSA_WITH_AES_128_GCM_SHA256","TLS_RSA_WITH_AES_128_CCM","TLS_RSA_WITH_AES_128_CBC_SHA256","TLS_RSA_WITH_AES_128_CBC_SHA","TLS_ECDH_RSA_WITH_AES_128_GCM_SHA256","TLS_ECDH_RSA_WITH_AES_128_CBC_SHA256","TLS_ECDH_RSA_WITH_AES_128_CBC_SHA","TLS_ECDH_ECDSA_WITH_AES_128_GCM_SHA256","TLS_ECDH_ECDSA_WITH_AES_128_CBC_SHA256","TLS_ECDH_ECDSA_WITH_AES_128_CBC_SHA","TLS_RSA_WITH_AES_128_CCM_8","TLS_RSA_WITH_CAMELLIA_128_GCM_SHA256","TLS_RSA_WITH_CAMELLIA_128_CBC_SHA256","TLS_RSA_WITH_CAMELLIA_128_CBC_SHA","TLS_ECDH_RSA_WITH_CAMELLIA_128_GCM_SHA256","TLS_ECDH_RSA_WITH_CAMELLIA_128_CBC_SHA256","TLS_ECDH_ECDSA_WITH_CAMELLIA_128_GCM_SHA256","TLS_ECDH_ECDSA_WITH_CAMELLIA_128_CBC_SHA256","TLS_RSA_WITH_3DES_EDE_CBC_SHA","TLS_ECDH_RSA_WITH_3DES_EDE_CBC_SHA","TLS_ECDH_ECDSA_WITH_3DES_EDE_CBC_SHA","TLS_RSA_PSK_WITH_AES_256_GCM_SHA384","TLS_RSA_PSK_WITH_AES_256_CBC_SHA384","TLS_RSA_PSK_WITH_AES_256_CBC_SHA","TLS_RSA_PSK_WITH_CAMELLIA_256_GCM_SHA384","TLS_RSA_PSK_WITH_CAMELLIA_256_CBC_SHA384","TLS_RSA_PSK_WITH_AES_128_GCM_SHA256","TLS_RSA_PSK_WITH_AES_128_CBC_SHA256","TLS_RSA_PSK_WITH_AES_128_CBC_SHA","TLS_RSA_PSK_WITH_CAMELLIA_128_GCM_SHA256","TLS_RSA_PSK_WITH_CAMELLIA_128_CBC_SHA256","TLS_RSA_PSK_WITH_3DES_EDE_CBC_SHA","TLS_PSK_WITH_AES_256_GCM_SHA384","TLS_PSK_WITH_AES_256_CCM","TLS_PSK_WITH_AES_256_CBC_SHA384","TLS_PSK_WITH_AES_256_CBC_SHA","TLS_PSK_WITH_CAMELLIA_256_GCM_SHA384","TLS_PSK_WITH_CAMELLIA_256_CBC_SHA384","TLS_PSK_WITH_AES_256_CCM_8","TLS_PSK_WITH_AES_128_GCM_SHA256","TLS_PSK_WITH_AES_128_CCM","TLS_PSK_WITH_AES_128_CBC_SHA256","TLS_PSK_WITH_AES_128_CBC_SHA","TLS_PSK_WITH_CAMELLIA_128_GCM_SHA256","TLS_PSK_WITH_CAMELLIA_128_CBC_SHA256","TLS_PSK_WITH_AES_128_CCM_8","TLS_PSK_WITH_3DES_EDE_CBC_SHA","TLS_EMPTY_RENEGOTIATION_INFO_SCSV"]
  2017 - Evandro Copercini - Apache 2.0 License.
*/

#include <WiFiClientSecure.h>

const char* ssid     = "your-ssid";     // your network SSID (name of wifi network)
const char* password = "your-password"; // your network password

const char*  server = "www.howsmyssl.com";  // Server URL

// www.howsmyssl.com root certificate authority, to verify the server
// change it to your server root CA
// SHA1 fingerprint is broken now!

const char* test_root_ca= \
     "-----BEGIN CERTIFICATE-----\n" \
     "MIIDSjCCAjKgAwIBAgIQRK+wgNajJ7qJMDmGLvhAazANBgkqhkiG9w0BAQUFADA/\n" \
     "MSQwIgYDVQQKExtEaWdpdGFsIFNpZ25hdHVyZSBUcnVzdCBDby4xFzAVBgNVBAMT\n" \
     "DkRTVCBSb290IENBIFgzMB4XDTAwMDkzMDIxMTIxOVoXDTIxMDkzMDE0MDExNVow\n" \
     "PzEkMCIGA1UEChMbRGlnaXRhbCBTaWduYXR1cmUgVHJ1c3QgQ28uMRcwFQYDVQQD\n" \
     "Ew5EU1QgUm9vdCBDQSBYMzCCASIwDQYJKoZIhvcNAQEBBQADggEPADCCAQoCggEB\n" \
     "AN+v6ZdQCINXtMxiZfaQguzH0yxrMMpb7NnDfcdAwRgUi+DoM3ZJKuM/IUmTrE4O\n" \
     "rz5Iy2Xu/NMhD2XSKtkyj4zl93ewEnu1lcCJo6m67XMuegwGMoOifooUMM0RoOEq\n" \
     "OLl5CjH9UL2AZd+3UWODyOKIYepLYYHsUmu5ouJLGiifSKOeDNoJjj4XLh7dIN9b\n" \
     "xiqKqy69cK3FCxolkHRyxXtqqzTWMIn/5WgTe1QLyNau7Fqckh49ZLOMxt+/yUFw\n" \
     "7BZy1SbsOFU5Q9D8/RhcQPGX69Wam40dutolucbY38EVAjqr2m7xPi71XAicPNaD\n" \
     "aeQQmxkqtilX4+U9m5/wAl0CAwEAAaNCMEAwDwYDVR0TAQH/BAUwAwEB/zAOBgNV\n" \
     "HQ8BAf8EBAMCAQYwHQYDVR0OBBYEFMSnsaR7LHH62+FLkHX/xBVghYkQMA0GCSqG\n" \
     "SIb3DQEBBQUAA4IBAQCjGiybFwBcqR7uKGY3Or+Dxz9LwwmglSBd49lZRNI+DT69\n" \
     "ikugdB/OEIKcdBodfpga3csTS7MgROSR6cz8faXbauX+5v3gTt23ADq1cEmv8uXr\n" \
     "AvHRAosZy5Q6XkjEGB5YGV8eAlrwDPGxrancWYaLbumR9YbK+rlmM6pZW87ipxZz\n" \
     "R8srzJmwN0jP41ZL9c8PDHIyh8bwRLtTcm1D9SZImlJnt1ir/md2cXjbDaJWFBM5\n" \
     "JDGFoqgCWjBH4d1QB7wCCZAA62RjYJsWvIjJEubSfZGL+T0yjWW06XyxV3bqxbYo\n" \
     "Ob8VZRzI9neWagqNdwvYkQsEjgfbKbYK7p2CNTUQ\n" \
     "-----END CERTIFICATE-----\n";

// You can use x.509 client certificates if you want
//const char* test_client_key = "";   //to verify the client
//const char* test_client_cert = "";  //to verify the client


WiFiClientSecure client;

void setup() {
  //Initialize serial and wait for port to open:
  Serial.begin(115200);
  delay(100);

  Serial.print("Attempting to connect to SSID: ");
  Serial.println(ssid);
  WiFi.begin(ssid, password);

  // attempt to connect to Wifi network:
  while (WiFi.status() != WL_CONNECTED) {
    Serial.print(".");
    // wait 1 second for re-trying
    delay(1000);
  }

  Serial.print("Connected to ");
  Serial.println(ssid);

  client.setCACert(test_root_ca);
  //client.setCertificate(test_client_cert); // for client verification
  //client.setPrivateKey(test_client_key);	// for client verification

  Serial.println("\nStarting connection to server...");
  if (!client.connect(server, 443))
    Serial.println("Connection failed!");
  else {
    Serial.println("Connected to server!");
    // Make a HTTP request:
    client.println("GET https://www.howsmyssl.com/a/check HTTP/1.0");
    client.println("Host: www.howsmyssl.com");
    client.println("Connection: close");
    client.println();

    while (client.connected()) {
      String line = client.readStringUntil('\n');
      if (line == "\r") {
        Serial.println("headers received");
        break;
      }
    }
    // if there are incoming bytes available
    // from the server, read them and print them:
    while (client.available()) {
      char c = client.read();
      Serial.write(c);
    }

    client.stop();
  }
}

void loop() {
  // do nothing
}
Remember to replace the Wi-Fi credentials with your own in order to connect to your network successfully.
How the Code Works?
The code starts by including the WiFiClientSecure.h library that is necessary to generate ESP32 HTTPS requests.
#include <WiFiClientSecure.h>Insert your network credentials in place of “your-ssid” and “your-password”.
const char* ssid     = "your-ssid";     // your network SSID (name of wifi network)
const char* password = "your-password"; // your network password
The server in this example is www.howsmyssl.com whom the ESP32 will make an HTTPS request to.
const char* server = "www.howsmyssl.com"; // Server URLNext, the root certificate is specified in the variable ‘test_root_ca.’
const char* test_root_ca= \
     "-----BEGIN CERTIFICATE-----\n" \
     "MIIDSjCCAjKgAwIBAgIQRK+wgNajJ7qJMDmGLvhAazANBgkqhkiG9w0BAQUFADA/\n" \
     "MSQwIgYDVQQKExtEaWdpdGFsIFNpZ25hdHVyZSBUcnVzdCBDby4xFzAVBgNVBAMT\n" \
     "DkRTVCBSb290IENBIFgzMB4XDTAwMDkzMDIxMTIxOVoXDTIxMDkzMDE0MDExNVow\n" \
     "PzEkMCIGA1UEChMbRGlnaXRhbCBTaWduYXR1cmUgVHJ1c3QgQ28uMRcwFQYDVQQD\n" \
     "Ew5EU1QgUm9vdCBDQSBYMzCCASIwDQYJKoZIhvcNAQEBBQADggEPADCCAQoCggEB\n" \
     "AN+v6ZdQCINXtMxiZfaQguzH0yxrMMpb7NnDfcdAwRgUi+DoM3ZJKuM/IUmTrE4O\n" \
     "rz5Iy2Xu/NMhD2XSKtkyj4zl93ewEnu1lcCJo6m67XMuegwGMoOifooUMM0RoOEq\n" \
     "OLl5CjH9UL2AZd+3UWODyOKIYepLYYHsUmu5ouJLGiifSKOeDNoJjj4XLh7dIN9b\n" \
     "xiqKqy69cK3FCxolkHRyxXtqqzTWMIn/5WgTe1QLyNau7Fqckh49ZLOMxt+/yUFw\n" \
     "7BZy1SbsOFU5Q9D8/RhcQPGX69Wam40dutolucbY38EVAjqr2m7xPi71XAicPNaD\n" \
     "aeQQmxkqtilX4+U9m5/wAl0CAwEAAaNCMEAwDwYDVR0TAQH/BAUwAwEB/zAOBgNV\n" \
     "HQ8BAf8EBAMCAQYwHQYDVR0OBBYEFMSnsaR7LHH62+FLkHX/xBVghYkQMA0GCSqG\n" \
     "SIb3DQEBBQUAA4IBAQCjGiybFwBcqR7uKGY3Or+Dxz9LwwmglSBd49lZRNI+DT69\n" \
     "ikugdB/OEIKcdBodfpga3csTS7MgROSR6cz8faXbauX+5v3gTt23ADq1cEmv8uXr\n" \
     "AvHRAosZy5Q6XkjEGB5YGV8eAlrwDPGxrancWYaLbumR9YbK+rlmM6pZW87ipxZz\n" \
     "R8srzJmwN0jP41ZL9c8PDHIyh8bwRLtTcm1D9SZImlJnt1ir/md2cXjbDaJWFBM5\n" \
     "JDGFoqgCWjBH4d1QB7wCCZAA62RjYJsWvIjJEubSfZGL+T0yjWW06XyxV3bqxbYo\n" \
     "Ob8VZRzI9neWagqNdwvYkQsEjgfbKbYK7p2CNTUQ\n" \
     "-----END CERTIFICATE-----\n";
An object of WiFiClientSecure is created called ‘client.’
WiFiClientSecure client;setup()
Inside the setup() function, first the serial communication is opened at a baud rate of 115200.
Serial.begin(115200);Then the ESP32 board attempts to connect to the Wi-Fi using the network credentials provided by the user. After a successful connection is established, the serial monitor displays the SSID it is connected to.
  Serial.print("Attempting to connect to SSID: ");
  Serial.println(ssid);
  WiFi.begin(ssid, password);

  // attempt to connect to Wifi network:
  while (WiFi.status() != WL_CONNECTED) {
    Serial.print(".");
    // wait 1 second for re-trying
    delay(1000);
  }

 Serial.print("Connected to ");
 Serial.println(ssid);
After connecting to the Wi-Fi, the root certificate of the server is set by calling the setCACert() method on the client object. It takes in the root certificate as a parameter inside it.
client.setCACert(test_root_ca);If the client successfully connects with the server, an HTTPS request is made to the server. Note that as we are generating an HTTPS request hence the port used is 443 instead of 80 and ‘https’ is used instead of ‘http’ in the URL when making the GET request.
  Serial.println("\nStarting connection to server...");
  if (!client.connect(server, 443))
    Serial.println("Connection failed!");
  else {
    Serial.println("Connected to server!");
    // Make a HTTP request:
    client.println("GET https://www.howsmyssl.com/a/check HTTP/1.0");
    client.println("Host: www.howsmyssl.com");
    client.println("Connection: close");
    client.println();
If the client is successfully connected, we obtain the response and print it in the Arduino serial monitor.
    while (client.connected()) {
      String line = client.readStringUntil('\n');
      if (line == "\r") {
        Serial.println("headers received");
        break;
      }
    }
    // if there are incoming bytes available
    // from the server, read them and print them:
    while (client.available()) {
      char c = client.read();
      Serial.write(c);
    }
Then the server disconnects from the client.
client.stop();Demonstration
Choose the correct board and COM port before uploading your code to the board. Therefore, go to Tools > Board and select ESP32 Dev Module.
Select the ESP32 Dev module as follows:
Then, go to Tools > Port and select the appropriate port through which your board is connected.

Click on the upload button to upload the code to ESP32 development board.
After you have uploaded your code to the ESP32, press its ENABLE button.

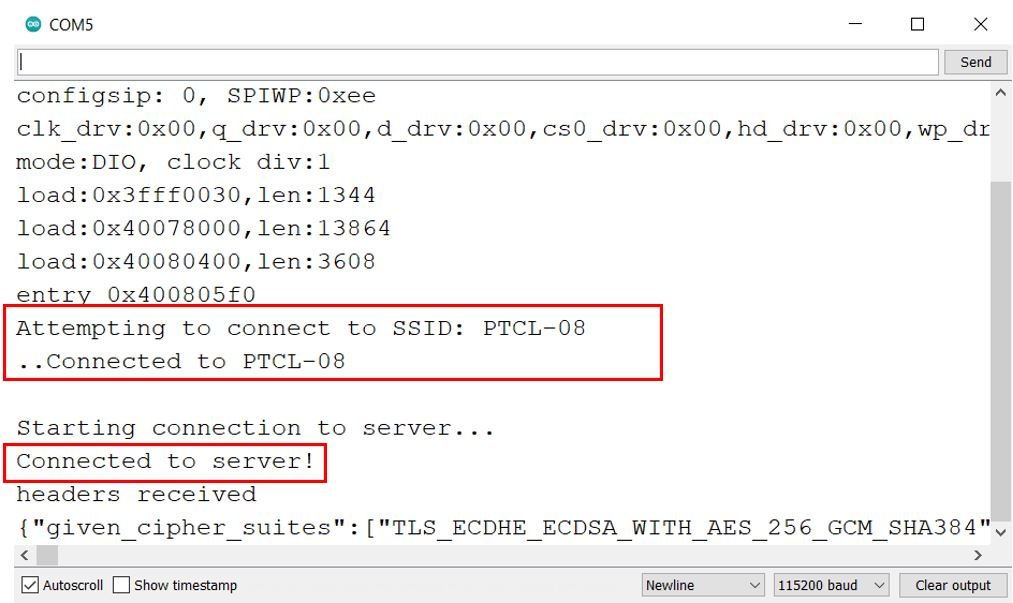
In your Arduino IDE, open up the serial monitor and set the baud rate to 115200. The serial monitor will start displaying the following messages:
First the client connects to the Wi-Fi network, then connects to the server. The headers are also received and displayed along with the TLS rating.
You can view the security of the connection as shown below:

Modify Example Sketch for a Different Server
Lets modify the above example code with the certificate we got for www.microcontrollerslab.com and see what results we obtain in the serial monitor.
Modify the server URL as follows:
const char* server = "www.microcontrollerslab.com"; // Server URLNow specify the root certificate that we obtained from Google Chrome. Remember to insert ” at the start of each line, \n” \ at the end of each line except the last line. Add \n” at the end of the last line. We have to do this because we have to use multi-line string in Arduino.
Our root certificate for www.microcontrollerslab.com will look something like this:
const char* test_root_ca= \
"-----BEGIN CERTIFICATE-----\n" \
"MIIDdzCCAl+gAwIBAgIEAgAAuTANBgkqhkiG9w0BAQUFADBaMQswCQYDVQQGEwJJ\n" \
"RTESMBAGA1UEChMJQmFsdGltb3JlMRMwEQYDVQQLEwpDeWJlclRydXN0MSIwIAYD\n" \
"VQQDExlCYWx0aW1vcmUgQ3liZXJUcnVzdCBSb290MB4XDTAwMDUxMjE4NDYwMFoX\n" \
"DTI1MDUxMjIzNTkwMFowWjELMAkGA1UEBhMCSUUxEjAQBgNVBAoTCUJhbHRpbW9y\n" \
"ZTETMBEGA1UECxMKQ3liZXJUcnVzdDEiMCAGA1UEAxMZQmFsdGltb3JlIEN5YmVy\n" \
"VHJ1c3QgUm9vdDCCASIwDQYJKoZIhvcNAQEBBQADggEPADCCAQoCggEBAKMEuyKr\n" \
"mD1X6CZymrV51Cni4eiVgLGw41uOKymaZN+hXe2wCQVt2yguzmKiYv60iNoS6zjr\n" \
"IZ3AQSsBUnuId9Mcj8e6uYi1agnnc+gRQKfRzMpijS3ljwumUNKoUMMo6vWrJYeK\n" \
"mpYcqWe4PwzV9/lSEy/CG9VwcPCPwBLKBsua4dnKM3p31vjsufFoREJIE9LAwqSu\n" \
"XmD+tqYF/LTdB1kC1FkYmGP1pWPgkAx9XbIGevOF6uvUA65ehD5f/xXtabz5OTZy\n" \
"dc93Uk3zyZAsuT3lySNTPx8kmCFcB5kpvcY67Oduhjprl3RjM71oGDHweI12v/ye\n" \
"jl0qhqdNkNwnGjkCAwEAAaNFMEMwHQYDVR0OBBYEFOWdWTCCR1jMrPoIVDaGezq1\n" \
"BE3wMBIGA1UdEwEB/wQIMAYBAf8CAQMwDgYDVR0PAQH/BAQDAgEGMA0GCSqGSIb3\n" \
"DQEBBQUAA4IBAQCFDF2O5G9RaEIFoN27TyclhAO992T9Ldcw46QQF+vaKSm2eT92\n" \
"9hkTI7gQCvlYpNRhcL0EYWoSihfVCr3FvDB81ukMJY2GQE/szKN+OMY3EU/t3Wgx\n" \
"jkzSswF07r51XgdIGn9w/xZchMB5hbgF/X++ZRGjD8ACtPhSNzkE1akxehi/oCr0\n" \
"Epn3o0WC4zxe9Z2etciefC7IpJ5OCBRLbf1wbWsaY71k5h+3zvDyny67G7fyUIhz\n" \
"ksLi4xaNmjICq44Y3ekQEe5+NauQrz4wlHrQMz2nZQ/1/I6eYs9HRCwBXbsdtTLS\n" \
"R9I4LtD+gdwyah617jzV/OeBHRnDJELqYzmp\n" \
"-----END CERTIFICATE-----\n"
;
This is the complete modified sketch:
#include <WiFiClientSecure.h>

const char* ssid     = "your-ssid";     // your network SSID (name of wifi network)
const char* password = "your-password"; // your network password

const char*  server = "www.microcontrollerslab.com";  // Server URL

// www.howsmyssl.com root certificate authority, to verify the server
// change it to your server root CA
// SHA1 fingerprint is broken now!

const char* test_root_ca= \
"-----BEGIN CERTIFICATE-----\n" \
"MIIDdzCCAl+gAwIBAgIEAgAAuTANBgkqhkiG9w0BAQUFADBaMQswCQYDVQQGEwJJ\n" \
"RTESMBAGA1UEChMJQmFsdGltb3JlMRMwEQYDVQQLEwpDeWJlclRydXN0MSIwIAYD\n" \
"VQQDExlCYWx0aW1vcmUgQ3liZXJUcnVzdCBSb290MB4XDTAwMDUxMjE4NDYwMFoX\n" \
"DTI1MDUxMjIzNTkwMFowWjELMAkGA1UEBhMCSUUxEjAQBgNVBAoTCUJhbHRpbW9y\n" \
"ZTETMBEGA1UECxMKQ3liZXJUcnVzdDEiMCAGA1UEAxMZQmFsdGltb3JlIEN5YmVy\n" \
"VHJ1c3QgUm9vdDCCASIwDQYJKoZIhvcNAQEBBQADggEPADCCAQoCggEBAKMEuyKr\n" \
"mD1X6CZymrV51Cni4eiVgLGw41uOKymaZN+hXe2wCQVt2yguzmKiYv60iNoS6zjr\n" \
"IZ3AQSsBUnuId9Mcj8e6uYi1agnnc+gRQKfRzMpijS3ljwumUNKoUMMo6vWrJYeK\n" \
"mpYcqWe4PwzV9/lSEy/CG9VwcPCPwBLKBsua4dnKM3p31vjsufFoREJIE9LAwqSu\n" \
"XmD+tqYF/LTdB1kC1FkYmGP1pWPgkAx9XbIGevOF6uvUA65ehD5f/xXtabz5OTZy\n" \
"dc93Uk3zyZAsuT3lySNTPx8kmCFcB5kpvcY67Oduhjprl3RjM71oGDHweI12v/ye\n" \
"jl0qhqdNkNwnGjkCAwEAAaNFMEMwHQYDVR0OBBYEFOWdWTCCR1jMrPoIVDaGezq1\n" \
"BE3wMBIGA1UdEwEB/wQIMAYBAf8CAQMwDgYDVR0PAQH/BAQDAgEGMA0GCSqGSIb3\n" \
"DQEBBQUAA4IBAQCFDF2O5G9RaEIFoN27TyclhAO992T9Ldcw46QQF+vaKSm2eT92\n" \
"9hkTI7gQCvlYpNRhcL0EYWoSihfVCr3FvDB81ukMJY2GQE/szKN+OMY3EU/t3Wgx\n" \
"jkzSswF07r51XgdIGn9w/xZchMB5hbgF/X++ZRGjD8ACtPhSNzkE1akxehi/oCr0\n" \
"Epn3o0WC4zxe9Z2etciefC7IpJ5OCBRLbf1wbWsaY71k5h+3zvDyny67G7fyUIhz\n" \
"ksLi4xaNmjICq44Y3ekQEe5+NauQrz4wlHrQMz2nZQ/1/I6eYs9HRCwBXbsdtTLS\n" \
"R9I4LtD+gdwyah617jzV/OeBHRnDJELqYzmp\n" \
"-----END CERTIFICATE-----\n"
;

// You can use x.509 client certificates if you want
//const char* test_client_key = "";   //to verify the client
//const char* test_client_cert = "";  //to verify the client


WiFiClientSecure client;

void setup() {
  //Initialize serial and wait for port to open:
  Serial.begin(115200);
  delay(100);

  Serial.print("Attempting to connect to SSID: ");
  Serial.println(ssid);
  WiFi.begin(ssid, password);

  // attempt to connect to Wifi network:
  while (WiFi.status() != WL_CONNECTED) {
    Serial.print(".");
    // wait 1 second for re-trying
    delay(1000);
  }

  Serial.print("Connected to ");
  Serial.println(ssid);

  client.setCACert(test_root_ca);
  //client.setCertificate(test_client_cert); // for client verification
  //client.setPrivateKey(test_client_key);	// for client verification

  Serial.println("\nStarting connection to server...");
  if (!client.connect(server, 443))
    Serial.println("Connection failed!");
  else {
    Serial.println("Connected to server!");
    // Make a HTTP request:
    client.println("GET https://www.micrcocontrollerslab.com/a/check HTTP/1.0");
    client.println("Host: www.microcontrollerslab.com");
    client.println("Connection: close");
    client.println();

    while (client.connected()) {
      String line = client.readStringUntil('\n');
      if (line == "\r") {
        Serial.println("headers received");
        break;
      }
    }
    // if there are incoming bytes available
    // from the server, read them and print them:
    while (client.available()) {
      char c = client.read();
      Serial.write(c);
    }

    client.stop();
  }
}

void loop() {
  // do nothing
}
Demonstration
To see the demonstration of the above code make sure you choose the correct board and COM port before uploading your code to the board. Click on the upload button to upload the code to ESP32 development board. After you have uploaded your code to the ESP32, press its ENABLE button.
In your Arduino IDE, open up the serial monitor and set the baud rate to 115200. The serial monitor will start displaying the following messages:

ESP32 HTTPS Requests using WiFiClientSecure without Certificate
We can also modify the WiFiClientSecure example above to remove the verification for the SSL/TLS server. Our connection will still be encrypted but there will be no guarantee if the client connected with the correct server or not.
To generate ESP32 HTTPS Requests using WiFiClientSecure without certificate verification, use the code below:
#include <WiFiClientSecure.h>

const char* ssid     = "your-ssid";     // your network SSID (name of wifi network)
const char* password = "you-password"; // your network password

const char*  server = "www.howsmyssl.com";  // Server URL

WiFiClientSecure client;

void setup() {
  //Initialize serial and wait for port to open:
  Serial.begin(115200);
  delay(100);

  Serial.print("Attempting to connect to SSID: ");
  Serial.println(ssid);
  WiFi.begin(ssid, password);

  // attempt to connect to Wifi network:
  while (WiFi.status() != WL_CONNECTED) {
    Serial.print(".");
    // wait 1 second for re-trying
    delay(1000);
  }

  Serial.print("Connected to ");
  Serial.println(ssid);

  client.setInsecure();

  Serial.println("\nStarting connection to server...");
  if (!client.connect(server, 443))
    Serial.println("Connection failed!");
  else {
    Serial.println("Connected to server!");
    // Make a HTTP request:
    client.println("GET https://www.howsmyssl.com/a/check HTTP/1.0");
    client.println("Host: www.howsmyssl.com");
    client.println("Connection: close");
    client.println();

    while (client.connected()) {
      String line = client.readStringUntil('\n');
      if (line == "\r") {
        Serial.println("headers received");
        break;
      }
    }
    // if there are incoming bytes available
    // from the server, read them and print them:
    while (client.available()) {
      char c = client.read();
      Serial.write(c);
    }

    client.stop();
  }
}

void loop() {
  // do nothing
}
We have removed the function setCACert() which set the client certificate. This way the certification verification will not occur.
client.setCACert(test_root_ca);Moreover, we added the following line before connecting with the client. It allows insecure TLS connection with the client.
client.setInsecure();The output will be the same, however the connection will not be trusted but still encrypted.
ESP32 HTTPS Requests in Arduino IDE using HTTPClient Library
Let us program our ESP32 board in Arduino IDE for HTTPS requests using the HTTPClient library.
ESP32 HTTPS Requests using using HTTPClient with Certificate
In this example sketch, the ESP32 makes a secure connection with the server www.howsmyssl.com and then displays the security of the connection by checking the certificate validity. In this example HTTPClient.h library is used instead.
#include <Arduino.h>
#include <WiFi.h>
#include <WiFiClientSecure.h>
#include <HTTPClient.h>

// Replace with your network credentials
const char* ssid = "your-ssid";
const char* password = "your-password";

// www.howsmyssl.com root certificate authority, to verify the server
// change it to your server root CA
const char* rootCACertificate = \
     "-----BEGIN CERTIFICATE-----\n" \
     "MIIFazCCA1OgAwIBAgIRAIIQz7DSQONZRGPgu2OCiwAwDQYJKoZIhvcNAQELBQAw\n" \
     "TzELMAkGA1UEBhMCVVMxKTAnBgNVBAoTIEludGVybmV0IFNlY3VyaXR5IFJlc2Vh\n" \
     "cmNoIEdyb3VwMRUwEwYDVQQDEwxJU1JHIFJvb3QgWDEwHhcNMTUwNjA0MTEwNDM4\n" \
     "WhcNMzUwNjA0MTEwNDM4WjBPMQswCQYDVQQGEwJVUzEpMCcGA1UEChMgSW50ZXJu\n" \
     "ZXQgU2VjdXJpdHkgUmVzZWFyY2ggR3JvdXAxFTATBgNVBAMTDElTUkcgUm9vdCBY\n" \
     "MTCCAiIwDQYJKoZIhvcNAQEBBQADggIPADCCAgoCggIBAK3oJHP0FDfzm54rVygc\n" \
     "h77ct984kIxuPOZXoHj3dcKi/vVqbvYATyjb3miGbESTtrFj/RQSa78f0uoxmyF+\n" \
     "0TM8ukj13Xnfs7j/EvEhmkvBioZxaUpmZmyPfjxwv60pIgbz5MDmgK7iS4+3mX6U\n" \
     "A5/TR5d8mUgjU+g4rk8Kb4Mu0UlXjIB0ttov0DiNewNwIRt18jA8+o+u3dpjq+sW\n" \
     "T8KOEUt+zwvo/7V3LvSye0rgTBIlDHCNAymg4VMk7BPZ7hm/ELNKjD+Jo2FR3qyH\n" \
     "B5T0Y3HsLuJvW5iB4YlcNHlsdu87kGJ55tukmi8mxdAQ4Q7e2RCOFvu396j3x+UC\n" \
     "B5iPNgiV5+I3lg02dZ77DnKxHZu8A/lJBdiB3QW0KtZB6awBdpUKD9jf1b0SHzUv\n" \
     "KBds0pjBqAlkd25HN7rOrFleaJ1/ctaJxQZBKT5ZPt0m9STJEadao0xAH0ahmbWn\n" \
     "OlFuhjuefXKnEgV4We0+UXgVCwOPjdAvBbI+e0ocS3MFEvzG6uBQE3xDk3SzynTn\n" \
     "jh8BCNAw1FtxNrQHusEwMFxIt4I7mKZ9YIqioymCzLq9gwQbooMDQaHWBfEbwrbw\n" \
     "qHyGO0aoSCqI3Haadr8faqU9GY/rOPNk3sgrDQoo//fb4hVC1CLQJ13hef4Y53CI\n" \
     "rU7m2Ys6xt0nUW7/vGT1M0NPAgMBAAGjQjBAMA4GA1UdDwEB/wQEAwIBBjAPBgNV\n" \
     "HRMBAf8EBTADAQH/MB0GA1UdDgQWBBR5tFnme7bl5AFzgAiIyBpY9umbbjANBgkq\n" \
     "hkiG9w0BAQsFAAOCAgEAVR9YqbyyqFDQDLHYGmkgJykIrGF1XIpu+ILlaS/V9lZL\n" \
     "ubhzEFnTIZd+50xx+7LSYK05qAvqFyFWhfFQDlnrzuBZ6brJFe+GnY+EgPbk6ZGQ\n" \
     "3BebYhtF8GaV0nxvwuo77x/Py9auJ/GpsMiu/X1+mvoiBOv/2X/qkSsisRcOj/KK\n" \
     "NFtY2PwByVS5uCbMiogziUwthDyC3+6WVwW6LLv3xLfHTjuCvjHIInNzktHCgKQ5\n" \
     "ORAzI4JMPJ+GslWYHb4phowim57iaztXOoJwTdwJx4nLCgdNbOhdjsnvzqvHu7Ur\n" \
     "TkXWStAmzOVyyghqpZXjFaH3pO3JLF+l+/+sKAIuvtd7u+Nxe5AW0wdeRlN8NwdC\n" \
     "jNPElpzVmbUq4JUagEiuTDkHzsxHpFKVK7q4+63SM1N95R1NbdWhscdCb+ZAJzVc\n" \
     "oyi3B43njTOQ5yOf+1CceWxG1bQVs5ZufpsMljq4Ui0/1lvh+wjChP4kqKOJ2qxq\n" \
     "4RgqsahDYVvTH9w7jXbyLeiNdd8XM2w9U/t7y0Ff/9yi0GE44Za4rF2LN9d11TPA\n" \
     "mRGunUHBcnWEvgJBQl9nJEiU0Zsnvgc/ubhPgXRR4Xq37Z0j4r7g1SgEEzwxA57d\n" \
     "emyPxgcYxn/eR44/KJ4EBs+lVDR3veyJm+kXQ99b21/+jh5Xos1AnX5iItreGCc=\n" \
     "-----END CERTIFICATE-----\n";

void setup() {
  Serial.begin(115200);
  Serial.println();
  // Initialize Wi-Fi
  WiFi.mode(WIFI_STA);
  WiFi.begin(ssid, password);
  Serial.print("Connecting to WiFi ..");
  while (WiFi.status() != WL_CONNECTED) {
    Serial.print('.');
    delay(1000);
  }
  Serial.println(WiFi.localIP());
}

void loop() {
  WiFiClientSecure *client = new WiFiClientSecure;
  if(client) {
    // set secure client with certificate
    client->setCACert(rootCACertificate);
    //create an HTTPClient instance
    HTTPClient https;

    //Initializing an HTTPS communication using the secure client
    Serial.print("[HTTPS] begin...\n");
    if (https.begin(*client, "https://www.howsmyssl.com/a/check")) {  // HTTPS
      Serial.print("[HTTPS] GET...\n");
      // start connection and send HTTP header
      int httpCode = https.GET();
      // httpCode will be negative on error
      if (httpCode > 0) {
      // HTTP header has been send and Server response header has been handled
       Serial.printf("[HTTPS] GET... code: %d\n", httpCode);
      // file found at server
        if (httpCode == HTTP_CODE_OK || httpCode == HTTP_CODE_MOVED_PERMANENTLY) {
          // print server response payload
          String payload = https.getString();
          Serial.println(payload);
        }
      }
      else {
        Serial.printf("[HTTPS] GET... failed, error: %s\n", https.errorToString(httpCode).c_str());
      }
      https.end();
    }
  }
  else {
    Serial.printf("[HTTPS] Unable to connect\n");
  }
  Serial.println();
  Serial.println("Waiting 2min before the next round...");
  delay(120000);
}
How the Code Works?
The code starts by including the necessary libraries that are necessary to generate ESP32 HTTPS requests. This includes WiFi.h, WiFiClientsecure.h and HTTPClient.h
#include <Arduino.h>
#include <WiFi.h>
#include <WiFiClientSecure.h>
#include <HTTPClient.h>
Insert your network credentials in place of “your-ssid” and “your-password”.
const char* ssid = "your-ssid";
const char* password = "your-password";
Next, the root certificate for www.howsmyssl.com is specified in the variable ‘test_root_ca.’
const char* rootCACertificate = \
     "-----BEGIN CERTIFICATE-----\n" \
     "MIIFazCCA1OgAwIBAgIRAIIQz7DSQONZRGPgu2OCiwAwDQYJKoZIhvcNAQELBQAw\n" \
     "TzELMAkGA1UEBhMCVVMxKTAnBgNVBAoTIEludGVybmV0IFNlY3VyaXR5IFJlc2Vh\n" \
     "cmNoIEdyb3VwMRUwEwYDVQQDEwxJU1JHIFJvb3QgWDEwHhcNMTUwNjA0MTEwNDM4\n" \
     "WhcNMzUwNjA0MTEwNDM4WjBPMQswCQYDVQQGEwJVUzEpMCcGA1UEChMgSW50ZXJu\n" \
     "ZXQgU2VjdXJpdHkgUmVzZWFyY2ggR3JvdXAxFTATBgNVBAMTDElTUkcgUm9vdCBY\n" \
     "MTCCAiIwDQYJKoZIhvcNAQEBBQADggIPADCCAgoCggIBAK3oJHP0FDfzm54rVygc\n" \
     "h77ct984kIxuPOZXoHj3dcKi/vVqbvYATyjb3miGbESTtrFj/RQSa78f0uoxmyF+\n" \
     "0TM8ukj13Xnfs7j/EvEhmkvBioZxaUpmZmyPfjxwv60pIgbz5MDmgK7iS4+3mX6U\n" \
     "A5/TR5d8mUgjU+g4rk8Kb4Mu0UlXjIB0ttov0DiNewNwIRt18jA8+o+u3dpjq+sW\n" \
     "T8KOEUt+zwvo/7V3LvSye0rgTBIlDHCNAymg4VMk7BPZ7hm/ELNKjD+Jo2FR3qyH\n" \
     "B5T0Y3HsLuJvW5iB4YlcNHlsdu87kGJ55tukmi8mxdAQ4Q7e2RCOFvu396j3x+UC\n" \
     "B5iPNgiV5+I3lg02dZ77DnKxHZu8A/lJBdiB3QW0KtZB6awBdpUKD9jf1b0SHzUv\n" \
     "KBds0pjBqAlkd25HN7rOrFleaJ1/ctaJxQZBKT5ZPt0m9STJEadao0xAH0ahmbWn\n" \
     "OlFuhjuefXKnEgV4We0+UXgVCwOPjdAvBbI+e0ocS3MFEvzG6uBQE3xDk3SzynTn\n" \
     "jh8BCNAw1FtxNrQHusEwMFxIt4I7mKZ9YIqioymCzLq9gwQbooMDQaHWBfEbwrbw\n" \
     "qHyGO0aoSCqI3Haadr8faqU9GY/rOPNk3sgrDQoo//fb4hVC1CLQJ13hef4Y53CI\n" \
     "rU7m2Ys6xt0nUW7/vGT1M0NPAgMBAAGjQjBAMA4GA1UdDwEB/wQEAwIBBjAPBgNV\n" \
     "HRMBAf8EBTADAQH/MB0GA1UdDgQWBBR5tFnme7bl5AFzgAiIyBpY9umbbjANBgkq\n" \
     "hkiG9w0BAQsFAAOCAgEAVR9YqbyyqFDQDLHYGmkgJykIrGF1XIpu+ILlaS/V9lZL\n" \
     "ubhzEFnTIZd+50xx+7LSYK05qAvqFyFWhfFQDlnrzuBZ6brJFe+GnY+EgPbk6ZGQ\n" \
     "3BebYhtF8GaV0nxvwuo77x/Py9auJ/GpsMiu/X1+mvoiBOv/2X/qkSsisRcOj/KK\n" \
     "NFtY2PwByVS5uCbMiogziUwthDyC3+6WVwW6LLv3xLfHTjuCvjHIInNzktHCgKQ5\n" \
     "ORAzI4JMPJ+GslWYHb4phowim57iaztXOoJwTdwJx4nLCgdNbOhdjsnvzqvHu7Ur\n" \
     "TkXWStAmzOVyyghqpZXjFaH3pO3JLF+l+/+sKAIuvtd7u+Nxe5AW0wdeRlN8NwdC\n" \
     "jNPElpzVmbUq4JUagEiuTDkHzsxHpFKVK7q4+63SM1N95R1NbdWhscdCb+ZAJzVc\n" \
     "oyi3B43njTOQ5yOf+1CceWxG1bQVs5ZufpsMljq4Ui0/1lvh+wjChP4kqKOJ2qxq\n" \
     "4RgqsahDYVvTH9w7jXbyLeiNdd8XM2w9U/t7y0Ff/9yi0GE44Za4rF2LN9d11TPA\n" \
     "mRGunUHBcnWEvgJBQl9nJEiU0Zsnvgc/ubhPgXRR4Xq37Z0j4r7g1SgEEzwxA57d\n" \
     "emyPxgcYxn/eR44/KJ4EBs+lVDR3veyJm+kXQ99b21/+jh5Xos1AnX5iItreGCc=\n" \
     "-----END CERTIFICATE-----\n";
setup()
Inside the setup() function, first the serial communication is opened at a baud rate of 115200.
Serial.begin(115200);Then the ESP32 board attempts to connect to the Wi-Fi using the network credentials provided by the user. After a successful connection is established, the serial monitor displays the SSID it is connected to.
 WiFi.mode(WIFI_STA);
  WiFi.begin(ssid, password);
  Serial.print("Connecting to WiFi ..");
  while (WiFi.status() != WL_CONNECTED) {
    Serial.print('.');
    delay(1000);
  }
  Serial.println(WiFi.localIP());
loop()
Inside the loop() function, we first define a pointer to WiFiClientSecure named ‘client’.
WiFiClientSecure *client = new WiFiClientSecure;If the client successfully connects with the server, a secure client with certificate is set using setCACert() method on the client. The root certificate is passed as a parameter inside it. Then, an HTTPClient instance is created called ‘https.’ After that the ESP32 makes a request on the server URL and obtains the server response code which is saved in the int variable ‘httpCode’.
Next, there is an if condition to check whether the connection was successfully established or not. This is checked by making sure the server response code is positive. If it is indeed positive, then the HTTPS response payload is retrieved and printed on the Arduino serial monitor. This is done by calling the getString() method on the https instance.
Otherwise, if a successful connection is not established (negative response code), then it is printed on the serial monitor and the connection is closed.
    if(client) {

    client->setCACert(rootCACertificate);

    HTTPClient https;


    Serial.print("[HTTPS] begin...\n");
    if (https.begin(*client, "https://www.howsmyssl.com/a/check")) {  // HTTPS
      Serial.print("[HTTPS] GET...\n");

      int httpCode = https.GET();

      if (httpCode > 0) {

       Serial.printf("[HTTPS] GET... code: %d\n", httpCode);

        if (httpCode == HTTP_CODE_OK || httpCode == HTTP_CODE_MOVED_PERMANENTLY) {

          String payload = https.getString();
          Serial.println(payload);
        }
      }
      else {
        Serial.printf("[HTTPS] GET... failed, error: %s\n", https.errorToString(httpCode).c_str());
      }
      https.end();
    }
  }
After every 2 minutes, a new HTTPS request is made.
 else {
    Serial.printf("[HTTPS] Unable to connect\n");
  }
  Serial.println();
  Serial.println("Waiting 2min before the next round...");
  delay(120000);
Demonstration
To see the demonstration of the above code make sure you choose the correct board and COM port before uploading your code to the board. Click on the upload button to upload the code to ESP32 development board. After you have uploaded your code to the ESP32, press its ENABLE button.
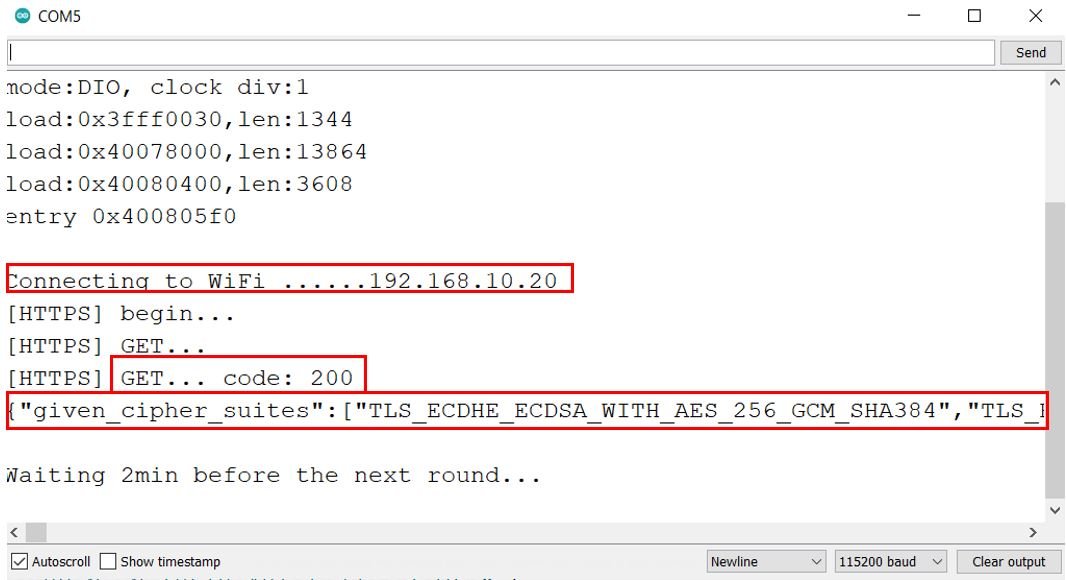
In your Arduino IDE, open up the serial monitor and set the baud rate to 115200. The serial monitor will start displaying the following messages:
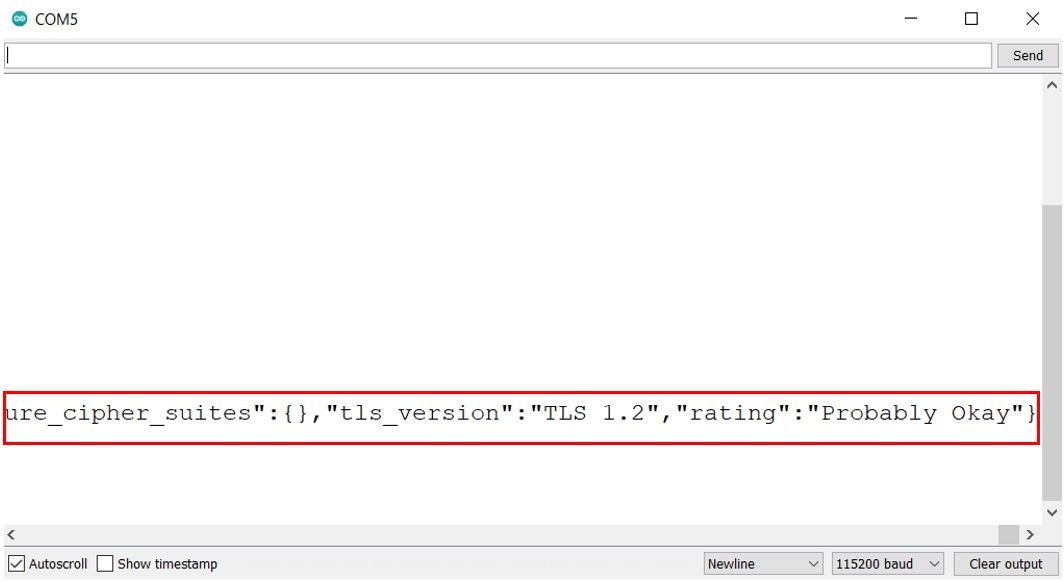
First the ESP32 board connects with the W-Fi network and the IP address is printed. Then we initialize the HTTPS GET request. The server response code received is 200 which means a successful connection has been established. After that you can view the response payload which includes the TLS rating/security of the connection.
ESP32 HTTPS Requests using HTTPClient Library without Certificate
Similarly, we can also modify the WiFiClientSecure example above to remove the verification for the SSL/TLS server. Our connection will still be encrypted but there will be no guarantee if the client connected with the correct server or not.
To generate ESP32 HTTPS Requests using HTTPClient without certificate verification, use the code below:
#include <Arduino.h>
#include <WiFi.h>
#include <WiFiClientSecure.h>
#include <HTTPClient.h>

// Replace with your network credentials
const char* ssid = "your-ssid";
const char* password = "your-password";

void setup() {
  Serial.begin(115200);
  Serial.println();
  // Initialize Wi-Fi
  WiFi.mode(WIFI_STA);
  WiFi.begin(ssid, password);
  Serial.print("Connecting to WiFi ..");
  while (WiFi.status() != WL_CONNECTED) {
    Serial.print('.');
    delay(1000);
  }
  Serial.println(WiFi.localIP());
}

void loop() {
 WiFiClientSecure *client = new WiFiClientSecure;
  if(client) {
    // set secure client with certificate
    client->setInsecure();
    //create an HTTPClient instance
    HTTPClient https;

    //Initializing an HTTPS communication using the secure client
    Serial.print("[HTTPS] begin...\n");
    if (https.begin(*client, "https://www.howsmyssl.com/a/check")) {  // HTTPS
      Serial.print("[HTTPS] GET...\n");
      // start connection and send HTTP header
      int httpCode = https.GET();
      // httpCode will be negative on error
      if (httpCode > 0) {
      // HTTP header has been send and Server response header has been handled
       Serial.printf("[HTTPS] GET... code: %d\n", httpCode);
      // file found at server
        if (httpCode == HTTP_CODE_OK || httpCode == HTTP_CODE_MOVED_PERMANENTLY) {
          // print server response payload
          String payload = https.getString();
          Serial.println(payload);
        }
      }
      else {
        Serial.printf("[HTTPS] GET... failed, error: %s\n", https.errorToString(httpCode).c_str());
      }
      https.end();
    }
  }
  else {
    Serial.printf("[HTTPS] Unable to connect\n");
  }
  Serial.println();
  Serial.println("Waiting 2min before the next round...");
  delay(120000);
}
We have removed the function setCACert() which set the client certificate. This way the certification verification will not occur.
client.setCACert(test_root_ca);Moreover, we added the following line before initiating the HTTP Client. It allows insecure TLS connection with the client.
client.setInsecure();The output will be the same, however the connection will not be trusted but still encrypted.
Demonstration
To see the demonstration of the above code, go to Tools > Core Debug Level > Debug. Then choose the correct board and COM port before uploading your code to the board. Click on the upload button to upload the code to ESP32 development board. After you have uploaded your code to the ESP32, press its ENABLE button.
In your Arduino IDE, open up the serial monitor and set the baud rate to 115200.
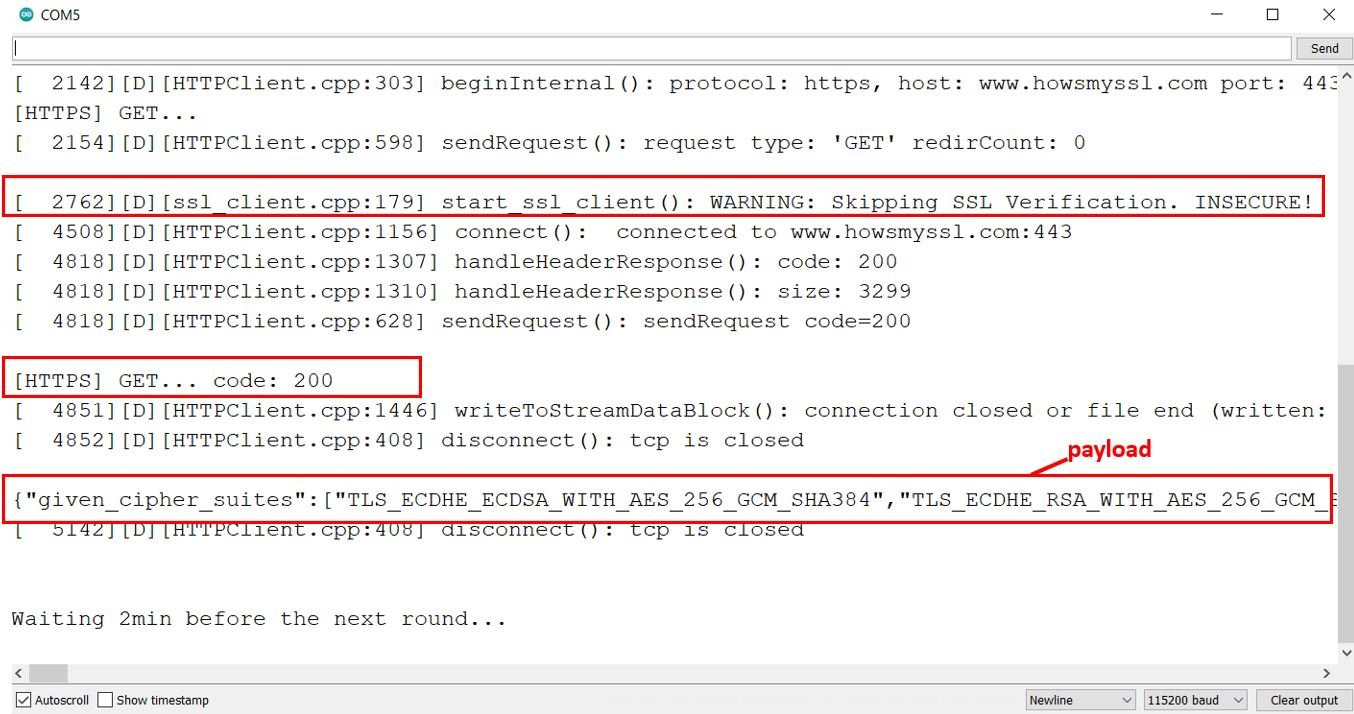
These are the messages that we received in our serial monitor. You may see that the SSL verification is skipped hence the connection is insecure. It is specified as a warning. Moreover, you can view that the HTTPS GET response code is 200 and the response payload as well. The connection between the client and server is encrypted but not trusted.
In summary:
In this guide, we have learned how to make HTTPS requests with ESP32 using WiFiClientSecure and HTTPClient libraries with and without certificates. We have seen what happens when we make HTTPS requests with or without TLS verification. In next steps, you can apply these concepts to your ESP32 projects and make your project secure with HTTPS.
You may also like to read:
- ESP32 SmartConfig Wi-Fi Provisioning with SmartPhone App
- ESP32 SHT31 Temperature and Humidity Web Server
- ESP32 ESP-NOW Send and Receive Encrypted Messages
- ESP32 MQTT Publish Multiple Sensor Readings to Node-Red with Arduino IDE
- Control ESP32 over Internet using Android App with MIT App Inventor
- ESP32 Getting Started with InfluxDB Time Series Database