In this tutorial, we will learn to use FreeRTOS software timers with Arduino. Unlike, hardware timers of Arduino, Software timers are provided by the FreeRTOS kernel and they do not use Arduino timers hardware resources. Because they are implemented by FreeRTOS and under the control of RTOS kernel. Most, importantly, they do not use Arduino processing time, until we actually call software timer call back function.
Recommended Components
The following are recommended for following along with these FreeRTOS Arduino tutorials.
| Component | How it’s used in this project | Buy on Amazon |
|---|---|---|
| Arduino Starter Kit (Uno R3) | An Arduino board and parts to build and run the FreeRTOS example tasks. | Check Price |
| 37-in-1 Sensor Modules Kit | Assorted sensor modules handy for the FreeRTOS tasks, queues and semaphore demos. | Check Price |
| Hands-On RTOS with Microcontrollers (Book) | Recommended reference for learning FreeRTOS concepts in depth. | Check Price |
| Hands-On RTOS with Microcontrollers (2nd Edition) | Updated second edition of the FreeRTOS reference book. | Check Price |
As an Amazon Associate we earn from qualifying purchases. Prices and availability are accurate as of the date/time indicated and are subject to change.
FreeRTOS Software Timers Introduction
In real-time operating systems, software timers provide the functionality to execute a task or function after a specific interval of time. In other words, they help to create a periodic task with a fixed frequency. Hence, we can create a function and attach a software timer with it.
Software Timers Configuration Setting
The use of software timers is optional in FreeRTOS. Before using them in your application, you should enable them by following these steps:
First, build the FreeRTOS source file by going to this location FreeRTOS/Source/timers.c as part of your project. But in FreeRTOS Arduino library, timers.c builds automatically when we build Arduino code.
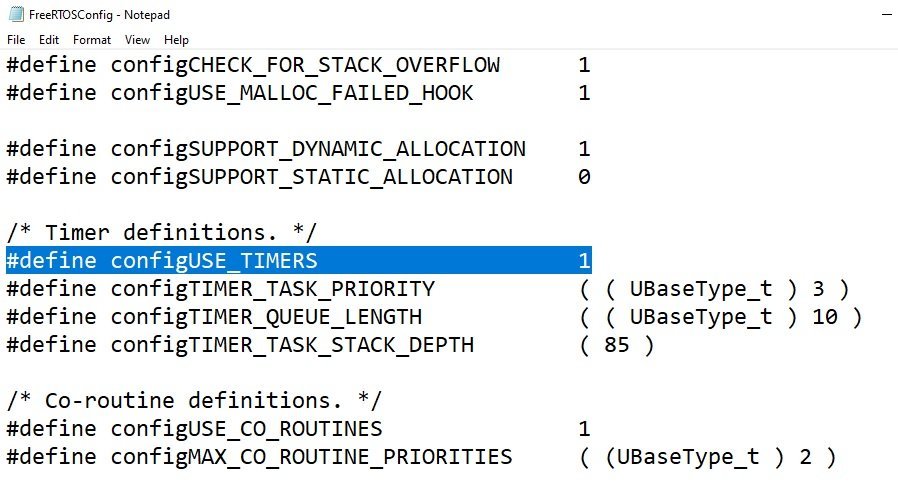
But you should Set configUSE_TIMERS to 1 in FreeRTOSConfig.h. To set configUSE_TIMERS, first go to the FreeRTOS Arduino library folder and open FreeRTOSConfig.h file.

After that set configUSE_TIMERS to 1 as shown below:
Software Timer’s Callback Function
One most important term is the software timer’s callback function. The function which executes only by the software timer call is known as software timer’s callback function. This is a prototype of a call back function.
void ATimerCallback( TimerHandle_t xTimer );
It return void and only argument it takes as a paramter is a handle to the software timer. You will learn about its use in example section.
Note: The software timer call back function must be short. It should run in a single execution from start to end and must not enter blocking state. Also to avoid its function to enter blocking state, do not call vTaskDelay() API.
Period of Software Timer
A Software timer period defines the interval between timer starts and after a specified time software timer’s call back function start to execute. For example, if we set the period to 100ms, a software timer will start and as soon as it reaches 100ms, the timer callback function starts its execution.
Types of Software Timers
FreeRTOS software timers can be configured in two modes. Details of both types are given below:
One-shot timers
One-shot timers execute its callback functions only once. For example, it will start and after the specified time executes call back function. But it will not restart itself automatically. We should restart it manually.
Auto-reload timers
Unlike one-shot, auto-reload timers are used for periodic execution of functions. They will re-start themselves after executing a callback function.
Now let’s see the difference between one-shot auto-reload timers with the help of a diagram. This picture depicts the difference between them. The dashed vertical lines mark the times at which a tick interrupt occurs.

According to this diagram, Timer1 is a one-shot type with a period of 6-time ticks, and Timer2 is an auto-reload type with a period of 5-time ticks. Both timers start at time t1.
Timer1 starts at t1 and its call back function starts to execute after 6 ticks at time t7. But its callback function will not execute again. Because timer1 is a one-shot timer. Similarly, Timer2 starts at t1, and its call back function executes after every 5 ticks at t6, t11, t17, and so on.
FreeRTOS Creating and Starting a Software Timer
In this section, we will learn to create and start a software timer in one-shot and auto-relaod mode using Arduino.
xTimerCreate() API Function
xTimerCreate() API function is used to create a timer. Therefore, we must create a timer with the help of this FreeRTOS API before using a timer. FreeRTOS software timer can be created either before staring a scheduler or after the scheduler has started.
Like FreeRTOS tasks and queues, reference variables are also used for timers that are of type TimerHandle_t. This is a xTimerCreate() API function prototype. It returns a TimerHandle_t to reference to the software timer it creates.
TimerHandle_t xTimerCreate( const char * const pcTimerName,
TickType_t xTimerPeriodInTicks,
UBaseType_t uxAutoReload,
void * pvTimerID,
TimerCallbackFunction_t pxCallbackFunction );| Input Argument | Function |
|---|---|
| pcTimerName | you can provide any descriptive name of timer |
| xTimerPeriodInTicks | Period of timer or time after which timer’s callback function will be called |
| uxAutoReload | Set uxAutoReload to pdTRUE to create an auto-reload timer Set uxAutoReload to pdFALSE to create a one-shot timer |
| pvTimerID | Provide a unique ID to each timer. It is useful when the same callback function will be used by more than one timer. |
| pxCallbackFunction | A pointer to a software timer’s callback function. You should explicitly provide the definition of a callback function. |
For more information on xTimerCreate() visit this link.
This example creates the one shot timer, storing the handle to the created timer in xOneShotTimer.
- First argument to this function is a name of the timer
- Second argument specifies the period that is 3333
- Setting third argument to pdFALSE creates a one-shot software timer and setting pdTRUE creates an auto-reload timer
- Fourth argument used to specify timer ID, but This example does not use the timer id. Therefore, it is set to 0.
- The last argument is the name of the callback function.
TimerHandle_t xOneShotTimer;
xOneShotTimer = xTimerCreate("OneShot",3333, pdFALSE, 0, prvOneShotTimerCallback );
Start and Stop Software Timer
It is used to start a timer that is already created. When we create a timer with xTimerCreate(), it will be in a dormant state. In the dormant state, software timer exists, and can be referenced by its handle, but is not running, so its callback functions will not execute. Therefore, we must start a timer with xTimerStart() after creating it.
Similarly, we can also stop a timer using xTimerStop() function. After stopping the timer, it enters into a dormant state. This is a prototype of a timer start function.
BaseType_t xTimerStart( TimerHandle_t xTimer, TickType_t xTicksToWait );The first argument to xTimerStart() is a handle of the reference timer that you want to start and the second argument is a starting time of the timer. For more information on xTimerStart() visit this link.
This example starts the software timers, using a block time of 0 (no block time). The scheduler has not been started yet so any block time specified here would be ignored anyway
TimerHandle_t xOneShotTimer;
xTimer1Started = xTimerStart( xOneShotTimer, 0 );
The xTimerDelete() API function deletes a timer. By calling xTimerDelete(), it will not exist and also removes it reference variable.
Create and Start FreeRTOS Software Timer with Arduino
This code generates on-shot timer and auto-load timer with 6 seconds and one second periods respectively.
#include <Arduino_FreeRTOS.h>
#include <timers.h>
#include <task.h>
/* The periods assigned to the one-shot and auto-reload timers are 6 second and one econd respectively. */
#define mainONE_SHOT_TIMER_PERIOD pdMS_TO_TICKS( 3333 )
#define mainAUTO_RELOAD_TIMER_PERIOD pdMS_TO_TICKS( 500 )
//create reference hanlders for one-shot and auto-relaod timers
TimerHandle_t xAutoReloadTimer, xOneShotTimer;
BaseType_t xTimer1Started, xTimer2Started;
void setup()
{
     Serial.begin(9600); // Enable serial communication library.
/* Create the one shot timer, storing the handle to the created timer in xOneShotTimer. */
xOneShotTimer = xTimerCreate(
/* Text name for the software timer - not used by FreeRTOS. */
"OneShot",
/* The software timer's period in ticks. */
mainONE_SHOT_TIMER_PERIOD,
/* Setting uxAutoRealod to pdFALSE creates a one-shot software timer. */
pdFALSE,
/* This example does not use the timer id. */
0,
/* The callback function to be used by the software timer being created. */
prvOneShotTimerCallback );
/* Create the auto-reload timer, storing the handle to the created timer in xAutoReloadTimer. */
xAutoReloadTimer = xTimerCreate(
/* Text name for the software timer - not used by FreeRTOS. */
"AutoReload",
/* The software timer's period in ticks. */
mainAUTO_RELOAD_TIMER_PERIOD,
/* Setting uxAutoRealod to pdTRUE creates an auto-reload timer. */
pdTRUE,
/* This example does not use the timer id. */
0,
/* The callback function to be used by the software timer being created. */
prvAutoReloadTimerCallback );
/* Check the software timers were created. */
if( ( xOneShotTimer != NULL ) && ( xAutoReloadTimer != NULL ) )
{
/* Start the software timers, using a block time of 0 (no block time). The scheduler has
not been started yet so any block time specified here would be ignored anyway. */
xTimer1Started = xTimerStart( xOneShotTimer, 0 );
xTimer2Started = xTimerStart( xAutoReloadTimer, 0 );
/* The implementation of xTimerStart() uses the timer command queue, and xTimerStart()
will fail if the timer command queue gets full. The timer service task does not get
created until the scheduler is started, so all commands sent to the command queue will
stay in the queue until after the scheduler has been started. Check both calls to
xTimerStart() passed. */
if( ( xTimer1Started == pdPASS ) && ( xTimer2Started == pdPASS ) )
{
/* Start the scheduler. */
vTaskStartScheduler();
}
}
}

void loop()
{
  // put your main code here, to run repeatedly:
}
static void prvOneShotTimerCallback( TimerHandle_t xTimer )
{
TickType_t xTimeNow;
/* Obtain the current tick count. */
xTimeNow = xTaskGetTickCount();
/* Output a string to show the time at which the callback was executed. */
Serial.print("One-shot timer callback executing ");
Serial.println(xTimeNow/31);

}
static void prvAutoReloadTimerCallback( TimerHandle_t xTimer )
{
TickType_t xTimeNow;
/* Obtain the current tick count. */
xTimeNow = xTaskGetTickCount();
/* Output a string to show the time at which the callback was executed. */
Serial.print("Auto-reload timer callback executing ");
Serial.println( xTimeNow/31 );
}
Arduino Serial Monitor Output
Now upload this code to Arduino. As you can observe from the output of serial monitor that one-shot timer executes call back function only once after 6 seconds and auto-reload timer executes its call back function every one second.

Other FreeRTOS tutorials: