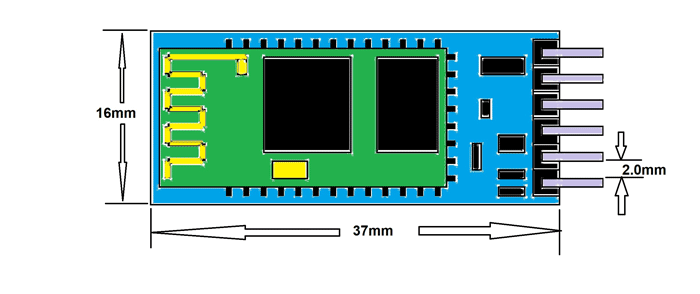
HC06 Bluetooth 2.0 Module is one of the short-range and cheapest communication modules. It consumes very low power and with 2.0 Bluetooth technology. The basic purpose of the module is to establish short-range communication between two microcontrollers and systems. The Bluetooth module mostly uses with Arduino/Microcontroller only in developing projects because the module has all the communication a modern Bluetooth offers. The only problem is the module is to perform the slave functions only. Even it has an internal storage method for the last slave to connect them without any permission or verification. The autoconnection and other methods are changeable through command mode in HC06.
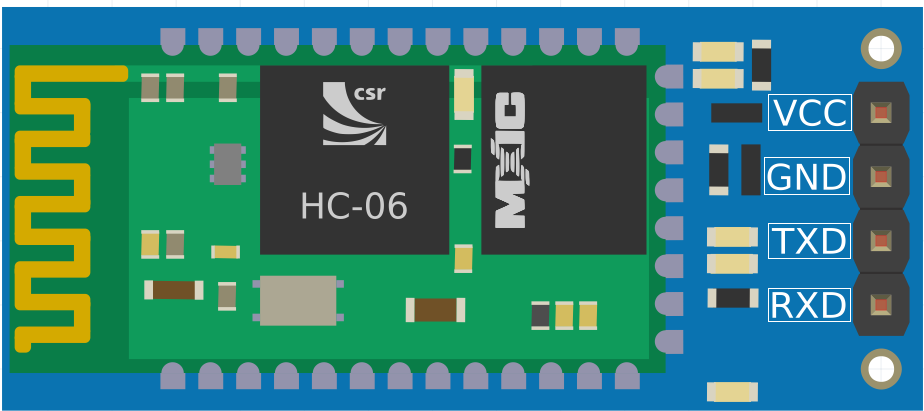
HC06 Pin Configuration
Module HC06 is a slave Bluetooth device that offers serial communication (UART). The module has only communication and power pins. It also didn’t have any indication like other Bluetooth modules have. All the pins of HC06 are:
VCC
The module HC06 has a single power-up the pin, which connects with +5V to power up the device.
GND
The module connects with external devices and power supply to operate and to make it happen a common ground is necessary. The GND pin helps to make the common ground.
TX
The communication method in the device is UART and TX pins are for data sending.
RX
This pin helps to receive the data in UART communication with external devices like Arduino or Microcontrollers.
HC06 Bluetooth Module Features
- HC06 BT module has a feature to remember the last device name which helps to connect them automatically.
- It can send data with up to 2-3MBs speed at a short distance only.
- Bluetooth Module HC06 is a total slave and is changeable by even command mode.
- The module has both command and data mode by default.
- The device can operate with any TTL/CMOS device due to its operating voltage which is 5V and its internal structure.
- There won’t be any antenna requirement in the module because of its builtin antenna of 2.4GHz.
- The data transfer for HC06 is based on GFSK technology. Therefore, it also has encryption and authentication for data safety.
- The operating temperature of the module is -20 to +55 and it operates at 20mA current.
Alternative BT options
How to use HC06
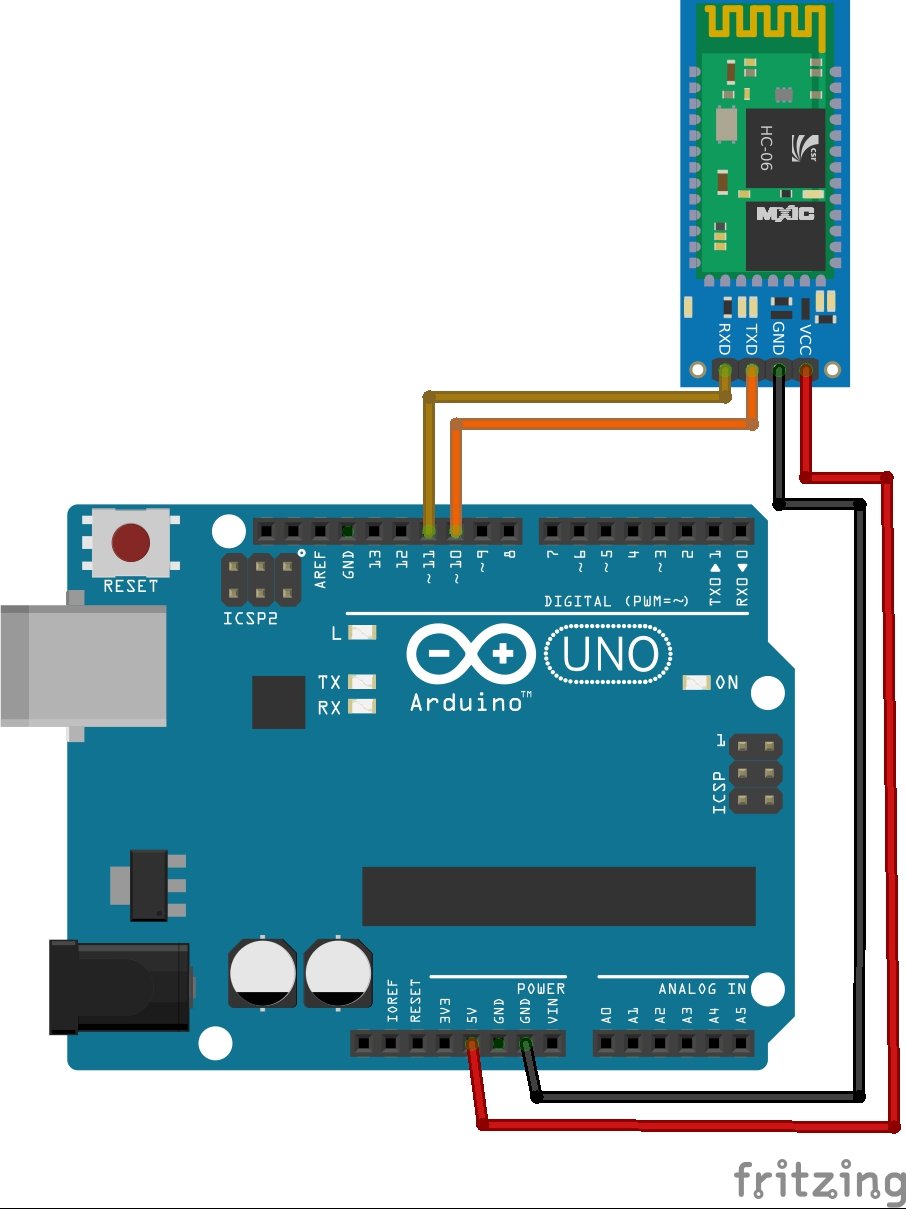
This Bluetooth module is useable with any microcontroller with UART communication. In every device the hardware serial and in most of the device software serial is available. Here you will learn how to use HC06 with Arduino and the same method will help to work with other microcontrollers and even boards. First, connect the module according to the given circuit diagram. Then understand first how the device works.
It acts as a slave. Hc06 can connect with external devices just by power on with the use of the password.
- Default Password – 1234 or 0000
BT will start transferring the data to the serial pins and to read them the serial read programming of Arduino/microcontroller will help.
Hardware Serial Communication Arduino
In Arduino, the two methods are helpful to read and write the data serially. The first one is the Hardware serial which is the default method. To use the hardware serial the following code will help.
void setup() {
Serial.begin(9600);
}

void loop() {
if (Serial.available() > 0 )
{
byte data = Serial.read();
Serial.print(data);
}
  Serial.print("DATA");
Serial.write("DATA");
}
The first command serial.begin is for initializing the baud rate of communication. The default baud rate of the module HC06 is 9600 but the baud rate is changeable. Every device with UART communication has builtin methods that offer the change in baud rate at specific levels. The second command is serial.available which is to detect the serial incoming and the last most important is serial.read. The serial.read is for reading the data from the external module. Therefore, always keep in mind to read the data in the byte variable because the data travels between the module are always in bytes. The Serial.write/Serial.print is for sending the data. Any data is spendable using the following command.
Command Mode HC06
The command mode is one of the defaults setting modes for hc06 BT module, where its factory settings are changeable. To access the command mode the above code is useable but the baud rate needs to be different. The baud rate for command mode is 38400. After making the baud rate at 38400 the commands will operate from the serial monitor of the Arduino IDE. These are following general commands which help to change the device settings.
| COMMAND | FUNCTIONS |
| AT | To enter the command mode or something to verify the communications. |
| AT+VERSION | The device firm is viewable through this command. |
| AT+NAMEname | Replace the “name” to set the new name of the device. |
| AT+PIN1234 | Sets the module PIN to 1234 |
| AT+BAUDX | Replace X with a number according to the baud rate. 1. 1200 2. 2400 3. 4800 4. 9600 5. 19200 6. 38400 7. 57600 8. 115200 9. 230400 10. 460800 11. 921600 12. 1382400 |
There are two methods to send commands. The first one is writing them directly and second is with Serial.print command in COM port of Arduino. just enter the command like the following example:
Serial.print("AT");In some devices the one method works, which depend on one of their module and software versions.
Software Serial Arduino for HC06
The software serial method is the best method to use the device with UART communication. The software serial uses the digital pins to generate the data in bytes and transmit and receive them exactly like the UART. The following code will help to use the software serial and avoid the hardware serial for other devices:
#include <SoftwareSerial.h>
SoftwareSerial mySerial(10, 11); // RX, TX

void setup() {
mySerial.begin(38400);
}

void loop() {
if (mySerial.available())
Serial.print(mySerial.read());
}
mySerial.print(Serial.read());
mySerial.write(Serial.read());
}
In the above code, the pin 10 will act as RX pin and 11 well as TX. Both pins are changeable.
The basic purpose of software serial communication is to leave the hardware serail for other devices. So, they can operate without any interruption with Arduino. The software serial is compatible with Bluetooth HC06 for every kind of data because of its data transfering in bytes. Otherwise, the software serial is hard to implement because of it only able to send data from 0-255 in integer form.
IOT Example HC06 With Arduino and DHT11
Here we will integrate the Bluetooth for an IoT application. In-home bases, the Bluetooth is useable for room temperate detection. We will use the DHT11 for temperature sensing and HC06 Bluetooth for transmitting the data. The Arduino will perform the basic operations of both devices. Here’s the following circuit.
To make it work the Arduino code needs to upload and here’s the code.
#include "DHT.h"

DHT dht(2, DHT11);

void setup() {
  Serial.begin(9600);
  dht.begin();
  pinMode(3, OUTPUT);
}

void loop() {
  float temp = dht.readTemperature();
  float hum = dht.readHumidity();

  Serial.print(temp);
  delay(100);
  Serial.print(hum);
  delay(1000);
  if (temp == 25)
    digitalWrite(3, HIGH);
  else
    digitalWrite(3, HIGH);
  }
The code will take the data from analog input pins and then it will transmit them to the hc06 Bluetooth. The Bluetooth will transmit the data to the Bluetooth receiving device. The receiving device could be anything like a screen, computer or smartphone. Then the broadcast signal is viewable with every second. The code has a limit for temperature increase. In case of an increase in temperature from above 50 degrees, the buzzer will activate to alarm the users.
Applications
- In most remote controllers the module is common due to its cheapness.
- For robots and cars, the device is best to communicate. It helps to avoid complex connectivity.
- In engineering projects for bulk Bluetooth device, the module is common.
- In mobile phone accessories, the HC06 module is common because the mobile mostly acts as a master and device as a slave.


