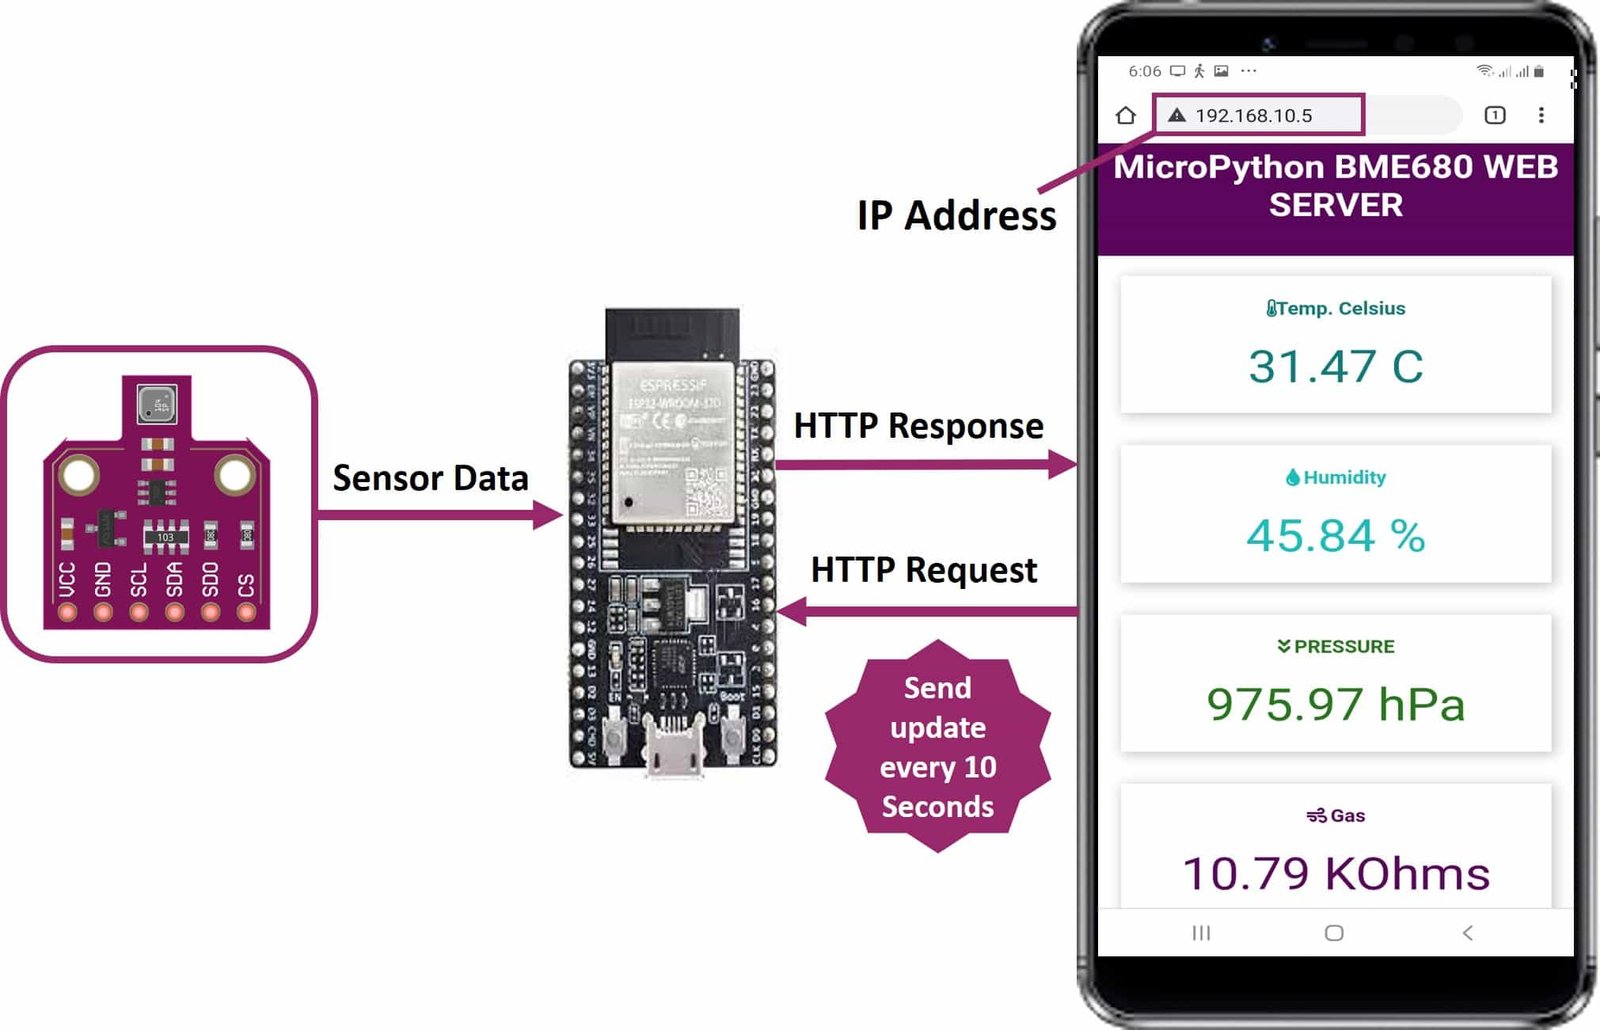
In this user guide, we will learn to create a web server with BME680 environmental sensor, which is used to measure ambient temperature, barometric pressure, relative humidity, and gas (VOC) or Indoor air quality (IAQ). We will learn how to display sensor values on a web page using ESP32 and ESP8266 NodeMCU and MicroPython firmware. This web server will act as a weather station as it will show temperature, humidity, pressure and IAQ readings on the web page.
We will use MicroPython firmware to build a responsive EP32/ESP8266 web server that can be accessed through any device which has a web browser, and the device should be connected to your local area network. That means the device should be connected to the same network to which the ESP32/ESP8266 board is connected.

Recommended Components
The following components are used in this project or are helpful for getting started with MicroPython on ESP32 and ESP8266.
| Component | How it’s used in this project | Buy on Amazon |
|---|---|---|
| ESP32 Development Board (DevKit V1) | The ESP32 board flashed with MicroPython firmware. | Check Price |
| ESP8266 NodeMCU (ESP-12E) | The ESP8266 NodeMCU running the same MicroPython code. | Check Price |
| Micro USB Cable | Programs and powers the board from your PC. | Check Price |
| BME680 Sensor | Measures temperature, humidity, pressure and gas readings. | Check Price |
| Breadboard | Holds the sensor and board for solderless wiring. | Check Price |
| Jumper Wires | Connect the I2C SDA, SCL, power and ground lines. | Check Price |
As an Amazon Associate we earn from qualifying purchases. Prices and availability are accurate as of the date/time indicated and are subject to change.
Prerequisites
Before we start this lesson make sure you are familiar with and have the latest version of MicroPython firmware installed in your ESP boards and have a running Integrated Development Environment (IDE) in which we will be doing the programming such as uPyCraft IDE or Thonny IDE.
- Getting Started with uPyCraft IDE on ESP32 and ESP8266
- Getting Started with Thonny MicroPython IDE for ESP32 and ESP8266
We will cover the following content in this MicroPython tutorial:
- How to create a BM680 web server using ESP32/ESP8266 and MicroPython
- Display Temperature, Humidity, Gas, and Pressure readings on a web page with ESP32 and ESP8266
We have similar guide to display BME680 sensor readings on MicroPython shell:
BME680 Introduction
BME680 is a four in one low power-driven sensor, which has integrated temperature, pressure, humidity and gas detection sensors. It runs on an operating voltage of 1.8-3.8V and communicates with other microcontrollers through I2C and SPI protocol. This sensor is used in areas such as tracking the quality of air, humidity indicators, weather trends, home automation and controlling and GPS enhancements.
Operating Range and Accuracy
Some key features of BME680 include:
- Temperature measurement: measures the ambient temperature with an accuracy of ±1.0°C and an operating range of -40 to 85 ºC.
- Relative Humidity measurement: measures relative humidity with a fast response rate and an accuracy of ±3% and an operating range of 0-100%.
- Pressure measurement: measures barometric pressure with ±1 hPa absolute accuracy and altitude with an accuracy of ±1 meter. The operating range of pressure ranges from 300-1100 hPa.
| | Accuracy | Operating Range |
|---|---|---|
| Temperature | ±1.0°C | -40 to 85 ºC |
| Humidity | ±3% | 0-100% |
| Pressure | ±1 hPa | 300-1100 hPa |
- Gas measurement: detects a wide range of gases including volatile organic compounds (VOCs) thus determining the indoor air quality.
- Due to its compact size and low power operation, it is suitable in mobile applications, smartwatches, and navigation systems.
As compared to BME280, BME680 is a unique and updated sensor in the sense that it contains a small-sized MOX (metal oxide) sensor.
Gas Sensor
BME680 sensor can determine the number of pollutants/VOCs in the environment such as carbon monoxide, Ethane, Isoprene /2-methyl-1,3 Butadiene, Acetone, and Ethanol. The VOCs are detected by the adsorption of oxygen molecules onto the metal oxide layer. Its actual detection is done by the principle of changing the resistance of the MOX sensor. Whenever the MOX gets in contact with a pollutant in the air, the resistance of the sensor changes with the concentration of the pollutants present. This means that the higher number of pollutants in the air leads to significantly lower resistance of the sensor. Likewise, with the lower concentration of VOCs in the air, the resistance of the sensor is significantly higher.
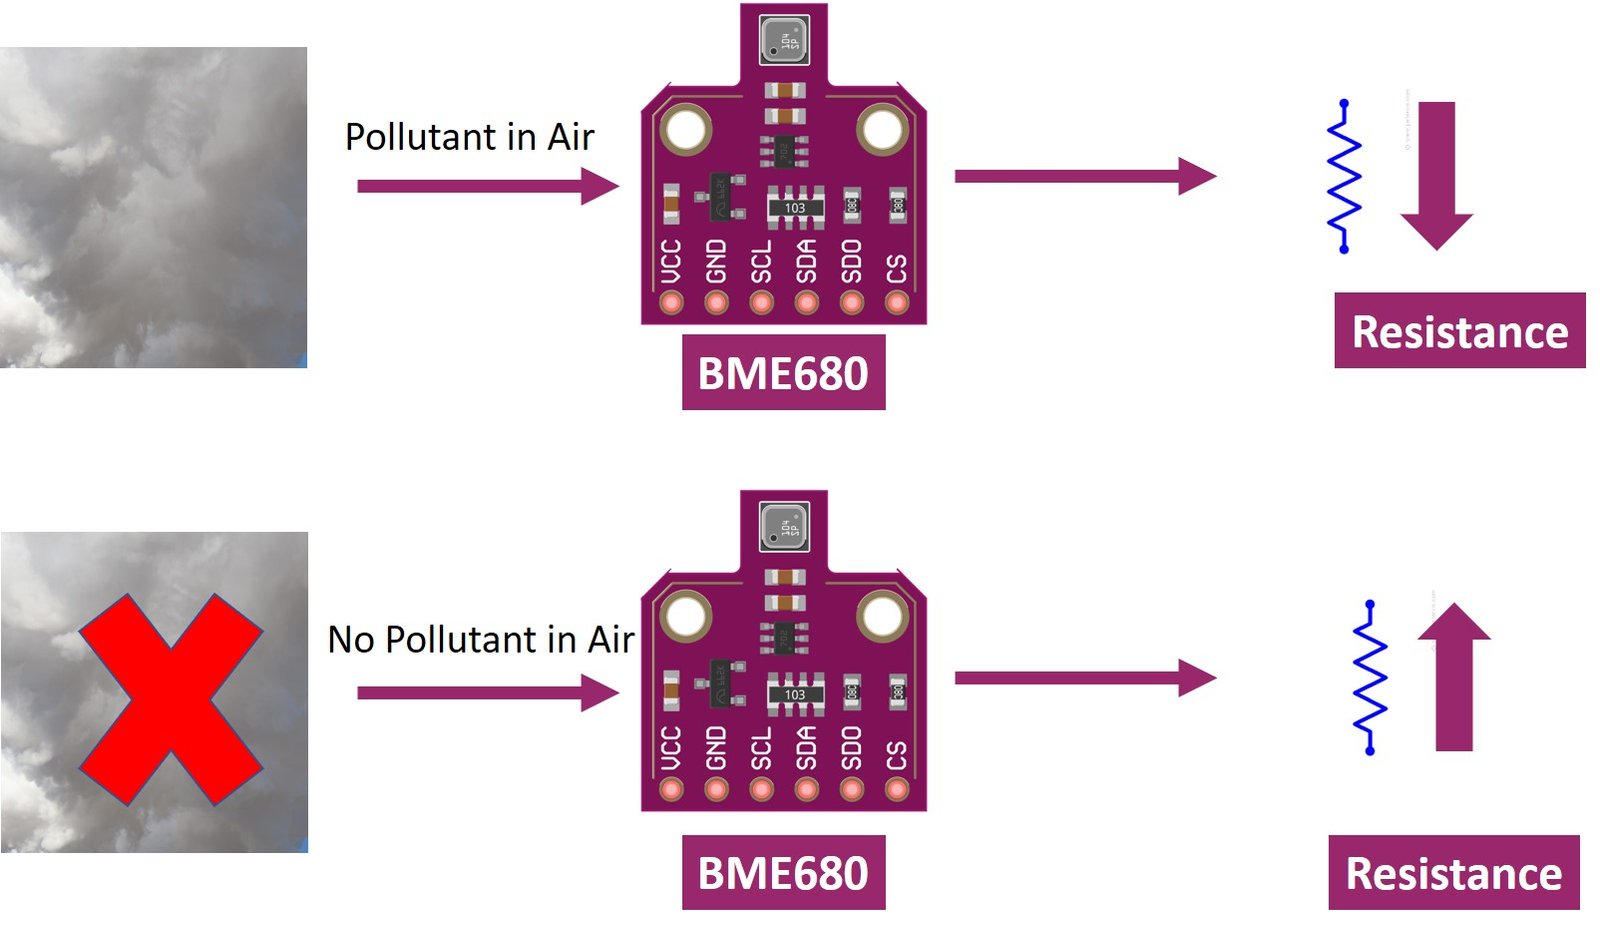
Note: The BME680 gas sensor is not a CO2 or ethanol measurement sensor. It gets the relative idea of CO2 from VOC in the air But we can not use it for direct measurement of CO2.
Like all other gas sensors, BME680 also gives variable results each time. To ensure greater accuracy, we have to calibrate it against a known source and then plot its curve. As the sensitivity levels are not constant during the initial use of the sensor, it is initially recommended to run it for forty-eight hours which can later be tuned down to thirty minutes before each use.
BME680 Modules
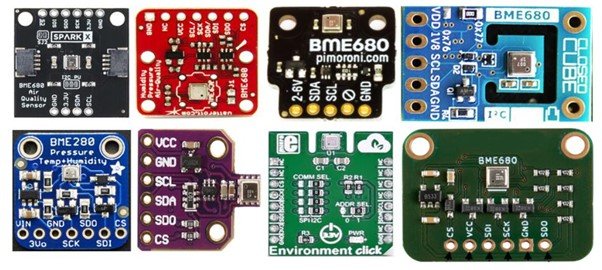
Several types of BME680 sensors with different sizes and numbers of terminals are available in the market. But all modules provide data through SPI and I2C interfaces and we can use the same MicroPython script to get sensor readings. Some of them are shown below:
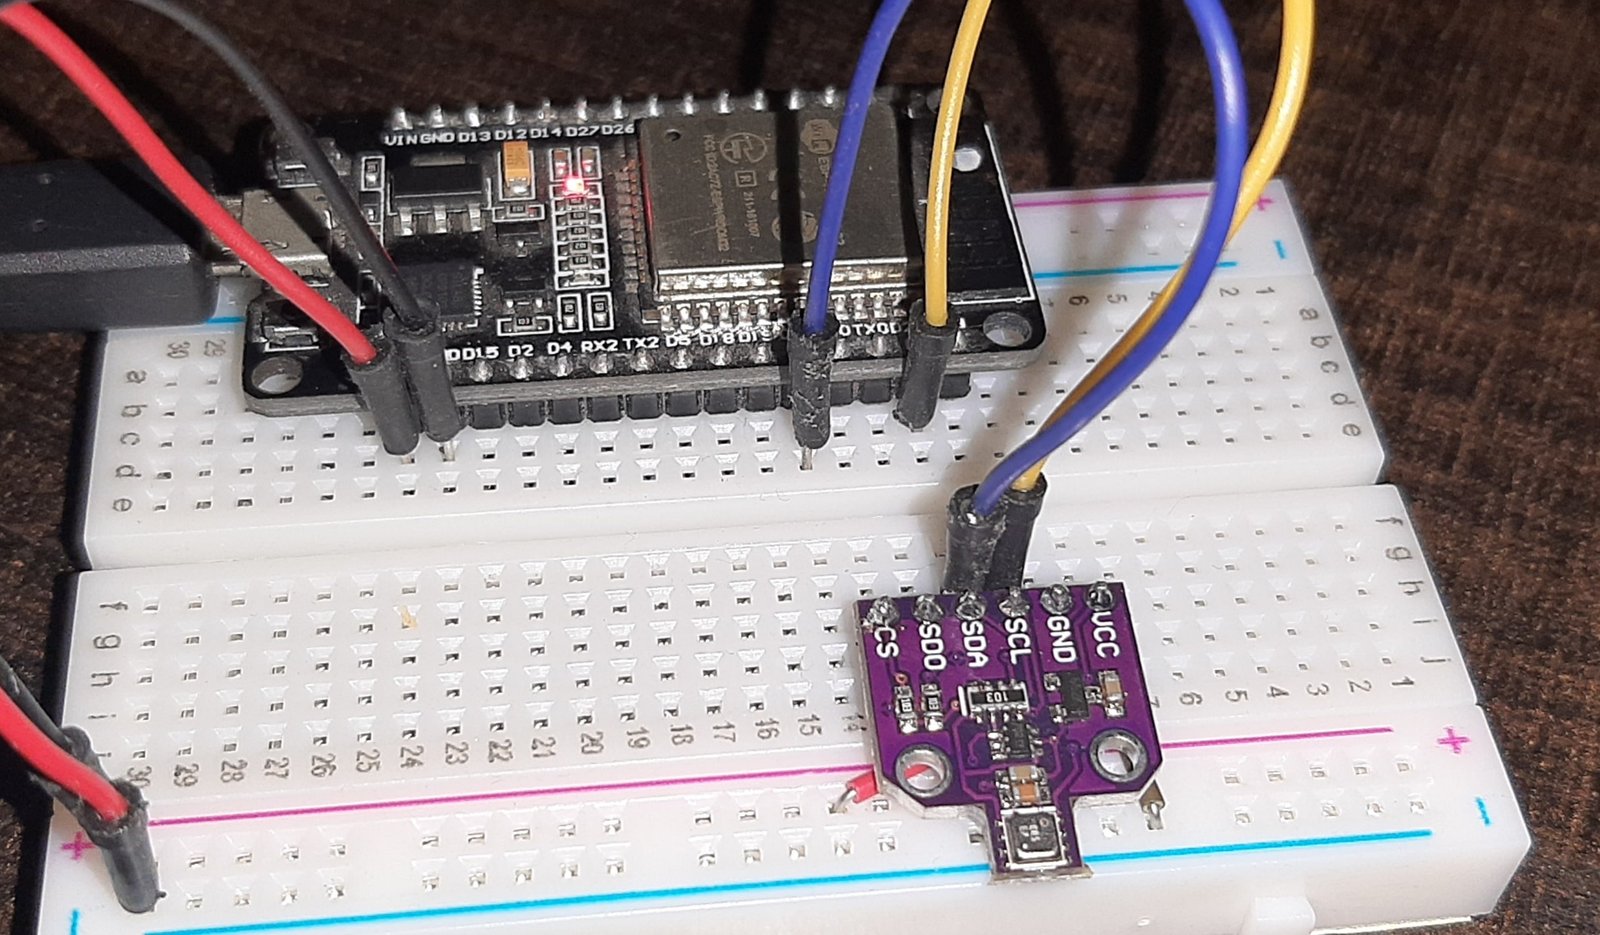
You can choose the module according to your convenience and the type of microcontroller you want to connect it with. In this article, we will use the BME680 sensor with 6 terminals, which is shown below. It has 4 SPI and 2 I2C terminals.
Pinout Diagram
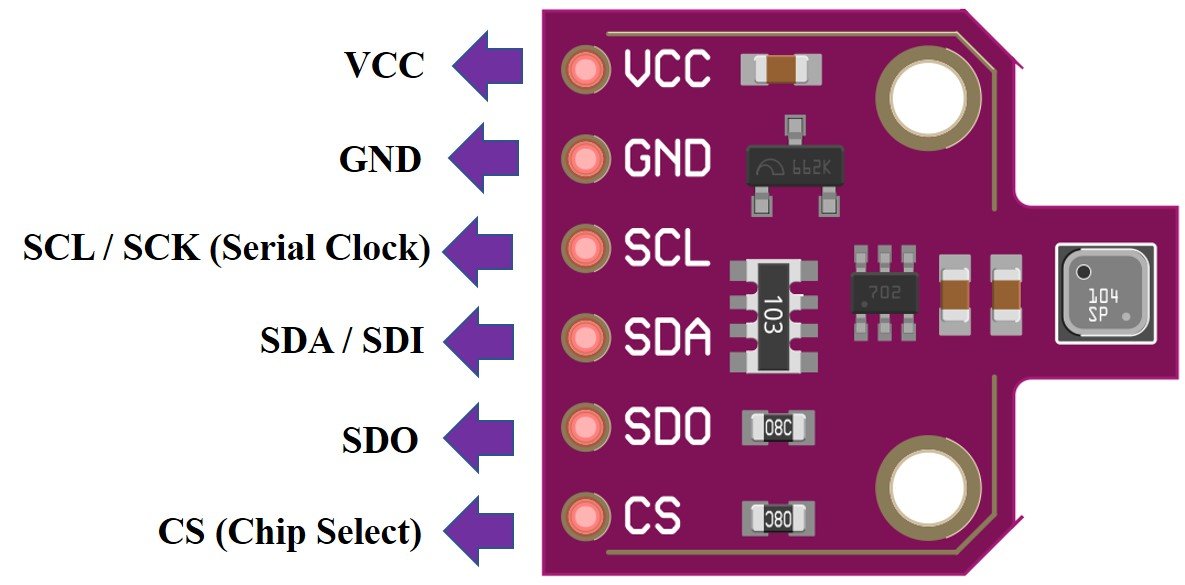
The following figure shows the pinout of BME680 sensor:
| Pin Name | Description |
|---|---|
| VCC | This pin powers up the sensor. |
| GND | This is the common ground pin for power and logic. |
| SCL | When using I2C protocol this pin acts as SCL or serial clock pin and when using SPI protocol this pin acts as SCK or the serial pin for SPI. It is the input to the chip. |
| SDA | When using I2C protocol this pin acts as SDA or Serial Data pin and when using SPI protocol this pin acts as SDI or Serial Data In also known as MOSI (‘Master out Slave in’). This is used as the I2C/SPI input to the sensor. |
| SDO | This is the SDO (Slave data out) /MISO (Master in slave out) pin for SPI communication. This pin is used as the SPI output from the sensor. |
| CS | This is the Chip Select pin used in SPI communication. Acts as an input to the sensor. |
BME680 I2C and SPI Interface
In this section, we will see how to interface the BME680 sensor module with ESP32. As discussed earlier, the BME680 offers two interfaces such as I2C and SPI. We can use either SPI or I2C interface t connect a sensor with the ESP32 or ESP8266 NodeMCU. We will show the connections for both scenarios in the next section.
I2C Interface with ESP32/ESP8266
If you want to interface BME680 sensor with ESP32 or ESP8266 NodeMCU using I2C interface, you should make the connections of ESP boards with sensor accoridng to these SCL and SDA pins.
| BME680 | ESP32 | ESP8266 NodeMCU |
|---|---|---|
| VCC | VCC=3.3V | VCC=3.3V |
| GND | GND | GND |
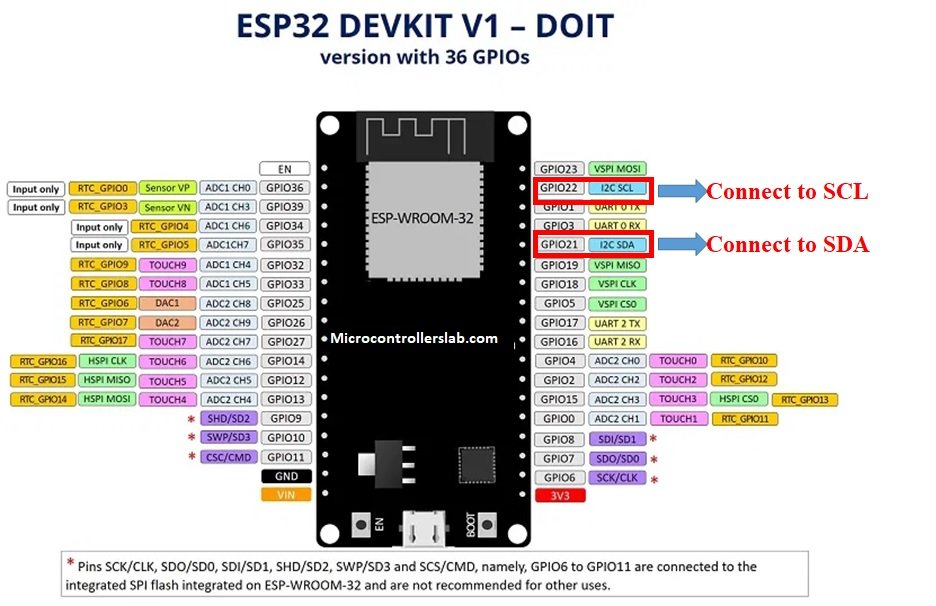
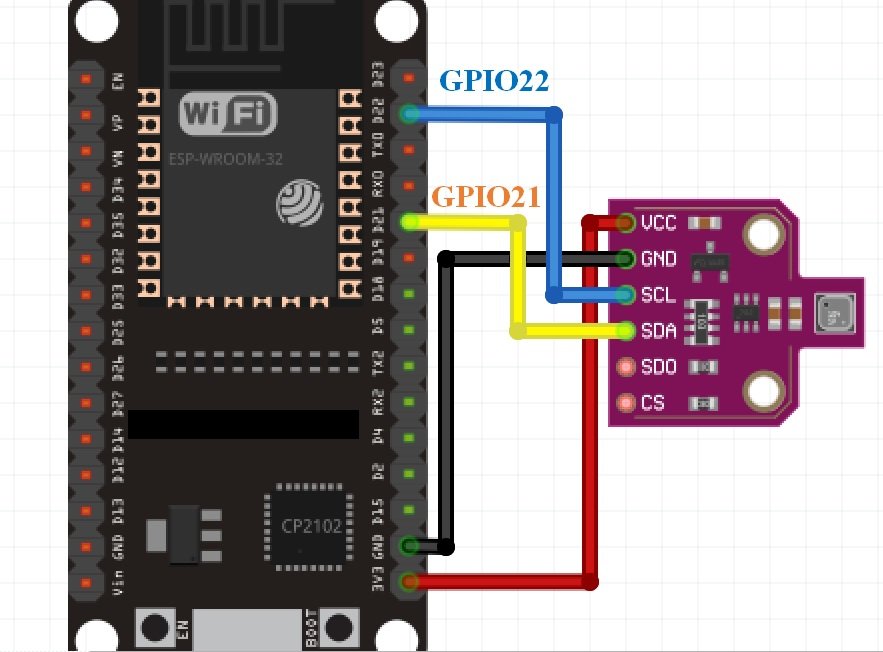
| SCL | GPIO22 | GPIO5 |
| SDA | GPIO21 | GPIO4 |
Connect the VCC pin of ESP32 and ESP8266 NodeMCU with the 3.3V VCC pin of the module to power up. Both grounds of the two devices will be connected in common. The SCL pin of BME680 will be connected with the default SCL pin of ESP32/ESP8266. Likewise, the SDA pin will be connected with the default SDA pin of ESP32/ESP8266.
Note: If we use the softI2C library of MicroPython, we can define any GPIO pins of ESP32 and ESP8266 as SCL and SDA pins. We don’t have to use default I2C pins.
ESP32 I2C Pins
The I2C pins stated above are set in default. If we want to change the GPIO pins we have to set them in code. The diagrams below show the pinout for the ESP32 and Esp8266 respectively.
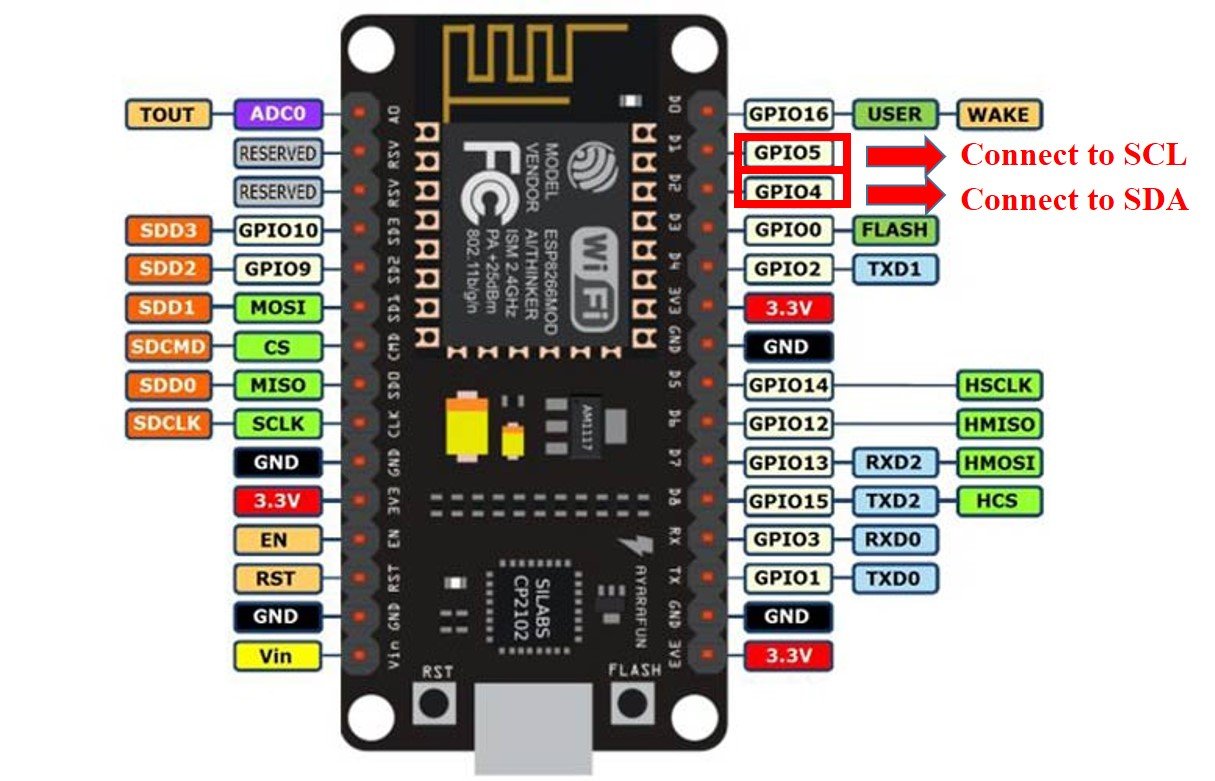
ESP8266 I2C Pins
The following figure shows the I2C pins of ESP8266 NodeMCU:
More information on ESP32 and ESP8266 pins is available here:
SPI Interface with ESP32/ESP8266
If you want to interface the BME680 sensor with ESP32 or ESP8266 NodeMCU using SPI interface, you should make the connections of ESP boards with the sensor according to these MOSI, MISO, and SCK pins. Because SPI protocol uses MOSI/SDI, MISO/SDO, and SCK pins.
| BME680 | ESP32 | ESP8266 |
|---|---|---|
| VCC | VCC=3.3V | VCC=3.3V |
| GND | GND | GND |
| SCL (SCK for SPI) | GPIO18 | GPIO14 (D5) |
| SDA (SDI / MOSI for SPI) | GPIO23 | GPIO13 (D7) |
| SDO / MISO | GPIO19 | GPIO12 (D6) |
| CS | GPIO5 | Any GPIO pin or GND |
The VCC pin will be connected with the 3.3V from the ESP32 module to power up. Both the grounds of the two devices will be connected in common. The SCL pin of BME680 will be connected with the default SCK/CLK pin of ESP32. Likewise, the SDA pin will be connected with the default MOSI pin of ESP32. The SDO pin will be connected with the default MISO pin of ESP32 and the CS pin of the sensor will also be connected with the default CS pin of ESP32.
Note: The above table lists the default SPI pins of ESP32 and ESP8266. But if you want to use any other pins, you need to define a softSPI library of MicroPython
As you can see, we will use the default I2C and default SPI pins of the ESP32 module to connect with the respective pins of the sensor. If you want to change the pins according to your preference that can be handled in the program code.
Which Interface to use?
So far we have discussed SPI and I2C interfaces of BME680 and learned to interface the sensor with ESP32 or ESP8266 using both interfaces. But the question is which communication protocol should we use to get reading from BME680. As we have seen SPI requires four pins to communicate. On the contrary, I2C requires two pins. However, SPI is generally faster in speed as compared to I2C. Hence, it’s a tradeoff between speed and the number of pins. In short, it depends on your choice and application. We will use the I2C interface to get sensor readings with default I2C pins of ESP32 and ESP8266 NodeMCU.
Required Hardware
We will need the following components to connect our ESP board with the BME680 sensor.
- ESP32/ESP8266
- BME680 Module
- Connecting Wires
- Breadboard
Schematic Diagrams ESP32 and ESP8266
Follow the schematic diagrams below for both the ESP modules and connect them accordingly. If you are using ESP32 for this project, connect the ESP32 device with BME680 as shown in the schematic diagram below:
Similarly, if you are using ESP8266 NodeMCU for this project, connect the ESP8266 device with BME680 as shown in the schematic diagram below:

BME680 MicroPython Library
By default, MicroPython does not have an implementation of the BME680 library. But, MicroPyhon provides I2C API of ESP32 and ESP8266 which can be used to read values from the BME680 sensor. Fortunately, there is one library available which is developed by Adafruit and can be downloaded from this link. Download the following library and upload it to ESP32/ESP8266 board with the name of bme680.py using uPyCraft or Thonny IDE.
import time
import math
from micropython import const
from ubinascii import hexlify as hex
try:
  import struct
except ImportError:
  import ustruct as struct
_BME680_CHIPID = const(0x61)
_BME680_REG_CHIPID = const(0xD0)
_BME680_BME680_COEFF_ADDR1 = const(0x89)
_BME680_BME680_COEFF_ADDR2 = const(0xE1)
_BME680_BME680_RES_HEAT_0 = const(0x5A)
_BME680_BME680_GAS_WAIT_0 = const(0x64)
_BME680_REG_SOFTRESET = const(0xE0)
_BME680_REG_CTRL_GAS = const(0x71)
_BME680_REG_CTRL_HUM = const(0x72)
_BME280_REG_STATUS = const(0xF3)
_BME680_REG_CTRL_MEAS = const(0x74)
_BME680_REG_CONFIG = const(0x75)
_BME680_REG_PAGE_SELECT = const(0x73)
_BME680_REG_MEAS_STATUS = const(0x1D)
_BME680_REG_PDATA = const(0x1F)
_BME680_REG_TDATA = const(0x22)
_BME680_REG_HDATA = const(0x25)
_BME680_SAMPLERATES = (0, 1, 2, 4, 8, 16)
_BME680_FILTERSIZES = (0, 1, 3, 7, 15, 31, 63, 127)
_BME680_RUNGAS = const(0x10)
_LOOKUP_TABLE_1 = (2147483647.0, 2147483647.0, 2147483647.0, 2147483647.0, 2147483647.0,
  2126008810.0, 2147483647.0, 2130303777.0, 2147483647.0, 2147483647.0,
  2143188679.0, 2136746228.0, 2147483647.0, 2126008810.0, 2147483647.0,
  2147483647.0)
_LOOKUP_TABLE_2 = (4096000000.0, 2048000000.0, 1024000000.0, 512000000.0, 255744255.0, 127110228.0,
  64000000.0, 32258064.0, 16016016.0, 8000000.0, 4000000.0, 2000000.0, 1000000.0,
  500000.0, 250000.0, 125000.0)
def _read24(arr):
  ret = 0.0
  for b in arr:
    ret *= 256.0
    ret += float(b & 0xFF)
  return ret
class Adafruit_BME680:
  def __init__(self, *, refresh_rate=10):
    self._write(_BME680_REG_SOFTRESET, [0xB6])
    time.sleep(0.005)
    chip_id = self._read_byte(_BME680_REG_CHIPID)
    if chip_id != _BME680_CHIPID:
      raise RuntimeError('Failed 0x%x' % chip_id)
    self._read_calibration()
    self._write(_BME680_BME680_RES_HEAT_0, [0x73])
    self._write(_BME680_BME680_GAS_WAIT_0, [0x65])
    self.sea_level_pressure = 1013.25
    self._pressure_oversample = 0b011
    self._temp_oversample = 0b100
    self._humidity_oversample = 0b010
    self._filter = 0b010
    self._adc_pres = None
    self._adc_temp = None
    self._adc_hum = None
    self._adc_gas = None
    self._gas_range = None
    self._t_fine = None
    self._last_reading = 0
    self._min_refresh_time = 1000 / refresh_rate
  @property
  def pressure_oversample(self):
    return _BME680_SAMPLERATES[self._pressure_oversample]
  @pressure_oversample.setter
  def pressure_oversample(self, sample_rate):
    if sample_rate in _BME680_SAMPLERATES:
      self._pressure_oversample = _BME680_SAMPLERATES.index(sample_rate)
    else:
      raise RuntimeError("Invalid")
  @property
  def humidity_oversample(self):
    return _BME680_SAMPLERATES[self._humidity_oversample]
  @humidity_oversample.setter
  def humidity_oversample(self, sample_rate):
    if sample_rate in _BME680_SAMPLERATES:
      self._humidity_oversample = _BME680_SAMPLERATES.index(sample_rate)
    else:
      raise RuntimeError("Invalid")
  @property
  def temperature_oversample(self):
      return _BME680_SAMPLERATES[self._temp_oversample]
  @temperature_oversample.setter
  def temperature_oversample(self, sample_rate):
    if sample_rate in _BME680_SAMPLERATES:
      self._temp_oversample = _BME680_SAMPLERATES.index(sample_rate)
    else:
      raise RuntimeError("Invalid")
  @property
  def filter_size(self):
    return _BME680_FILTERSIZES[self._filter]
  @filter_size.setter
  def filter_size(self, size):
    if size in _BME680_FILTERSIZES:
      self._filter = _BME680_FILTERSIZES[size]
    else:
      raise RuntimeError("Invalid")
  @property
  def temperature(self):
    self._perform_reading()
    calc_temp = (((self._t_fine * 5) + 128) / 256)
    return calc_temp / 100
  @property
  def pressure(self):
    self._perform_reading()
    var1 = (self._t_fine / 2) - 64000
    var2 = ((var1 / 4) * (var1 / 4)) / 2048
    var2 = (var2 * self._pressure_calibration[5]) / 4
    var2 = var2 + (var1 * self._pressure_calibration[4] * 2)
    var2 = (var2 / 4) + (self._pressure_calibration[3] * 65536)
    var1 = (((((var1 / 4) * (var1 / 4)) / 8192) *
      (self._pressure_calibration[2] * 32) / 8) +
      ((self._pressure_calibration[1] * var1) / 2))
    var1 = var1 / 262144
    var1 = ((32768 + var1) * self._pressure_calibration[0]) / 32768
    calc_pres = 1048576 - self._adc_pres
    calc_pres = (calc_pres - (var2 / 4096)) * 3125
    calc_pres = (calc_pres / var1) * 2
    var1 = (self._pressure_calibration[8] * (((calc_pres / 8) * (calc_pres / 8)) / 8192)) / 4096
    var2 = ((calc_pres / 4) * self._pressure_calibration[7]) / 8192
    var3 = (((calc_pres / 256) ** 3) * self._pressure_calibration[9]) / 131072
    calc_pres += ((var1 + var2 + var3 + (self._pressure_calibration[6] * 128)) / 16)
    return calc_pres/100
  @property
  def humidity(self):
    self._perform_reading()
    temp_scaled = ((self._t_fine * 5) + 128) / 256
    var1 = ((self._adc_hum - (self._humidity_calibration[0] * 16)) -
      ((temp_scaled * self._humidity_calibration[2]) / 200))
    var2 = (self._humidity_calibration[1] *
      (((temp_scaled * self._humidity_calibration[3]) / 100) +
       (((temp_scaled * ((temp_scaled * self._humidity_calibration[4]) / 100)) /
         64) / 100) + 16384)) / 1024
    var3 = var1 * var2
    var4 = self._humidity_calibration[5] * 128
    var4 = (var4 + ((temp_scaled * self._humidity_calibration[6]) / 100)) / 16
    var5 = ((var3 / 16384) * (var3 / 16384)) / 1024
    var6 = (var4 * var5) / 2
    calc_hum = (((var3 + var6) / 1024) * 1000) / 4096
    calc_hum /= 1000
    if calc_hum > 100:
      calc_hum = 100
    if calc_hum < 0:
      calc_hum = 0
    return calc_hum
  @property
  def altitude(self):
    pressure = self.pressure
    return 44330 * (1.0 - math.pow(pressure / self.sea_level_pressure, 0.1903))
  @property
  def gas(self):
    self._perform_reading()
    var1 = ((1340 + (5 * self._sw_err)) * (_LOOKUP_TABLE_1[self._gas_range])) / 65536
    var2 = ((self._adc_gas * 32768) - 16777216) + var1
    var3 = (_LOOKUP_TABLE_2[self._gas_range] * var1) / 512
    calc_gas_res = (var3 + (var2 / 2)) / var2
    return int(calc_gas_res)
  def _perform_reading(self):
    if (time.ticks_diff(self._last_reading, time.ticks_ms()) * time.ticks_diff(0, 1)
        < self._min_refresh_time):
      return
    self._write(_BME680_REG_CONFIG, [self._filter << 2])
    self._write(_BME680_REG_CTRL_MEAS,
      [(self._temp_oversample << 5)|(self._pressure_oversample << 2)])
    self._write(_BME680_REG_CTRL_HUM, [self._humidity_oversample])
    self._write(_BME680_REG_CTRL_GAS, [_BME680_RUNGAS])
    ctrl = self._read_byte(_BME680_REG_CTRL_MEAS)
    ctrl = (ctrl & 0xFC) | 0x01
    self._write(_BME680_REG_CTRL_MEAS, [ctrl])
    new_data = False
    while not new_data:
      data = self._read(_BME680_REG_MEAS_STATUS, 15)
      new_data = data[0] & 0x80 != 0
      time.sleep(0.005)
    self._last_reading = time.ticks_ms()
    self._adc_pres = _read24(data[2:5]) / 16
    self._adc_temp = _read24(data[5:8]) / 16
    self._adc_hum = struct.unpack('>H', bytes(data[8:10]))[0]
    self._adc_gas = int(struct.unpack('>H', bytes(data[13:15]))[0] / 64)
    self._gas_range = data[14] & 0x0F
    var1 = (self._adc_temp / 8) - (self._temp_calibration[0] * 2)
    var2 = (var1 * self._temp_calibration[1]) / 2048
    var3 = ((var1 / 2) * (var1 / 2)) / 4096
    var3 = (var3 * self._temp_calibration[2] * 16) / 16384
    self._t_fine = int(var2 + var3)
  def _read_calibration(self):
    coeff = self._read(_BME680_BME680_COEFF_ADDR1, 25)
    coeff += self._read(_BME680_BME680_COEFF_ADDR2, 16)
    coeff = list(struct.unpack('<hbBHhbBhhbbHhhBBBHbbbBbHhbb', bytes(coeff[1:39])))
    coeff = [float(i) for i in coeff]
    self._temp_calibration = [coeff[x] for x in [23, 0, 1]]
    self._pressure_calibration = [coeff[x] for x in [3, 4, 5, 7, 8, 10, 9, 12, 13, 14]]
    self._humidity_calibration = [coeff[x] for x in [17, 16, 18, 19, 20, 21, 22]]
    self._gas_calibration = [coeff[x] for x in [25, 24, 26]]
    self._humidity_calibration[1] *= 16
    self._humidity_calibration[1] += self._humidity_calibration[0] % 16
    self._humidity_calibration[0] /= 16
    self._heat_range = (self._read_byte(0x02) & 0x30) / 16
    self._heat_val = self._read_byte(0x00)
    self._sw_err = (self._read_byte(0x04) & 0xF0) / 16
  def _read_byte(self, register):
    return self._read(register, 1)[0]
  def _read(self, register, length):
    raise NotImplementedError()
  def _write(self, register, values):
    raise NotImplementedError()
class BME680_I2C(Adafruit_BME680):
  def __init__(self, i2c, address=0x77, debug=False, *, refresh_rate=10):
    self._i2c = i2c
    self._address = address
    self._debug = debug
    super().__init__(refresh_rate=refresh_rate)
  def _read(self, register, length):
    result = bytearray(length)
    self._i2c.readfrom_mem_into(self._address, register & 0xff, result)
    if self._debug:
      print("\t${:x} read ".format(register), " ".join(["{:02x}".format(i) for i in result]))
    return result
  def _write(self, register, values):
    if self._debug:
      print("\t${:x} write".format(register), " ".join(["{:02x}".format(i) for i in values]))
    for value in values:
      self._i2c.writeto_mem(self._address, register, bytearray([value & 0xFF]))
      register += 1
Uploading BME680 Library with uPyCraft IDE
Now, we will look at how to upload the BME680 library to ESP32 and ESP8266. This step is required because MicroPython itself does not contain the sensor’s library. Follow the steps in order to successfully upload the library to ESP32/ESP8266 in uPyCraft IDE:
- First, in the Tools section, click on the NEW FILE button and open a file.

- Then replicate the following BME680 library in that file.
- Name the file bme680.py and save it by choosing your desired directory.

- Now press the button DOWNLOAD AND RUN in the tools section.

As soon as you click on the download and run button, you will get the message that states “download ok”. Moreover, you will also see bme680.py file lists under device menue.

You have now successfully uploaded the BME680 library to ESP32/ESP8266 using uPyCraft IDE. After that, we can use the above library functions to read the Gas (VOC), Pressure, Temperature, Humidity from a sensor. You can use a similar procedure to upload files using Thonny IDE.
Uploading BME680 Library in Thonny IDE
If you are using Thonny IDE , open a new file and copy the code as we did in uPyCraft IDE.
- Save the file as bm680.py
- In addition, head over to Device> Upload Current Script with Current Name
In the latest version of Thonny IDE, you will get the option to save the library to a device when you click on the save as option.
You have successfully uploaded BME680 library to ESP32/ESP8266 using Thonny IDE.
BME680 Web Server Code: Display Temperature, Humidity, Gas, and Pressure
In this part of the user guide, we will learn how to display readings obtained from a BME680 on a web server using ESP32/ESP8266 NodeMCU and MicroPython firmware. Follow the steps in order to successfully display sensor readings on a local webserver.
- We will be required to make three files in our IDE.
- BME680.py
- boot.py
- main.py
Out of these three, we have already uploaded the BME680.py file to ESP32/ESP8266. This was the file that contains the BME680 library.
- Similarly, we will also upload a boot.py file. This contains all the major configurations like the setting up of Pins, I2C GPIOs, importing BM680 library, and importing other relevant libraries.
- Finally, we will upload the main.py file which contains our final code to configure the web server which runs after boot.py.

boot.py File
Copy the following code in your boot.py file and upload it your ESP board.
Note: Make sure to change the Wi-Fi name and password to the one you are currently using.
try:
  import usocket as socket
except:
  import socket

from time import sleep

from machine import Pin, I2C
import network

import esp
esp.osdebug(None)

import gc
gc.collect()

from bme680 import *

# ESP32 - Pin assignment
i2c = I2C(scl=Pin(22), sda=Pin(21))
# ESP8266 - Pin assignment
#i2c = I2C(scl=Pin(5), sda=Pin(4))

ssid = 'Enter your WiFi Name'
password = 'Enter your WiFi Password'

station = network.WLAN(network.STA_IF)

station.active(True)
station.connect(ssid, password)

while station.isconnected() == False:
  pass

print('Connection successful')
print(station.ifconfig())Importing MicroPython Libraries
In this code, we first import all the modules and from the modules, we import the necessary classes. After that, we define the I2C pins for ESP32 and ESP8266 board. We have set the default I2C GPIO pins for both. Next, we will connect to the network.
First, we will use sockets and the socket API of Python to develop our web server. Hence, we will import the socket library first.
try:
import usocket as socket
except:
import socket
Now, we will import the sleep class from the time module to include delays. We will also import I2C, network, BME680, and Pin libraries. As we have to connect our ESP32/ESP8266 board with Wi-Fi that is why we will also import the network library.
from time import sleep
from machine import Pin, I2C
import network
from bme680 import *
Vendor OS debugging messages are turned off through the following lines.
import esp
esp.osdebug(None)
In these lines, we are calling the garbage collector. Object memories which are no longer used by the system are reclaimed through this.
import gc
gc.collect()
Defining ESP32/ESP8266 GPIO Pins I2C
Now, we initialize the I2C method by giving it three arguments. The first argument specifies the GPIO pin for SCL. This is given as GPIO22 for ESP32 and GPIO5 for ESP8266. The second parameter specifies the GPIO pin for the SDA. This is given as GPIO21 for ESP32 and GPIO4 for ESP8266. Keep in mind, these are the default I2C pins for SCL and SDA which we have used for both the ESP boards respectively. The third parameter specifies the maximum frequency for SCL to be used.
# ESP32 - Pin assignment
i2c = I2C(scl=Pin(22), sda=Pin(21))
# ESP8266 - Pin assignment
#i2c = I2C(scl=Pin(5), sda=Pin(4))
Connect to WiFi Network
Make sure you enter your Wi-Fi name in SSID and your wi-fi password as well so that your esp board connects with your local network.
ssid = 'Enter your SSID name'
password = 'Enter your SSID password here'
In these lines, we are setting our ESP32/ESP8266 development boards as a WI-FI station.
station = network.WLAN(network.STA_IF) #Connecting to the networkIn order to activate our Wi-Fi station, we write the following line:
station.active(True)
These next lines, authenticate our Wi-Fi and password and only proceeds with the program code when the ESP board is properly connected.
station.connect(ssid, password)
while station.isconnected() == False:
pass
BME680 main.py
Now write the following code in a new file and save it as main.py. Make sure all your three files (bme680.py, boot.py, main.py) are uploaded to ESP32/ESP8266 and you can see them under the device option in uPyCraft IDE.
def web_page():
  bme = BME680_I2C(i2c=i2c)
  temp = str(round(bme.temperature, 2)) + ' C'
  hum = str(round(bme.humidity, 2)) + ' %'
  pres = str(round(bme.pressure, 2)) + ' hPa'
  gas = str(round(bme.gas/1000, 2)) + ' KOhms'
  html = """<html>
<head>
  <title>MicroPython BME680 Web Server</title>
  <meta http-equiv="refresh" content="10">
  <meta name="viewport" content="width=device-width, initial-scale=1">
  <link rel="stylesheet" href="https://use.fontawesome.com/releases/v5.7.2/css/all.css" integrity="sha384-fnmOCqbTlWIlj8LyTjo7mOUStjsKC4pOpQbqyi7RrhN7udi9RwhKkMHpvLbHG9Sr" crossorigin="anonymous">
  <link rel="icon" href="data:,">
  <style>
    html {font-family: Arial; display: inline-block; text-align: center;}
    p {  font-size: 1.2rem;}
    body {  margin: 0;}
    .topnav { overflow: hidden; background-color: #5c055c; color: white; font-size: 1.7rem; }
    .content { padding: 20px; }
    .card { background-color: white; box-shadow: 2px 2px 12px 1px rgba(140,140,140,.5); }
    .cards { max-width: 700px; margin: 0 auto; display: grid; grid-gap: 2rem; grid-template-columns: repeat(auto-fit, minmax(300px, 1fr)); }
    .reading { font-size: 2.8rem; }
    .card.temperature { color: #0e7c7b; }
    .card.humidity { color: #17bebb; }
    .card.pressure { color: hsl(113, 61%, 29%); }
    .card.gas { color: #5c055c; }
  </style>
</head>
<body>
  <div class="topnav">
    <h3>MicroPython BME680 WEB SERVER</h3>
  </div>
  <div class="content">
    <div class="cards">
      <div class="card temperature">
        <h4><i class="fas fa-thermometer-half"></i>Temp. Celsius</h4><p><span class="reading">""" + temp+ """</p>
      </div>
      <div class="card humidity">
        <h4><i class="fas fa-tint"></i> Humidity</h4><p><span class="reading">""" + hum + """</p>
      </div>
      <div class="card pressure">
        <h4><i class="fas fa-angle-double-down"></i> PRESSURE</h4><p><span class="reading">""" + pres +"""</p>
      </div>
      <div class="card gas">
        <h4><i class="fas fa-wind"></i> Gas</h4><p><span class="reading">""" + gas + """</p>
      </div>
    </div>
  </div>
</body>

</html>"""
  return html

s = socket.socket(socket.AF_INET, socket.SOCK_STREAM)
s.bind(('', 80))
s.listen(5)

while True:
  try:
    if gc.mem_free() < 102000:
      gc.collect()
    conn, addr = s.accept()
    conn.settimeout(3.0)
    print('Got a connection from %s' % str(addr))
    request = conn.recv(1024)
    conn.settimeout(None)
    request = str(request)
    print('Content = %s' % request)
    response = web_page()
    conn.send('HTTP/1.1 200 OK\n')
    conn.send('Content-Type: text/html\n')
    conn.send('Connection: close\n\n')
    conn.sendall(response)
    conn.close()
  except OSError as e:
    conn.close()
print('Connection closed') Create Web Page to Display BM280 Sensor Readings
We start off our program code by defining a web_page() function. In order to build our web page, we have to create an HTML document that sets up the web page. This HTML variable is returned through the web_page function which we will discuss later.
def web_page():Inside the web_page() function, we create an object of the BME680 method named bme and specify the I2C communication protocol to read data from a sensor. You can also specify SPI pins if you are using SPI to get BME680 sensor readings.
bme = BME680_I2C(i2c=i2c)
After that, get the sensor reading by using an object “bme” on temperature, humidity, pressure, and gas methods. Also save these values in temp, hum, pres, and gas string variables.
temp =str(round(bme.temperature, 2)) + ' C'
hum = str(round(bme.humidity, 2)) + ' %'
pres = str(round(bme.pressure, 2)) + ' hPa'
gas = str(round(bme.gas/1000, 2)) + ' KOhms
HTML and CSS File
In this HTML document, we use cards, paragraphs, links, icons, headings and title tags to create a web page. This web page displays temperature, humidity, gas (VOC) or Indoor air quality (IAQ) and pressure readings of BME680 sensor.
<html>
<head>
  <title>MicroPython BME680 Web Server</title>
  <meta http-equiv="refresh" content="10">
  <meta name="viewport" content="width=device-width, initial-scale=1">
  <link rel="stylesheet" href="https://use.fontawesome.com/releases/v5.7.2/css/all.css" integrity="sha384-fnmOCqbTlWIlj8LyTjo7mOUStjsKC4pOpQbqyi7RrhN7udi9RwhKkMHpvLbHG9Sr" crossorigin="anonymous">
  <link rel="icon" href="data:,">
  <style>
    html {font-family: Arial; display: inline-block; text-align: center;}
    p {  font-size: 1.2rem;}
    body {  margin: 0;}
    .topnav { overflow: hidden; background-color: #5c055c; color: white; font-size: 1.7rem; }
    .content { padding: 20px; }
    .card { background-color: white; box-shadow: 2px 2px 12px 1px rgba(140,140,140,.5); }
    .cards { max-width: 700px; margin: 0 auto; display: grid; grid-gap: 2rem; grid-template-columns: repeat(auto-fit, minmax(300px, 1fr)); }
    .reading { font-size: 2.8rem; }
    .card.temperature { color: #0e7c7b; }
    .card.humidity { color: #17bebb; }
    .card.pressure { color: hsl(113, 61%, 29%); }
    .card.gas { color: #5c055c; }
  </style>
</head>
<body>
  <div class="topnav">
    <h3>MicroPython BME680 WEB SERVER</h3>
  </div>
  <div class="content">
    <div class="cards">
      <div class="card temperature">
        <h4><i class="fas fa-thermometer-half"></i>Temp. Celsius</h4><p><span class="reading">""" + temp+ """</p>
      </div>
      <div class="card humidity">
        <h4><i class="fas fa-tint"></i> Humidity</h4><p><span class="reading">""" + hum + """</p>
      </div>
      <div class="card pressure">
        <h4><i class="fas fa-angle-double-down"></i> PRESSURE</h4><p><span class="reading">""" + pres +"""</p>
      </div>
      <div class="card gas">
        <h4><i class="fas fa-wind"></i> Gas</h4><p><span class="reading">""" + gas + """</p>
      </div>
    </div>
  </div>
</body>

</html>
This meta-tag http-equiv provides attributes to HTTP header. The http-equiv attribute takes many values or information to simulate header response. In this example, we use the http-equiv attribute to refresh the content of the web page after every specified time interval. Users aren’t required to refresh the web page to get updated sensor values. This line forces the HTML page to refresh itself after every 10 seconds.
<meta http-equiv="refresh" content="10">We have explained rest o the HTML and CSS part of in our previously published articles. You can read these articles here:
- ESP32/ESP8266 MicroPython Web Server – Control Outputs
- MicroPython: DHT11/DHT22 Web Server with ESP32/ESP8266
- MicroPython: DS18B20 Web Server with ESP32/ESP8266(Weather Station)
BME680 Web Server with MicroPython Socket API
In these lines of code, we create a socket object called ‘s’. This is formed by creating a socket and stating its type.
s = socket.socket(socket.AF_INET, socket.SOCK_STREAM)By using the bind() method, we will bind the socket with an address. We are passing two parameters. The first one is an empty string ‘ ’, which specifies our ESP32/ESP8266 board and the second parameter is the port which we have stated as ‘80’.
s.bind(('', 80))Now we are creating a socket used for listening. We have passed ‘5’ as the parameter which means that 5 is the maximum number of queued connections.
s.listen(5)Next, we use an infinite loop through which we will check when a user connects to the web server. In order to accept the connection, the accept() method is used. A new socket object is saved in the conn variable and it also saves the address there.
while True:
  try:
    if gc.mem_free() < 102000:
      gc.collect()
    conn, addr = s.accept()
    conn.settimeout(3.0)
print('Got a connection from %s' % str(addr))
By using send() and recv() methods, we exchange the data between the user and the web server. A request variable is created which saves it in the newly created socket.
request = conn.recv(1024)
conn.settimeout(None)
request = str(request)
Prints the whatever data is present in the request variable.
print('Content = %s' % request)The variable ‘response’ contains the HTML text
response = web_page()By using send() and sendall() methods, we will be sending the response to the socket user.
conn.send('HTTP/1.1 200 OK\n')
conn.send('Content-Type: text/html\n')
conn.send('Connection: close\n\n')
conn.sendall(response)
This line closes the connection with the socket which was created.
conn.close()
except OSError as e:
conn.close()
print('Connection closed')
In summary, we created a web server with ESP32/ESP8266 which could handle HTTP requests from a web client. Whenever the ESP32 or ESP8266 board received a request on its IP address, the program code creates a socket which in turn responds to the client request with an HTML page to display the current readings on the BME680 sensor regarding temperature, humidity, and pressure.
BME680 MicroPython Web Server Demo
To test the MicroPython BME680 web server with ESP32 and ESP8266, upload all the files to ESP32/ESP8266. After uploading MicroPython scripts, click on Enable/Reset button of ESP32:

Sometimes later, your ESP board will make a connection with your WiFi router and shows a “successful connection” message and also prints the IP address on the MicroPython shell as follows:

Now, open your web browser either on your laptop or mobile and type the IP address which we have found in the last step. As soon as you type the IP address on your web browser and hit enter. The ESP32/ESP8266 web server will receive an HTTP request. The web page function will be called.
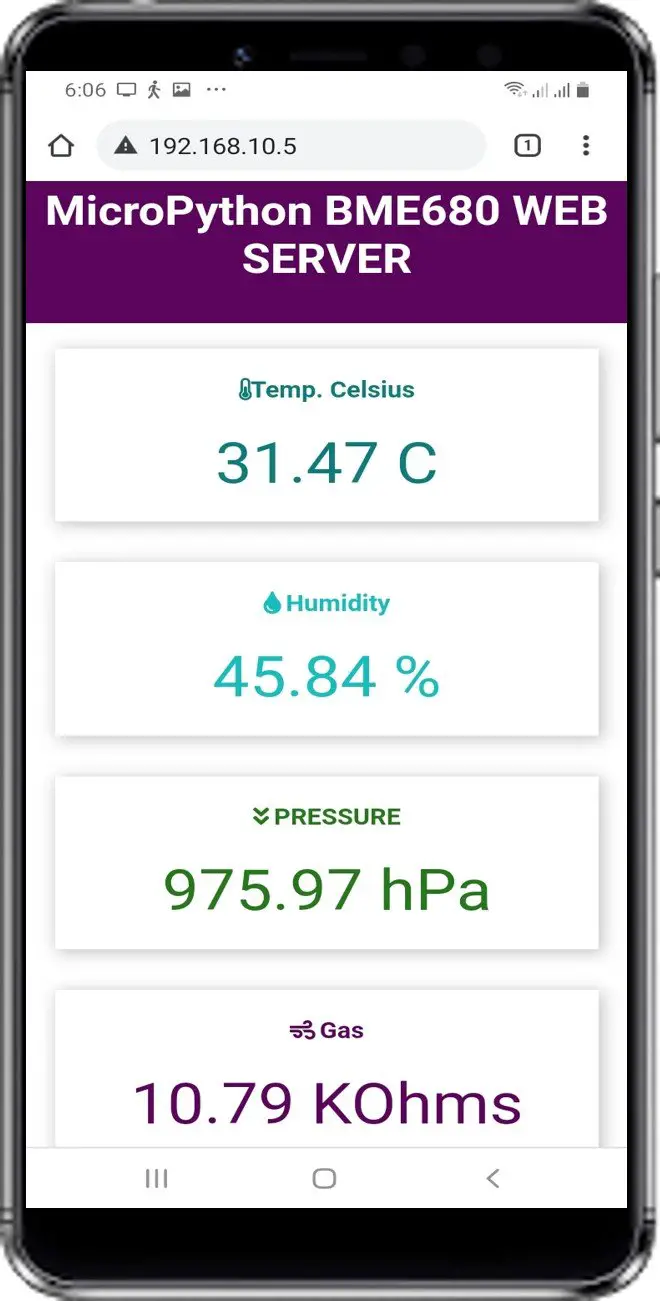
You will see the web page with the latest BME680 sensor values in your web browser:

On Mobile, you will see web page with BME680 sensor readings like this:
Video Demo:
More MicroPython tutorials:
- MicroPython: DS18B20 Web Server with ESP32/ESP8266(Weather Station)
- ESP32/ESP8266 MicroPython Web Server – Control Outputs
- MicroPython: DHT11/DHT22 Web Server with ESP32/ESP8266
- MicroPython: Timers with ESP32 and ESP8266
- ESP32/ESP8266 ADC with MicroPython
- MicroPython: Interrupts with ESP32 and ESP8266
- Push Button with ESP32 and ESP8266 using MicroPython
- MicroPython: PWM with ESP32 and ESP8266