Tutorial 2: Programming Arduino with LabVIEW: In this tutorial, we will walk you through the process of programming Arduino using LabVIEW. This step-by-step tutorial will help you bridge the worlds of physical computing and graphical programming, allowing you to see the power of LabVIEW’s visual programming language to control and interact with your Arduino projects. Whether you’re a beginner or an experienced Arduino developer, this tutorial will help to integrate LabVIEW’s capabilities into your Arduino tutorials and projects.
In our last tutorial, we learned how to get started with LabVIEW. We answered questions such as “What is LabVIEW?” and “How does its program look?” We also covered how to create our first program in LabVIEW. In this tutorial, we will focus on the interfacing of LabVIEW and Arduino. We will delve into the process of connecting these two platforms.
- Necessary software required for interfacing LabVIEW and Arduino?
- How to make a program in LabView, upload it to Arduino, and control it through the user interface?
Recommended Components
The following components are used in this project or are helpful for building it with the Arduino.
| Component | How it’s used in this project | Buy on Amazon |
|---|---|---|
| Arduino Uno R3 | The main board that runs the sketch and controls all the components in this project. | Check Price |
| Breadboard | A solderless breadboard for prototyping and wiring the circuit without soldering. | Check Price |
| Jumper Wires | Male-to-male jumper wires to connect the Arduino to the breadboard and modules. | Check Price |
As an Amazon Associate we earn from qualifying purchases. Prices and availability are accurate as of the date/time indicated and are subject to change.
What is Arduino?
Arduino is an open-source hardware board with many open-source libraries to interface its onboard microcontroller with various external components like LED, motors, LCD, keypad, Bluetooth module, GSM module, and many other devices one wishes to interface with the Arduino board. Arduino is basically made from a microcontroller, but it has all the necessary external sockets to connect with other devices, and it also has a built-in programmer that is used to program the Arduino from a computer. Therefore, Arduino is a complete board that includes everything needed to connect with external peripherals and is easy to program through a computer. There are many Arduino boards available, but in this article, I will give you a brief review of the popular Arduino UNO R3 board, which is widely used among engineering students.
Arduino is one of the most excellent electronic platforms of the 21st century; it has revolutionized the entire microcontroller system into a small and handy device. It is an open-source hardware that anyone can use due to its user-friendly nature and ease of use. Arduino can be used to create complex projects with simple programming algorithms. It not only allows users to design and develop projects but also enables them to test prototypes and hardware extensively. The hardware consists of different microcontrollers depending on the model being used, along with other electronic components. These can be programmed using the Arduino IDE, allowing users to accomplish a wide range of tasks, from simple LED glow experiments to building advanced systems like Mars Rovers and Drones. The human-friendly nature of the Arduino language makes it easier for individuals to build prototypes and hardware for their own interests or for industrial purposes. Additionally, Arduino utilizes a simplified version of C++ which further facilitates program development.
Arduino is intended for people who want to play, experiment, and build complex hardware without needing extensive programming skills or algorithmic knowledge. It is the best open-source platform currently available in the market and has sparked a revolution in its usage and popularity. Being open-source hardware, many programs and software are readily available on the internet. The development cost of Arduino is extremely low compared to other major microcontrollers in the market.
The software files include the basic programs for beginners in their source code libraries. Users can use them to make their projects versatile and can further edit the programs to improve their capabilities. It also has a strong online community platform for help and support.
Following are the main features of Arduino UNO which we will use in our tutorials:
- 14 digital IO (6 can be PWM outputs)
- 32KB program memory
- 6 Analog Inputs (10-bit resolution)
- Interfacing port
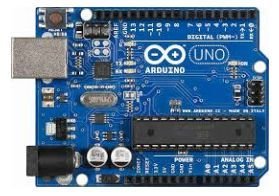
Fig. 1: Arduino UNO Board
How Labview Makes Arduino Programming simple and useful?
LabVIEW simplifies and enhances Arduino programming by providing a visual programming environment that streamlines the process of creating, testing, and deploying Arduino projects. Here’s how LabVIEW achieves this:
Graphical Programming: LabVIEW’s visual programming paradigm replaces traditional lines of code with graphical representations of functions and logic elements. This intuitive approach allows users to drag and connect icons representing various functions, sensors, and actuators, eliminating the need for extensive coding knowledge.
Abstraction of Complexity: With LabVIEW, the complexities of low-level Arduino programming, such as memory management and timing issues, are abstracted. This enables users to focus on the high-level logic and functionality of their projects rather than getting bogged down in intricate technical details.
User-Friendly Interface: LabVIEW’s drag-and-drop interface simplifies the creation of user interfaces for controlling and monitoring Arduino projects. Users can quickly design custom graphical interfaces with buttons, sliders, graphs, and other interactive elements without writing code.
Easy Hardware Integration: LabVIEW offers pre-built libraries and tools for interfacing with various hardware, including Arduino boards. This eliminates the need for manual configuration and coding when connecting and communicating with Arduino peripherals.
Real-Time Feedback: LabVIEW provides real-time visualization of data, enabling users to see sensor readings, control outputs, and monitor variables in real-time. This feature is invaluable for troubleshooting and understanding the behavior of the Arduino system.
Modularity and Reusability: LabVIEW promotes modular design by allowing users to encapsulate functionality into subVI (sub-virtual instrument) blocks. These modular components can be reused across projects, enhancing efficiency and maintainability.
Wide Range of Applications: LabVIEW can be used for a diverse array of applications, from simple sensor monitoring to complex control systems and data analysis. This versatility makes it an ideal tool for various industries and research domains.
In essence, LabVIEW’s visual programming approach and integrated tools simplify the process of programming Arduino boards, making it accessible to a wider audience, including those without extensive programming backgrounds. It accelerates development, enhances understanding, and empowers users to bring their Arduino-based ideas to life efficiently and effectively.
Required Softwares
Here is the list of software you need to install for interfacing Arduino and LabVIEW. All the software is free and easily available.
- Arduino IDE
- LabVIEW
- Visual Package Manger (You might already have it if you installed LabVIEW. If not download it.)
- LabVIEW Interface for Arduino(Present in Visual Package Manger. Download and install it)
- NI-VISA Package
After installation test your installation using a sample program at the “finish” dialogue box.
Write Your First Labview Program for Arduino
In this section, we will create an example to control an onboard LED of Arduino using a Push Button GUI that we will create in LabVIEW.
- Start the LabVIEW.
- Create Blank VI as in Tutorial 1.
- Go to “Block Diagram” Panel
- Right click on white space. Go to “Arduino” and select “init”.
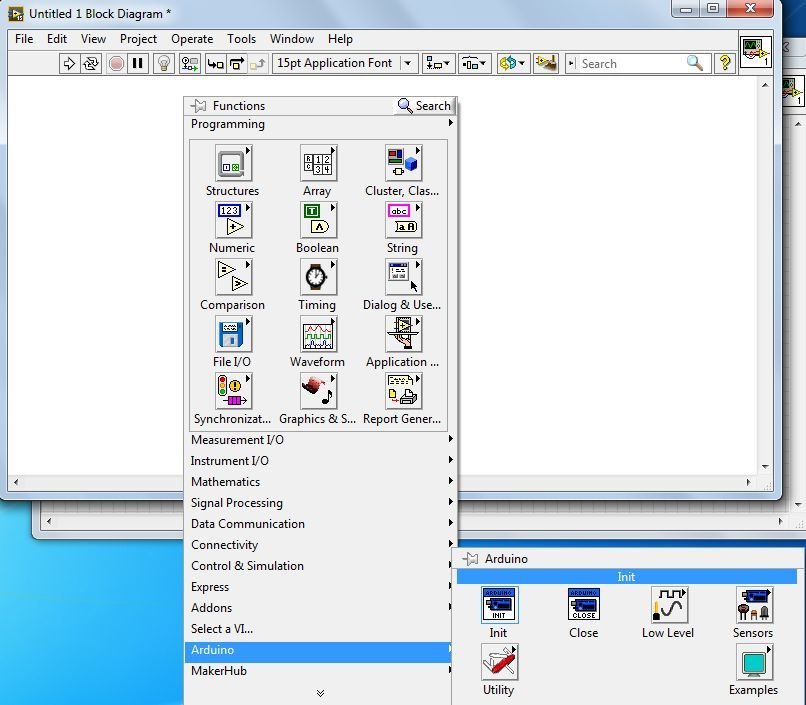
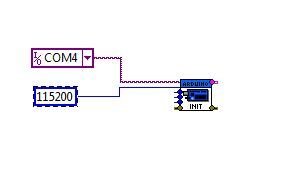
Bring the cursor to anywhere in the “Block Diagram” panel and place the “Init”.

The first input is “VISA resource”. It is the serial port you are using for interfacing with Arduino. You can find it in the “Device Manager” of your computer under “Ports (COM & LPT)…”. Make sure the Arduino board is connected to the computer, otherwise, it won’t be shown. In my case, it is COM4.
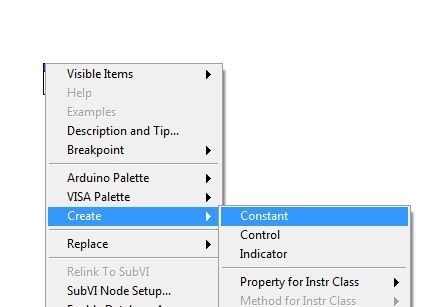
Bring the cursor on the first input of “Init” until it shows “VISA resource”. Right-click on it. Go to “create” and select “constant”. This will be a constant value of the Port that will always be used for serial communication.
Click on the arrow. It will show the available options. In my case, it’s “COM4”. Select the appropriate one after checking from Device Manager as mentioned above; otherwise, it won’t work.

Second input is “Baud Rate”. Create it as constant as done for “VISA resource”. Right click on “Baud Rate” then “create” and then “constant”.

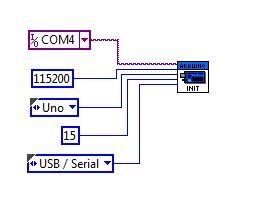
The third input is “Board Type”, the fourth is “Bytes per packet”, and the fifth is “Connection type”. Make them also constant.
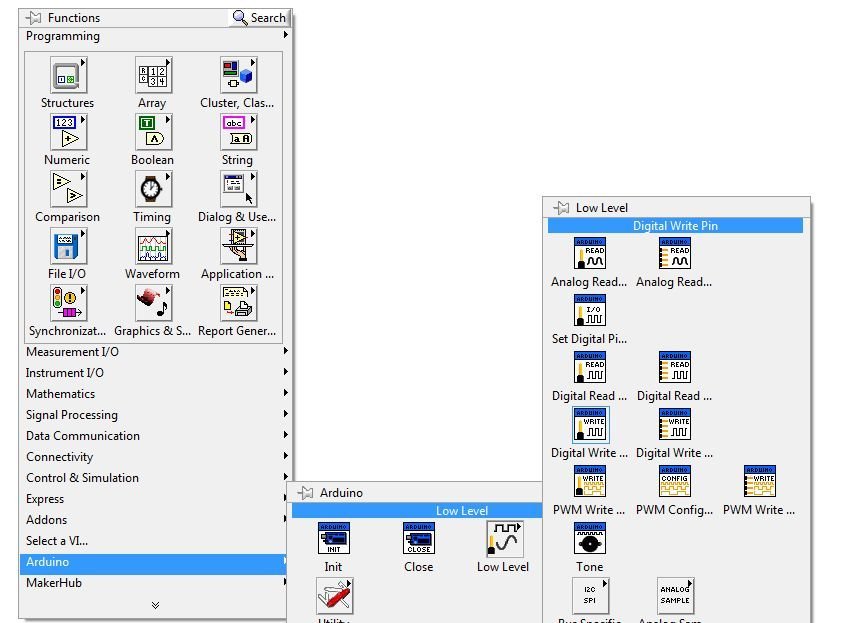
Click on the white space on the “Block Diagram” and then navigate to “Arduino → Low Level → Set Digital Pin”.

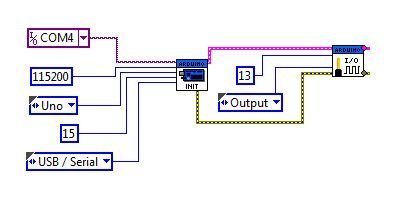
Place “Set Digital Pin” on “Block Diagram” and join the “Arduino resource” of both blocks. Create “digital I/O pin” as a constant and write 13 in it. This will be the pin we will control. Make the second input “Pin Mode” as a constant and select the output from the drop-down menu. This means the pin will work as an output pin. Join the “error in” with the “error out” of the other block. If any error occurs in the previous block, it will be transferred to the next block. We will elaborate on its purpose at the end of the article.
This is the code that we execute in the setup loop of an Arduino program. Click on the white space in the “Block Diagram” section and select “Arduino → Low Level → Digital Write”. Place the “Digital Write” block on the diagram.
“Now next, as we do in programming, we place the digitalWrite function in the void loop. We will do the same here. Click on the white space on the ‘Block Diagram’ and select ‘Structure’ -> ‘While loop’.”

Draw a rectangle on the “Block Diagram” and click on the red color round icon called “loop condition”. Create a constant by right-clicking on it. It will show a “STOP” icon on the diagram. 
Bring “Arduino Resources: Error Out and Pin 13” on a rectangle.
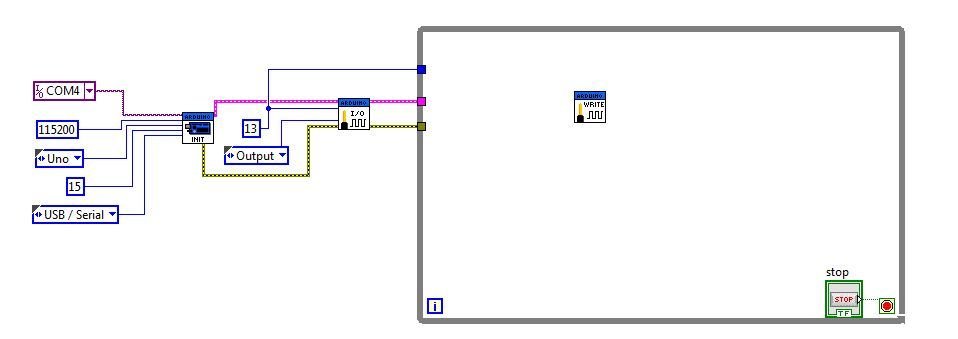
Connect “Resources with Resources”, “Error with Error”, and “Digital IO with Pin 13”. 
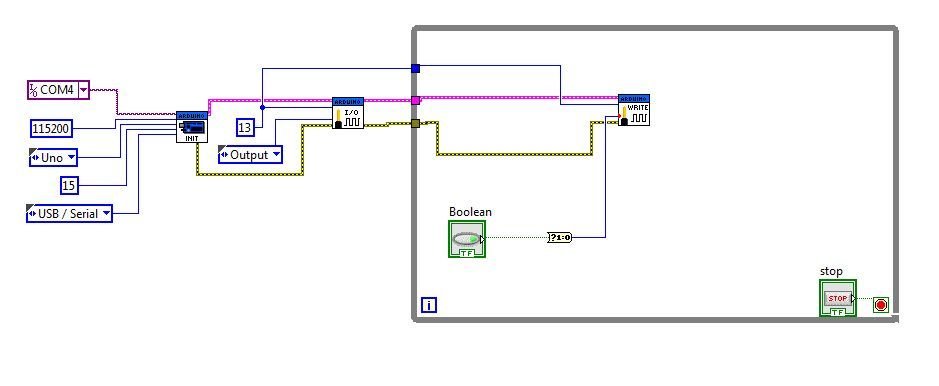
For creating the “value” input, go to the Front Panel. Right-click on “silver” -> Boolean -> Push Button and place it in the Front Panel. It will also be shown in the “Block Diagram” automatically.

Bring the Boolean in while loop and find “Boolean to (0,1)” as follows.
Place “Boolean to (0, 1)” in “Block Diagram” and connect as shown.
Find “Close Block” as Follows.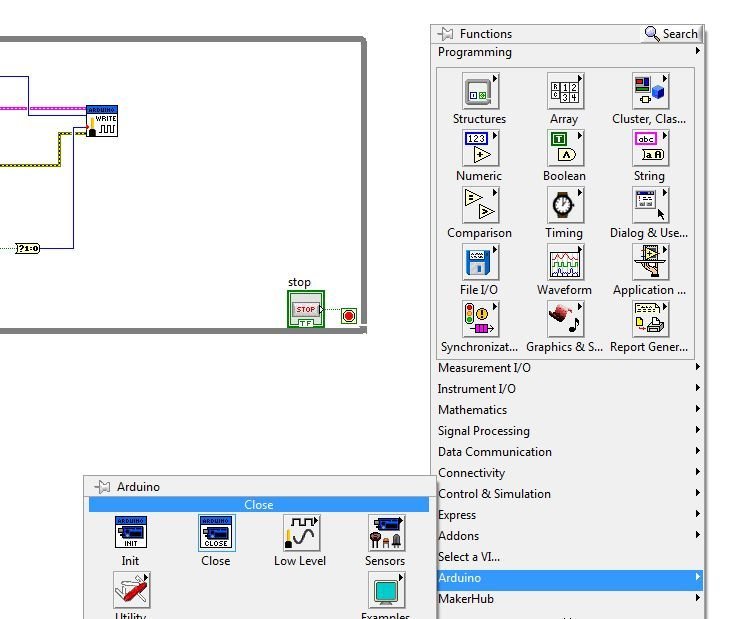
Connect Close Block as Follows.
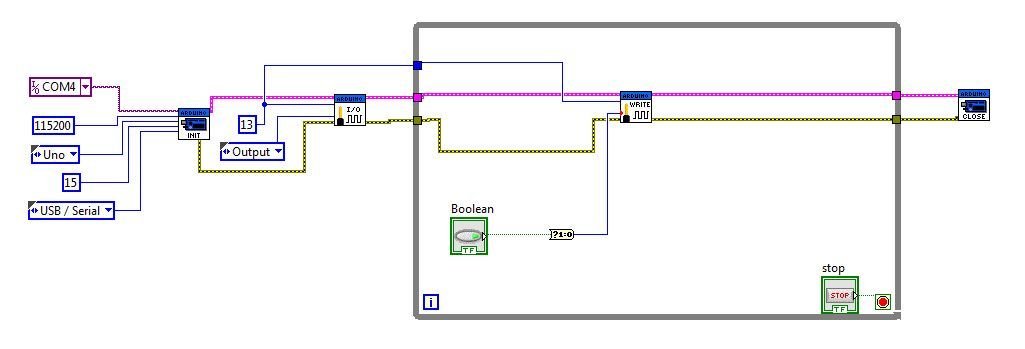
Upload Labview Generated Arduino Code to Arduino Board
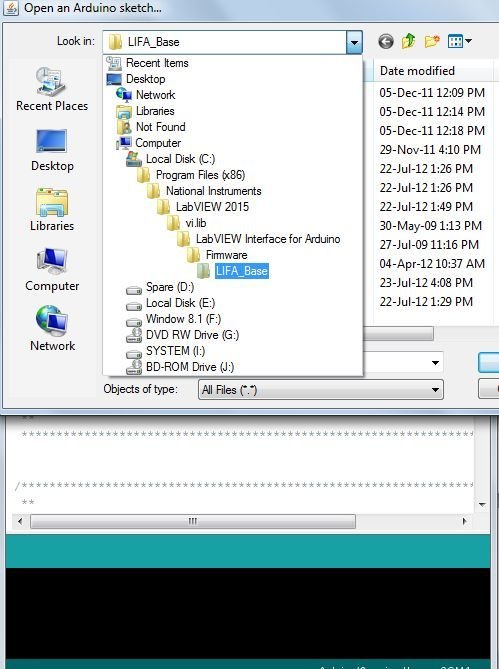
Now Start Arduino IDE. Click “File” then “Open” and Follow as shown. Go through all these folders from “Computer” onward and open the LIFA_BASE Arduino file.
- Upload the program by clicking the arrow button on top of the Arduino IDE.
- Once the upload is complete, close the Arduino IDE. It is very important to close it because both LabVIEW and Arduino are using COM4. If it is not closed, LabVIEW will not be able to communicate and it may crash.
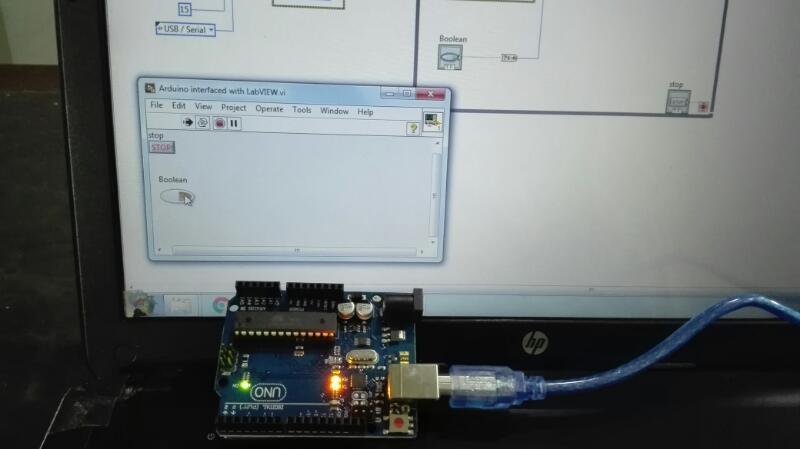
- Now go to the Front Panel in LabVIEW and run the program.
- Once both the Tx and Rx lights are on, press the Boolean button on the front panel of the Arduino board. You will observe that the LED on the board, connected to pin 13, turns on when the push button on LabVIEW is pressed once. Pressing it again will send a 0, turning the LED off.
Video Demo:
Hi
thank you
As I know this method VISA is old and not supported any more since I have tride many times with teo arduinos Uno but it fail till I found Linx firmware which easy to communicate with arduino but not all sensors are found in the list
Best regards
but Linx still need VIS not possible without VISA
hi
i try to make project
leveling see tank or water control pump with labview arduino
please sample project need
SALUT je suis un débutant j’ai essayé votre tutoriel pour pouvoir interfacer arduino mais il ne fonctionne pas .et j’ai des erreurs vous pouvez m’aider svp.merci
voici l’erreur:
LabVIEW: (Hex 0xBFFF009E) VISA or a code library required by VISA could not be located or loaded. This is usually due to a required driver not being installed on the system.
how to download lifa_base file???can you provide the link please asap
Is board type “Leonardo” impossible to include?
What version of Labview was this tutorial for? The first step is no longer available in the 2024 Q3 version …