In this tutorial, we will learn how to read and write data from and to text files (with .txt extension) in LabView. At the start, we have provided a simple and explanatory introduction to the text files, their uses, and why we need to read and write data on them. After that, their functionality in LabView is explained with the help of a VI and an example block diagram in the explanation section. At the end of the tutorial, we have provided an exercise for you to do on your own, and in the next tutorials, we will assume that you have done those exercises, and we will not explain the concept regarding them.
Introduction to Text Files in LabVIEW
A computer file that is structured as a sequence of lines of electronic text is known as a text file. An old alternative name is “flat file”. Data can be stored within a computer file with the help of a text file.
The easiest format to use and share data is text files. Writing to and reading from a text file can be done on a computer. Almost every simple text-based program can read and write data to a text file. Data to be processed in text files is of type string.
In LabView, data from your devices can be stored permanently in a text file using simple file I/O function blocks. We can create a text file, open it, write data to a text file, read data from a file, and after all this, close a text file in LabView, as we will discuss shortly in this tutorial.
How to Read and Write to Text Files in LabVIEW
We will now explain the workings of LabVIEW when used with a text file. This will help us understand the main purpose of this tutorial in detail. Try to do all the exercises in the tutorial on your own for a better understanding of this tutorial. Create a new blank VI and save it for future use, as we have been doing in every tutorial.
Writing Data to a Text File in LabVIEW
From the Control Palette on the Front Panel, select String & Path, then select String Control. Now place it on the Front Panel as shown in the figure below.

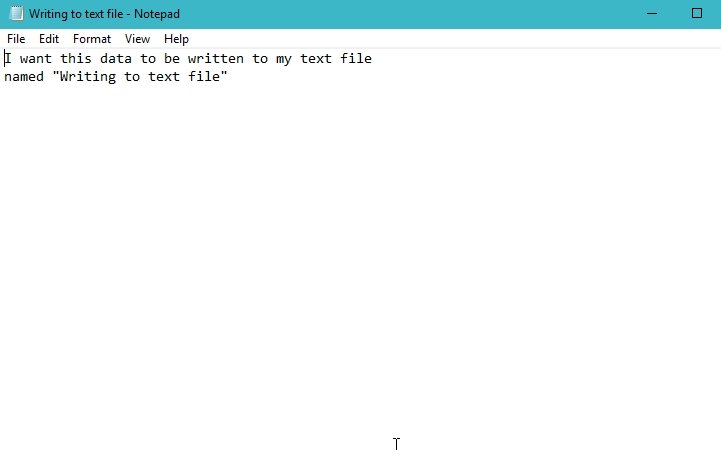
Extend its size and rename it according to the need, as in this case I have named it “Data to be written to text file”, and write the string or data inside the string control that you want to be written to your text file. In this case, I have written “I want this data to be written to my text file named “Writing to text file””.

From the function palette select File I/O and then select write to text file block as shown in the figure below,

Text File Block
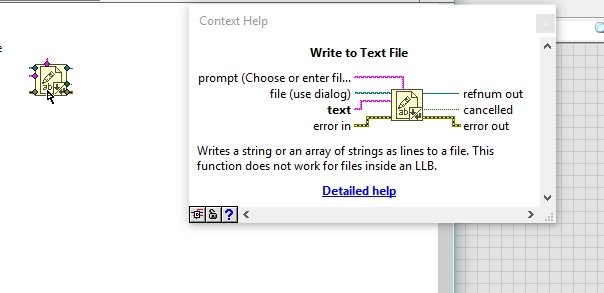
The write-to-text file block is shown in the figure below,

If you want to know about the pins present at the input or output sides of a block simply click on the question mark at the top right corner of the block diagram as shown in the figure below,

A window will appear, after that hover over the block about which you want to know, and the details about that block will appear in the help window as shown in the figure below,
Connect the string control you created previously to the pin named as text in the above diagram and at the pin named as file(use dialog) in the above figure, create a control as we have done before, this will automatically create a file path control as shown in the figure below,

We haven’t discussed these types of controls so far but in this tutorial, you will learn how to use them too. On the front panel, this path control will have a window and a browsing button as shown in the figure below,

Choosing File
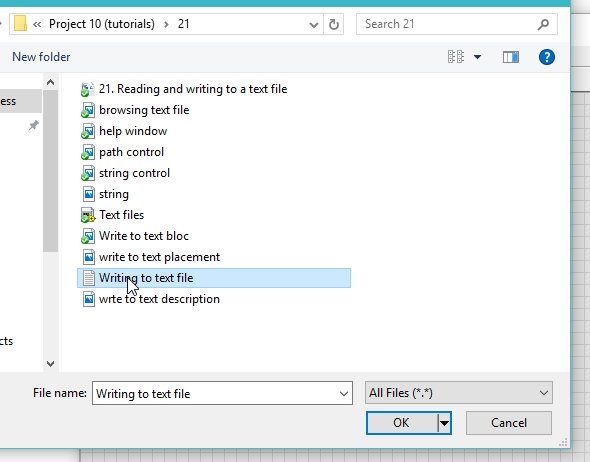
This button will allow you to browse the text file to which you want to write the data in the string you created previously as shown in the figure below,
Doing so will display the path of this file in your computer on the window of the ath control as shown in the figure below,

Running this VI will write the data that is written in the string control to the text file whose path you have specified. Open the text file and check whether the data has been written to it or not. Refer to the figure below:
Reading Data from a Text File in LabVIEW
Now if we want to read the same text file click right on the write to text file block, from the drop-down select replace then select file I/O palette and from that palette select read from text file as shown in the figure below,

The read to text block is shown in the figure below,

Again, open the help window and review the pin details of this block. Also, delete the string control you created in the “writing to text file” example. The figure below shows the description of the pins of the “read to text file” block in the context help window.

At the output pin named as text, click right and from the dropdown select create and then select an indicator, see the figure below,

Rename the indicator and on the front panel window resize the string indicator you just created. Now run the VI and the VI will read data from the text file (to which you have written date recently) and print it in the indicator as shown in the figure below,

You can also open a text file, create a text file or replace it using a block from the palette named open/create/replace a file. From the function palette select file I/O and then select open/create/replace file. Hence, this block will help us create a new text file in the path you specified in the path control as shown in the figure below,

Lastly, we will close the file using a block named close file from the same section in function block as shown in the figure below,

Exercise
Create and open a file using the “open/create/replace” block. Now write data in it using the “write to text file” block. After this, read data from it using the “read to text file” block. Finally, close it using the “close file” block in the same VI.
(Hint: Use the context help window to see the pin names of the blocks you haven’t used already)
Conclusion
In conclusion, this tutorial provided a comprehensive overview of reading and writing data from and to text files in LabVIEW. We explored the concept of text files, their uses, and why they are important in data processing. The tutorial then delved into the step-by-step process of writing data to a text file using LabVIEW’s file I/O function blocks, including creating a string control, connecting it to the write to text file block, and specifying the file path. Similarly, we covered the process of reading data from a text file using the read from text file block. Lastly, the tutorial emphasized the importance of practicing the exercises provided to solidify the understanding of the concepts discussed. By following this tutorial, users can effectively manipulate text files in LabVIEW for data management and analysis.
You may also like to read
- Set ESP32 Custom Hostname with Arduino IDE
- FreeRTOS Event Groups – Tasks Synchronization Example with Arduino
- I2C LCD interfacing with ESP32 and ESP8266 in Arduino IDE
- SEPIC Converter Proteus Simulation
- ESP32 HTTPS Requests using Arduino IDE
This concludes today’s article. If you face any issues or difficulties let us know in the comment section below.
Hello there, I had try your tutorial. But I do not get any text in the text file folder. Is there anything that I had missed?
you must be missing some components connection. Make sure to check them again