16×2 LCD is a 32 digits display screen for all kinds of CMOS/TTL devices. This word comes from the liquid crystal and 16X2 represents its screen size. In Liquid crystal display 16×2, there are 2 rows and 16 columns. Besides, 5×8 pixel makes a single digit. Any digit from ASCII code is viewable on the module. It supports the custom signs and designs but those require some specific methods and have some limitations. This display module has too much use in most of the commercial projects and there is almost a library in every programming language about it. The premade libraries made it easy to interface with other devices.
Pinout Diagram 16×2 LCD
There are two sections pins on the whole 16×2 LCD module. Some of them are data pins and some are command pin. Somehow, every pin has a role in controlling a single pixel on the display. Additionally, all the input/output pins of this module are shown in the pinout diagram:

16×2 LCD Pin Configuration and Working of Each Pin
Power Pins
| PINS | DETAILS | |
|---|---|---|
| Pin1 | VSS | It’s a ground pin for common grounds. |
| Pin2 | VDD | The power pin will use for voltage input to the 16X2 LCD. |
Control Pins
| PINS | DETAILS | |
|---|---|---|
| Pin3 | VE | Pin 3 will connect with power and ground through 3 pin potentiometers. It will help to control the contrast of PIXELS according to the 16X2 LCD light. |
| Pin4 | RS | This pin is known as a register select pin. It helps to toggle the command/data register. |
| Pin5 | R/W | The signal on Pin5 will decide whether it is going to read from LCD or write on it. |
| Pin6 | EN | Enable pin will help to transfer the instruction from the data pins and another command pin to the LCD. It act as permission to internal registers. |
Data Pins
| PINS | DETAILS | |
|---|---|---|
| Pin7 | D0 | D0-D1 is the first 4 bits input pins of the 8-bit input data to the LCD. |
| Pin8 | D1 | |
| Pin9 | D2 | |
| Pin10 | D3 | |
| Pin11 | D4 | D4-D7 pins use to give the input of least 4-bit of the data. In some cases, alone usage of the least 4-pins can make the device functional. |
| Pin12 | D5 | |
| Pin13 | D6 | |
| Pin14 | D7 |
Led Pins
| PINS | DETAILS | |
|---|---|---|
| Pin15 | +ve | The LCD comes in multiple colors and every time in different LCD the color will depend on the internal LED. Pin15 is for the power input of the LED. |
| Pin16 | -ve | Pin16 is the ground pin of the LED. |
16×2 Liquid Crystal Display Constructions
In the LCD the registers are used to store the data and commands. The command registers store the data of different functions that can be performed on the screen. The Data registers help to store the data and then pass it to the controller. The Data and command registers are only able to store the operation of basic light control. The liquid crystals are placed between the two glass sheets on the screen. The two sheets are also placed between these sheets. The sheets are used to stop the light.


Working Principal
The basic principle in LCD is by the passing of light from one layer (sheet) to another layer with the use of modules. The modules vibrate and align their position at 90 degrees, which allows the polarized sheet to pass the light through it. The molecules are responsible for showing the data on each pixel. Each pixel uses the light-absorbing method to show the digit. To show the value, molecules need to change their position to change the angle of light. So this deflection of light will make the human eye see the light of the remaining part which will make the dark part as a value and digits on the grid pixels. The data, we can see, will be the part where the light gets absorbed. The data will pass towards the molecules and will be there until they are changed.
How to Us 16×2 LCD?
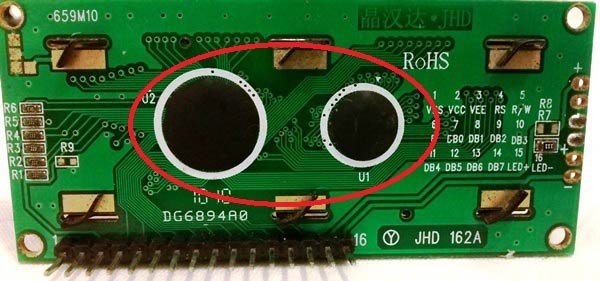
The LCD consists of Data, Command and control registers. All the register helps to control the different kinds of functions on the LCD. The data and command registers take the input from digital pins D0-D7. Then controls pins help to differentiate between command/data registers. The LCD is made up of liquid crystals and the below image represents the two ICs which makes it control the LCD with the external devices.
To control the LCD there are two kinds of methods. The first method is by understanding the internal registers operating method and then use it. Therefore, the second method is easy and simple. in this method, the only Library needs to use. Due to the wide usage of LCD in almost every field, All the boards and microcontrollers have LCD libraries. In both cases, the control method and circuits will different.
16×2 LCD Direct Programming Method
To control the LCD without library all the 8 digital pins need to use. So, first, understand the control pins how they should operate. The first pins are the RS pin which helps to differentiate between command/data register. After connecting the data at digital input, it will go to the data or command register. If there is LOW input on RS pin then data will transfer to the command registers and If there is a HIGH input state at that pin then data will transfer at the data registers. The different kinds of data at the digital pins, will responsible for different functions on the LCD. All the commands of LCD with their functions are:
Commands List
| HEX CODE | FUNCTIONS |
|---|---|
| 0F | Turn on the Display and Cursor |
| 01 | It will clear the screen |
| 02 | The cursor will return at the (0,0) position |
| 04 | It will shift the cursor to the left |
| 06 | It will shift the cursor to the right |
| 05 | The display will shift to the right |
| 07 | The display will shift to the left |
| 0E | The display will on and the cursor will start blinking |
| 80 | The following command will force the cursor to start at the beginning |
| C0 | It will make the cursor to start from the second line |
| 38 | For 5×7 Matrix with 2 lines |
| 83 | Cursor at first line but third position |
| 3C | It will activate the second line |
| 08 | The following command will turn off the display and the cursor. |
| C1 | It will make the jump to the second line but at position one |
| 0C | The display will on but now there won’t be any cursor on the screen. |
| C2 | The following command will make the jump to the second line and position 2. |
The above command will only read by the module when there is low input at command pin but there should be low input at R/W pin. Low input at R/W pin will indicate that LCD is reading from the external pins. After that there is a third pin, enable pin. The enable pins will need to receive a low to HIGH pulse to transfer the command from registers to the LCD. Once the command is sent then there won’t be any change until new commands opposite to the given one replace it. These all functions will send through all the digital pins.
Data Display
The data display will also get through the digital pins. The data pins will send the data from the digital pins to the data register, whenever there will HIGH input signal at RS pin. All the data in alphabets or other words the ASCII code will able to show at the LCD. After transferring the data, the enable pin also needs to get the LOW to HIGH pulse. The LOW to high pulse needs only for few milliseconds. Therefore, To show the data on pixel grids, commands need to store within the module. If the command isn’t set according to each required function then the LCD will display the data according to the previously sent commands. So always send the commands before showing any data.
Custom Character Display
To display the custom, the character isn’t hard but it requires to follow some specific protocols. To display the character the CG RAM of the LCD needs to store the data for custom pixel.

Commands to send and store Data
The following commands will help to send and store the custom pixel data.
| Characters | RAM ADDRESS (HEX) | Commands |
|---|---|---|
| 1 | 40 | 0 |
| 2 | 48 | 1 |
| 3 | 56 | 2 |
| 4 | 64 | 3 |
| 5 | 72 | 4 |
| 6 | 80 | 5 |
| 7 | 88 | 6 |
| 8 | 96 | 7 |
Once the character is stored the commands need to send to the LCD to show the character. The character won’t show until it receives the command.
Programming with Library Method
The library method will send the data with the use of four pins mostly. In the library method, we are going to use Arduino as a reference here. The library method will send the data with the use of four pins mostly. In the library method, the data and other pins will be set once and the remaining will change through programming. Here’s the circuit diagram:

The following code will help to display the data.
#include <LiquidCrystal.h> //Library
LiquidCrystal LCD(rs, en, d4, d5, d6, d7); //the varable will replace with each of the pins.
void setup() {
lcd.begin(16, 2);
}
void loop() {
lcd.clear();
lcd.setCursor(0, 1);
lcd.print("hello, world!");
delay(500);
}
The library size needs to initialize by lcd.begin command. The lcd.clear will clear the LCD display. The set.cursor will help to set the starting position of cursor and print will help to send the data to the LCD.
16×2 LCD Tutorials and Projects
These are the tutorials and projects to explore this module further.
- LCD interfacing with Arduino UNO R3
- 16×2 LCD Interfacing with PIC Microcontroller
- I2C LCD interfacing with ESP32
- LCD interfacing with MSP430 LaunchPad
- Scrolling text on LCD using MSP430 microcontroller
- SCROLLING TEXT ON LCD USING PIC MICROCONTROLLER|Mikro C
- I2C LCD interfacing with ESP32 and ESP8266 in Arduino IDE
- Display GPS Co-ordinates on LCD using pic microcontroller
16×2 LCD Features
- This module is useable with any CMOS/TTL device.
- All kinds of Alphabets and digits present in the ASCII code are drawn able on the LCD.
- It operates at 4.7 to 5.3Vs
- A custom symbol size is each 5×8 pixel.
- Useable by both 4-bit and 8-bit data input.
16×2 LCD Applications
- In most of the applications that’s have only small values to show, uses the LCD.
- Most of the commercial meters use this module to represent the data output.
- In the toys and developing projects, it is still vastly in use.
- In black and white printers, it helps to show the printer settings and status.
2D Diagram

Alternative Displays:
- Monochrome 0.96” OLED Display
- Nokia5110 LCD Module
- 2.4″ TFT LCD Display Module overview
- TFT Display
- TM1637- Grove 4 Digit Display Module
- 7 Segment Display
Other Electronic Components:
Thanks for this informative
Post.