In this tutorial, we will discuss Atmel Studio 6. After reading the getting started tutorial on the AVR microcontroller, we can follow this tutorial with step-by-step guidelines for getting started with Atmel Studio 6. We will learn how to develop codes and program our device. This tutorial will also provide basic information about Atmel Studio 6 and how to use it to write the first program for the AVR microcontroller. How to program an AVR microcontroller. The best way to learn the AVR microcontroller is by starting with simple codes.
What is Atmel Studio 6?
Atmel Studio 6 is an integrated development environment by Atmel. It provides a modern, powerful, and simple environment to write programs in Assembly, C, and C++ languages while also helping in debugging programs in Windows XP, Vista, and Windows 7/8 environments. Atmel Studio 6 supports all AVR ICs by Atmel as well as new AVR and ARM devices. It provides the same platform for 8-bit, 32-bit, and ARM series microcontrollers. It also provides support for several programmers, including AVR Dragon, AVRRISP mkII, AVR ONE!, JTAGICE3, JTAGICE mkII, QT600, STK500, and STK600. Atmel Studio 6 has its own C compiler, which is why there is no need for an external C compiler.
Getting Started with Atmel Studio 6
Step 1: Download Atmel Studio 6
First, we have to download Atmel Studio 6 from the Atmel website and install it by following the instructions on this website. We can download its setup free of charge from the following website: www.atmel.com
Step 2: Open Atmel Studio
Now, open Atmel Studio 6 by clicking Atmel Studio as shown in the given figure.
Step 3: Create a New Project
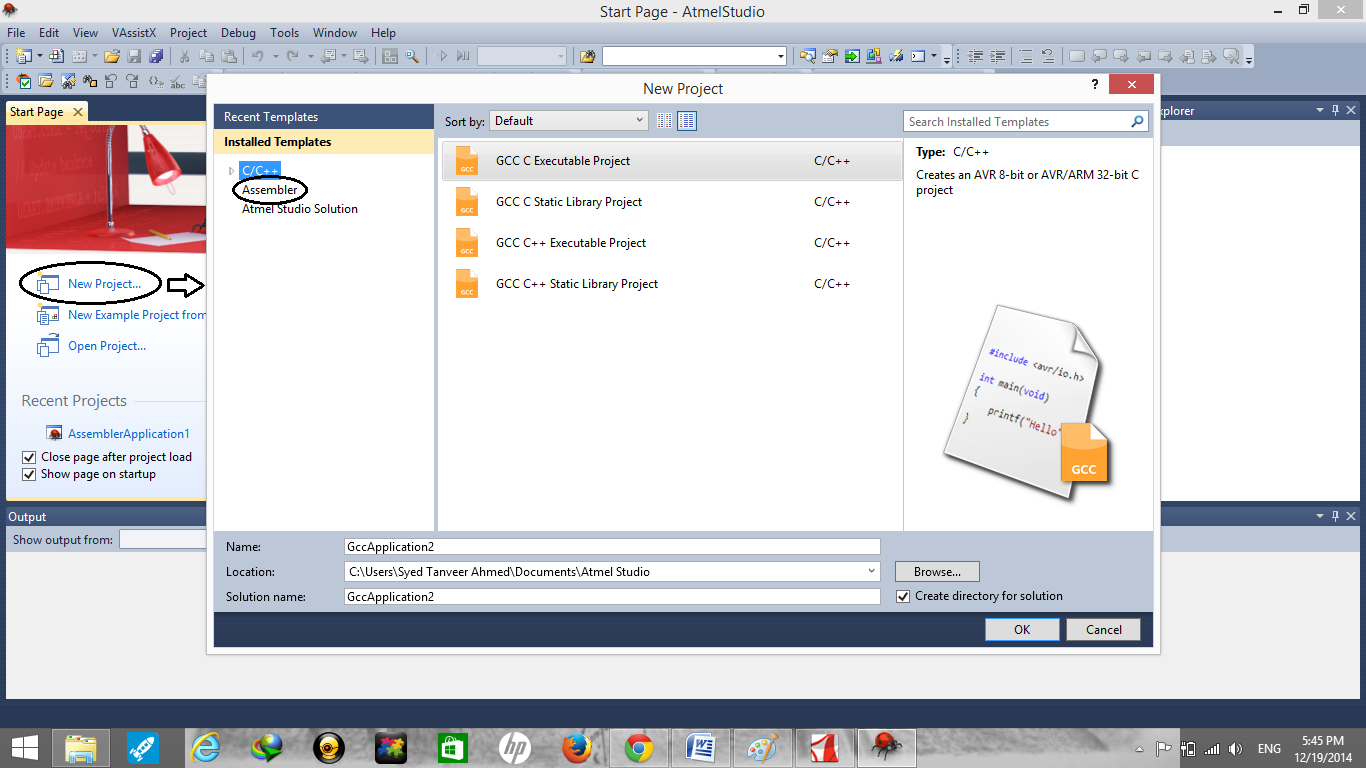
The simplest way to create a new project is to select the “New Project” option; a new project dialog box will appear. Select any one template; if you want to work on C, then select “GCC C Executable Project”, for C++, select “GCC C++ Executable Project”, and if you want to work on assembly language, then select assembler in the left “installed template” box. Then click OK.
| S.No | PROJECT Template | Function |
|---|---|---|
| 1 | GCC C Executable Project | To create 8-bit/32-bit AVR/ARM GCC project |
| 2 | GCC C Static Library Project | To create 8-bit/32-bit AVR/ARM GCC static library project |
| 3 | GCC C++ Executable Project | To create 8-bit/32-bit AVR/ARM C++ project |
| 4 | GCC C Static Library Project | To create 8-bit/32-bit AVR/ARM C++ static library project |
| 5 | Assembler | To create 8-bit Assembler project |
Another way to create a new project is to select “file”, choose “New” and click on “Project”.
Step 4: Device Selection
Select the device from the “select device” dialog box. For quick selection, go to the “Device Family” box and select your required family. Then click “OK”.
Step 5: Write a Program
A window will appear automatically. This is a newly created C file in the source editor. Now you can write code in this window.
Step 6: Compile the Code
After writing the required code, we have to compile it. For compilation, go to “build” in the top toolbar and select the “compile” option from the build menu, or we can simply press “Ctrl+F7” to compile the code.
Step 7: Select Programmer
Connect your programmer to your computer via the USB port. Go to the “Tool” option in the top tool bar and select “STK500” from the toolbar.
Select the serial port and click “Apply”, when the following screen appears.
Step 8: Device Programming
For the programming of your device, click “Device Programming” in the toolbar.
Now the device programming dialog box will appear. Select the tool (Exp: STK500) and device (Exp: Atmega32) that you are using, and select the interface (Exp: ISP) you want to use. Then click “Apply”.
This software is very easy to use, and we can build up any type of application as per our requirements, either in assembly, C, or C++. For beginners, the best way to start with Atmel Studio 6 is with an LED-blinking project example.
Conclusion
In this tutorial, we have covered the following topics:
- Introduction to Atmel Studio 6
- Step-by-step procedure for getting started with Atmel Studio 6.
Related Articles
You may also like to read.
- AVR microcontroller tutorials for beginners.
- How to use timers of AVR microcontroller.
- ATtiny2313 8-bit AVR Microcontroller.
- Optocoupler interfacing with AVR pic and 8051 microcontroller.
- LCD interfacing with ATmega32 AVR Microcontroller.
The installation process is very easy; we have covered each step in this tutorial, but if you face difficulty in installation, let us know, and we will upload a video that will explain all the steps.


i m not even getting build option between debug and project option, plus ctrl+f7 also not working?why?