The 433MHz RF Transmitter is one of the most popular and cost-effective RF modules used in wireless communication projects. It is simple to use, easy to implement, and widely available. This module serves as the first part of a 433MHz RF communication system, working alongside a compatible 433MHz RF receiver module to enable one-way data transmission.
The 433MHz RF transmitter accepts serial data as input and wirelessly transmits it over a default range of approximately 3 meters without an antenna. However, by attaching a simple 17.3 cm wire antenna to the ANT pin, the effective range can be extended up to 100 meters in open-air conditions. The actual range depends on factors such as supply voltage, antenna quality, surrounding obstacles, and environmental interference.
The transmitter does not operate on its own; it requires an external data source such as a microcontroller or a hardware encoder. It uses ASK (Amplitude Shift Keying) modulation, which makes it straightforward to interface with virtually any microcontroller, including Arduino, ESP32, STM32, PIC, and 8051. In some setups, hardware encoders like the HT12E can be used to avoid complex programming, making the module accessible even for beginners. The module transmits data in an encoded form, which is why it depends on external devices for data generation and encoding.

433MHz RF Transmitter Module Pinout Diagram
The 433MHz RF Transmitter Module has 4 pins that are used for power, data input, and antenna connection. The following image shows the pinout diagram of this RF transmitter module.
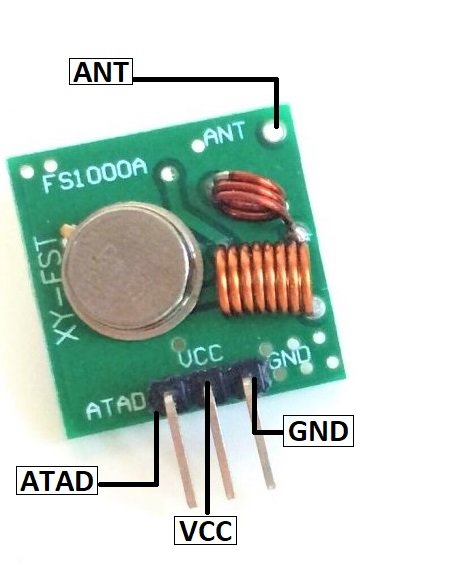
Pin Configuration Details
The following table describes each pin of the 433MHz RF transmitter module:
- VCC: This is the power supply pin. Connect it to a DC voltage between 3V and 12V. A higher supply voltage (e.g., 12V) increases the transmission range.
- GND: This is the ground pin. It must be connected to the common ground of the microcontroller or encoder/decoder circuit to ensure proper operation.
- ATAD (DATA): This is the serial data input pin. It receives encoded data from a microcontroller or an encoder IC (such as HT12E) and transmits it wirelessly via the antenna.
- ANT (Antenna): This pin is used to connect an external antenna. While the module can work without an antenna at a very short range (up to 3 meters), connecting a 17.3 cm straight wire antenna significantly improves the transmission range up to 100 meters.
433MHz RF Transmitter Module Features and Specifications
- Operating frequency: 433.92 MHz (ISM band)
- Modulation type: ASK (Amplitude Shift Keying) / OOK (On-Off Keying)
- Operating voltage: 3V to 12V DC
- Data transfer rate: up to 4 Kbps (typically 1 Kbps for reliable communication)
- Transmission range: up to 3 meters without an antenna and up to 100 meters with a 17.3 cm wire antenna
- The module supports one-way (simplex) communication only
- Low power consumption, making it suitable for battery-powered applications
- Compact size and lightweight PCB design
- Compatible with a wide variety of microcontrollers including Arduino, ESP32, ESP8266, STM32, PIC, AVR, and 8051
- Can be paired with hardware encoders (HT12E) or software libraries for data encoding
- One of the most affordable and widely used RF modules available for hobbyists and commercial applications
Applications
The 433MHz RF transmitter module is used in a wide range of wireless applications, including:
- IoT (Internet of Things) projects for wireless communication between devices
- Car security and remote keyless entry systems
- Home automation systems for controlling lights, fans, and appliances remotely
- Home security systems, including smoke detectors, motion sensors, and door/window sensors
- Wireless weather stations for transmitting sensor data
- Garage door openers and remote-controlled gates
- Industrial telemetry and remote monitoring
- Robot control and wireless data logging
- Short-range and medium-range communication (up to 100 meters in open air)
How to Use the 433MHz RF Transmitter Module
There are two common methods to use the 433MHz RF transmitter module: through software programming with a microcontroller, or through a hardware encoder IC. Both methods are explained below.
Method 1: Using a Microcontroller (Programming)
The most popular way to use the 433MHz RF transmitter is with a microcontroller such as Arduino. Several libraries are available that simplify the process of sending data through the RF module. Here are some commonly used libraries:
- #include <RH_ASK.h> – RadioHead ASK library (compatible with Arduino, ESP32, and STM32F103C8)
- #include <VirtualWire.h> – VirtualWire library (a simpler alternative for Arduino)
- #include <REGx051.H> – For 8051 microcontroller-based projects (C-language)
These libraries handle the low-level ASK modulation, allowing you to focus on your application logic. The transmitter data pin is connected to a digital output pin of the microcontroller, and the library takes care of encoding and transmitting the data.
Check this complete tutorial for interfacing with Arduino:
The RadioHead library is the most widely used option and supports multiple platforms. It provides functions to send strings, byte arrays, and structured data packets. The only requirement is that the microcontroller must generate the ASK-modulated signal, which these libraries handle automatically.
Method 2: Using a Hardware Encoder (HT12E)
The second method uses a hardware encoder IC such as the HT12E. This is the simplest approach because it does not require any programming. The HT12E encoder accepts 4-bit parallel data input and converts it into a serial encoded signal that is fed directly to the RF transmitter’s data pin.
This method is commonly used in applications where the same data is transmitted repeatedly, such as car remotes, home security key fobs, and simple on/off control systems. The encoder handles all the data encoding, so even basic circuits without a microcontroller can use the RF module effectively.
On the receiver side, a matching HT12D decoder IC is used to decode the received signal back into 4-bit parallel data. This encoder-decoder pair provides a simple and reliable way to build wireless communication systems without writing any code.
Security Considerations
Since the 433MHz RF module broadcasts data over the air within a specific frequency range, the signal can potentially be intercepted by any compatible receiver tuned to the same frequency. To mitigate data theft or unauthorized access, you should implement security measures such as data encryption, unique address codes, rolling codes, checksums, or authentication protocols. The HT12E/HT12D pair provides basic address-based security with 8 address bits, but for more sensitive applications, software-based encryption is recommended.
2D Diagram

Other Wireless Communication Modules