In this tutorial, we learn something fun. We will learn to design a game named “Guess the Number”. The player enters a guessed input number within the range of 0 to 10; if the number is correct, the LED will blink; otherwise, it will remain turned off. At the end of the tutorial, we have provided an exercise for you to do on your own, and in the next tutorials, we will assume that you have done those exercises and not explain the concept regarding them.
Introduction to Guess the Number Game
The “Guess the Number” game is a classic and interactive program often used to demonstrate the basic principles of programming and user interaction. It involves creating an application where the program selects a random number within a specified range, and the player attempts to guess that number based on his or her intuition. When the player guesses the correct number, the program indicates this on the output. Similarly, when the player is unable to guess the correct number, it is also displayed on the output.
In the next section, we will see how to develop this game in LabVIEW with the help of LabVIEW’s VI.
Guess the Number Game in LabVIEW Example
Now let’s design a VI that performs the operation described above. First of all, create a VI as we have done in Tutorial 1 and save it for future use, as we have been doing in the entire previous tutorial.
The VI we are going to design will generate random numbers within the range of 0 to 10, and it will compare the input value of the user with the randomly generated number; if they are the same, the indicator LED will turn on; otherwise, it will remain off.
From the Function Palette on the block diagram, select Numeric, and then select Random Number, as shown in the figure below.
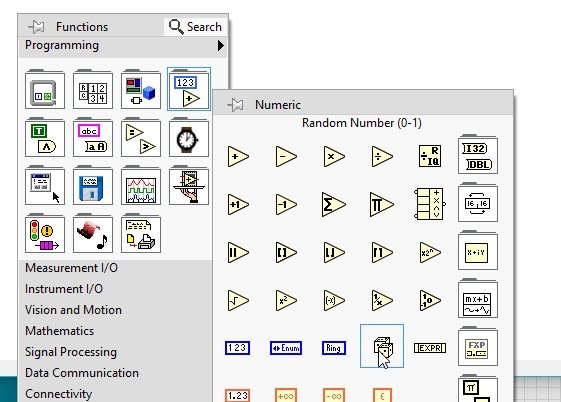
The problem here is that the built-in random number generator generates random numbers within the range of 0–1, and it generates floating-point random numbers, whereas we want to compare them with integers. Hence, first we have to somehow manipulate the range of the random number generator to 0-10.
We can do this simply by multiplying the output of the random number generator by 10. From the Function Palette on the block diagram, select Numeric, and then select Multiply, as shown in the figure below.

Connect one input side of this block with the output of the random generator, and on the other input side, create a constant as shown in the figure below and give it a value of 10.

Random Number Generator
After doing so, the block diagram thus formed will generate random numbers within the range of 0–10, but the numbers will be of type float, as shown in the figure below.

Now if we want to convert this random number from floating point to integer, we will use a built-in block of LabView. From the function palette on the block diagram, select numeric, then select conversion,and then select long integer, as shown in the figure below.
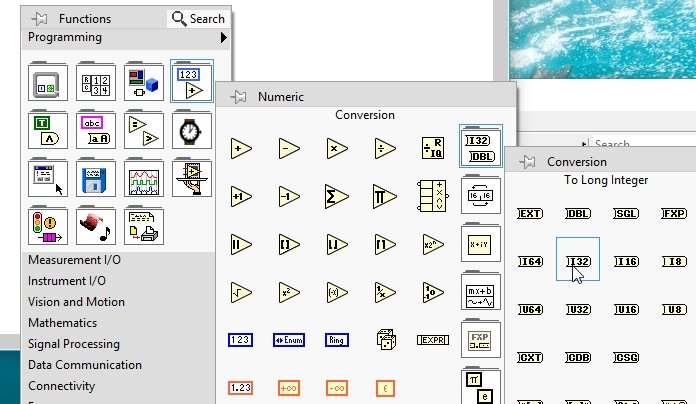
This block will apply the ceil function and change the floating point number to its next integer. At the output of this block, create an indicator to keep track of the number to guess, as shown in the figure below.

Now from the Control Palette on the front panel, select Numeric and then select Control, as shown in the figure below.
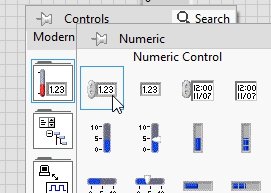
This control will take the input value from the user, compare it with the randomly generated value, and display the correct guess in the form of an LED indicator.
Don’t forget to name or label every control and indicator according to their work in the VI. Now for the comparison portion of the VI, from the Function Palette, select Comparison, and then select Equal. As shown in the figure below,
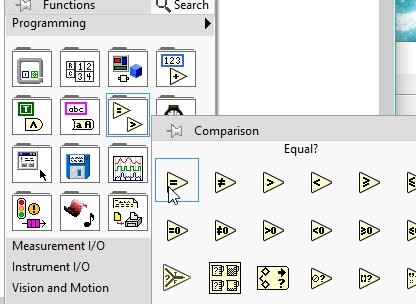
At one input of this block, connect the output of the ‘to integer’ block that was generating random numbers, and at the other input, connect the numeric control whose values are taken from the user as a guess.
Comparison Block
This block will compare both values; if they are equal, the output of the block will be returned as true and false otherwise. The comparison block diagram is shown in the figure below.

At the output node of this block, press right-click, and from the drop-down menu, select Create, and then select Indicator, as shown in the figure below.

Block Diagram
This will create an LED indicator to show the correctness of your answer. The complete block diagram of your VI is shown in the figure below.

Output
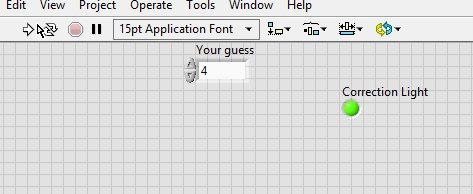
Finally, enter a value in the control and run the VI. If the guess matches the number generated, the LED will turn on, as shown in the figure below.

If the number generated by LabVIEW is different from the number guessed by the player. Then the LED will remain off, as shown in the figure below.

Now, in order to keep the randomly generated number a secret, we will delete the numeric indicator from the block diagram and run the VI. The correct and incorrect conditions are shown in the figure below.

Exercise:
- Create a guess number game that will allow you to guess numbers in the range 2–8 instead of 0–10.
Conclusion
In conclusion, this tutorial provides an in-depth overview of how to develop a guess-the-number game in LabVIEW. This tutorial also provides a step-by-step procedure for developing the game. You can utilize this concept and add more rules and functionalities as you like. At the end, an exercise is also provided to reinforce the concept of the guess the number game in LabVIEW. Hopefully, this tutorial was helpful in expanding your knowledge of LabVIEW.
You may also like to read.
- ESP32 Retain the Last GPIO State After a Reset
- ESP32 MicroPython Send Emails with SMTP Client
- TCA9548A I2C Multiplexer Arduino Use Same Address I2C Devices
- MicroSD Card Module with STM32 Blue Pill using STM32CubeIDE
- UCC25600 High-Performance Resonant Mode Controller
This concludes today’s article. If you face any issues or difficulties, let us know in the comment section below.