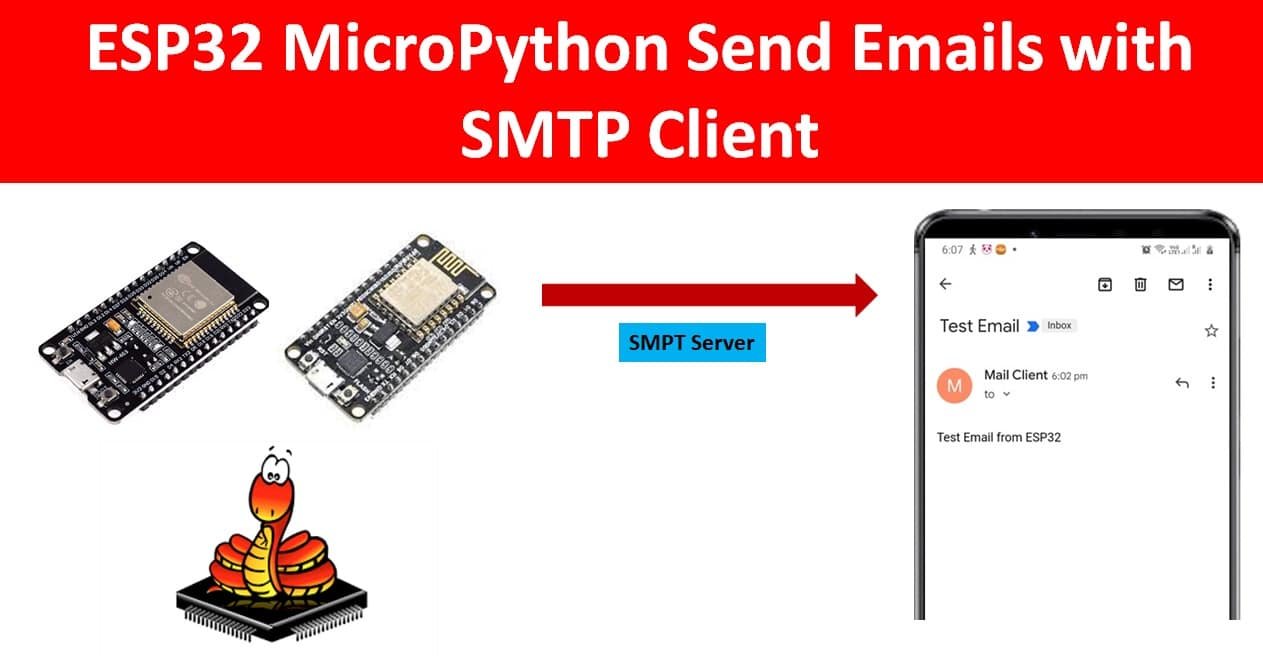
In this tutorial, you will learn to send emails with an SMTP client and MicroPython using ESP32. We will learn to send emails to SMTP servers such as Gmail, Hotmail, and Outlook. The umail is a lightweight, scalable SMTP client for sending emails in MicroPython. For demonstration, we will send a simple text message in email But we can also use it to send notification alerts, door alerts, motion detection, and sensor readings such as BME680, DS18B20, SHT31, DHT22, etc.
Recommended Components
The following components are used in this project or are helpful for getting started with MicroPython on ESP32 and ESP8266.
| Component | How it’s used in this project | Buy on Amazon |
|---|---|---|
| ESP32 Development Board (DevKit V1) | The ESP32 board flashed with MicroPython firmware. | Check Price |
| Micro USB Cable | Programs and powers the board from your PC. | Check Price |
As an Amazon Associate we earn from qualifying purchases. Prices and availability are accurate as of the date/time indicated and are subject to change.
We have a similar guide for Raspberry Pi Pico W:
Prerequisites
Before we start this lesson make sure you are familiar with and have the latest version of MicroPython firmware installed in your ESP32 board and have a running Integrated Development Environment (IDE) in which we will be doing the programming such as uPyCraft IDE or Thonny IDE.
- Getting Started with uPyCraft IDE on ESP32 and ESP8266
- Getting Started with Thonny MicroPython IDE for ESP32 and ESP8266
If you want to use VS Code, you can follow this guide:
- MicroPython ESP32 and ESP8266: Program with VS Code and Pymakr
- Flash MicroPython Firmware with esptool.py to ESP32 and ESP8266
SMTP Servers Introduction
SMTP (Simple Mail Transfer Protocol) is a protocol used to send and receive emails. An SMTP server is a server that implements the SMTP protocol and is responsible for sending and delivering email messages.
Here are some popular SMTP servers:
- Gmail: smtp.gmail.com (port 587)
- Outlook: smtp-mail.outlook.com (port 587)
- Yahoo Mail: smtp.mail.yahoo.com (port 465)
- Hotmail: smtp.live.com (port 587)
Please note that different email providers may have different policies and requirements for using their SMTP servers. You should consult the provider’s documentation for more information on how to use their SMTP servers.
Gmail SMTP Server Settings
You can view the Gmail server settings as shown below. Knowing this is important because we have to include them in our program code to configure our account properly.
- Server: smtp.gmail.com
- Sender Username: the complete email address of the sender account.
- Sender Password: the password of the sender account
- Server port (TLS): 587
- Server port (SSL): 465
- SMTP TLS/SSL required: yes
Outlook SMTP Server Settings
These are the common SMTP server settings for Outlook:
- Server: smtp-mail.outlook.com
- Port: 587
- Encryption method: TLS
- User name: Your full Outlook email address
- Password: Your Outlook email password
Hotmail SMTP Server Settings
These are the common SMTP server settings for Outlook.com:
- Server: smtp-mail.outlook.com
- Port: 587
- Encryption method: TLS
- User name: Your full Outlook.com email address
- Password: Your Outlook.com email password
Setting up Gmail Account
To send emails using the ESP32, we would require two email accounts. One for the sender and one for the recipient. You can use your email account as the sender account but it is recommended to create a new one just in case something goes wrong in the program code. For this article, we will use Gmail as the primary email provider. You can use any other provider according to your preference.
Creating a Gmail Account
For this tutorial, we have created a new Gmail account and we also recommend you create a new Gmail account. Because if something wrong happens with your ESP32 MicroPython code and you may incidentally make too many email requests from your personal account, Google may ban your account or block it temporarily. The receiver’s email address can be your personal email address.
To create a Google account:
- Go to the Google Sign Up page: https://www.google.com/gmail/about/ in the required information, such as first and last name, desired email address, password, phone number, and date of birth.
- Click “Next” to proceed with the verification process.
- Read and accept the terms of service and privacy policy.
- Click “Create Account.”

Now type all the relevant information and click ‘Next’. You can give in details according to your preference.

Proceed with all the steps accordingly to create your account successfully.
Create an App Password
To send an email with ESP32, first, you need to create an App password using your Gmail account. An app password in Gmail is a unique password generated for an app or device that does not support 2-step verification. When 2-step verification is enabled for a Gmail account, users are required to enter a verification code in addition to their password when signing in. However, some apps or devices may not be able to prompt for the verification code. In these cases, users can generate an app password to use instead of their regular password for accessing Gmail on the app or device. The app password is only valid for a specific app or device and can be revoked at any time from the Google Account security settings.
First, enable 2-step verification on your account by following these steps:
- Log in to your Google Account.
- Go to the “Security” section in your Google Account settings.
- Scroll down to “Signing in to Google.”
- Under “2-Step Verification,” click “Get Started.”
- Follow the prompts to set up 2-step authentication, which may include adding a phone number to receive verification codes via text or voice call.
- After setting up 2-step authentication, you will be prompted to enter a verification code whenever you sign in to your Google Account on a new device or browse
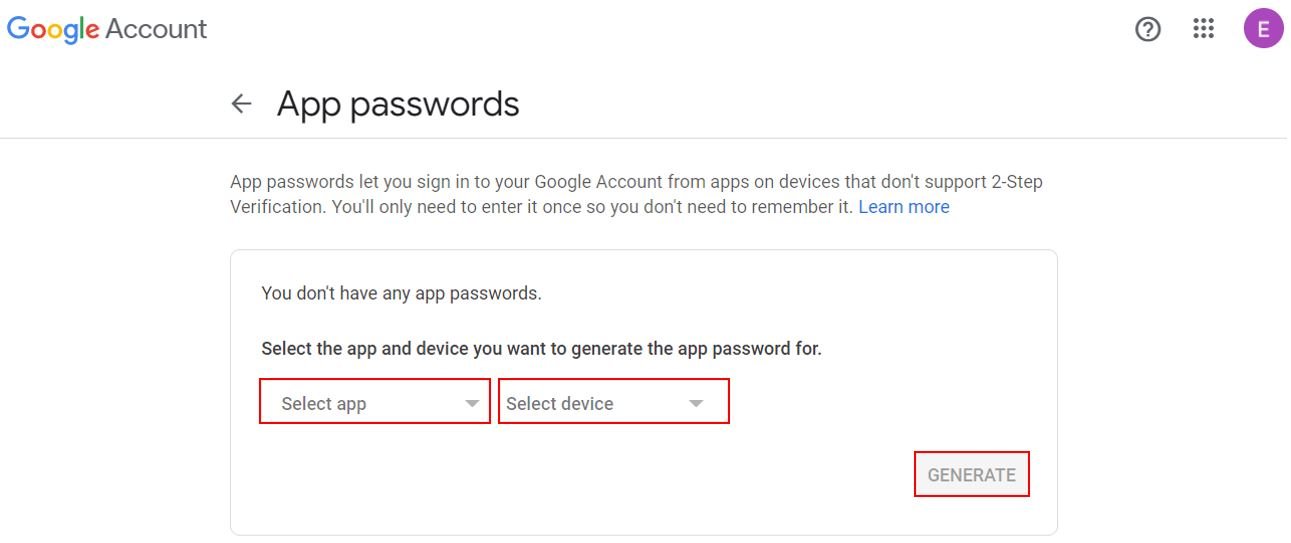
To get an app password:
Log in to your Google Account and Go to the “Security” section in your Google Account settings.
Scroll down to “Signing in to Google.” and Click “App Passwords.”
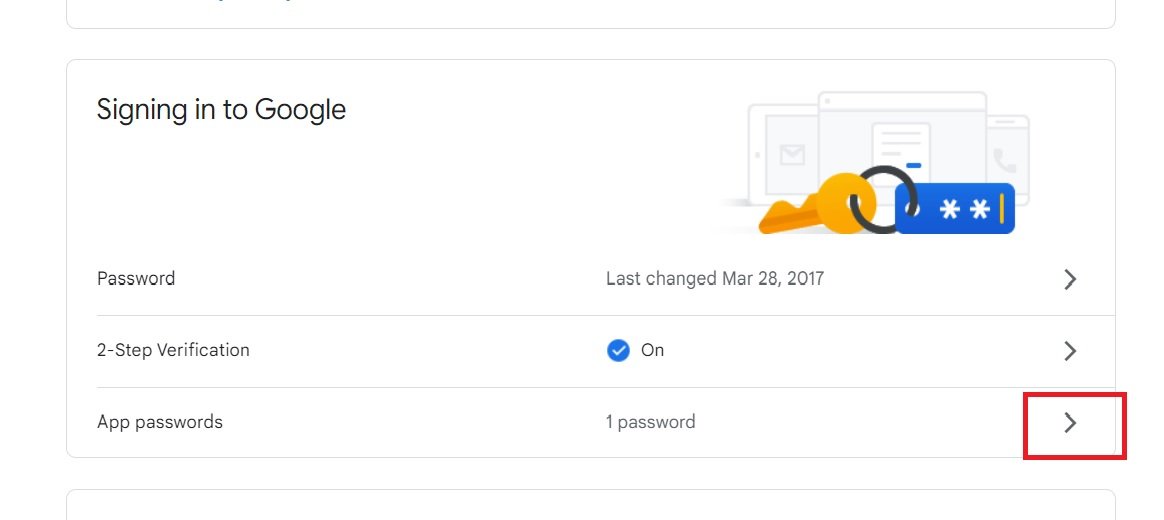
Follow the prompts to generate a unique password for the app you want to use with your Google Account. From the select app field, chose mail and device as other. Give any name to this device. After that click on generate.
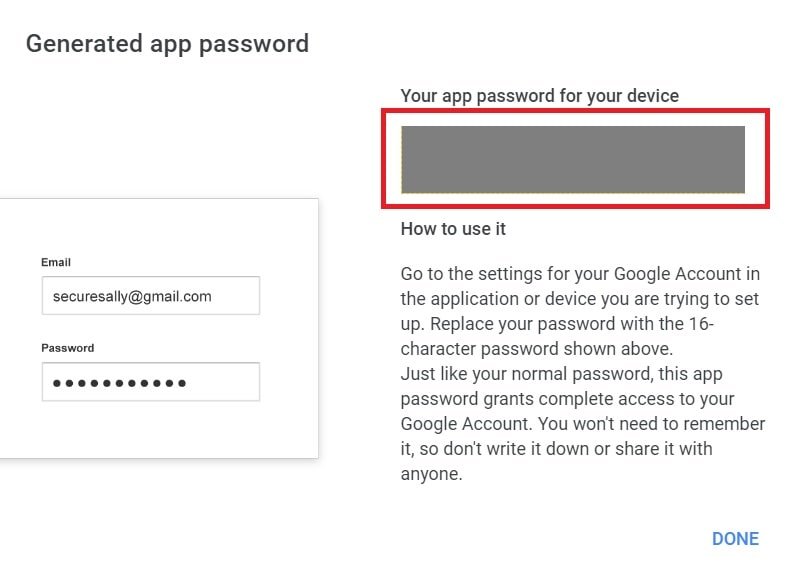
It will generate an app password for this specific device. Save this for later use. Because we will use it inside our code instead of the Gmail password.
Upload umail MicroPython SMTP Client Library to Raspberry Pi Pico W
As mentioned earlier, we are using the umail SMTP client library to send emails. This library is not available in the Thonny IDE MicroPython package manager. Therefore, we need to upload it to ESP32 manually through Thonny IDE.
Create a new file in Thonny IDE. Copy the following code into that file and save it with the name of umail.py.
# uMail (MicroMail) for MicroPython
# Copyright (c) 2018 Shawwwn <shawwwn1@gmai.com> https://github.com/shawwwn/uMail/blob/master/umail.py
# License: MIT
import usocket

DEFAULT_TIMEOUT = 10 # sec
LOCAL_DOMAIN = '127.0.0.1'
CMD_EHLO = 'EHLO'
CMD_STARTTLS = 'STARTTLS'
CMD_AUTH = 'AUTH'
CMD_MAIL = 'MAIL'
AUTH_PLAIN = 'PLAIN'
AUTH_LOGIN = 'LOGIN'

class SMTP:
    def cmd(self, cmd_str):
        sock = self._sock;
        sock.write('%s\r\n' % cmd_str)
        resp = []
        next = True
        while next:
            code = sock.read(3)
            next = sock.read(1) == b'-'
            resp.append(sock.readline().strip().decode())
        return int(code), resp

    def __init__(self, host, port, ssl=False, username=None, password=None):
        import ussl
        self.username = username
        addr = usocket.getaddrinfo(host, port)[0][-1]
        sock = usocket.socket(usocket.AF_INET, usocket.SOCK_STREAM)
        sock.settimeout(DEFAULT_TIMEOUT)
        sock.connect(addr)
        if ssl:
            sock = ussl.wrap_socket(sock)
        code = int(sock.read(3))
        sock.readline()
        assert code==220, 'cant connect to server %d, %s' % (code, resp)
        self._sock = sock

        code, resp = self.cmd(CMD_EHLO + ' ' + LOCAL_DOMAIN)
        assert code==250, '%d' % code
        if not ssl and CMD_STARTTLS in resp:
            code, resp = self.cmd(CMD_STARTTLS)
            assert code==220, 'start tls failed %d, %s' % (code, resp)
            self._sock = ussl.wrap_socket(sock)

        if username and password:
            self.login(username, password)

    def login(self, username, password):
        self.username = username
        code, resp = self.cmd(CMD_EHLO + ' ' + LOCAL_DOMAIN)
        assert code==250, '%d, %s' % (code, resp)

        auths = None
        for feature in resp:
            if feature[:4].upper() == CMD_AUTH:
                auths = feature[4:].strip('=').upper().split()
        assert auths!=None, "no auth method"

        from ubinascii import b2a_base64 as b64
        if AUTH_PLAIN in auths:
            cren = b64("\0%s\0%s" % (username, password))[:-1].decode()
            code, resp = self.cmd('%s %s %s' % (CMD_AUTH, AUTH_PLAIN, cren))
        elif AUTH_LOGIN in auths:
            code, resp = self.cmd("%s %s %s" % (CMD_AUTH, AUTH_LOGIN, b64(username)[:-1].decode()))
            assert code==334, 'wrong username %d, %s' % (code, resp)
            code, resp = self.cmd(b64(password)[:-1].decode())
        else:
            raise Exception("auth(%s) not supported " % ', '.join(auths))

        assert code==235 or code==503, 'auth error %d, %s' % (code, resp)
        return code, resp

    def to(self, addrs, mail_from=None):
        mail_from = self.username if mail_from==None else mail_from
        code, resp = self.cmd(CMD_EHLO + ' ' + LOCAL_DOMAIN)
        assert code==250, '%d' % code
        code, resp = self.cmd('MAIL FROM: <%s>' % mail_from)
        assert code==250, 'sender refused %d, %s' % (code, resp)

        if isinstance(addrs, str):
            addrs = [addrs]
        count = 0
        for addr in addrs:
            code, resp = self.cmd('RCPT TO: <%s>' % addr)
            if code!=250 and code!=251:
                print('%s refused, %s' % (addr, resp))
                count += 1
        assert count!=len(addrs), 'recipient refused, %d, %s' % (code, resp)

        code, resp = self.cmd('DATA')
        assert code==354, 'data refused, %d, %s' % (code, resp)
        return code, resp

    def write(self, content):
        self._sock.write(content)

    def send(self, content=''):
        if content:
            self.write(content)
        self._sock.write('\r\n.\r\n') # the five letter sequence marked for ending
        line = self._sock.readline()
        return (int(line[:3]), line[4:].strip().decode())

    def quit(self):
        self.cmd("QUIT")
        self._sock.close()
- Connect the ESP32 to your computer using a USB cable.
- Open the Thonny IDE and go to “Tools” > “Options” > “Interpreters” > “ESP32”.
- Click on the “Autodetect” button to detect the Pico board connected to your computer.
- Once the board is detected, you can upload umail.py file to ESP32 in the Thonny IDE.
- Save your code.
- To upload the code to the ESP32, go to “Run” > “Run current script” or press the “F5” key.
- The code will be uploaded to the Pico and automatically run.
After you have done all the above steps successfully, you will be able to use umail.py code inside your MicroPython sketch with import umail.
MicroPython Code to Send Email
This MicroPython sends an email using the Gmail server and SMPT client library.
import umail
import network
# Your network credentials
ssid = 'replace_with_your_ssid' # Replace with the name of your network
password = 'replace_with_your_password' # Replace with your network password
# Email details
sender_email = 'write_senders_email' # Replace with the email address of the sender
sender_name = 'Mail Client' # Replace with the name of the sender
sender_app_password = 'write_senders_app_password' # Replace with the app password of the sender's email account
recipient_email ='write_receivers_email' # Replace with the email address of the recipient
email_subject ='Test Email' # Subject of the email
def connect_wifi(ssid, password):
# Connect to your network using the provided credentials
station = network.WLAN(network.STA_IF)
station.active(True)
station.connect(ssid, password)
# Wait for the connection to be established
while station.isconnected() == False:
pass
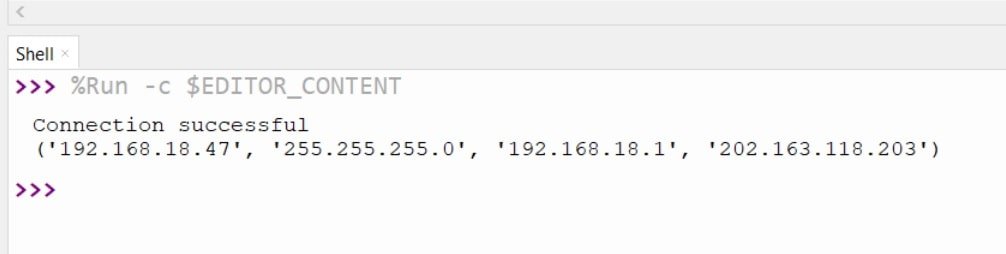
print('Connection successful') # Print a message if the connection is successful
print(station.ifconfig()) # Print the network configuration
# Connect to your network
connect_wifi(ssid, password)
# Send the email
# Connect to the Gmail's SSL port
smtp = umail.SMTP('smtp.gmail.com', 465, ssl=True)
# Login to the email account using the app password
smtp.login(sender_email, sender_app_password)
# Specify the recipient email address
smtp.to(recipient_email)
# Write the email header
smtp.write("From:" + sender_name + "<"+ sender_email+">\n")
smtp.write("Subject:" + email_subject + "\n")
# Write the body of the email
smtp.write("Test Email from ESP32")
# Send the email
smtp.send()
# Quit the email session
smtp.quit()
Before uploading the above MicroPython script to ESP32 replace ssid, password, sender_email, sender_app_password, and recipient email with your own details.
How MicroPython Script Works?
First imports the umail and network libraries. The umail library is an SMTP client library which provides methods to send emails through SMTP servers and the network library provides methods to connect ESP32 with your network.
import umail
import network
Defines the network credentials and email details such as the sender’s email address, name, and app password, the recipient’s email address, and the email subject.
ssid = 'replace_with_your_ssid' # Replace with the name of your network
password = 'replace_with_your_password' # Replace with your network password

# Email details
sender_email = 'write_senders_email' # Replace with the email address of the sender
sender_name = 'Mail Client' # Replace with the name of the sender
sender_app_password = 'write_senders_app_password' # Replace with the app password of the sender's email account
recipient_email ='write_receivers_email' # Replace with the email address of the recipient
email_subject ='Test Email' # Subject of the email
Next, we will connect the ESP32 board to the Wi-Fi network. The network.WLAN() is used to create a WLAN network interface object.
Supported interfaces are:
- network.STA_IF (station mode)
- network.AP_IF (Soft access point mode)
After that, activate the station by passing the “True” argument to the sta_if.active() method. The connect() method is used to connect to the specified wireless network using the specified Wi-Fi name (SSID) and password.
In station mode, isconnected() method returns “True” if ESP32 successfully connects to a Wi-Fi network and a device also assigned a valid IP address. Otherwise, it returns “False”. This statement checks if the ESP32 device connects to the Wi-Fi or not. The code does not move to the next step till the board is not connected to the Wi-Fi network.
After a Wi-Fi connection is established on the ESP32 board, an IP address gets assigned. The ifconfig() method provides an IP address assigned to the ESP32. In this statement, we print the IP address using the ifconfig() method on the station object which we created previously.
def connect_wifi(ssid, password):
  # Connect to your network using the provided credentials
  station = network.WLAN(network.STA_IF)
  station.active(True)
  station.connect(ssid, password)
  # Wait for the connection to be established
  while station.isconnected() == False:
    pass
  print('Connection successful') # Print a message if the connection is successful
  print(station.ifconfig()) # Print the network configuration
Call the “connect_wifi” function to connect to the network.
# Connect to your network
connect_wifi(ssid, password)
Send an Email with Gmail SMTP Server
Connect to Gmail’s SMTP server through the SSL port. Use the “SMTP” class from the “umail” library to create an object for connecting to Gmail’s secure SMTP server, which runs on port 465. If you are using another SMTP server such as Outlook or Hotmail, use the server address and port number accordingly.
smtp = umail.SMTP('smtp.gmail.com', 465, ssl=True) # Gmail's SSL port
Login to the email account using the smtp.login(). This function logs in to the Gmail account using the email address and app password provided.
smtp.login(sender_email, sender_app_password)
The smtp.to() function specifies the recipient’s email address.
smtp.to(recipient_email)
writes the email header which includes the “From” field with the sender’s name and email address.
and also writes the “Subject” field of the email header with the specified subject.
smtp.write("From:" + sender_name + "<"+ sender_email+">\n")
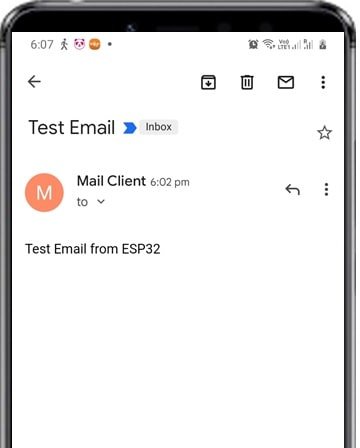
smtp.write("Subject:" + email_subject + "\n")In the end, writes the body of the email. This is a test email with ESP32. Hence, we are sending “Test Email from ESP32” in the email body.
smtp.write("Test Email from ESP32")
As soon as send() method will execute, it will send the email to the server.
smtp.send()Finally, close the SMTP client connection with the Gmail server.
smtp.quit()Demonstration
After uploading umail.py and main.py files to ESP32, click on the run button on Thonny IDE.
As soon as you click on the run button and if everything goes well, you will see a success message on the Thonny ID console as shown below:
After a few seconds, you will receive an email in your recipient account:

In summary:
In this tutorial, we learned to send emails with an SMTP client and MicroPython using ESP32. We learned to send emails to SMTP servers such as Gmail, Hotmail, and Outlook
You may also like to read:
- Twilio Send SMS with ESP32 ESP8266 using MicroPython
- ESP32 ESP8266 MicroPython Send Messages to WhatsApp
- MicroPython ESP8266 MQTT Publish Multiple Sensor Readings to Node-Red
- ESP32 MicroPython MQTT Publish Subscribe – Control Outputs
- ESP32 MicroPython Send Sensor Readings to ThingSpeak (BME280)
- MicroPython: Send Sensor Readings via Email (IFTTT) with ESP32 and ESP8266
- MicroPython: OpenWeatherMap API with ESP32/ESP8266 – Sensorless Weather Station