In this comprehensive tutorial, we will learn how to flash MicroPython firmware to ESP32 and ESP8266 NodeMCU boards using esptool.py. The esptool.py tools can be used on Windows, Linux, and MacOS. It is a python based command line utility used to flash and erase Micropython firmware for various development boards such as ESP32 and ESP8266. The esptool.py communicates with ROM bootloader to flash and erase firmware.

Recommended Components
The following components are used in this project or are helpful for getting started with MicroPython on ESP32 and ESP8266.
| Component | How it’s used in this project | Buy on Amazon |
|---|---|---|
| ESP32 Development Board (DevKit V1) | The ESP32 board flashed with MicroPython firmware. | Check Price |
| ESP8266 NodeMCU (ESP-12E) | The ESP8266 NodeMCU running the same MicroPython code. | Check Price |
| Micro USB Cable | Programs and powers the board from your PC. | Check Price |
As an Amazon Associate we earn from qualifying purchases. Prices and availability are accurate as of the date/time indicated and are subject to change.
Previously, we used uPyCraft IDE to flash firmware to ESP32 and ESP8266 boards using UpyCraft IDE. You can access the tutorial by clicking the link down below:
However, this time we will guide you how to flash the firmware using esptool.py instead. It is available in MicroPython applications in Windows, Linux, and Ubuntu. Let us start with the user guide. Follow the instructions in order to successfully flash the MicroPython firmware to your ESP boards. This guide covers both the ESP development boards: ESP32 and ESP8266.
You may also like to read:
Installing esptool.py and Python 3
Now we will learn how to flash ESP32 and ESP8266 with Micro-python firmware. Before we start the installation of esptool.py, make sure you have the latest version of Python 3.7 or the latest installed on your windows-based. If you don’t have the python 3 package installed on your Windows, follow these steps to install one:
- First of all, go to this link here and download the latest version of Python3.
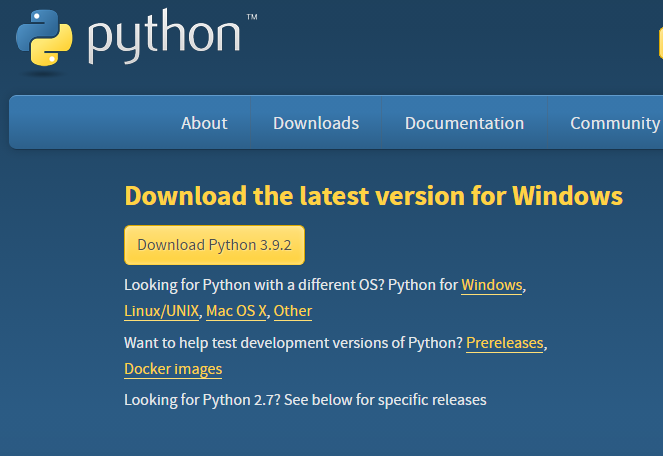
- After you click the Download Python 3.9.2 button .exe file will start downloading. After the download is completed click on it and the following appears.
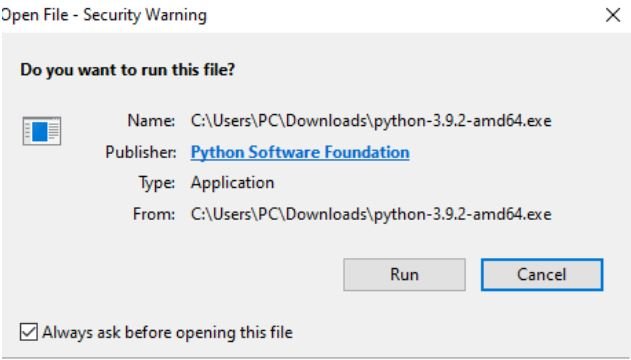
- Press the run button. The following screen appears. Make sure to tick Add Python 3.9 to a path and then click Install Now.

After the installation is complete a screen appears showing that the download was successful.
Install Python on Linux
Most Linux distributions come with Python preinstalled. However, you may need to install a specific version or a package that is not included in the default installation. Here’s how to install Python on popular Linux distributions:
To install Python on Ubuntu or Debian, open a terminal and run the following command:
sudo apt-get install python3
To install Python on CentOS or Fedora, open a terminal and run the following command:
sudo dnf install python3
Installing esptool.py in Python3
Now after you have successfully installed the latest version of Python3, we will install the esptool.py in it. First, open the command prompt by typing cmd.exe in the search box of the taskbar.
Type the following command in the terminal and the installation will start.
pip install esptoolIf for some reason the installation does not start, try typing the commands given below:
- pip3 install esptool
- python -m pip install esptool
- pip2 install esptool
Now, the esptool.py will get installed in the Python directory.
To check whether everything is working fine, type esptool.py in the command terminal.
You will be able to view the following messages.

We have successfully installed esptool.py in our system. Now let us download and flash MicroPython firmware in our ESP32 and ESP8266 boards.
Download and Flash MicroPython firmware to ESP32 with esptool.py
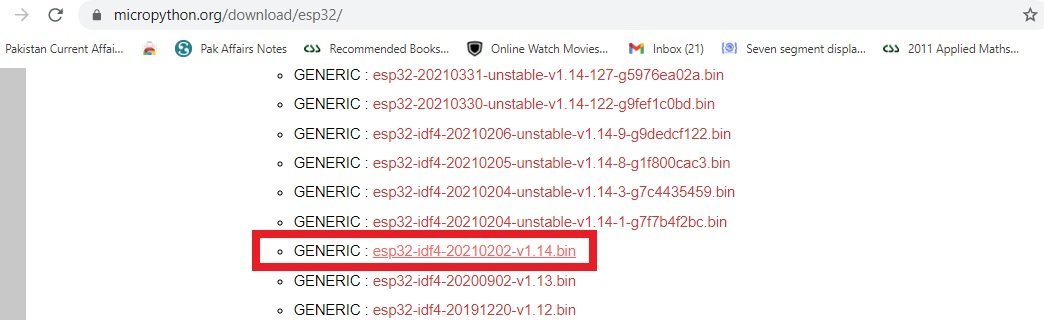
By default, the ESP32 is not flashed with MicroPython. It is very easy to flash ESP32 with the help of esptool.py. To download the latest version of Micro-Python firmware for the ESP32, go to the website Micro-python and in its download page here (https://micropython.org/download/esp32) and select the latest firmware for ESP32. The format will be of the type esp32-X.bin
After the download is complete rename the file as ‘esp32-firmware.bin’ for simplicity purposes.
Finding the Serial Port
In order to select the serial port through which our ESP32 board is connected we will use Arduino IDE. Connect your ESP32 board to your system via the USB port. Open the Arduino IDE and go to Tools > Port and look for the COM port for your ESP32. In our case, it is COM5.

If you are unable to view the Port then you will have to troubleshoot. Make sure the USB cable which you are using to connect the ESP32 board with your system is a data cable not a charging one. The data cable will be able to set up the serial communication with the ESP module. If you are sure that you are using a data cable and still can not find the Port in Arduino IDE then make sure you have the required USB drivers installed.
First, we need to find a port number to which ESP32 is connected. Here’s how to find the connected port number in Windows, Linux, and macOS:
Windows
- Open the Device Manager by pressing the Windows key + X and selecting “Device Manager” from the menu.
- Look for the device you want to find the port number for. It should be listed under “Ports (COM & LPT)”.
- Right-click on the device and select “Properties”.
- Click on the “Port Settings” tab.
- The port number will be listed under “Port”.
Linux
- Open a terminal and type the following command:
dmesg | grep ttyUSB*
or
ls /dev/ttyUSB*
This command will display a list of all serial devices that have been detected by the system. Look for the device you want to find the port number for. The device name will typically start with “tty”. The port number will be listed at the end of the device name. For example, if the device name is “/dev/ttyUSB0”, the port number is “0”.
MacOS
Open the Terminal app. Type the following command:
ls /dev/tty.*
- This command will display a list of all serial devices that have been detected by the system
- The port number will be listed at the end of the device name. For example, if the device name is “/dev/tty.usbserial-ABC123”, the port number is “ABC123”.
Installing USB Driver for ESP32 board
To install the required USB driver for your ESP board look for the chip which the board uses. To install the driver for your particular chip search and install it on your system. We are using ESP32 DEVKIT V1 DOIT which uses CP2102 chip. Go to the following website (https://www.silabs.com/developers/usb-to-uart-bridge-vcp-drivers) to download the CP210X Universal Windows Driver.

After the driver is installed, you will be able to view the COM port in the Arduino IDE.
Locating the esp32-firmware.bin file
To find the location of the MicroPython firmware which we downloaded for ESP32 we will use the command prompt. Open the command prompt by typing cmd.exe in the search box of the taskbar. To look through the Downloads folder type ‘cd Downloads’ in the terminal.
For Windows:
To find all the files located in the Downloads folder type dir
For Linux / Ubuntu:
To find all the files located in the Downloads folder type ls

This shows that the esp32-firmware.bin file is indeed present in the Downloads folder.
Erasing ESP32 Flash Memory
The last step before flashing the MicroPython firmware will be to erase the ESP32 flash memory. Open the command prompt and type esptool.py –chip esp32 erase_flash
Additionally, press the hold-down “BOOT” button on the ESP32 module when you see “Connecting….” in the terminal. It can be seen clearly in the following picture.
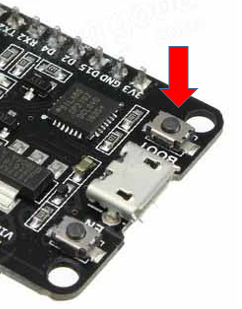
After a few seconds, the module’s flash memory will be erased as shown in the message in the terminal.

If the Connecting….…. message continues, then press the BOOT button of your ESP32 module and hold it so that the ESP board goes into flashing mode. Also, type the erase flash memory command again.
Flashing MicroPython Firmware on ESP32
Now we are ready to flash the MicroPython firmware on our ESP32 board. Make sure you know the COM port and the esp32-X.bin file name. Additionally, the flash memory of the ESP board should also be erased.
To flash the firmware using esptool.py type the following command in the command terminal:
esptool.py –chip esp32 –port <COM_PORT> write_flash -z 0x1000 <esp32-X.bin>
Replace <COM_PORT> with your COM port and <esp32-X.bin> with your esp32-X.bin file name. In our case the ESP32 board is connected with COM5 and the esp32-X.bin file is esp32-firmware.bin. So our command will look something like this:
esptool.py –chip esp32 –port COM5 write_flash -z 0x1000 esp32-firmware.bin
Before typing this command make sure to press the hold-down “BOOT” button on the ESP32 module. After a few moments, the MicroPython firmware will successfully get flashed on your ESP32 board.

If you get an error, repeat the steps again and remember to press the BOOT button.
Download and Flash MicroPython firmware to ESP8266 with esptool.py
By default, the ESP8622 is not flashed with MicroPython. It is very simple to flash ESP8266 with the help of esptool.py just as we did with ESP32. To download the latest version of Micro-Python firmware for the ESP8266 board, go to the website Micro-python (https://micropython.org/download/esp8266/) and select the latest firmware for ESP8266. The format will be of the type esp8266-X.bin

After the download is complete rename the file as ‘esp8266-firmware.bin’ for simplicity purposes.
Finding the Serial Port
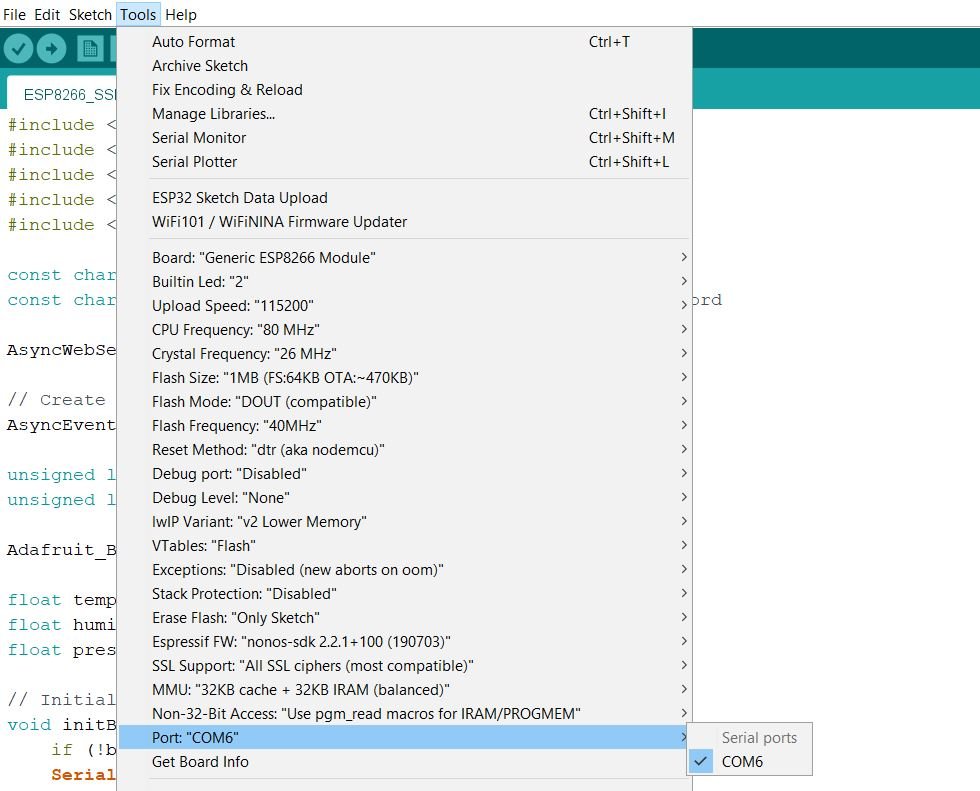
In order to select the serial port through which our ESP8266 board is connected we will use Arduino IDE. Connect your ESP8266 board to your system via the USB port. Open the Arduino IDE and go to Tools > Port and look for the COM port for your ESP8266. In our case, it is COM6.
If you are unable to view the Port then you will have to troubleshoot. Make sure the USB cable which you are using to connect the ESP8266 board with your system is a data cable not a charging one. The data cable will be able to set up the serial communication with the ESP module. If you are sure that you are using a data cable and still can not find the Port in Arduino IDE then make sure you have the required USB drivers installed.
Installing USB Driver for ESP8266 board
To install the required USB driver for your ESP board look for the chip which the board uses. To install the driver for your particular chip search and install it on your system. We are using ESP8266 ESP-12E NodeMCU which uses CP2102 chip. Go to the following website (https://www.silabs.com/developers/usb-to-uart-bridge-vcp-drivers) to download the CP210X Universal Windows Driver.
After the driver is installed, you will be able to view the COM port in the Arduino IDE.
Locating the esp8266-firmware.bin file
To find the location of the MicroPython firmware which we downloaded for ESP8266 we will use the command prompt. Open the command prompt by typing cmd.exe in the search box of the taskbar. To look through the Downloads folder type ‘cd Downloads’ in the terminal.
For Windows:
To find all the files located in the Downloads folder type dir
For Linux / Ubuntu:
To find all the files located in the Downloads folder type ls

This shows that the esp8266-firmware.bin file is indeed present in the Downloads folder.
Erasing ESP8266 Flash Memory
The last step before flashing the MicroPython firmware will be to erase the ESP8266 flash memory.
Open the command prompt and type esptool.py –chip esp8266 erase_flash
Additionally, press the hold-down “FLASH” button on the ESP8266 module when you see “Connecting….” in the terminal. It can be seen clearly in the following picture.

After a few seconds, the module’s flash memory will be erased as shown in the message in the terminal.

If the Connecting….…. message continues, then press the FLASH button of your ESP8266 module and hold it so that the ESP board goes into flashing mode. Also, type the erase flash memory command again.
Flashing MicroPython Firmware on ESP8266
Now we are ready to flash the MicroPython firmware on our ESP8266 board. Make sure you know the COM port and the esp8266-X.bin file name. Additionally, the flash memory of the ESP board should also be erased.
To flash the firmware using esptool.py type the following command in the command terminal:
esptool.py –chip esp8266 –port <COM_PORT> write_flash -z 0x1000 <esp8266-X.bin>
Replace <COM_PORT> with your COM port and <esp8266-X.bin> with your esp8266-X.bin file name. In our case the ESP8266 board is connected with COM6 and the esp8266-X.bin file is esp8266-firmware.bin. So our command will look something like this:
esptool.py –chip esp8266 –port COM6 write_flash -z 0x1000 esp8266-firmware.bin
Before typing this command make sure to press the hold-down “FLASH” button on the ESP8266 module. After a few moments, the MicroPython firmware will successfully get flashed on your ESP8266 board.

If you get an error, repeat the steps again and remember to press the FLASH button. You can find more information on esptool.py on this link.
If you want to erase ESP32 flash memory and perform factory reset, you can follow this guide:
Conclusion
In conclusion, we were able to show you how to flash MicroPython firmware in your ESP32 and ESP8266 by using esptool.py. It is very simple and easy to follow and in a few moments your ESP board will get flashed with the firmware and you will be able to program your boards in MicroPython.
For more ESP32/ESP8266 MicroPython related tutorials visit the links below:
- MicroPython: ESP32 Deep Sleep Mode and Wake Up Sources
- OLED Display with ESP32 and ESP8266 in MicroPython
- MicroPython: Wi-Fi Manager with ESP32 and ESP8266
- Getting Started with Thonny MicroPython IDE for ESP32 and ESP8266
- MicroPython: Send Sensor Readings via Email (IFTTT) with ESP32 and ESP8266
- ESP32/ESP8266 ADC with MicroPython – Measure Analog Readings
- ESP32/ESP8266 ADC with MicroPython – Measure Analog Readings