Best Solar Charge Controllers for IoT: Victron, EPEVER, Genasun & More (Buying Guide)
⚠️ Affiliate Disclosure: This post contains Amazon affiliate links. If you purchase through our links, we may earn a small commission at no extra cost to you. We only recommend products we have researched and verified. Prices change frequently, so we don’t list them here. Always tap through and confirm the live price on Amazon before buying.
Ultimate Buying Guide
🔋 Best Solar Charge Controllers for IoT
7 solar charge controllers ranked for IoT gateways, LTE cameras, LoRa base stations and 12V sensor masts, from Victron and EPEVER MPPT units you can read over UART or Modbus to tiny maker boards, with real specs, honest verdicts and direct Amazon links.
Once an IoT node grows beyond a single ESP32 and an 18650, the tiny solar boards stop being enough. A cellular gateway, a LoRaWAN base station, an IP camera or a sensor mast with a 4G modem needs a proper solar charge controller: something that handles a 20 to 100W panel, a 12V lead-acid or LiFePO4 battery, a switched load output, and ideally a data port your microcontroller can read so the node can report its own battery health back to the cloud.
That last point is what separates a good IoT charge controller from a generic RV one. Victron’s VE.Direct UART, EPEVER’s RS485 Modbus and Renogy’s RS232 port let an ESP32 or Raspberry Pi log panel power, battery voltage and charge state alongside your sensor data. This guide ranks 7 controllers on PV input range, charge current, battery chemistry support, night-time self-consumption and how easy they are to integrate. If you are powering a small single-cell node instead (CN3791, TP4056 and friends), see our companion guide to the best solar charging modules for IoT.
💡 Reality check before you buy: A “10A” rating is the maximum battery-side charge current, not what you will see on a cloudy afternoon. MPPT only beats PWM when the panel voltage is well above the battery voltage, so a 12V battery on an “18V” (36-cell) panel benefits; a matched panel on PWM loses less than marketing suggests. Most of these controllers expect a 12V or 24V battery bank, so a 3.3V ESP32 still needs a buck converter from the battery or load terminal. Watch night-time self-consumption: a controller that idles at 10mA burns 240mAh a day before your node does anything. And always connect the battery before the panel, or many controllers will mis-detect the system voltage.
🔋 Quick Comparison: All 7 Solar Charge Controllers
Specs are taken from the Amazon listings and manufacturer datasheets and may vary by revision. Prices change constantly, so tap through to see the current price on Amazon before buying.
🔍 What to Look for in an IoT Solar Charge Controller
📈
MPPT vs PWM
MPPT converts surplus panel voltage into extra charge current, typically worth 15 to 30% more harvest with a higher-voltage panel or in cold, low-sun conditions. PWM is cheaper and fine when the panel is closely matched to a 12V battery.
📡
Data / Telemetry Port
VE.Direct (TTL UART), RS485 Modbus or RS232 lets your ESP32 or Pi read panel watts, battery volts and charge state. For an unattended node, remote battery visibility is the difference between a planned visit and a surprise outage.
🔋
Battery Chemistry
Confirm the controller has a proper LiFePO4 profile (or user-defined voltages) if you’re not on lead-acid. LiFePO4 is the default for outdoor IoT today, but needs the right absorption voltage and ideally low-temperature charge protection.
🌙
Self-Consumption
The controller’s own idle draw runs 24/7. For a 10W gateway it’s noise; for a sensor averaging 2mA, a controller idling at 10mA is the biggest load in the system. Low-power nodes reward specialist controllers.
🔌
Load Output & LVD
A switched load output with low-voltage disconnect cuts your node off before it kills the battery, then reconnects once the sun returns. It’s the cheapest insurance you can get for a remote installation.
🏆 Detailed Reviews: All 7 Solar Charge Controllers
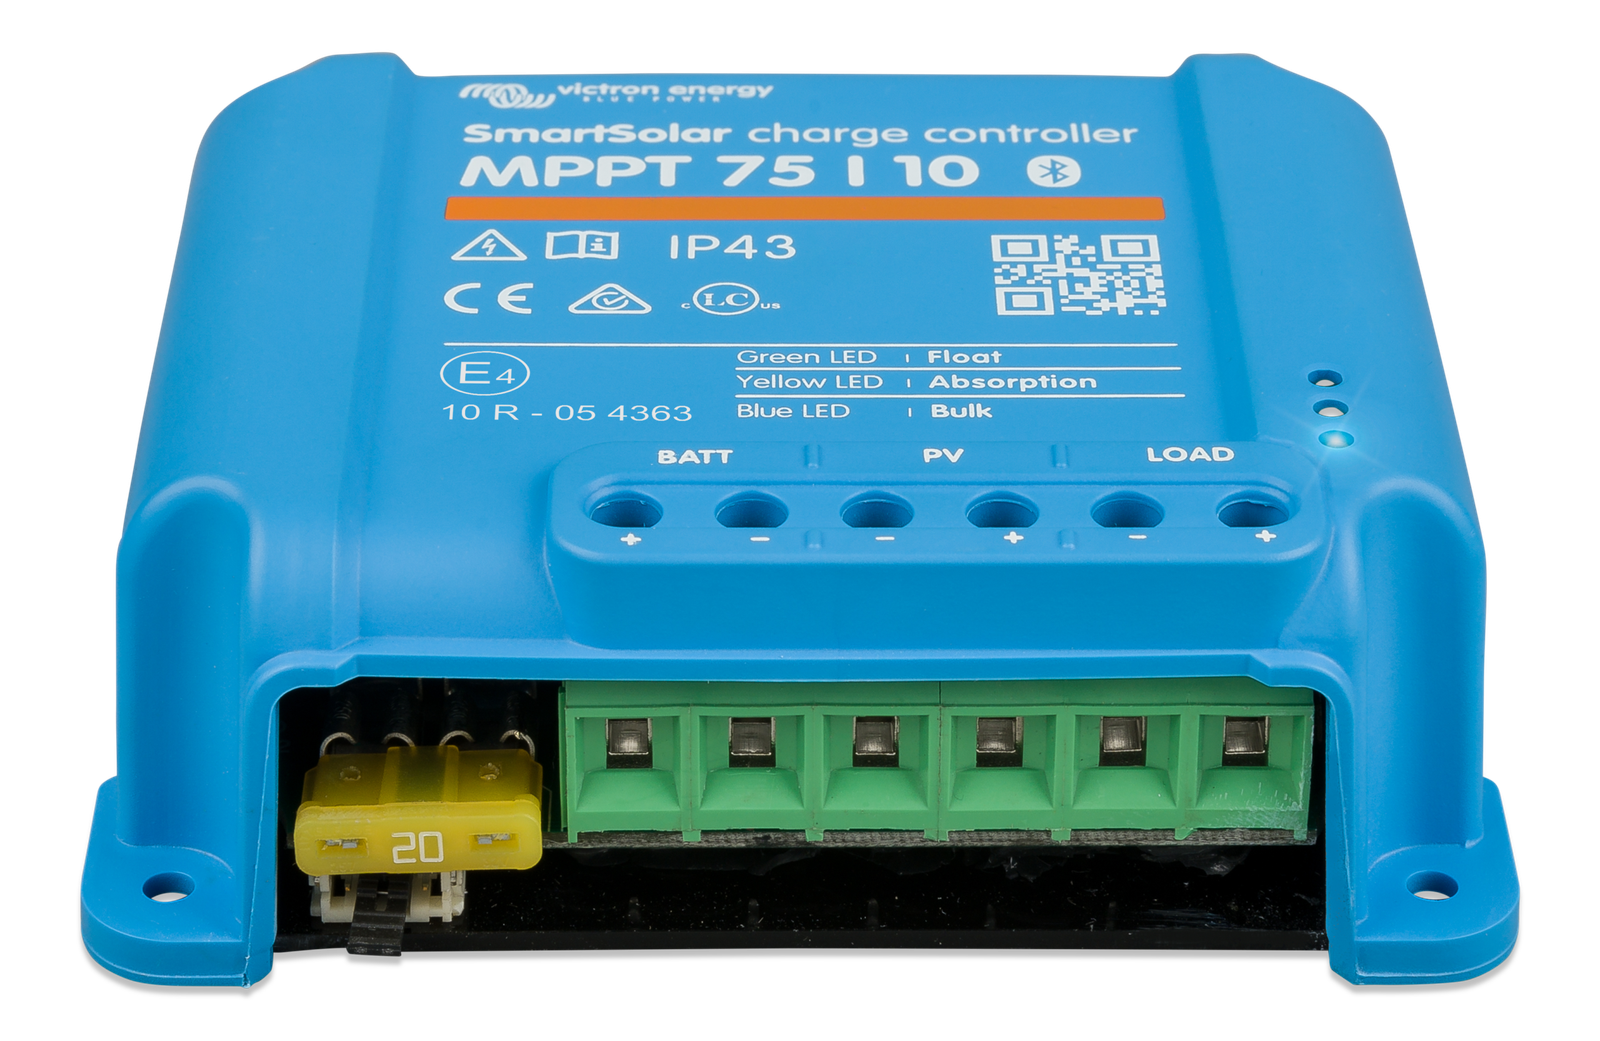
The Victron SmartSolar MPPT 75/10 is the controller we’d put on any IoT installation that has to run for years without a site visit. It accepts up to 75V of PV, charges a 12V or 24V bank at up to 10A with Victron’s fast, shade-tolerant tracking, and has proper profiles for lithium, AGM, gel and flooded batteries. Two things make it the IoT pick: built-in Bluetooth for setup from the VictronConnect app, and the VE.Direct port, a simple TTL UART that streams panel power, battery voltage, charge state and yield as plain text. Victron publishes the protocol openly, and there are mature ESP32 and Raspberry Pi parsers, so your node can upload its own power health with a few lines of code. The load output with configurable low-voltage disconnect protects the battery when the weather turns.
✅ Pros
Open, documented VE.Direct UART
Bluetooth setup and monitoring
Excellent tracking and charge algorithms
Load output with configurable LVD
❌ Cons
Costs more than generic MPPTs
VE.Direct cable/connector sold separately
Check UART logic level for your MCU
🎯 Verdict: The best solar charge controller for IoT. Bulletproof charging plus a data port your microcontroller can actually read.
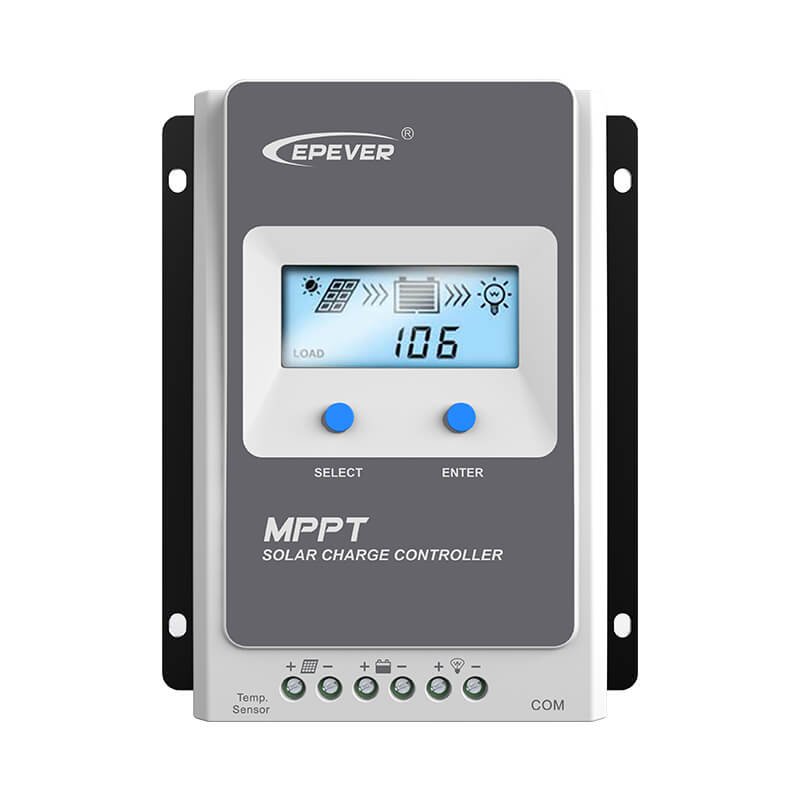
The EPEVER Tracer1210AN is the controller half the ESP32 solar-monitoring projects on the internet are built around, and for good reason. It takes up to 100V open-circuit PV (so two 12V panels in series are no problem), charges 12V or 24V banks at 10A with MPPT, and supports lead-acid plus LiFePO4 and NMC lithium with user-defined voltages. Its RS485 port on an RJ45 jack speaks Modbus RTU, so a MAX485/MAX3485 transceiver and an ESP32 give you full read access to PV, battery, load and energy-statistics registers, and even let you change settings remotely. The onboard LCD and common-negative grounding make wiring and field checks easy. You lose a little polish compared with Victron, but you gain a lot of headroom per dollar.
✅ Pros
RS485 Modbus, huge community code base
Wide 100V PV input
Lithium and lead-acid profiles
LCD plus common-negative design
❌ Cons
Higher idle draw than specialist units
Needs an RS485 transceiver to read
Bulkier than a 10A load deserves
🎯 Verdict: The best value IoT controller. Real MPPT, wide input and Modbus telemetry that every ESP32 maker can tap into.
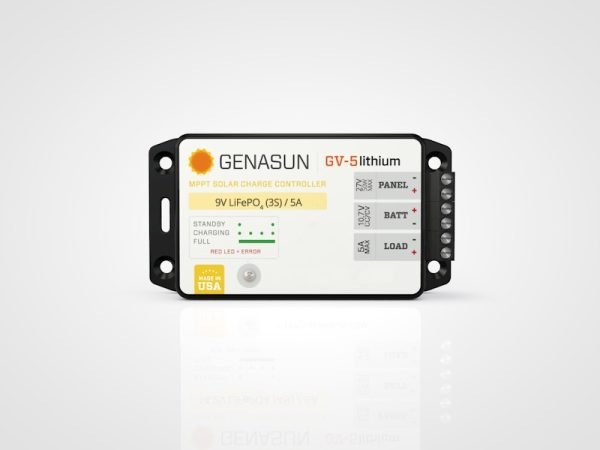
The Genasun GV-5 is a small, sealed, US-made MPPT controller built for exactly the kind of installation IoT engineers care about: a modest panel (up to about 65W), a 12V-class battery, and a load that has to survive long dark spells. Its headline number is a night-time draw of just 0.125mA, roughly one eightieth of a typical hobby MPPT, which matters enormously when your sensor node averages only a few milliamps. It tracks the panel 15 times a second, adds a 5A load output with low-voltage disconnect, and carries a 10-year warranty. This listing is the 4S LiFePO4 (14.2V) version; Genasun also sells a lead-acid GV-5-Pb, so pick the variant that matches your battery. There’s no data port, so pair it with an INA219/INA226 current sensor if you want telemetry.
✅ Pros:Tiny 0.125mA idle; fast MPPT; sealed and rugged; LVD load output; 10-year warranty.
❌ Cons:Fixed chemistry per model; no data port; premium price for 5A.
🎯 Verdict: The best controller for low-power remote nodes. When the controller’s own idle draw matters, nothing else here comes close.
🌻 BEST MAKER BOARD · ⭐ 4.5/5
4. DFRobot Solar Power Manager (9V/12V/18V)
7–30V solar · MPPT 9/12/18V selectable · 1S Li up to 2A · 5V 1.5A, 3.3V 1A, 9/12V 0.5A outputs
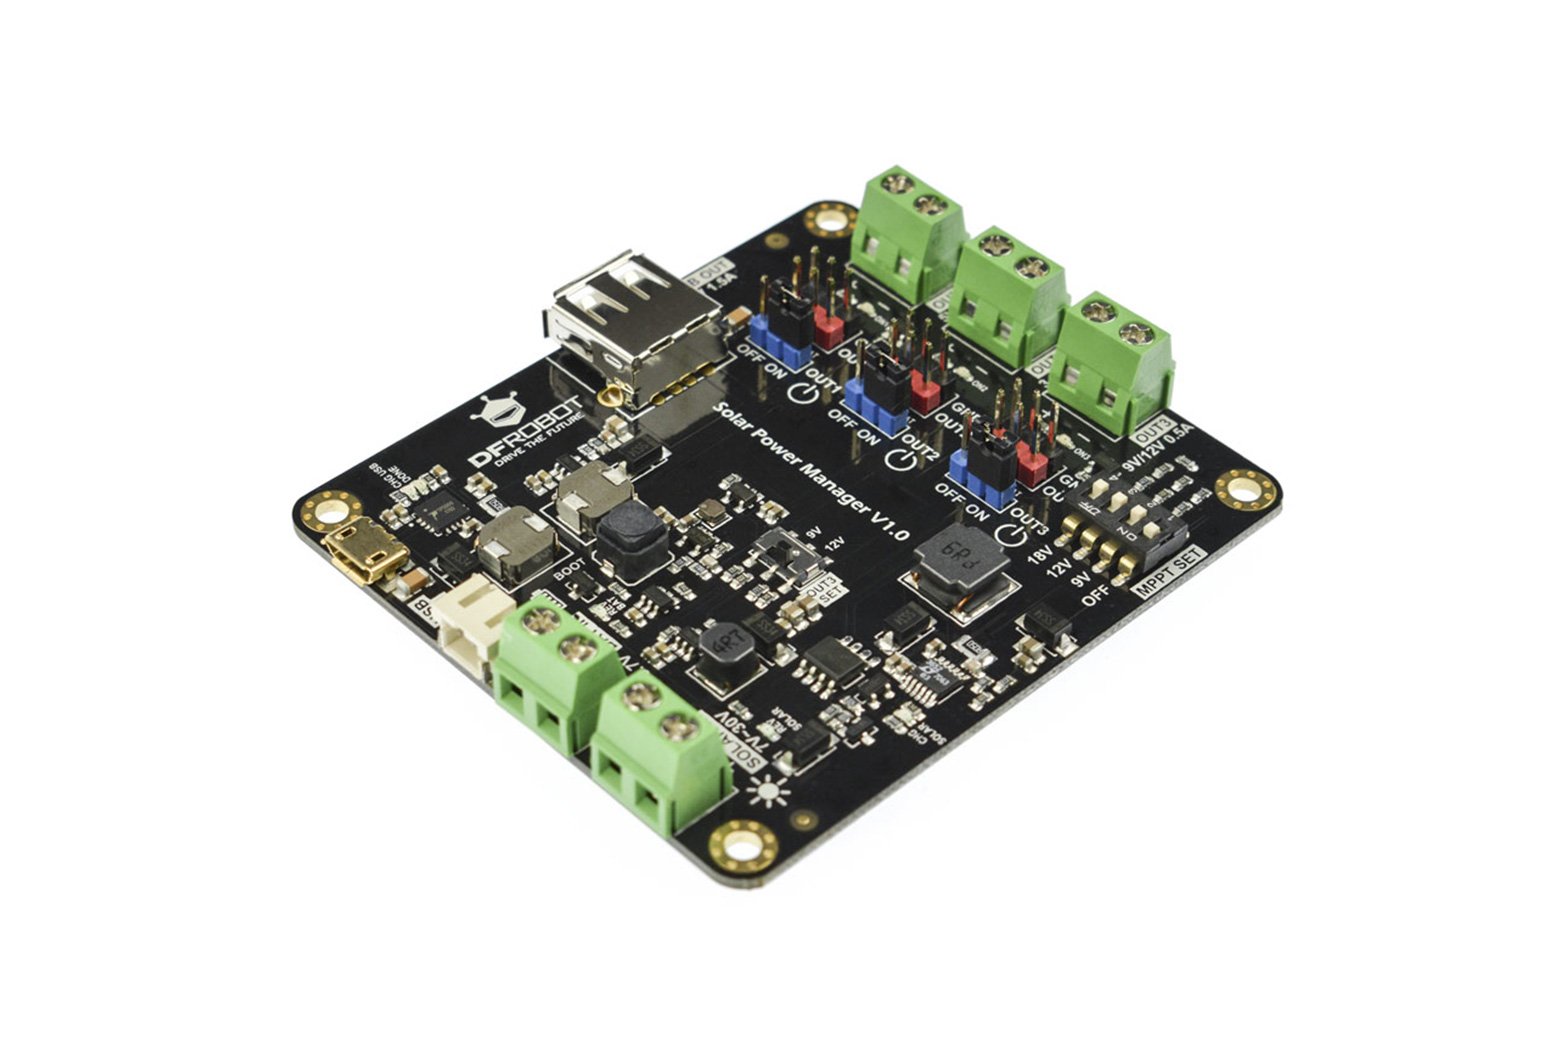
The DFRobot Solar Power Manager (DFR0535, “Sunflower”) bridges the gap between bare charger chips and full 12V controllers. It accepts a 7–30V panel with a switch to set the MPPT point for 9V, 12V or 18V panels, charges a single 3.7V Li-ion/LiPo cell at up to 2A through an LTC3652 charger IC, and then gives you three independently switchable regulated rails: 5V at 1.5A, 3.3V at 1A and 9V/12V at 0.5A. That combination is ideal when a node mixes a 3.3V ESP32, a 5V sensor and a 12V actuator or modem, and you’d rather not add three separate converters. Battery, reverse-polarity, over-temperature and short-circuit protection are built in, and DFRobot’s wiki is thorough. It’s a Li-ion board, so it isn’t the right fit for 12V lead-acid or LiFePO4 banks.
✅ Pros:Three switchable rails incl. 12V; selectable MPPT point; full protection; great docs.
❌ Cons:Single-cell Li only; best with panels up to ~20W; 12V rail limited to 0.5A.
🎯 Verdict: The best maker-friendly controller board. One module covers 3.3V, 5V and 12V loads from a single Li-ion cell.
🔵 BEST WIRED-ONLY VICTRON · ⭐ 4.5/5
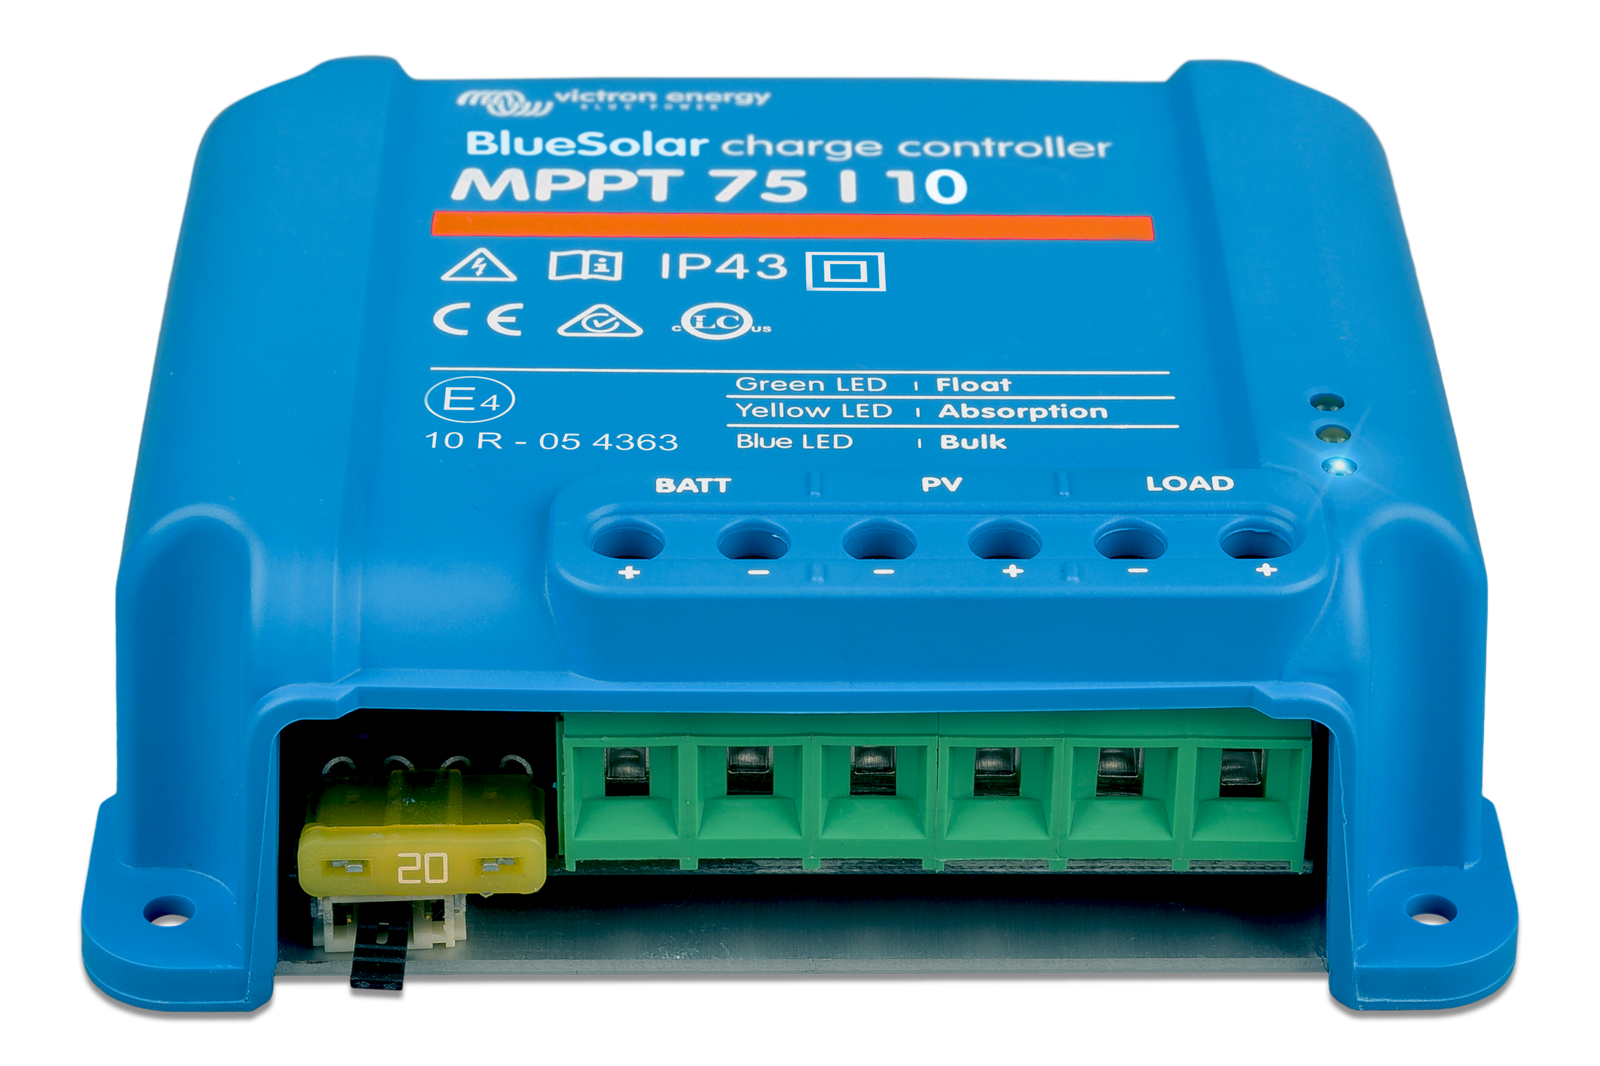
5. Victron BlueSolar MPPT 75/10
75V PV · 10A · 12/24V auto · VE.Direct UART · load output · no Bluetooth
The Victron BlueSolar MPPT 75/10 is the same 75V, 10A Victron hardware class as our top pick, minus the built-in Bluetooth. For many IoT builds that’s actually a plus: your ESP32 or Pi is going to read the VE.Direct UART anyway, so you get the same charge quality and the same documented data stream without paying for a radio you’ll never use. Initial setup can be done through the rotary/defaults or a VE.Direct dongle, and it’s typically a little cheaper than the SmartSolar. If you want to configure it from your phone in the field, spend the extra on the SmartSolar.
✅ Pros:Victron charge quality; VE.Direct telemetry; load output; usually cheaper than SmartSolar.
❌ Cons:No Bluetooth; settings changes need a cable or dongle; still pricier than EPEVER.
🎯 Verdict: The best Victron for builds where the microcontroller does the monitoring. Same core, same data port, no unused radio.
💵 BEST BUDGET 12V · ⭐ 4.2/5
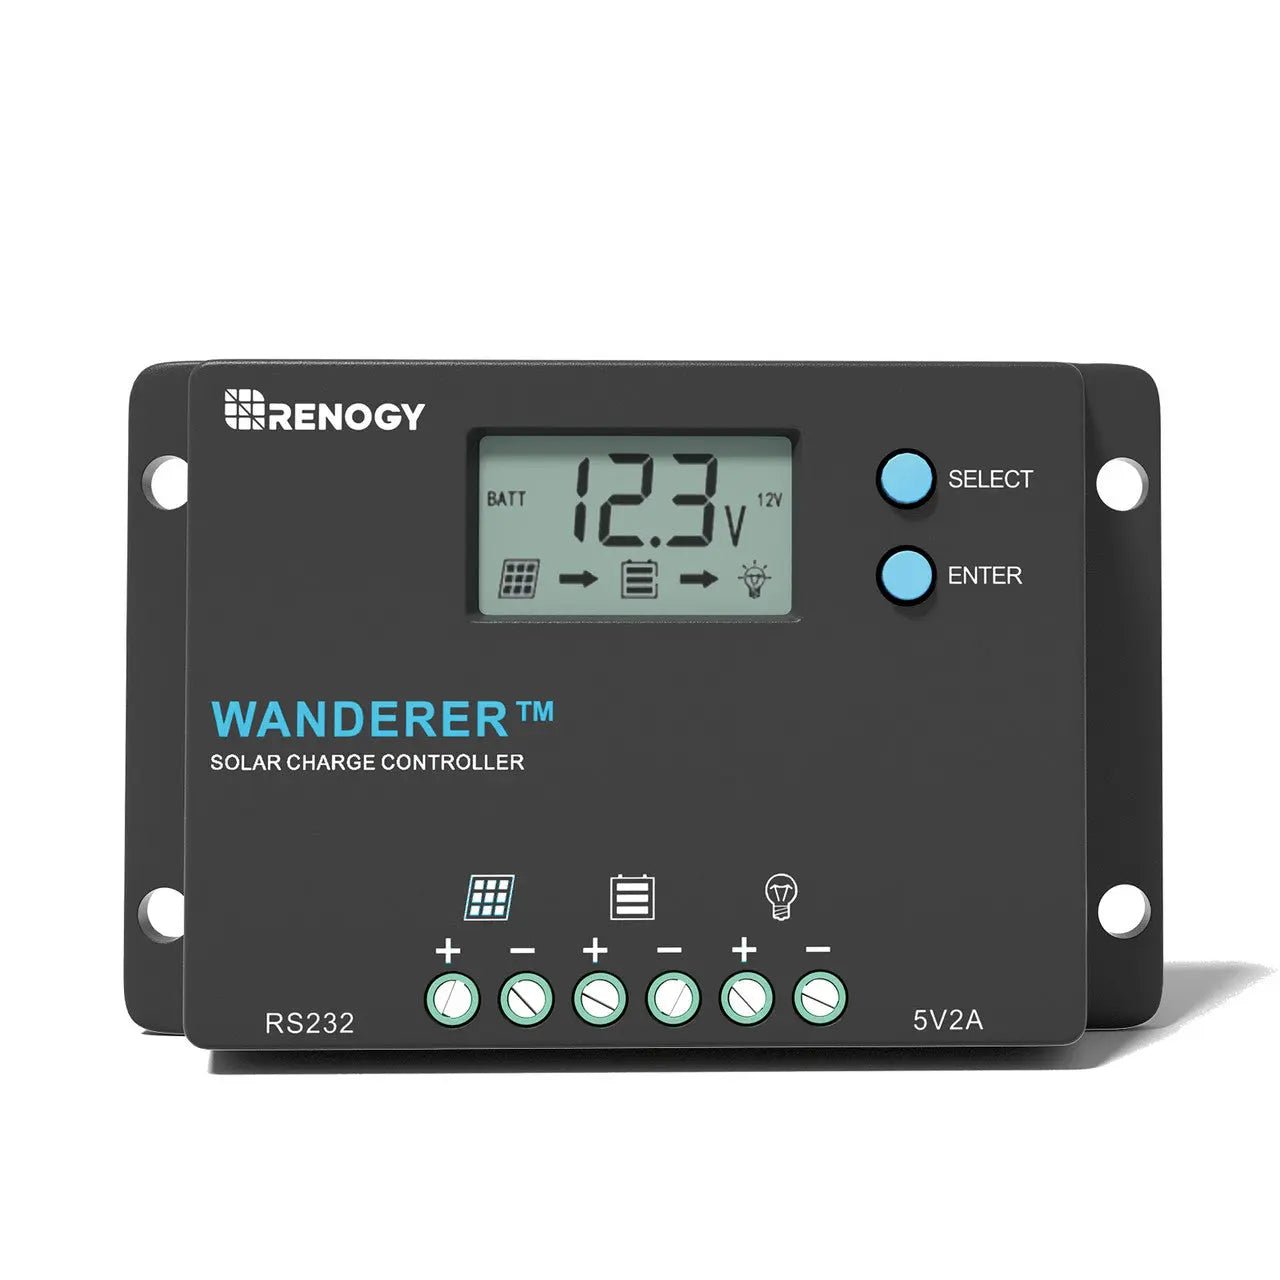
6. Renogy Wanderer 10A PWM
PWM · 50V PV input · 10A · 12/24V · lithium support · RS232 port · 5V/2A USB · LCD
If your panel is a standard 12V-class module closely matched to a 12V battery, the Renogy Wanderer 10A is the cheapest sensible way in. It’s a PWM controller, so it won’t convert surplus panel voltage into extra current the way MPPT does, but in that matched-panel scenario the gap is small. You get 4-stage charging for AGM, gel, flooded and lithium, a backlit LCD, a 5V/2A USB port that can power a small board directly, and an RS232 port on an RJ12 jack intended for Renogy’s BT-1 Bluetooth module (sold separately). That same port can be read from a microcontroller through a MAX3232 level shifter, with community-documented Modbus registers.
✅ Pros:Very affordable; lithium profile; RS232 data port; USB output; clear LCD.
❌ Cons:PWM, not MPPT; needs a matched panel; RS232 needs a level shifter.
🎯 Verdict: The best budget 12V controller. With a matched panel it does the job, and the data port keeps it IoT-friendly.
🛠️ BEST DIY MULTI-CELL · ⭐ 4.1/5
7. NOYITO MPPT 5A Solar Charging Board
8–28V in · 5–26V adjustable CC/CV out · 5A · 2–4S Li-ion/LiFePO4, 6V/12V lead-acid · up to ~100W
The NOYITO MPPT 5A board is the hacker’s option for anything the off-the-shelf controllers don’t cover. It’s a 300kHz synchronous buck charger with true MPPT that takes an 8–28V panel and outputs an adjustable 5–26V constant-voltage, constant-current charge at up to 5A, so one board can charge a 2S, 3S or 4S Li-ion pack, a 2S to 4S LiFePO4 pack, or a 6V/12V lead-acid battery. You set the charge voltage, current limit and MPPT point with potentiometers, which makes it ideal for a custom-built pack in a weatherproof enclosure. The trade-off is that you are the safety system: set the voltage before connecting the battery, use only protected lithium packs, and add your own low-voltage disconnect for the load.
✅ Pros:Very cheap; adjustable for almost any chemistry and cell count; real 5A MPPT; anti-backflow at night.
❌ Cons:Manual pot tuning; no load output or LVD; needs a protected battery/BMS.
🎯 Verdict: The best DIY multi-cell charger. Unbeatable flexibility per dollar, as long as you handle the protection side yourself.
🔎 Looking for CN3791 or other single-cell solar chargers? Bare chip boards like the CN3791, TP4056 and BQ25570 are covered in depth in our best solar charging modules for IoT guide. They’re the right choice for a single ESP32 or LoRa node on a 1S Li-ion cell; the controllers above are for 12V/24V banks, multi-cell packs and heavier gateway loads.
🛒 How to Choose the Right Charge Controller
📡
Remote gateway that must report its own health?
Get the Victron SmartSolar 75/10. Bluetooth for setup, VE.Direct UART for your ESP32 or Pi to log every watt.
🧮
Want Modbus telemetry on a budget?
The EPEVER Tracer1210AN gives you MPPT, 100V PV and RS485 Modbus with tons of open-source ESP32 code.
🌙
Milliamp-level sensor station?
The Genasun GV-5 idles at 0.125mA, so the controller isn’t the biggest load on your battery.
🧰
Mixed 3.3V, 5V and 12V loads?
The DFRobot Solar Power Manager gives three switchable rails from one Li-ion cell and a 9/12/18V panel.
💵
Matched 12V panel and tight budget?
The Renogy Wanderer 10A PWM controller does the job cheaply and still has a readable RS232 port.
🔧
Custom 2S to 4S battery pack?
The adjustable NOYITO MPPT 5A board charges almost any chemistry, provided you add a BMS and LVD.
⚙️ Key Specs Compared: Side by Side
Spec
Victron SmartSolar
EPEVER 1210AN
Genasun GV-5
DFRobot Manager
Renogy Wanderer
Max PV Input
75V
100V ⭐
~65W panel
30V
50V
Tracking
Fast MPPT ⭐
MPPT
15Hz MPPT ⭐
Set-point MPPT
PWM
Charge Current
10A ⭐
10A ⭐
5A
2A
10A ⭐
Battery
12/24V Li + lead-acid ⭐
12/24V Li + lead-acid ⭐
4S LiFePO4 (Pb variant)
1S Li-ion
12/24V Li + lead-acid
Data Port
BLE + VE.Direct ⭐
RS485 Modbus
None
None
RS232
Night Draw
Low
Moderate
0.125mA ⭐
Low
Moderate
Load Output
Yes, LVD ⭐
Yes, LVD ⭐
5A, LVD ⭐
3 regulated rails
Yes + USB
Specs are approximate and vary by hardware revision. Always confirm details on the live Amazon listing before buying.
❓ Frequently Asked Questions
Is MPPT worth it over PWM for an IoT node?
It depends on the gap between panel and battery voltage. A PWM controller effectively connects the panel straight to the battery, so a 36-cell “18V” panel gets dragged down to about 13V and the extra voltage is wasted. An MPPT controller converts that surplus into extra charge current, which matters most in cold weather, low winter sun, or when you run panels in series. For a small 12V system with a matched panel in a sunny climate, PWM is acceptable; for anything that has to survive the worst week of winter, MPPT is the safer choice.
How do I read a charge controller from an ESP32?
It depends on the port. Victron’s VE.Direct is a TTL UART that sends text frames once a second, so you connect its TX to an ESP32 RX pin (checking the logic level for your model) and parse the label/value pairs. EPEVER’s RS485 port needs a MAX485 or MAX3485 transceiver, then you poll the Modbus RTU registers. Renogy’s RS232 port needs a MAX3232 level shifter. In every case, share a common ground and keep the cable short or shielded on an outdoor mast. If your controller has no port, an INA219 or INA226 on the battery line gives you voltage and current instead.
How do I power a 3.3V or 5V board from a 12V solar controller?
Take power from the controller’s load output (so low-voltage disconnect protects the battery) and feed a buck converter set to 5V or 3.3V. Avoid linear regulators like the 7805 or AMS1117 from 12V: they burn most of the energy as heat, which is exactly what a solar budget can’t afford. An efficient synchronous buck module is the right tool; see our step-down regulator buying guide for options. The DFRobot Solar Power Manager skips this step by providing 3.3V and 5V rails directly.
LiFePO4 or lead-acid for a solar IoT installation?
LiFePO4 is the better default today: thousands of cycles, usable to a much deeper depth of discharge, lighter, and no sulfation if it sits partly charged through a cloudy week. Its weakness is cold: most LiFePO4 cells must not be charged below about 0°C, so in freezing climates choose a battery with low-temperature charge protection or a controller with a temperature sensor. Sealed lead-acid (AGM) is cheaper and tolerates charging in the cold but ages quickly if it’s regularly deep-discharged. Whichever you choose, set the controller to the matching battery profile.
How do I size the panel and battery for a 24/7 gateway?
Start from daily energy. A gateway averaging 3W uses 72Wh per day. For autonomy, size the battery for three to five days without sun at a safe depth of discharge: about 300 to 400Wh, or roughly a 12V 30Ah LiFePO4. For the panel, divide daily energy by your location’s worst-month peak sun hours and add 30 to 50% for losses, so with 3 sun hours you’d want around 35 to 40W, realistically a 50W panel. Then pick a controller whose current rating covers the panel: a 50W panel on 12V is about 4A, comfortably inside any 10A controller here.
🏁 Final Verdict: Best Charge Controller for Every IoT Build
The right solar charge controller for every project and budget:
🥇 Best Overall: Victron SmartSolar MPPT 75/10, Bluetooth plus VE.Direct telemetry
For most solar IoT installations the Victron SmartSolar MPPT 75/10 is the one to buy: excellent charging and a documented data port your firmware can read. If budget matters more than polish, the EPEVER Tracer1210AN delivers MPPT and Modbus telemetry for much less. Milliamp-level sensor stations belong on a Genasun GV-5; mixed-voltage maker builds suit the DFRobot Solar Power Manager; matched-panel 12V systems on a shoestring can run on a Renogy Wanderer; and custom packs are what the NOYITO MPPT board is for. Pair your power stage with our ESP32, ESP8266, Arduino and Raspberry Pi tutorials and build a node that keeps itself running.
💬 Not sure which controller fits your setup? Tell us your load (gateway, camera, LoRa node), battery type and how much winter sun you get in the comments below, and we’ll help you pick.
All Amazon links above use our affiliate tag (microlab05-20). Purchasing through them supports microcontrollerslab.com at no extra cost to you. Prices and availability change frequently, so always confirm the current price on Amazon before buying.