In this tutorial, we will learn how to set up ESP32 as a BLE server and use the GATT service to send battery levels to the Android app. For demonstration, we will use the GATT service to send battery percentage levels to our android smartphone from ESP32. The ESP32 board will therefore act as a BLE server which is operated through a battery whose battery percentage is being sent.
The Bluetooth Low Energy (BLE) Battery Service is a simple GATT service that allows a device to expose the current battery level to other devices. The service consists of a single characteristic that contains the current battery level as a percentage (0-100). The service also includes a notification property that allows the battery level to be updated automatically when it changes.
To use the Battery Service, a device must first advertise the service and its associated characteristic. Other devices can then discover the service and read the battery level characteristic, or enable notifications to receive updates when the battery level changes.

Bluetooth Low Energy (BLE)
Bluetooth Low Energy or simply BLE is designed as a low power consumption version of the generic classic Bluetooth connection. Instead of focusing on high data rates, BLE is optimized for reduced energy consumption and is widely used in applications such as fitness trackers, smartwatches, and battery-operated devices. That is why BLE has become one of the prominent technologies in the internet of things.
Although BLE is suitable for applications where we need to transfer smaller amounts of data over a shorter distance. But its power consumption is approximately 10 times lower than that of classic Bluetooth. This is because BLE activates radio only whenever it is want to transmit or receive data to/from another device otherwise it is in standby mode.
It is important to point out the major differences between BT classic and BLE in terms of electrical specifications. You can view the table below to see some of the differences between the two modes of Bluetooth connections.
| Bluetooth Classic | Bluetooth Low Energy / BLE | |
|---|---|---|
| Data Transfer Rate | 2-3 Mbps | 1 Mbps |
| Range | ~10-100m | ~50m |
| Operating Frequency | 79 RF | 40 RF |
| Peak Current Consumption | ~30mA | <15mA |
| Power Consumption | 1W | 0.01-0.5W |
| Total time to send data | 100ms | 3ms |
| Applications | Audio straming or files transfer | Sensor data, Control commands, etc |
BLE operates at 2.4 GHz ISM (Industrial, Scientific, and Medical) band and designed to target applications which need to run on batteries for longer periods of time—months, and even year.
Key features
- Low Power consumption
- Cost-Effective
- Faster connection
- Compact size
- Secure & reliable
BLE Client and Server
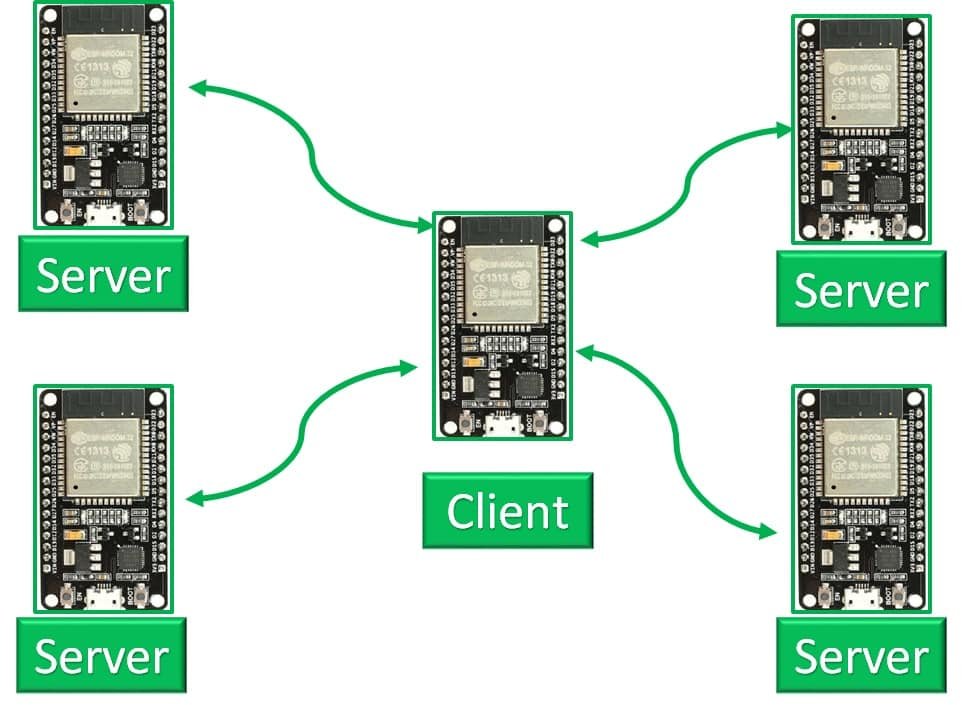
In BLE, there are two types of devices known as the server (Peripheral) and the client (Central). A client can have many simultaneous connections with multiple servers. But a server can have only one connection at a time. Therefore, BLE communication can be either one-to-one or one-to-many communication.
Apart from point-to-point communication, BLE also supports mesh networks and broadcast modes. In broadcast mode, multiple devices connect to a single server. It is a point to a multipoint data communication or one-to-many. Whereas in a mesh network, all the devices are connected so it acts as a multipoint-to-multipoint or many-to-many communication.
As shown in the figure below, one ESP32 acts as a client (central), and the other ESP32 boards act as a server.
- The BLE server announces its presence by sending radio advertising packets and a ready-to-accept connection from a client.
- The BLE client discovers and listens to BLE devices that are advertising. That means the BLE client initiates the process of establishing a connection to the BLE servers.
Note: ESP32 can act both as a server or client. Most importantly, the BLE client can hold connections with multiple servers at the same time.
The client has two modes such as scanning and connected. Similarly, the server also has two modes such as advertising and connected.about:blank
Now let’s see how the BLE server and client establised a connection through advertising, scanning and conneting steps.
Advertising
A server advertises on the radio frequency by advertising connectable advertisement packets, its device name, and unique UUID then on another in a process known as frequency hopping. In doing so, it reduces radio interference created from reflected signals or other devices.
Scanning
A client listens to incoming advertisements on the same radio frequency and scans the nearby devices. An advertising event from a server may consist of multiple events. When a client finds a connectable event in an advertising packet, it sends a connection request to a server with a CONNECT_IND packet.
Connecting
In the end, the BLE clients connect to a server by performing several types of handshaking steps.
Note: While connected to a client, the server may not connect to any other device.
Communication
A client can request data from a server through something called a “Characteristic.” Characteristics are provided by the server for the client to read and write data. A Characteristic may have one or more properties, for example, READ or WRITE. Each Characteristic belongs to a Service, which is like a container for Characteristics. This paradigm is called the Bluetooth Generic Attribute Profile (GATT)
BLE GATT Profile
BLE clients and servers devices transmit and receive data through Generic Attribute Profile (GATT). In this protocol, the central devices act as clients and any peripheral device is the server. The server has Characteristics, Services, and a particular ATT table that is used in the transmission and reception of data. The GATT protocol consists of a hierarchy in which there are different sections known as Profiles, Services, and Characteristics. The figure below shows these different sections in their particular order and positions.
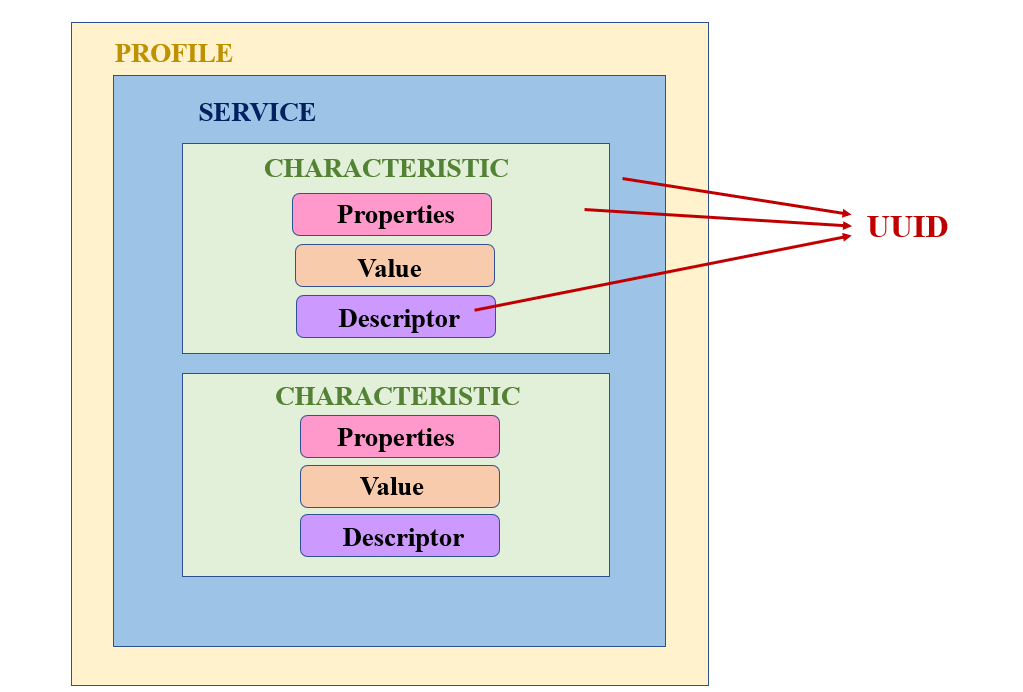
Profile
At the top of the hierarchy, you can find the Profile which consists of one or more Services. These are the set of Services that are defined by the designers or by Bluetooth Special Interest Group (SIG).
GATT Services
These are sets of simple data for example readings from a sensor and are divided into subcategories known as Characteristics. Pre-defined Services by Bluetooth SIG are available such as reading heart rate, Weight Scale, Blood pressure, etc. To view all the official services, click here.
UUID or Universally Unique Identifier is the unique ID code of a particular Service. It can be 16 or 128 bits depending on the service. We can use the preset UUIDs or customize our own for a particular service. To obtain a unique UUID go to the online website UUIDGenerator.
An example of a UUID obtained from this generator is: c31cb7af-34e2-42eb-8e7e-198230848b4a
Characteristics
Every service has its own Characteristics. These are broken down into a single Characteristic or several Characteristics. They also have unique UUIDs consisting of 16/128 bits. These contain all the useful information in its ‘value’ section and declaration which supplies metadata.about:blank
The descriptor is optional and is used in describing the Characteristic value. They contain a different type of metadata through which they expand the Characteristic. The Properties exercise the role of permitting operations including read, notify, write, indicate, or broadcast. These are the functions of a particular value that is defined by property. This property is then linked with a particular Characteristic.
ESP32 BLE Server Send Battery Level Indication with GATT Service
After getting to know about the necessary BLE terminologies, let us move ahead and program our ESP32 module as a BLE server. We will create a battery level indicator using the GATT service. For this we will require the nRF android application on our smartphone. Moreover, we will need a phone which supports BLE connection.
We will use Arduino IDE to program our ESP32 development board. Thus, you should have the latest version of Arduino IDE. Additionally, you also need to install the ESP32 plugin. If your IDE does not have the plugin installed you can visit the link below:
Open your Arduino IDE and go to File > New. Copy the following code and save it.
#include <BLEDevice.h>
#include <BLEUtils.h>
#include <BLEServer.h>
#include <BLE2902.h>

bool _BLEClientConnected = false;
#define BatteryService BLEUUID((uint16_t)0x180F)

BLECharacteristic BatteryLevelCharacteristic(BLEUUID((uint16_t)0x2A19), BLECharacteristic::PROPERTY_READ | BLECharacteristic::PROPERTY_NOTIFY);
BLEDescriptor BatteryLevelDescriptor(BLEUUID((uint16_t)0x2901));


class MyServerCallbacks : public BLEServerCallbacks {
    void onConnect(BLEServer* pServer) {
      _BLEClientConnected = true;
    };


    void onDisconnect(BLEServer* pServer) {
      _BLEClientConnected = false;
    }
};

void InitBLE() {
  BLEDevice::init("BLE Battery");
  // Create the BLE Server
  BLEServer *pServer = BLEDevice::createServer();

  pServer->setCallbacks(new MyServerCallbacks());

  // Create the BLE Service
  BLEService *pBattery = pServer->createService(BatteryService);
  pBattery->addCharacteristic(&BatteryLevelCharacteristic);
  BatteryLevelDescriptor.setValue("Percentage 0 - 100");
  BatteryLevelCharacteristic.addDescriptor(&BatteryLevelDescriptor);
  BatteryLevelCharacteristic.addDescriptor(new BLE2902());
  pServer->getAdvertising()->addServiceUUID(BatteryService);
  pBattery->start();

  // Start advertising
  pServer->getAdvertising()->start();
}


void setup() {
  Serial.begin(115200);
  Serial.println("BLE Battery Level Indicator");
  InitBLE();
}

uint8_t battery_level = 0;

void loop() {
  BatteryLevelCharacteristic.setValue(&battery_level, 1);
  BatteryLevelCharacteristic.notify();
  delay(5000);
  battery_level++;
  Serial.println(int(battery_level));
  if (int(battery_level) == 100)
    battery_level = 0;
}
Working of the Code
The code starts off by including all the libraries which are necessary for the BLE server communication, connection and advertisement.
#include <BLEDevice.h>
#include <BLEUtils.h>
#include <BLEServer.h>
#include <BLE2902.h>
Next, we define the server callback function. This function will make sure that a successful connection is established between the server and client. The bool variable ‘_BLEClientConnected’ is initially set as false. Inside the onConnect() function, it is set as true and inside the onDisconnect() function it is set as false.
bool _BLEClientConnected = false;

class MyServerCallbacks : public BLEServerCallbacks {
    void onConnect(BLEServer* pServer) {
      _BLEClientConnected = true;
    };


    void onDisconnect(BLEServer* pServer) {
      _BLEClientConnected = false;
    }
};
Next, we define the UUID, characteristic, and descriptor for the Battery Level Service. As we are using Battery Service hence its UUID is 0x108F. You can get the UUIDs from this link.
#define BatteryService BLEUUID((uint16_t)0x180F)Next, we set the characteristic for the Battery Service which is Battery Level. This characteristic is read using the GATT Read characteristic value sub-procedure and outputs the current battery level as a percentage from 0% to 100%. Its UUID is 0x2A19. This characteristic has two properties, Read which is mandatory, and Notify which is optional. Moreover, the descriptor’s value is given as 0X2901 as the size of the value is 8-bit.
BLECharacteristic BatteryLevelCharacteristic(BLEUUID((uint16_t)0x2A19), BLECharacteristic::PROPERTY_READ | BLECharacteristic::PROPERTY_NOTIFY);
BLEDescriptor BatteryLevelDescriptor(BLEUUID((uint16_t)0x2901));
InitBLE()
The InitBLE() function is called inside the setup() function which initializes the Bluetooth device.
void InitBLE() {
  BLEDevice::init("BLE Battery");
  // Create the BLE Server
  BLEServer *pServer = BLEDevice::createServer();

  pServer->setCallbacks(new MyServerCallbacks());

  // Create the BLE Service
  BLEService *pBattery = pServer->createService(BatteryService);
  pBattery->addCharacteristic(&BatteryLevelCharacteristic);
  BatteryLevelDescriptor.setValue("Percentage 0 - 100");
  BatteryLevelCharacteristic.addDescriptor(&BatteryLevelDescriptor);
  BatteryLevelCharacteristic.addDescriptor(new BLE2902());
  pServer->getAdvertising()->addServiceUUID(BatteryService);
  pBattery->start();

  // Start advertising
  pServer->getAdvertising()->start();
}
First, define your BLE device by specifying the name of your choice in the init command. In our case, we our device name is ‘BLE Battery.’
BLEDevice::init("BLE Battery");Next, we create the BLE server by using the createServer() function and set the server callback.
  BLEServer *pServer = BLEDevice::createServer();
  pServer->setCallbacks(new MyServerCallbacks());
Then, the BLE GATT service is created. After that, we will add the Characteristic on our server. By using the setValue() method, we will set the ‘Value’ of the characteristic with the text: “Percentage 0-100.” You can change this value according to your liking. After we start the BLE GATT service, the descriptor along with the characteristics is joined and the values are set. Additionally, BLE2902 service is also included.
  BLEService *pBattery = pServer->createService(BatteryService);
  pBattery->addCharacteristic(&BatteryLevelCharacteristic);
  BatteryLevelDescriptor.setValue("Percentage 0 - 100");
  BatteryLevelCharacteristic.addDescriptor(&BatteryLevelDescriptor);
  BatteryLevelCharacteristic.addDescriptor(new BLE2902());
After the service has started, we will use getAdvertising() to initiate the advertising process so that nearby devices would be able to spot our server and connect with it. After a connection had been made, the Battery Service is started. We will then launch the server, using the start() command.
pServer->getAdvertising()->addServiceUUID(BatteryService);
pBattery->start();
setup()
Inside the setup() function, we open the serial communication at a baud rate of 115200 and print “BLE Battery Level Indicator” on the serial monitor. Then InitBLE() function is called which initializes our BLE device.
void setup() {
  Serial.begin(115200);
  Serial.println("BLE Battery Level Indicator");
  InitBLE();
}
loop()
Inside the loop() function, we set the value of the characteristic with the hard coded battery level which is 0. This will be sent to the client. Note that this characteristic can take values from 0% to 100%. Hence we increment the battery level after every 5 seconds and when the level reaches 100, the value is set back to 0.
uint8_t battery_level = 0;

void loop() {
  BatteryLevelCharacteristic.setValue(&battery_level, 1);
  BatteryLevelCharacteristic.notify();
  delay(5000);
  battery_level++;
  Serial.println(int(battery_level));
  if (int(battery_level) == 100)
    battery_level = 0;
}
Demonstration
Choose the correct board and COM port before uploading your code to the board. Therefore go to Tools > Board and select ESP32 Dev Module.
Select the ESP32 Dev module as follows:
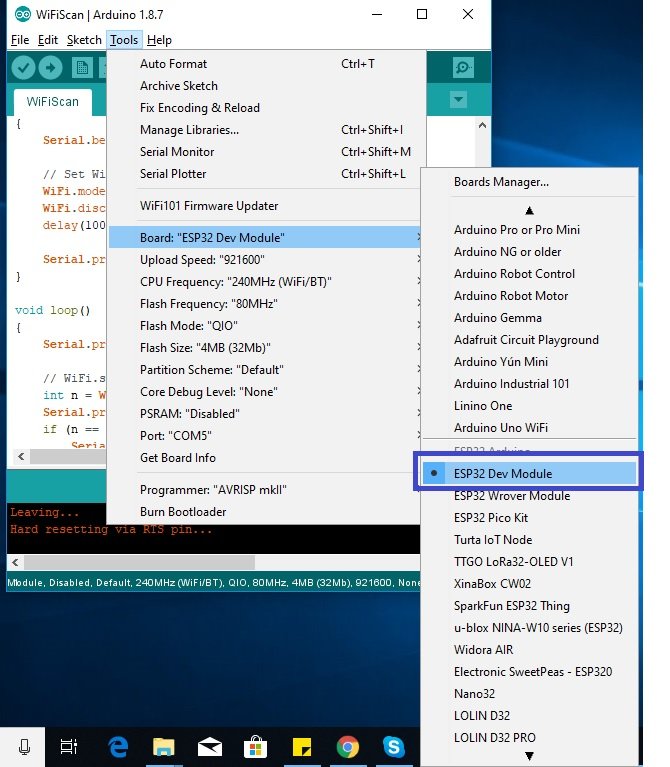
Then, go to Tools > Port and select the appropriate port through which your board is connected.

Click on the upload button to upload the code to ESP32 development board.
After you have uploaded your code to the ESP32, press its ENABLE button.about:blank

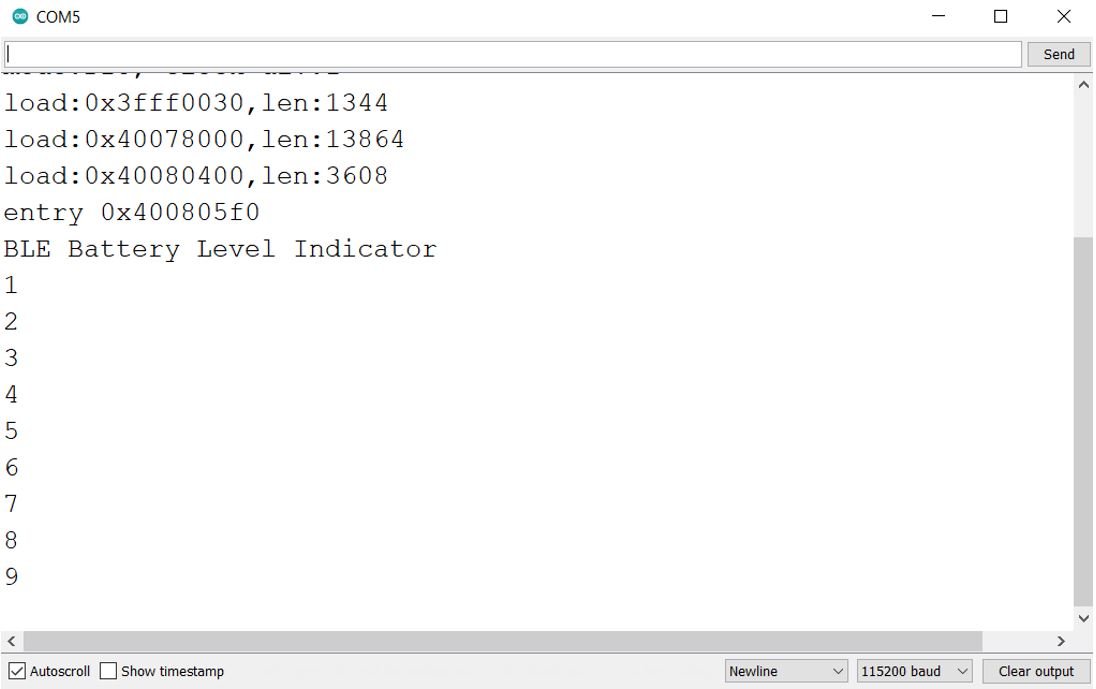
In your Arduino IDE, open up the serial monitor and set the baud rate to 115200. You will be able to view the battery value. It will increment after every 5 seconds.
Testing BLE Server GATT Service Battery Level Indication
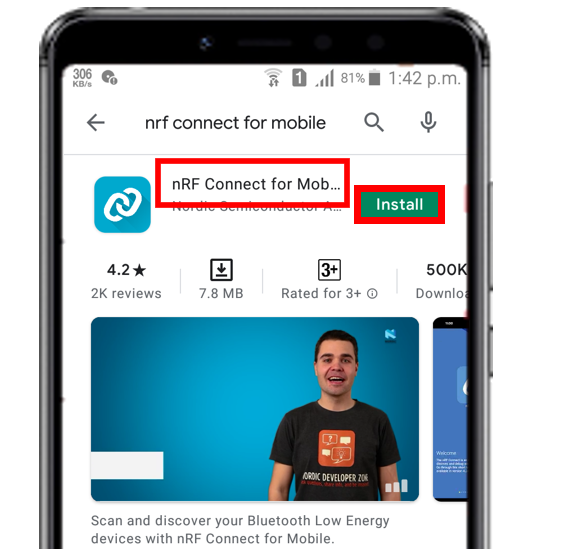
To perform the testing functionality of the ESP32 BLE server on a cell phone we will need a phone which supports a BLE connection. After you have got your hands on one, open the Play Store and search for ‘nRF Connect for Mobile.’ This is a free app that will help us to check for the connection. Install the app on your cell phone.
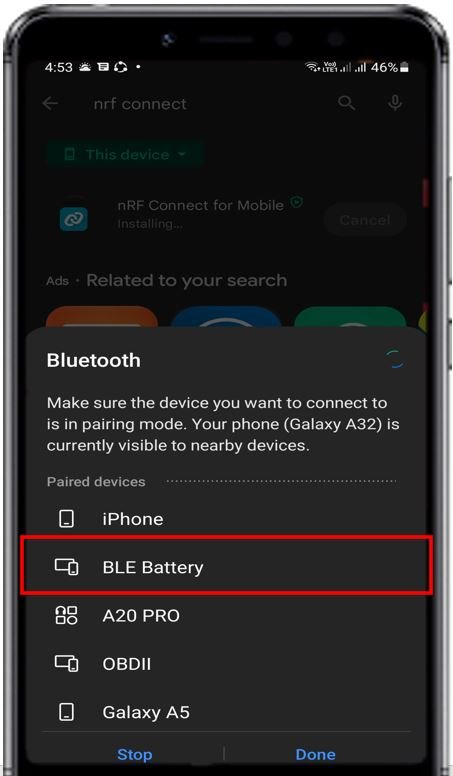
Before proceeding further, enable the Bluetooth on your smartphone and pair it with “BLE Battery” which is the name of our BLE device.
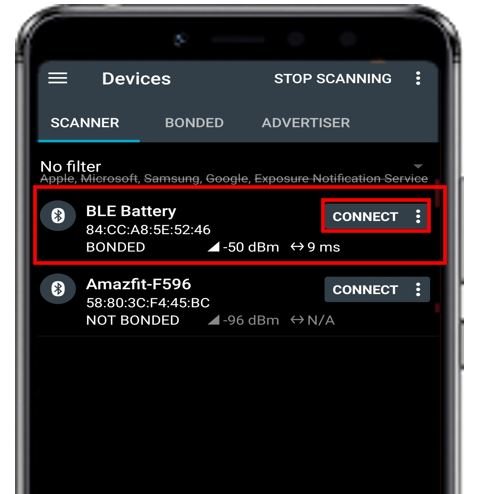
Now, open the nRF Connect for Mobile application and tap the Scan button. This will scan for all the devices which are close to the cell phone. Thus, our BLE device will also get scanned and you will be able to see ‘BLE Battery’ written among the scanned devices as shown below. Connect with it.
Now, tap the Connect button and the following appears on the cell phone screen.
The Service (Battery Service) and the Characteristic (Battery Level) which we had defined in the program code can be viewed here. It displays “Percentage 0-100” which we set as our characteristic value and both the service and the characteristic UUIDs are also visible with the properties: Read and notify. The current battery value is 61% which gets incremented after every 5 seconds.

You may also like to read: