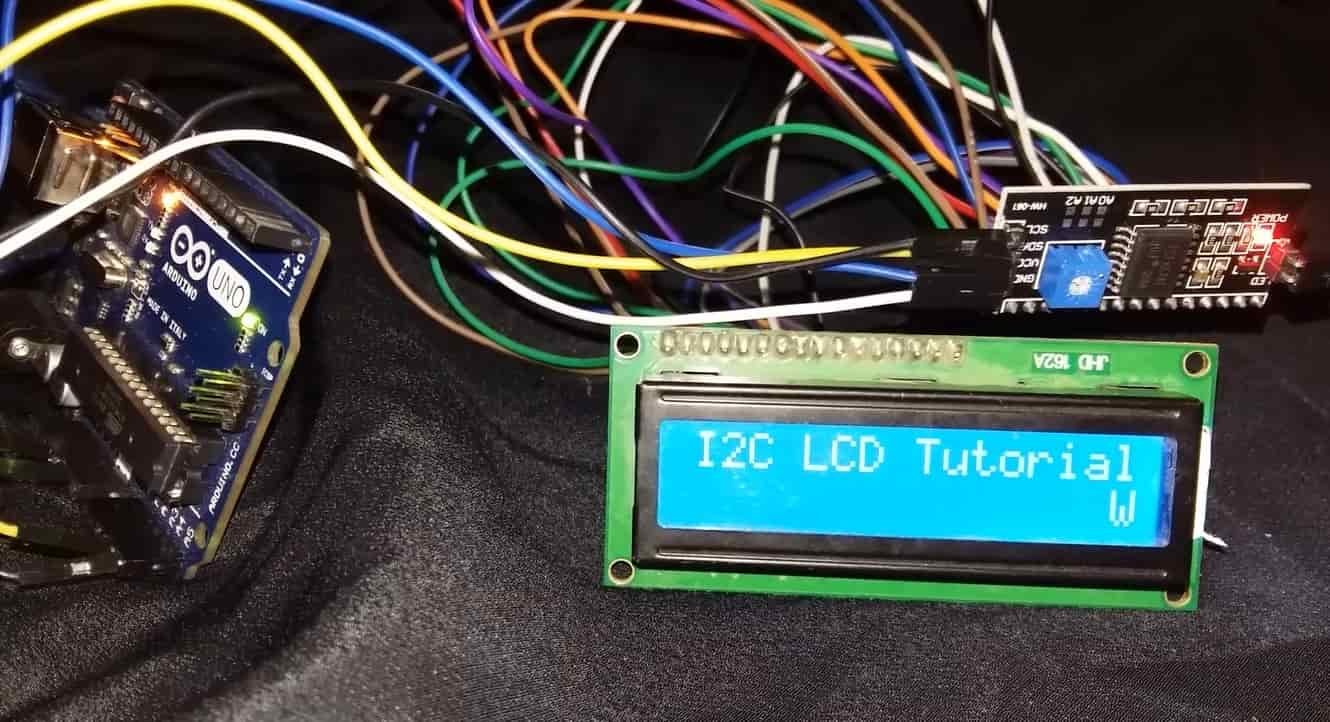
In this tutorial, we will learn how to interface I2C LCD with Arduino and how to display static, scrolling, and custom characters on I2C LCD. This I2C LCD is a 16×2 device which means it can display 16 columns by two rows of characters. The characters are alphanumeric, but you can create custom characters for basic graphics, bar graphs that kind of thing. The LCD has the usual type of hd44780 controller, and it also has an I2C circuit connected with it which makes it easy to connect to the Arduino board. 16X2 LCD without I2C circuit has sixteen pins.
You can find more information about the pins by going to this article:16×2 Liquid crystal display
But if we want to connect this board directly with Arduino, we have to use at least eight pins of Arduino which will be a waste. So the better solution is to use an I2C LCD instead of typical 16×2 LCD. In this tutorial, we are using 16×2 I2C LCD, but LCD of any size will also work the same way as we will learn in this tutorial. The advantage of using an I2C LCD is that we only need to use four pins (including the VCC and GND pins) of Arduino to connect with this display.
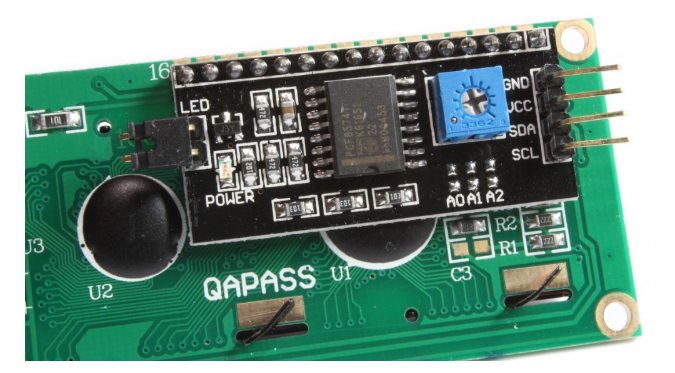
At the backside of this liquid crystal display, you can also see a variable resistor. This variable resistor is used to modify the brightness of the LCD. This potentiometer is very handy when you are using this display module in different light conditions.
We have a similar guide with ESP32 and ESP8266:
Recommended Components
The following components are used in this project or are helpful for building it with the Arduino.
| Component | How it’s used in this project | Buy on Amazon |
|---|---|---|
| Arduino Uno R3 | The main controller board that drives the LCD over I2C to display the scrolling text and custom characters. | Check Price |
| Breadboard | Solderless board to build and prototype the circuit without soldering. | Check Price |
| Jumper Wires | Used to connect the LCD’s four I2C pins to the Arduino. | Check Price |
| 16×2 I2C LCD | The 16×2 character LCD with I2C backpack that shows the scrolling text and custom characters using just two data lines. | Check Price |
As an Amazon Associate we earn from qualifying purchases. Prices and availability are accurate as of the date/time indicated and are subject to change.
I2C LCD Pinout
So now let’s start with the pinout of this display. This display has four pins:
- Ground pin
- Vcc pin
- SDA
- SCL
Now let’s see how to connect this LCD with Arduino UNO.
Interfacing I2C LCD with Arduino
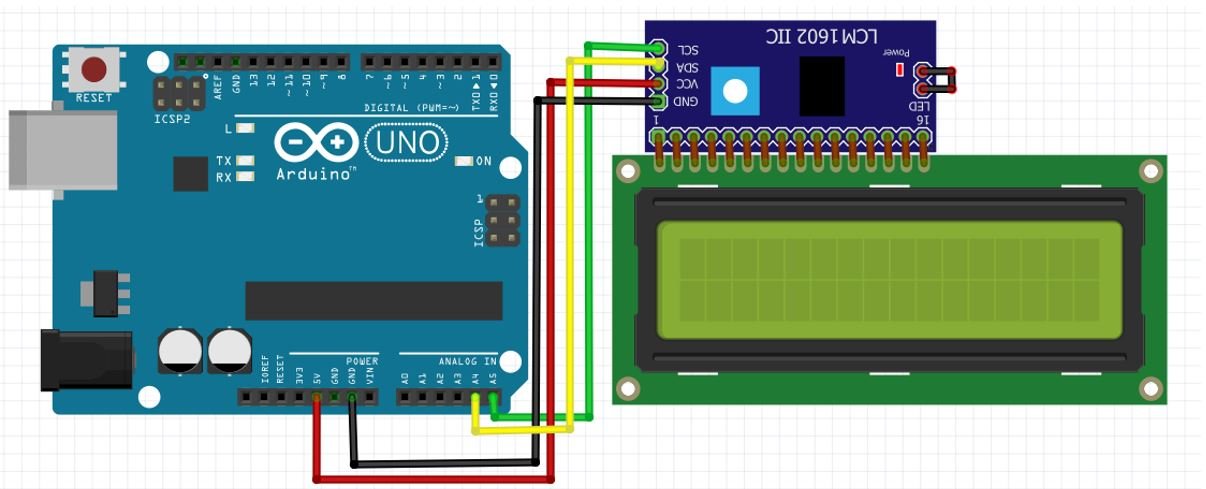
Now we will see the wiring diagram of I2C LCD with Arduino UNO. The wiring diagram is straightforward.
In this circuit, we are using the default I2C communication pins of Arduino UNO. In this board, A5 is the default SCL pin, and A4 is the default SDA pin for I2C communication. So you need to connect A5 with SCL pin of LCD and A4 with SDA pin of liquid crystal display. You can also check to this table for wiring connections.
| Arduino UNO | I2C LCD |
|---|---|
| A5 | SCL |
| A4 | SDA |
| GND | GND |
| 5V | VIN |
Installing I2C LCD Arduino Library
So we will move to the coding part. Before writing code, we need to prepare the Arduino IDE to write code.
We will introduce the library of I2C LCD in Arduino IDE. This library is not available in the compiler. So we need to install an external library. There are many I2C LCD libraries available. You can use different libraries if you want. But in this tutorial, we are using the library developed by johnrickman. Now add this library by following these steps:
- Go to this link and download the I2C LCD library.
- The file which you download in the last step will be a compressed or zip file. Now unzip this file.
- After unzipping the file, you will get a folder with the name of LiquidCrystal_I2C-master.
- Rename this folder
LiquidCrystal_I2C-masterto LiquidCrystal_I2C. - Now close the Arduino software, if you have already opened it.
- Now copy this folder inside the library folder of your Arduino IDE.
- Now open your Arduino software. Your library will be included successfully.
Till now you have successfully installed the library and made the circuit diagram.
Getting I2C LCD Address
When you connect your I2C display with Arduino, you need to check its address. Because every I2C device has an address associated with it. For many devices of I2C LCD, the default address is 0x27 where 0x shows hex format of the numbers. But address can be different in some cases. This address depends on the position of pads A0, A1, and A2 on the I2C controller on this device. As you can see, we have three soldering pads, so we can have 8 different values of address depending on the connections of the pads.
| Pad A0 | Pad A1 | Pad A2 | HEX Address |
| 1 | 1 | 1 | 0x27 |
| 0 | 1 | 1 | 0x26 |
| 1 | 0 | 1 | 0x25 |
| 0 | 0 | 1 | 0x24 |
| 1 | 1 | 0 | 0x23 |
| 0 | 1 | 0 | 0x22 |
| 1 | 0 | 0 | 0x21 |
| 0 | 0 | 0 | 0x20 |
But you don’t need to worry about the internal connections of this device; we will use the code given below to check the address of the controller. Now copy this code and upload it your board.
#include <Wire.h> // This library includes I2C communication functions

void setup() {
Wire.begin();
Serial.begin(115200);
Serial.println("Scanning for I2C devices");
}

void loop() {
byte error_i2c, address_i2c;
int I2C_Devices;
Serial.println("Scanning started");
I2C_Devices = 0;
for(address_i2c = 1; address_i2c < 127; address_i2c++ )
{
Wire.beginTransmission(address_i2c);
error_i2c = Wire.endTransmission();
if (error_i2c == 0) {
Serial.print("I2C device found at address_i2c 0x");
if (address_i2c<16)
{
Serial.print("0");
}
Serial.println(address_i2c,HEX);
I2C_Devices++;
}
else if (error_i2c==4)
{
Serial.print("Unknow error_i2c at address_i2c 0x");
if (address_i2c<16)
{
Serial.print("0");
}
Serial.println(address_i2c,HEX);
}
}
if (I2C_Devices == 0)
{
Serial.println("No I2C device connected \n");
}
else {
Serial.println("done I2C device searching\n");
}
delay(2000);
}

This code will search for devices connected with pins A4 and A5 and display its result on the serial monitor. After connecting the device with Arduino properly, you will get this message on the serial monitor. This message shows the address of liquid crystal display which is 0x27. You will most likely get the same address for LCD with 16 columns and 2 rows.
Displaying Text on I2C LCD
In this section, we will display a static message on the screen.
#include <LiquidCrystal_I2C.h>

int totalColumns = 16;
int totalRows = 2;

LiquidCrystal_I2C lcd(0x27, totalColumns, totalRows);

void setup(){
lcd.init();
lcd.backlight(); // use to turn on and turn off LCD back light
}

void loop()
{
lcd.setCursor(0, 0);
lcd.print("Microcontrollers");
lcd.setCursor(0,1);
lcd.print("I2C LCD tutorial");
delay(1000);
lcd.clear();
lcd.setCursor(0, 0);
lcd.print("Static text");
delay(1000);
lcd.setCursor(0,1);
lcd.print("I2C LCD tutorial");
delay(1000);
lcd.clear();
}
This code will display the message “Microcontrollers” in the first row and “I2C LCD tutorial” in the second row for one second. After that, it will clear the LCD and displays “Static text” in the first row and “I2C LCD tutorial” in the second row as shown below.
How the Code Works?
Now we will see the working of code. This line will add the library in the code.
#include <LiquidCrystal_I2C.h>These two variables define the name of the total number of rows and columns of the display which in our case is 16×2. If you want to use a screen of any other size, you need to need to change the number here accordingly, for example, the 20×4 display.
int totalColumns = 16;
int totalRows = 2;
This line is used to initialize the library with the address of LCD, the total number of columns and rows. The first argument to this function is an address which we have found in the last example. Second and thirds arguments are the size in terms of the number of columns and number of rows.
LiquidCrystal_I2C lcd(0x27, totalColumns, totalRows);Inside the setup(), we first initialized the LCD with above-mentioned parameters.
lcd.init();This backlight() function is used to turn on or turn off the backlight. Every LCD has a backlight built-in inside it, so you can control it through this function.
lcd.backlight();In loop() part, code is used to display messages and also to clear the message for LCD. To display anything text on LCD, first, you need to set the cursor position. Cursor position defines where you want to display the text. The setCursor() function is used to set the position. For example, if you want to set the cursor to the first row and first column, you will use this function like this:
lcd.setCursor(0,0);If you want to set the cursor to the first column and second row, you will use this function like this:
lcd.setCursor(0,1);First values inside this function define column number and second value defines row number. So inside the loop(), first we set the cursor to the first row and second column. After that lcd.print() will display the message “Microcontrollers” in the first row.
lcd.setCursor(0, 0);
lcd.print("Microcontrollers");
Similarly, these two lines will set the cursor to the second row and display the text “I2C LCD tutorial” on the second row. For one second same text will be displayed in the first and second row. The delay() is used to add the delay of one second.
lcd.setCursor(0,1);
lcd.print("I2C LCD tutorial");
delay(1000);
After waiting for one second, clear() will erase the text.
lcd.clear();Now the other section of the code also works in the same way.
lcd.setCursor(0, 0);    // move cursor to starting position
lcd.print("Static text");  // display text " Static text"
lcd.setCursor(0,1);       // move the curos to second row
lcd.print("I2C LCD tutorial");   //display a string
delay(1000);               //  add delay of 1 second
lcd.clear();                 // clear the screen
Demonstration
To see the demonstration of this project, upload the code to the your board. But, before uploading code, make sure to select Arduino Uno from Tools > Board and also select the correct COM port to which the board is connected from Tools > Port.

Once the code is uploaded to the board, adjust the brightness of the display through the potentiometer until the LCD starts displaying the messages:
Display Scrolling Text on I2C LCD using Arduino
Open your Arduino IDE and go to File > New. A new file will open. Copy the code given below in that file and save it.
In this section, we will display a scrolling message on the screen.
#include <LiquidCrystal_I2C.h>

int totalColumns = 16;
int totalRows = 2;

LiquidCrystal_I2C lcd(0x27, totalColumns, totalRows);

String staticMessage = "I2C LCD Tutorial";
String scrollingMessage = "Welcome to Microcontrollerslab! This is a scrolling message.";

void scrollMessage(int row, String message, int delayTime, int totalColumns) {
  for (int i=0; i < totalColumns; i++) {
    message = " " + message;
  }
  message = message + " ";
  for (int position = 0; position < message.length(); position++) {
    lcd.setCursor(0, row);
    lcd.print(message.substring(position, position + totalColumns));
    delay(delayTime);
  }
}

void setup(){
  lcd.init();
  lcd.backlight();
}

void loop(){
  lcd.setCursor(0, 0);
  lcd.print(staticMessage);
  scrollMessage(1, scrollingMessage, 250, totalColumns);
}
How the Code Works?
This line will add the library in the code.
#include <LiquidCrystal_I2C.h>These two variables define the name of the total number of rows and columns of the display which in our case is 16×2. If you want to use the screen of any other size, you need to need to change the number here accordingly, for example, 20×4 display.
int totalColumns = 16;
int totalRows = 2;
This line is used to initialize the library with the address of LCD, the total number of columns and rows. The first argument to this function is an address which we have found in the last example. Second and thirds arguments are the size in terms of the number of columns and number of rows.
LiquidCrystal_I2C lcd(0x27, totalColumns, totalRows);Next, we will define two string variables that will hold the static and the scrolling message that we will display on the LCD.
String staticMessage = "I2C LCD Tutorial";
String scrollingMessage = "Welcome to Microcontrollerslab! This is a scrolling message.";
scrollMessage()
The user defined scrollMessage() function will be used to scroll a text on the LCD. It takes in four arguments. The first is the row where we will display our message. The second is the message that will be displayed. The third is the delay time that will control the speed of the scrolling text. Lastly, the fourth argument is the total columns of the LCD.
void scrollMessage(int row, String message, int delayTime, int totalColumns) {
  for (int i=0; i < totalColumns; i++) {
    message = " " + message;
  }
  message = message + " ";
  for (int position = 0; position < message.length(); position++) {
    lcd.setCursor(0, row);
    lcd.print(message.substring(position, position + totalColumns));
    delay(delayTime);
  }
}
setup()
Inside the setup(), we first initialized the LCD with above-mentioned parameters.
lcd.init();This backlight() function is used to turn on or turn off the backlight. Every LCD has a backlight built-in inside it, so you can control it through this function.
lcd.backlight();loop()
In loop() part, we will first set the cursor and then print the static message by using lcd.print() and pass the staticMessage as an argyment inside it. Then call the scrollMessage() function and pass ‘1’ as the starting row, ‘scrollingMessage’ as the message to be displayed, 250ms delay time and specify the ‘totalColumns’ of the LCD.
void loop(){
  lcd.setCursor(0, 0);
  lcd.print(staticMessage);
  scrollMessage(1, scrollingMessage, 250, totalColumns);
}
Demonstration
To see the demonstration of this project, upload the code to the board. But, before uploading code, make sure to select Arduino Uno from Tools > Board and also select the correct COM port to which the board is connected from Tools > Port.
Once the code is uploaded to the board, adjust the brightness of the display through the potentiometer until the LCD starts displaying the messages:
Display Custom Characters on I2C LCD using Arduino
In this section, we will display custom characters on the LCD screen.
For our 16×2 LCD display that we are using, we have the option to display custom characters as well. In this particular LCD, each block consists of 5×8 pixels. These can be used to display custom characters by setting the state of each pixel by inside a byte variable.
There is a very simple way to generate the byte variable of your own custom character. Head over to the following custom character generator: (Custom Character Generator for HD44780 LCD Modules).
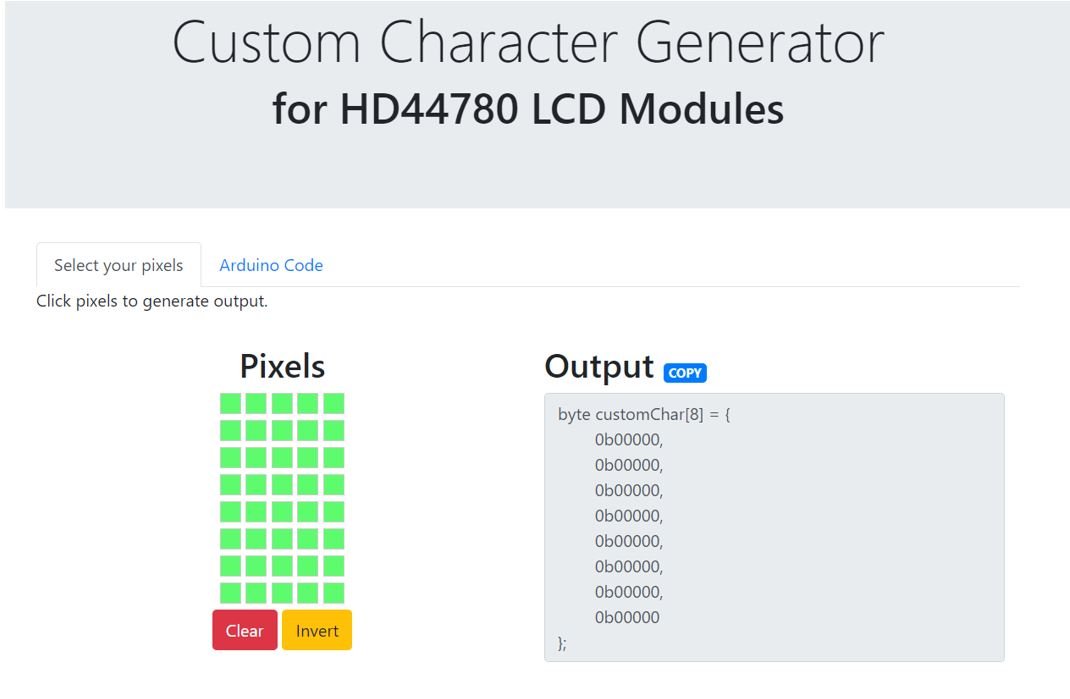
Specify the custom character you want to display by clicking the pixels in the 5×8 pixel block and the corresponding byte variable will be generated.
In our case, we will display a ‘+’ character on the screen. This is the byte variable that we will use in our program code to display this particular character on the LCD.

Arduino Sketch
Open your Arduino IDE and go to File > New. A new file will open. Copy the code given below in that file and save it.
In this sketch, we will display a custom character on the LCD.
#include <LiquidCrystal_I2C.h>

int totalColumns = 16;
int totalRows = 2;

LiquidCrystal_I2C lcd(0x27, totalColumns, totalRows);

byte customChar[8] = {
  0b00000,
  0b00100,
  0b00100,
  0b11111,
  0b00100,
  0b00100,
  0b00000,
  0b00000
};

void setup()
{
  lcd.init();
  lcd.backlight();
  lcd.createChar(0, customChar);
}

void loop()
{
 lcd.setCursor(0, 0);
 lcd.write(0);
}
How the Code Works?
Include the byte variable that we obtained from the custom character generator. This is the byte variable for a ‘+’ character.
byte customChar[8] = {
  0b00000,
  0b00100,
  0b00100,
  0b11111,
  0b00100,
  0b00100,
  0b00000,
  0b00000
};
Inside the setup() function we will create the custom character by calling lcd.createChar() and pass a number between 0-7 (allocated location) and the byte variable as parameters inside it.
lcd.createChar(0, customChar);
Inside the loop() function we will display our character using lcd.write() and pass the allocated location as the parameter.
void loop()
{
 lcd.setCursor(0, 0);
 lcd.write(0);
}
Demonstration
To see the demonstration of this project, upload the code to the board. But, before uploading code, make sure to select Arduino Uno from Tools > Board and also select the correct COM port to which the board is connected from Tools > Port.
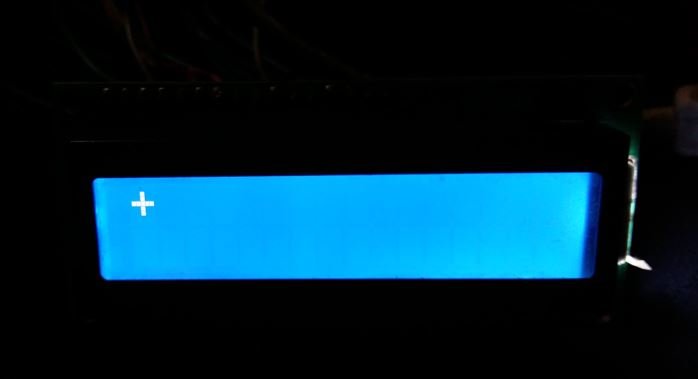
Once the code is uploaded to the board, adjust the brightness of the display through the potentiometer until the LCD starts displaying the character:
Excelente trabajo ,muy bien explicado .Gracias.
Como disminuyo el parpadeo de la pantalla, gracias
Hey,
thanks for your code. I managed to get this working without delay.
Please help yourself to my code below with timers.
#include “Wire.h”
#include
int totalColumns = 16;
int totalRows = 2;
LiquidCrystal_I2C lcd(0x27, totalColumns, totalRows);
unsigned long previous=0;
unsigned long prev=0;
int pos=0;
String staticMessage = “I2C LCD Tutorial”;
String scrollingMessage = “Welcome to Microcontrollerslab! This is a scrolling message.”;
int scrollMessage(int row, String message, int totalColumns, int position) {
unsigned long current=millis();
if (current-previous>400) {
previous=millis();
for (int i=0; i < totalColumns; i++) {
message = " " + message;
}
message = message + " ";
lcd.setCursor(0, row);
lcd.print(message.substring(position, position + totalColumns));
if (position1000) {
prev=millis();
lcd.setCursor(0,1);
lcd.print(“Test”);
}
pos=scrollMessage(0, scrollingMessage, totalColumns, pos);
}
Guess something doesnt work with the encoding…
I’ll try it once more. the code seems to be correct until “if(position1000) {…
if (position1000) {
prev=millis();
lcd.setCursor(0,1);
lcd.print(“Test”);
}
pos=scrollMessage(0, scrollingMessage, totalColumns, pos);
}