Shift registers are a powerful concept in LabVIEW programming that allows us to pass values from previous iterations through a loop to the next iteration. In this tutorial, we will explore the working principles and benefits of using shift registers with loops. We will start with an explanatory introduction that covers the basics of shift registers and their uses. Then, we will dive into a LabVIEW program that demonstrates the use of shift registers with a while loop. We will also learn how to expand a shift register and access values from previous iterations. By the end of this tutorial, you will have a solid understanding of shift registers and their application in LabVIEW programming. So let’s get started!
Shift Registers in LabVIEW
When we want to pass values from previous iterations through a loop to the next iteration, we need shift registers. These are shown below; they are basically a pair of terminals placed directly opposite each other on the vertical sides of the loop border.
How to Get Shift Registers in LabVIEW
On the right side of the loop, a terminal is present that contains an up arrow, and this terminal stores data on the completion of the iteration. Data stored in the right terminal of the shift register is transferred to the left terminal in LabVIEW. The data from the left terminal is then used by the loop as the initial values for the next iteration. Until all the iterations of the loop are executed, this process continues. The terminal on the right side of the loop returns the last value stored in the shift register after every execution of the loop.
Any data type can be transferred using the shift register, and it automatically changes to the data type of the first object wired to it. The data type of the data wired to each of the terminals should be the same.
Multiple Shift Registers
Multiple shift registers can be added to one loop. We use them to store the data values from different processes within the loop if we have multiple operations that use the values from previous iterations within the loop.
A shift register must always be initialized in the case of a while loop. When it is not initialized, “while loops” produce default data. We must wire the shift register to 0 if we want a for loop to produce default data. If we wire an empty array to the For Loop as an input with auto-indexing enabled, it will still produce default data. Shift registers are used to transfer values through a loop, whether or not the loop executes.
LabVIEW Program to Use Shift Registers
Let’s move to LabVIEW and try to understand the work of shift registers in depth. Create a blank VI as discussed in tutorial 1 and save it as we have done in all previous tutorials.
While Loop
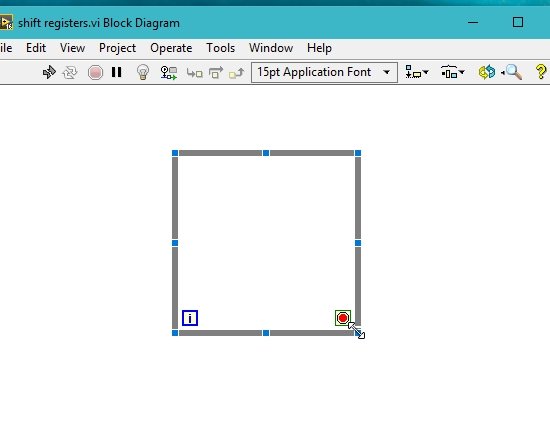
From the Function Palette, select Structures, then select While Loop and place it on the block diagram. We have been using for loops in all previous tutorials; let’s work with while loops in this one. You must have done the exercise we gave you to do by yourself in the previous tutorials, and you must be familiar with the working principle of a while loop. Refer to the figure below.
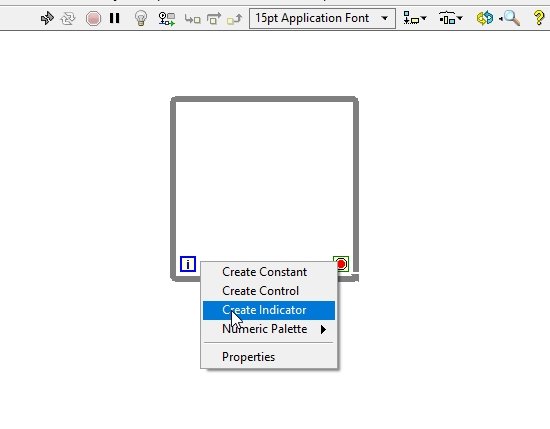
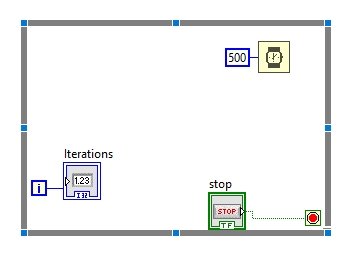
Right-click on the iterative index, and a drop-down menu will appear. Select Create Indicator. This will create a numeric indicator; see the figure below.
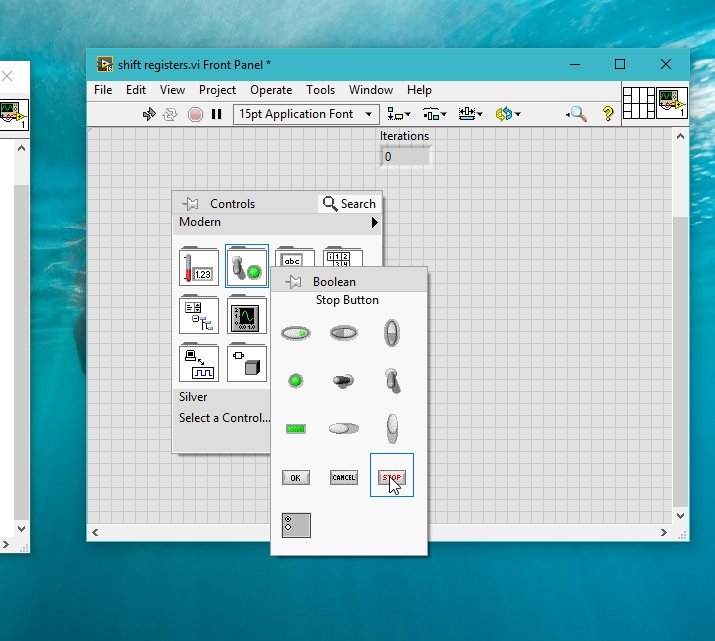
Right-click on the front panel from the Control Palette, select Boolean, and then select the Stop button, as shown in the figure below.
On the block diagram, the respective block of the stop button will appear. Connect this block to the loop condition of the while loop (a red dot at the bottom right corner), and the resulting block diagram will look like the one shown below.
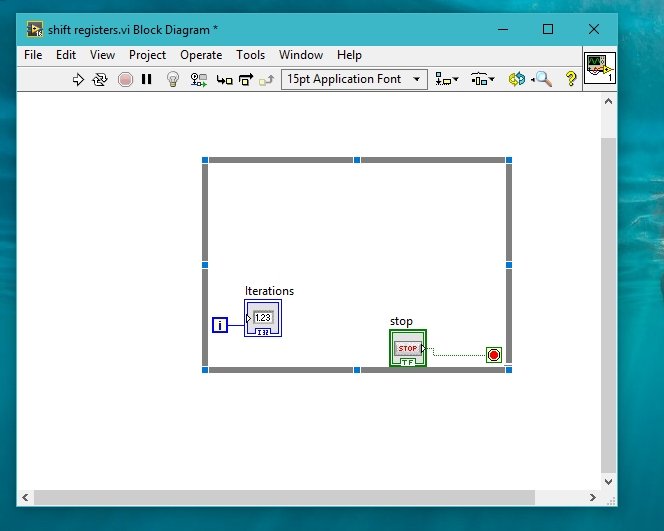
Block Diagram While Loop
Now, what is not present in the block? A wait watch to control the time of each iteration. Let’s add a wait watch and set its time to 0.5 seconds.
Do yourself: Place the wait watch as we have done in previous tutorials.
- After the placement of the wait watch, the complete block diagram will look like the one shown in the figure below.
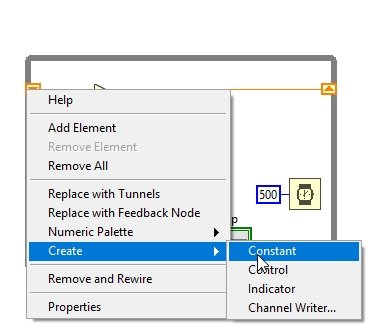
Adding Shift Register
- Right-click on the boundary of the while loop, and a dropdown will appear as shown in the figure below. Select the Shift Register from the menu.
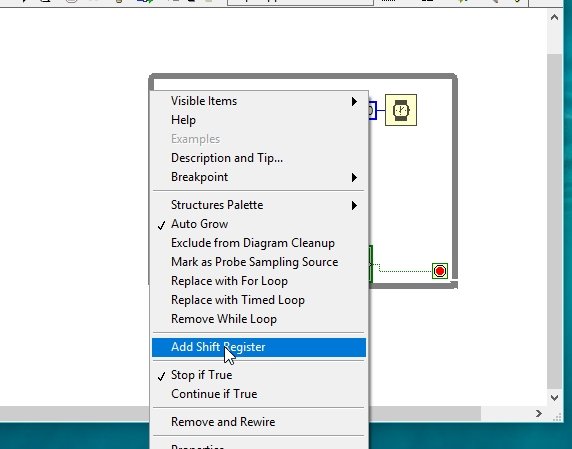
Block Diagram Connections
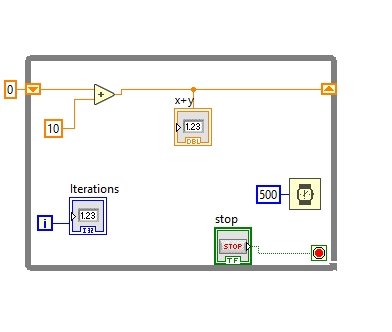
This will place a pair of shift registers on each side of the loop, one pointing up and the other pointing down. Now place an addition block inside the for loop and connect the left to one of its inputs, and at the other input, connect a constant with a value of 10 in it, as shown below.
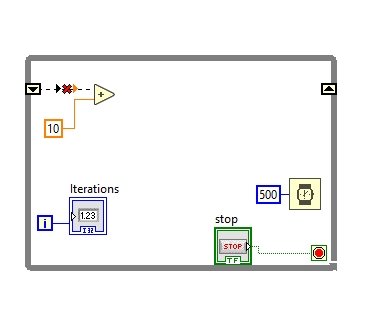
Shifting Values
The wire connected to the shift register is broken because, right now, no value is stored in it; it is void. Connect the output of the add block to the right side, as shown above. This will provide input to the previous value of the register, and this value will move to the left shift register in the next iteration. In each iteration, the previous value is added, with 10 placed in the next register and then moved forward to the one below it for the next iterations. Every subsequent number will increase by 10, more than the previous; see the figure below.
Initializing Shift Register
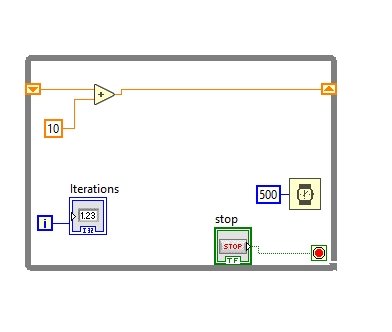
Now, who will tell the registers where to start? The shift register should always be initialized. Right-click on it, create a Constant, and place a zero in it. This is where the register will start processing.
Now, if we want to see the value stored in the register at each iteration, place an indicator at the output of the addition block as shown below.
This gives the value of the sum after iteration. Run the program and see the results. The sum of the blocks will update by 10 every half a second; see the figure below.
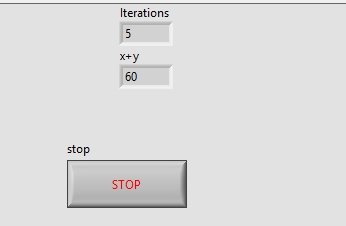
Starting from 0 at the 5th iteration, the number of additions is 60 (adding 10 at each iteration). If we want to stop the execution, we press the stop button.
There is another important feature of the shift register, and that is that we can expand it down on the left side. This allows us to access not only the value from the previous iteration but also the one before that. See the figure below.

But when we use more than one register, we must initialize all of them in order to make them start together. Place an indicator on both of them and see the values of both registers at each iteration.
Exercise
- See the results of the expanded shift register and try to understand them.
- Try to work with shift registers using for loop.
Conclusion
In conclusion, shift registers are a powerful tool in LabVIEW programming that allow us to pass values from previous iterations through a loop to the next iteration. By understanding the working principles of shift registers, we can enhance the functionality of our programs and access data from previous iterations. In this tutorial, we explored the basics of shift registers and learned how to use them with a while loop in LabVIEW. We also discovered the benefits of expanding shift registers to access values from multiple iterations. With this knowledge, we can effectively utilize shift registers in our LabVIEW programs and improve their efficiency.
You may also like to read:
- 74LS323 8-Bit Universal Shift Register IC
- CD4035 4-Stage Parallel in Parallel out Shift Register
- MPLAB XC8 Compiler – Write your First Program
- ESP8266 OTA Over The Air Programming using AsyncElegantOTA Library and Arduino IDE
This concludes today’s article. If you face any difficulties or issues, let us know in the comment section below.