Through this article, you will learn how to make HTTP GET requests from OpenWeatherMap API with ESP32/ESP8266 in acquiring useful data using MicroPython firmware. With the help of OpenWeatherMap API, we will make HTTP GET request to obtain current weather readings and display those readings on the MicroPython terminal.
Recommended Components
The following components are used in this project or are helpful for getting started with MicroPython on ESP32 and ESP8266.
| Component | How it’s used in this project | Buy on Amazon |
|---|---|---|
| ESP32 Development Board (DevKit V1) | The ESP32 board flashed with MicroPython firmware. | Check Price |
| ESP8266 NodeMCU (ESP-12E) | The ESP8266 NodeMCU running the same MicroPython code. | Check Price |
| Micro USB Cable | Programs and powers the board from your PC. | Check Price |
As an Amazon Associate we earn from qualifying purchases. Prices and availability are accurate as of the date/time indicated and are subject to change.
We have a similar guide for ESP32 using Arduino IDE and for Raspberry Pi Pico W using MicroPython:
- HTTP GET using ESP32 and Arduino IDE (OpenWeatherMap.org and ThingSpeak)
- Raspberry Pi Pico W OpenWeatherMap API Sensorless Weather Station
This article covers the followings:
- Introduction to API and OpenWeatherMap
- Setting up and accessing the OpenWeatherMap API
- Introduction to JSON Script
- A simple Micro-Python Script to decode JSON data from the API
Prerequisites
Before we start this lesson make sure you are familiar with and have the latest version of MicroPython firmware installed in your ESP boards and have a running Integrated Development Environment (IDE) in which we will be doing the programming such as uPyCraft IDE or Thonny IDE.
- Getting Started with uPyCraft IDE on ESP32 and ESP8266
- Getting Started with Thonny MicroPython IDE for ESP32 and ESP8266
You should also know how to connected ESP32/ESP8266 boards with WiFi networking using network library of MicroPython. If you don’t know, you can read these getting started guides:
OpenWeatherMap Introduction
API
Application Programming Interface or API in short is an interface through which different services communicate with one another without knowing the complex structures through which they are implemented. This is advantageous as it makes our whole process simpler, cost-effective and less time-consuming. In easy terms, APIs conveys a user’s response to a system and in return sends the system’s response back to the user.
Although there are several different types of APIs, the one which we will be focusing on is called a web API. Its main aspect is to send requests from web applications and responses from servers through the Hypertext Transfer Protocol (HTTP). This is usually done in the JavaScript Object Notation (JSON) format.
OpenWeatherMap API
OpenWeatherMap is an online webpage that gives the user information about the weather parameters for any set location. These include temperature, precipitation, humidity, pressure, wind, and even forecasts to name a few.
It has accurate and fast APIs which perform this functionality. In our project, we will be requesting the weather forecast for our set location through this API. Before we describe our project in detail, first we have to set up an account in the OpenWeatherMap.
Using OpenWeatherMap API

Go to the following webpage: https://openweathermap.org/appid/ to open the API. You will see the following window when the web page loads. Click ‘here’ as shown in the red box to sign up.

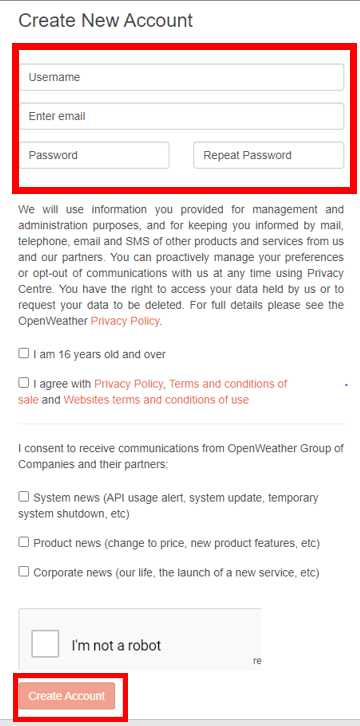
You will be shown a page where you will have to add your username, password and some other details to create your account. Complete all the details, tick the relevant fields and then click on the ‘Create Account’ button.
The webpage will send a confirmation link to the email address you provided. After confirmation, the following appears:

Now, go to the ‘API keys’ tab and the following window will appear, carrying your unique API key.

The key highlighted in the red box is your unique key which we will be using later. Save this key and for security reasons do not share it with anyone.
Obtaining the Weather Update
Now as we have set up our account with OpenWeatherMap and have also obtained our key let see look into how to get weather update for a location of our choice. You will have to type the following URL in a new tab:
http://api.openweathermap.org/data/2.5/weather?q=your_city, your_country_code&APPID=your_unique_API_key
There are three parameters which we are specifying in the URL. First ‘q=your_city’ is the name of the city whose weather update you are acquiring. Second, ‘your_country_code’ specifies the country code of the city you specified before. Third, you will enter your unique API key which we just saved before.
Let us take a simple example. For example, if we want to know the weather update of the city Seoul in South Korea, we will enter the following URL:
http://api.openweathermap.org/data/2.5/weather?q=Seoul,KR&APPID=68de4b6c1e6--------------b4213a2
Copy the following URL in a new window and the following parameters pop up. This is the current weather update of Seoul, South Korea (same time report).

As you see above, the information is not easy to decipher. In fact, is in JSON script which we will now learn how to read.
MicroPython: Reading the JSON Script
The syntax we obtained above was in JavaScript Object Notation or JSON in short. APIs usually communicate through this universally accepted script for ease. As you can see there are different types of symbols including {} [] “ ”,
The following rules apply to JSON Script
- Data is depicted through name/value pairs
- After every name, we put a colon (:)
- Commas (,) separate the names
- Curly brackets {} are used for objects
- Square brackets [] are used for arrays
Now I will arrange the JSON Script which we obtained for Seoul in a readable manner according to the rules stated above.
according to the rules stated above.
 {
 "coord":{
 "lon":126.9778:,
 "lat":37.5683
 },
 "weather":[{
 "id":800,
 "main":"Clear",
 "description":"clear sky",
 "icon":"01d"
 }
 ],
 "base":"stations",
 "main":{
 "temp":291.52,
 "feels_like":290.59,
 "temp_min":290.15,
 "temp_max":292.15,
 "pressure":1021,
 "humidity":45},
 "visibility":10000,
 "wind":{
 "speed":6.17,
 "deg":110
 },
 "clouds":{
 "all":0
 },
 "dt":1619314324,
 "sys":{
 "type":1,
 "id":8105,
 "country":"KR",
 "sunrise":1619297049,
 "sunset":1619345742
 },
 "timezone":32400,
 "id":1835848,
 "name":"Seoul",
 "cod":200
 }
MicroPython Script: HTTP GET OpenWeatherMap.org
As we have already seen how to obtain weather updates from the OpenWeatherMap API on a URL, now we will use the ESP32/ESP8266 development board to display the current weather parameters (temperature, pressure, humidity, and wind) from the API and onto the shell terminal of our uPyCraft IDE.
Create a new Micropython file in uPyCraft ide or thonny IDE and save it as boot.py. Copy the code given below.
# Visit Microcontrollerslab.com for complete project details

import time

try:
  import urequests as requests
except:
  import requests

try:
  import ujson as json
except:
  import json

import network

import esp
esp.osdebug(None)

import gc
gc.collect()

sssid = 'REPLACE_WITH_YOUR_SSID'
password = 'REPLACE_WITH_YOUR_PASSWORD'

city = 'REPLACE_WITH_YOUR_CITY_NAME'
country_code = 'REPLACE_WITH_YOUR_2_LETTER_COUNTRY_CODE'
#example
#city = 'Lahore'
#country_code = 'PAK'

open_weather_map_api_key = 'f19282a3fe5af10cce5eb39f29d767e0'

station = network.WLAN(network.STA_IF)

station.active(True)
station.connect(ssid, password)

while station.isconnected() == False:
  pass

print('Connection successful')
print(station.ifconfig())

#set your unique OpenWeatherMap.org URL
open_weather_map_url = 'http://api.openweathermap.org/data/2.5/weather?q=' + city + ',' + country_code + '&APPID=' + open_weather_map_api_key

weather_data = requests.get(open_weather_map_url)
print(weather_data.json())

# Location (City and Country code)
location = 'Location: ' + weather_data.json().get('name') + ' - ' + weather_data.json().get('sys').get('country')
print(location)

# Weather Description
description = 'Description: ' + weather_data.json().get('weather')[0].get('main')
print(description)

# Temperature
raw_temperature = weather_data.json().get('main').get('temp')-273.15

# Temperature in Celsius
temperature = 'Temperature: ' + str(raw_temperature) + '*C'
#uncomment for temperature in Fahrenheit
#temperature = 'Temperature: ' + str(raw_temperature*(9/5.0)+32) + '*F'
print(temperature)

# Pressure
pressure = 'Pressure: ' + str(weather_data.json().get('main').get('pressure')) + 'hPa'
print(pressure)

# Humidity
humidity = 'Humidity: ' + str(weather_data.json().get('main').get('humidity')) + '%'
print(humidity)

# Wind
wind = 'Wind: ' + str(weather_data.json().get('wind').get('speed')) + 'mps ' + str(weather_data.json().get('wind').get('deg')) + '*'
print(wind)
How the Code Works?
Import Libraries
We will start off by importing all the necessary libraries, modules, and classes. urequests and ujson libraries are used in making HTTP GET and POST requests to get and send required data to a web client or web server. The network library is necessary as we have to connect our ESP boards to the local network through the router.
import time

try:
  import urequests as requests
except:
  import requests

try:
  import ujson as json
except:
  import json

import network

import esp
esp.osdebug(None)

import gc
gc.collect()
Connecting to Network
The next step is to enter all your credentials including the local network as well as the location parameters. Enter your Wi-fi name and password through which you will be connecting your ESP board. Then enter the city name, its two-digit country code, and the unique API key which you would have already saved before. Note the API key is different for every user and should not be shared.
sssid = 'REPLACE_WITH_YOUR_SSID'
password = 'REPLACE_WITH_YOUR_PASSWORD'

city = 'REPLACE_WITH_YOUR_CITY_NAME'
country_code = 'REPLACE_WITH_YOUR_2_LETTER_COUNTRY_CODE'
#example
#city = 'Lahore'
#country_code = 'PAK'

open_weather_map_api_key = 'f19282a3fe5af10cce5eb39f29d767e0'
Then connect to your local network through the following block of code.
station = network.WLAN(network.STA_IF)

station.active(True)
station.connect(ssid, password)

while station.isconnected() == False:
  pass

print('Connection successful')
print(station.ifconfig())
Make HTTP GET Request
Next, comes the important part. We will now be creating an API request by forming a variable ‘open_weather_map_url’ which contains the URL which displays the weather updates. This URL will be fed with the location and key parameters which we specified above. You can change the credentials according to your need.
open_weather_map_url =
'http://api.openweathermap.org/data/2.5/weather?q=' + city +
',' + country_code + '&APPID=' + open_weather_map_api_key
This variable will be useful in making the API request. We will use requests.get(open_weather_map_url) to make the API request. This data will be saved in the variable named ‘weather_data.’
weather_data = requests.get(open_weather_map_url)We will be converting the data stored inside weather_data into JSON syntax by using weather_data.json(). The .json() method is being used here. Then we will print the readings on the Shell of our IDE.
print(weather_data.json())We can also use the HTTP get() method to obtain specific parts of the data. For example, if you want to access the data about sunset which is present inside sys as seen below:
"sys":{
"type":1,
"id":8105,
"country":"KR",
"sunrise":1619297049,
"sunset":1619345742
},
Then we will give the following command:
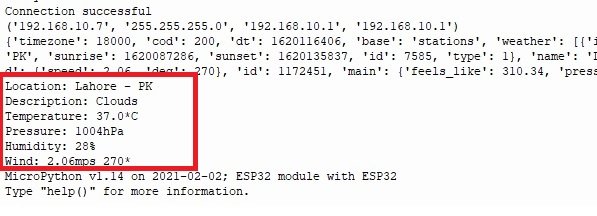
weather_data.json().get('sys').get('sunset')Copy the above code to boot.py file and upload it to ESP32 or ESP8266. After that press the reset button of your device, you will see the temperature, humidity and pressure readings in your specified location as follows:
Output in Thonny IDE:
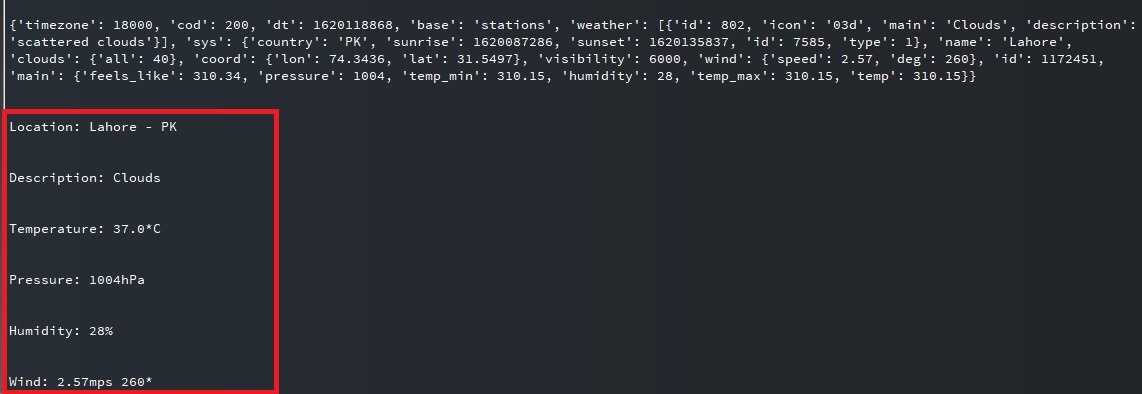
Output in uPyCraft IDE:
In this article, we learned how to create an HTTP GET request from OpenWeatherMap API using ESP32/ESP8266 in Micropython.
You may also like to check these Weather station projects with MicroPython:
- MicroPython: BME280 Web Server with ESP32/ESP8266 (Weather Station)
- MicroPython: DS18B20 Web Server with ESP32/ESP8266(Weather Station)
- ESP32/ESP8266 MicroPython Web Server – Control Outputs
- MicroPython: DHT11/DHT22 Web Server with ESP32/ESP8266 (Weather Station)
- ESP32 HTTP POST using Arduino IDE (ThingSpeak and IFTTT)
Fantastic learning experience for this very old programmer.
W4GHV since ’54
Great tutorial, thank you so much!
I found a tiny typo: you define the variable “sssid” with three “s”es, then later use the variable “ssid”.
Appears twice: in the full program, then again when you nicely explain each individual code block.
Thanks again for the great instructions.