In this tutorial, we will introduce you to Twilio with ESP32 to send text messages. Twilio is a communications web service that allows users to make and receive phone calls and SMS along with other communication functions. Although Twilio is not free to use but you can get started with a free trial account as well to test the service. With Twilio, there is no need to use a GSM module or have a SIM card, as you get access to a Twilio phone number to send messages.

We have a similar Twilio tutorial using Raspberry Pi Pico W and MicroPython:
Recommended Components
The following components are used in this project or are helpful for building it with the ESP32.
| Component | How it’s used in this project | Buy on Amazon |
|---|---|---|
| ESP32 Development Board | The main microcontroller board that runs the code for this project. | Check Price |
| Micro USB Cable | Connects the ESP32 to your computer for programming and power. | Check Price |
| Breadboard | Lets you build the circuit without soldering. | Check Price |
| Jumper Wires | Connect the ESP32 to the other components on the breadboard. | Check Price |
As an Amazon Associate we earn from qualifying purchases. Prices and availability are accurate as of the date/time indicated and are subject to change.
Twilio Web Service
“Twilio powers personalized interactions and trusted global communications to connect you with customers.”
Twilio is a cloud communication platform that enables developers to build, scale, and operate communications within software applications. Twilio provides a suite of APIs, or application programming interfaces, that allow developers to integrate voice, video, messaging, and other communication capabilities into their applications.
Some examples of how Twilio can be used include:
- Enabling users to make phone calls or send text messages directly from a website or mobile app
- Building chatbots that can communicate with users over messaging platforms such as SMS or WhatsApp
- Adding voice and video capabilities to online meeting and collaboration tools
- Integrating SMS or voice notifications into business processes and workflows
Twilio is designed to be easily integrated into a wide range of programming languages and development environments, and it provides extensive documentation and support resources to help developers get started.
As mentioned before, Twilio is a communication web service for making and receiving calls/messages and other communication features. Our focus will be to show you how to use Twilio Twilio with ESP32 to send SMS to a phone number. The sender’s phone number will be one that we will buy from Twilio itself. We will be using the trial version to demonstrate, however, if you like the services you can upgrade your account as well.
Create Twilio Trial Account
Let’s start by creating a free trial account on Twilio. Open the following link and head over to ‘Sign up and start building.’

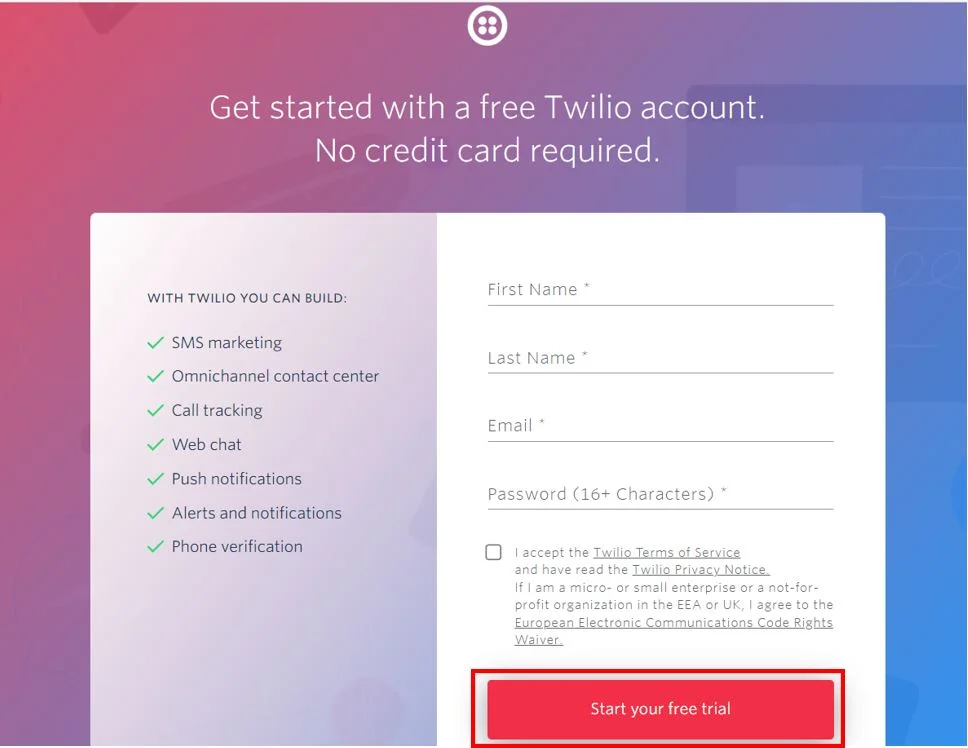
Now you will be asked to fill in your details to create the free Twilio account. Enter your first name, last name, email and password. Then accept the Twilio terms of service. Now click the ‘Start your free trial’ button.
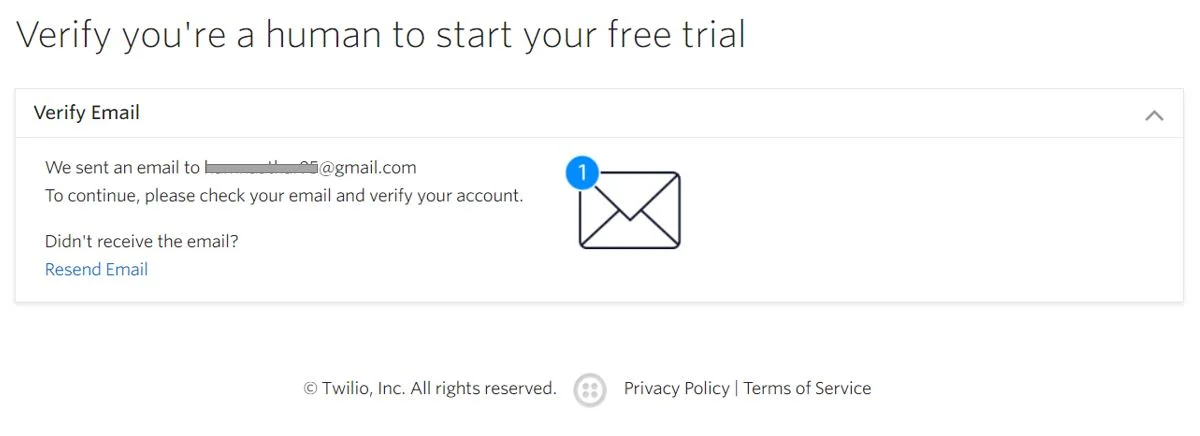
You will be asked to verify your email. Open your email to verify your account.
After verifying the email, you will be asked to enter your phone number for verification.

After the verifications are complete, your Twilio console will open up.

Set up Twilio Free Account
Now to set up our Twilio free account, head over to Phone Numbers > Manage > Verified Caller IDs.
You will be able to see the phone number you entered while verifying your Twilio account.

Next click ‘Add a new Caller ID‘ to add a caller ID. Once you enter the number, you will receive the verification code through an SMS on that number. Enter the verification code to successfully add the caller ID.
Any number that we will use to send any SMS will have to be verified first as we are using a free trial account. Therefore, we will have to add the caller ID.

Get a Phone Number from Twilio
In order to use Twilio, we would have to buy a phone number from Twilio itself. Although we are using a free trial account but we get $15.50 credit from Twilio. This can be used to buy the number that we will use to send the SMS.
Go to Phone Numbers > Manage > Buy a number. Select the capabilities you want for the number. Remember to tick SMS. Moreover, you have the option to choose the country as well as other advanced search options as well which will offer you a number that you want from the available numbers.

You will be asked to agree to the terms and conditions. Finally click the Buy button.

Moreover, you may be asked to configure the number as well.

Head over to Phone Numbers > Manage > Active Numbers and you will be able to see the number that you just bought in the Active Numbers.
Setting Up Programmable Messaging Service
Now as we have set up our free Twilio account, added verified caller ID and bought a Twilio number to send SMS with, let us set up the programmable messaging service.
Head over to Messaging > Try it out > Get Set Up. This opens the programmable messaging service welcome page. Click the ‘Start setup‘ button.

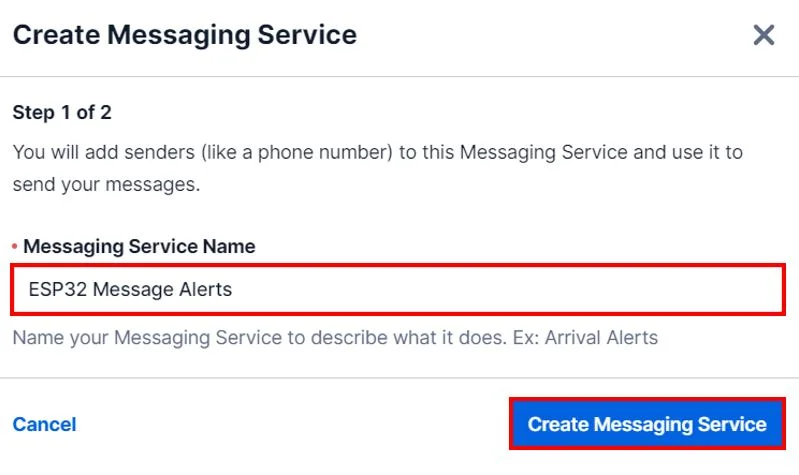
Give a name to your messaging service and then click ‘Create Messaging Service‘.
Enter the Twilio Phone number that you just bought. Then click ‘Add this number.’

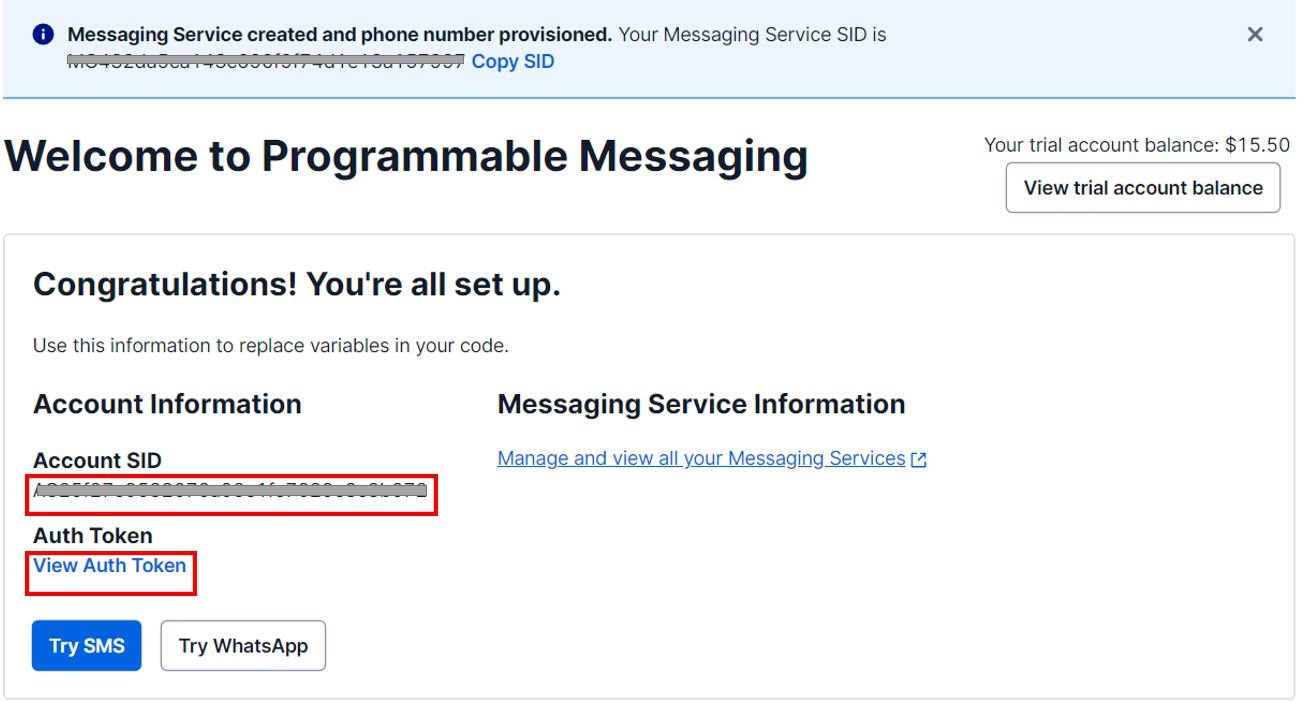
Now we have successfully set up our programmable messaging service. You will get access to your Message Service SID, Account SID and Auth Token. These will be required while programming the ESP32 board to send SMS.
Testing the Service
Before programming our ESP32 board, lets first test our programmable messaging service that we created.
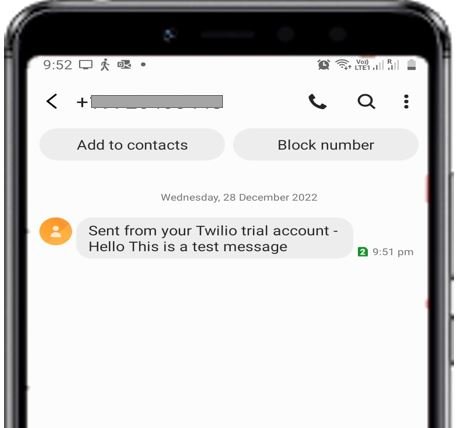
Go to Messaging > Try it out > Send an SMS. Enter the recipient phone number. Remember it should be a verified caller ID, messaging service SID and the message body. Then click ‘Send test SMS‘ button.

Shortly, the recipient phone number will receive the test message.
Install twilio-esp32-client Library In Arduino IDE
We will use Arduino IDE to program our ESP32 development board. Thus, you should have the latest version of Arduino IDE. Additionally, you also need to install the ESP32 plugin. If your IDE does not have the plugin installed you can visit the link below:
We will require the Twilio esp32 client library to program our ESP32 using Arduino IDE. Open Arduino IDE and go to Tools > Manage Libraries.

After that, this window library manager window will appear. Search for “twilio-esp32-client” by typing in the search bar and install the latest version.

ESP32 Arduino Sketch Send SMS with Twilio
Open your Arduino IDE and go to File > Examples > twilio-esp32-client > send_sms. The following example code opens up.
This is an example sketch provided by twilio-esp32-client library to easily send an SMS using Twilio. You will have to provide your network credentials, Twilio SID, Twilio auth token, recipient and sender phone numbers.
#include "twilio.hpp"

// Set these - but DON'T push them to GitHub!
static const char *ssid = "";
static const char *password = "";

// Values from Twilio (find them on the dashboard)
static const char *account_sid = "";
static const char *auth_token = "";
// Phone number should start with "+<countrycode>"
static const char *from_number = "";

// You choose!
// Phone number should start with "+<countrycode>"
static const char *to_number = "";
static const char *message = "Sent from my ESP32";

Twilio *twilio;

void setup() {
  Serial.begin(115200);
  Serial.print("Connecting to WiFi network ;");
  Serial.print(ssid);
  Serial.println("'...");
  WiFi.begin(ssid, password);

  while (WiFi.status() != WL_CONNECTED) {
    Serial.println("Connecting...");
    delay(500);
  }
  Serial.println("Connected!");

  twilio = new Twilio(account_sid, auth_token);

  delay(1000);
  String response;
  bool success = twilio->send_message(to_number, from_number, message, response);
  if (success) {
    Serial.println("Sent message successfully!");
  } else {
    Serial.println(response);
  }
}

void loop() {
}
How the Code Works?
We will start off by including the necessary libraries for this project. The twillio.hpp will help us access functions to send the SMS via HTTP requests by ESP32.
#include "twilio.hpp"Enter your Wi-Fi SSID and password in the following empty variables.
static const char *ssid = "";
static const char *password = "";
Enter your Twilio SID and Auth Token that you received when setting up the programmable messaging service.
static const char *account_sid = "";
static const char *auth_token = "";
Here specify your Twilio number that you bought to send SMS. Remember the phone number should start with +<countrycode>
static const char *from_number = "";Enter the recipient number here. It should be be a verified caller ID. Remember the phone number should start with +<countrycode>
static const char *to_number = "";The pointer variable ‘message’ holds the body of the text that we want to send. In this case, the message is ‘Sent from my ESP32.’ You can change it according to your preference.
static const char *message = "Sent from my ESP32";Next a Twilio pointer variable called ‘twilio’ is created.
Twilio *twilio;setup()
Inside the setup() function we open the serial communication at a baud rate of 115200. Moreover, we connect our ESP32 with the Wi-Fi network using WiFi.begin() with the ssid and password that we previously provided. This is necessary because we want our ESP32 to make HTTP requests in order to send the SMS successfully.
Serial.begin(115200);
  Serial.print("Connecting to WiFi network ;");
  Serial.print(ssid);
  Serial.println("'...");
  WiFi.begin(ssid, password);

  while (WiFi.status() != WL_CONNECTED) {
    Serial.println("Connecting...");
    delay(500);
  }
  Serial.println("Connected!");
Next, a new Twilio instance is created which takes in the Twilio Account SID and Auth Token as parameters inside it.
twilio = new Twilio(account_sid, auth_token);Then after a delay of one second, an HTTP request is generated by ESP32 to Twilio to send the SMS. This is done by the send_message() function which takes in the recipient number, sender number, message, and response as parameters inside it. If the message is successfully sent, then the serial monitor will print a success message otherwise the HTTP response will be printed instead.
delay(1000);
  String response;
  bool success = twilio->send_message(to_number, from_number, message, response);
  if (success) {
    Serial.println("Sent message successfully!");
  } else {
    Serial.println(response);
  }
Demonstration
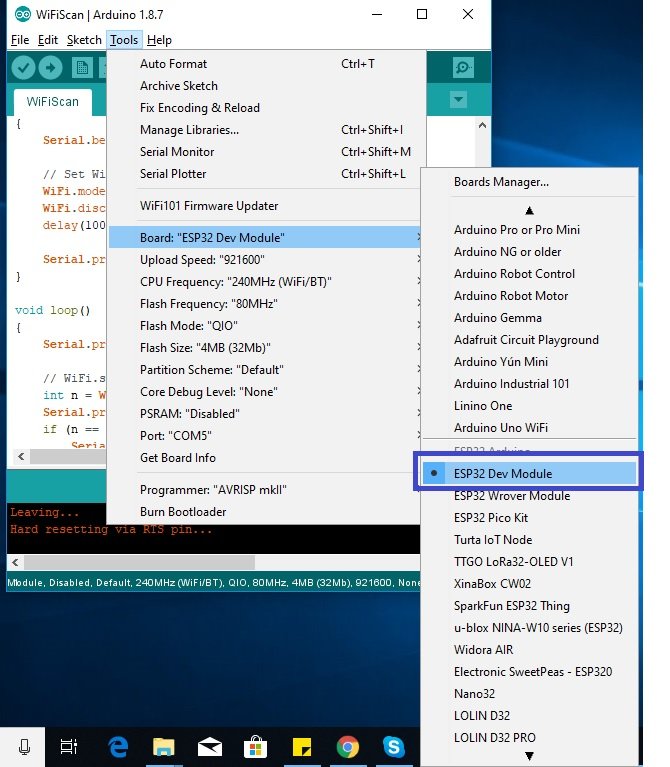
Choose the correct board and COM port before uploading your code to the board. Therefore go to Tools > Board and select ESP32 Dev Module.
Select the ESP32 Dev module as follows:
Then, go to Tools > Port and select the appropriate port through which your board is connected.

Click on the upload button to upload the code to ESP32 development board.
After you have uploaded your code to the ESP32, press its ENABLE button.

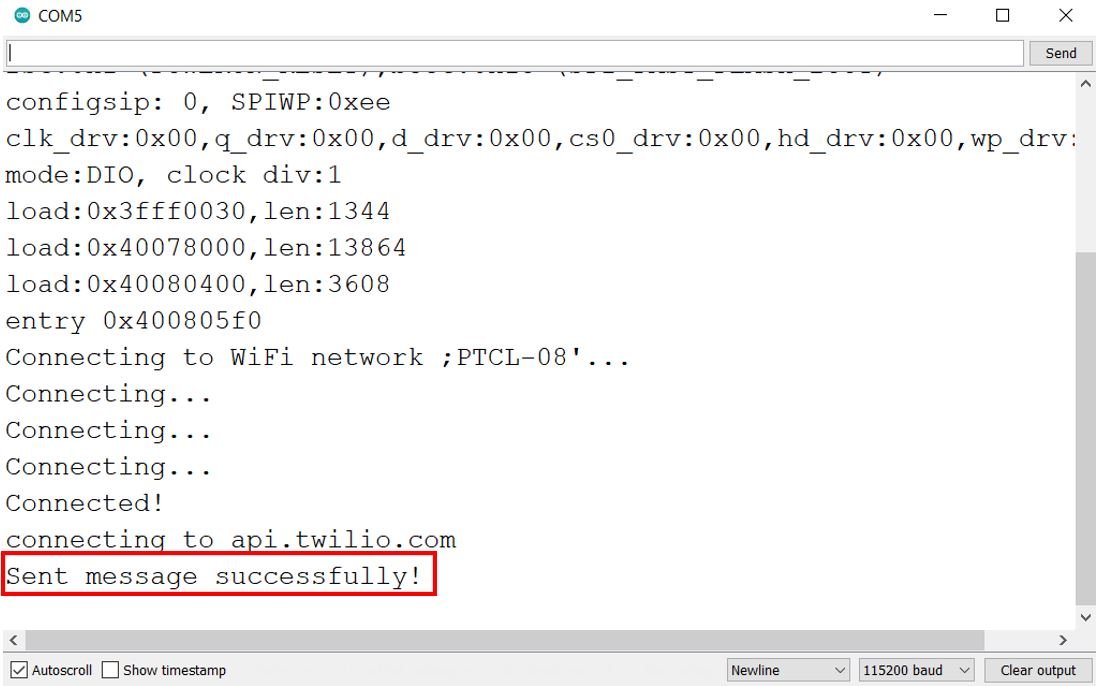
In your Arduino IDE, open up the serial monitor and set the baud rate to 115200. First, the ESP32 board connects with the Wi-Fi network and with the api.twilio.com. After connecting with Twilio, the message is successfully sent.

Summary:
In this tutorial, we have learned how to send SMS with ESP32 using Twilio API. By using this free cloud service, we can send SMS to any device without requiring a physical GMS module and a physical SIM card.
Twilio offers a free trial that allows you to try out its SMS, voice, and other communication services. During the free trial, you can send and receive SMS and voice calls, and use other Twilio features at no cost. However, after the free trial period ends, you will need to purchase a Twilio plan in order to continue using the services.
Twilio offers a variety of pricing plans, including pay-as-you-go and monthly subscription plans. The cost of using Twilio depends on the specific services you use and the volume of usage. You can view Twilio’s current pricing for SMS, voice, and other services on its website.
It’s worth noting that while Twilio provides a powerful set of tools for building communication applications, it is not the only option available. There are other providers that offer similar services, and you may want to compare pricing and features to find the best fit for your needs.
Twilio Limitations
Twilio has a number of limitations that you should be aware of when using its services.
- SMS message length: SMS messages are limited to 160 characters in most countries. If you want to send a message that is longer than 160 characters, Twilio will automatically send it as multiple messages, which will be charged as separate SMS messages.
- Number of messages per second: Twilio limits the number of messages you can send per second. If you exceed this limit, your messages may be rejected or delayed.
- Phone number availability: Twilio may not have phone numbers available for all countries or regions.
- Content restrictions: Twilio has certain content restrictions for SMS and voice messages. You are not allowed to send spam or illegal content, or content that is deemed to be inappropriate or offensive.
- Geographical limitations: Twilio’s services may not be available in all countries or regions.
It’s important to carefully review Twilio’s terms of service and pricing plans before using its services, to ensure that you understand the limitations and costs associated with using Twilio.
You may also like to read:
There was an update end of 2023 to the github repository of twilio-esp32-client concerning the Root Certificate. As of today, when using the Arduino library manager, the outdated version Version 0.1.0 is used, resulting in “Connection failed.” when testing the example code. So YOU NEED TO MANUALLY DOWNLOAD the library from https://github.com/ademuri/twilio-esp32-client .
So Twilio, please do your job and update the library for Arduino!
Nota bene that Twilio meanwhile offers so-called Alphanumeric Caller IDs, this will help you for most countries to send SMS (but not receive anything) without renting a phone number. Using the “Pay as you Go”-plan with a minimum prepaid USD20, non-recurring if you want, this offers a rather cheap access to this nice service!
This works well for me in Germany: My ESP32-C3 setup (Power LED removed) sends two SMS for far less than a mWh in around 3 seconds (including WLAN setup), then goes to deep-sleep at far less than 0.1 mAh until a button is pressed, so it will work for thousands of runs and many years on a single CR123 3.0V Lithium battery.