In this tutorial, we will introduce you to Deta Base (NoSQL database) and how to use it with ESP32. We will show you how to perform different CRUD operations such as create, read, update, delete and query for a Deta Base instance using our ESP32 and Arduino IDE. We will demonstrate all this through an example sketch provided by the detaBaseArduinoESP32 library.
Recommended Components
The following components are used in this project or are helpful for building it with the ESP32.
| Component | How it’s used in this project | Buy on Amazon |
|---|---|---|
| ESP32 Development Board | The main microcontroller board that runs the code for this project. | Check Price |
| Micro USB Cable | Connects the ESP32 to your computer for programming and power. | Check Price |
| Breadboard | Lets you build the circuit without soldering. | Check Price |
| Jumper Wires | Connect the ESP32 to the other components on the breadboard. | Check Price |
As an Amazon Associate we earn from qualifying purchases. Prices and availability are accurate as of the date/time indicated and are subject to change.
Deta Base Introduction
Deta Base is a production-grade NoSQL database that great thing is beginner friendly and free to use with unlimited storage. It provides a great User Interface through which the user can easily see, query, update and delete records in the database.
Some key features of Deta Base include:
- Easy to use API
- Very fast and highly scalable
- Unlimited Databases
- Graphical User Interface
For more information about Deta Base, refer to the official documentation.
Setting up Deta Base Account
To use Deta Base facilities, we would first have to setup our account in it. Click the following link: https://www.deta.sh/ to open the Deta Cloud official page. The following page will open up.
Click ‘Join Deta’ to start setting up your Deta Base account.

This opens the Sign Up page which asks for a username, password and email address. Specify all three parameters and click the sign Up button.

At this point, you will receive a notification that the registration was successful and that you have to verify your email address. Head over to your email account and finish the verification process.

Once the email is successfully verified, it redirects you the following page where you will be able to Sign In with the details through which you registered your account.

After Signing In, the following Welcome page opens up. Click ‘Create First Project’ button to start.

Specify the region nearest to your location and click ‘Create’.

This will create a project called ‘default’. To work with a project, two will require a Project ID and a Project Key. These two parameters are important to access the project otherwise there will be an authorization error. To obtain the ID and key, head over to Project Keys sections. You will find the Project ID there as highlighted below. To obtain the Project key, click the ‘Create Key’ button.

This will create a new Project key which you should copy and save as you will not be able to access it again.

Both the Project ID and the Project key will be required while programming our ESP32 board to access our project.
Install Deta Base Library in Arduino IDE
We will use Arduino IDE to program our ESP32. Thus, you should have the latest version of Arduino IDE. Additionally, you also need to install the ESP32 plugin.
If your IDE does not have the plugin installed you can visit the link below: Installing ESP32 library in Arduino IDE and upload code.
Open Arduino IDE and click on Sketch > Library > Manage Libraries
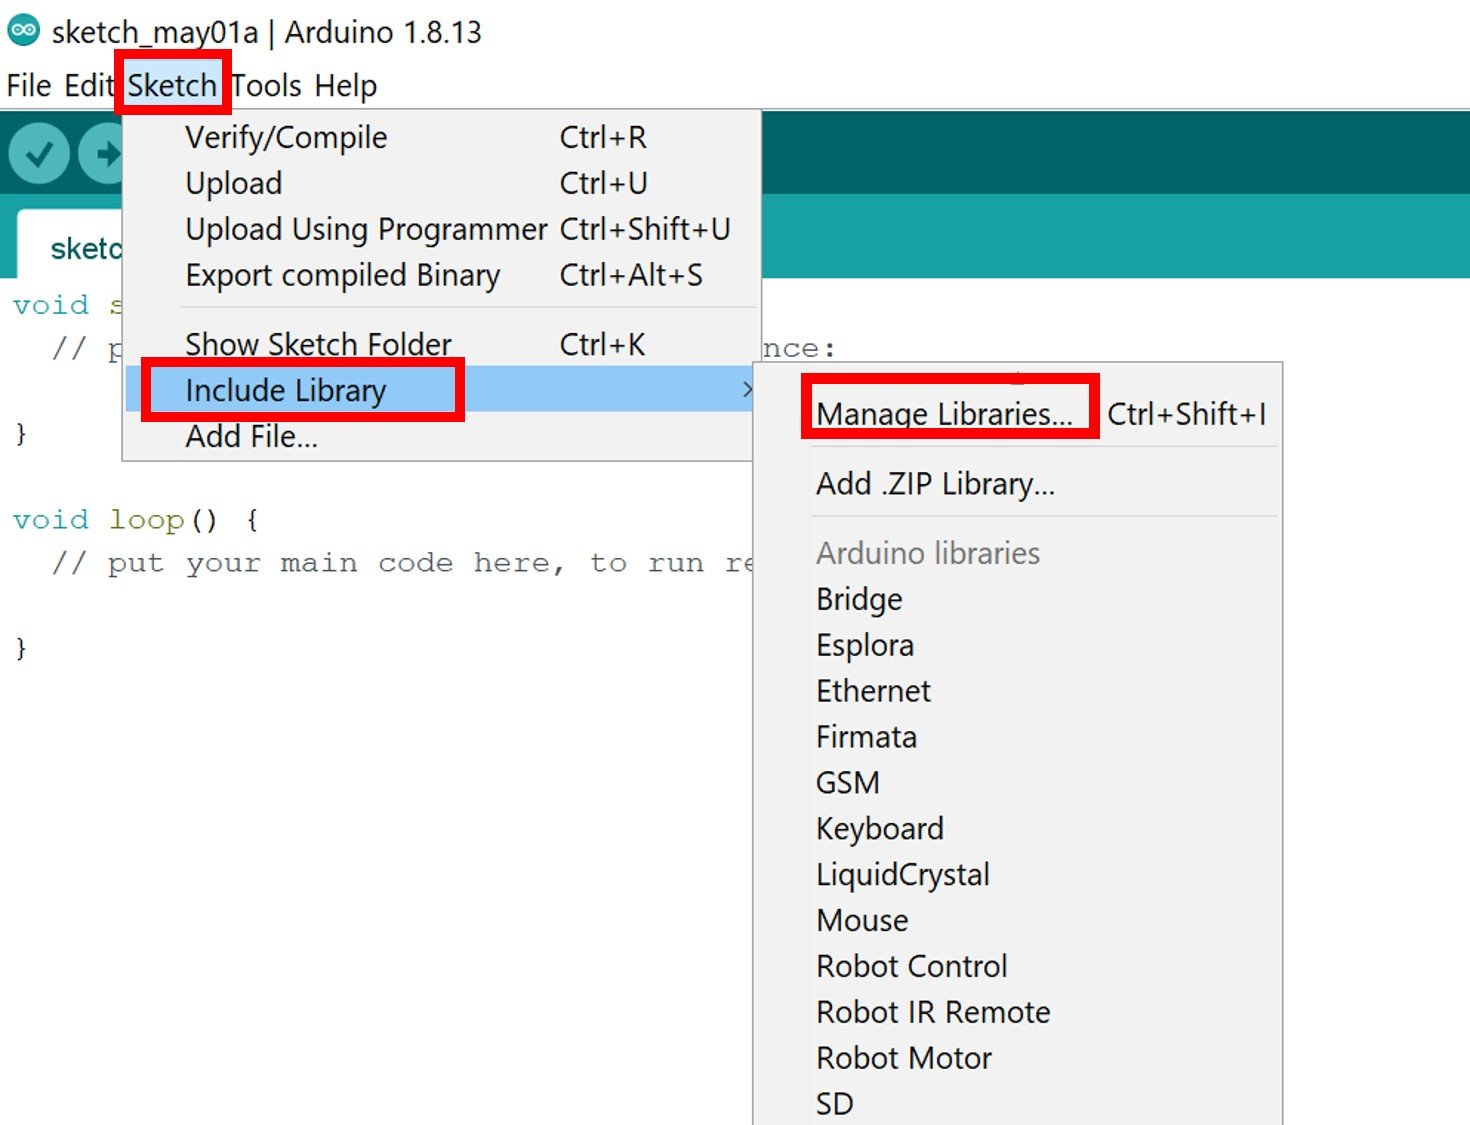
The following window will open up.

Type ‘detabasearduinoesp32’ in the search bar and press enter. Install the latest version of the library as shown below.

After installation of the library, restart your IDE.
Example Sketch: detaLibTest
Open your Arduino IDE and go to File > Examples > detaBaseArduinoESP32 > detaLibTest. This opens the example sketch provided by detaBaseArduinoESP32 library. This example sketch will help us understand how to perform CRUD operations including create, read, update delete and query on our Deta Base that we created. You will have to specify your project ID, project key and Deta Base name to access your project. Using Deta Base Cloud platform requires a internet connectivity hence you will also have to specify the SSID and password of the AP through which your ESP32 will connect to.
#include <detaBaseArduinoESP32.h>
#include <WiFiClientSecure.h>
#define LED 2

char* apiKey = "MY_KEY";
char* detaID = "MY_ID";
char* detaBaseName = "MY_BASE";

WiFiClientSecure client;
DetaBaseObject detaObj(client, detaID, detaBaseName, apiKey, true);


void setup() {
  Serial.begin(115200);
  Serial.println("Let's begin initialization");
  pinMode(LED, OUTPUT);
  digitalWrite(LED, LOW);
  Serial.println("Reached before WiFi init");
  WiFi.begin("0xCAFE", "0xC0FFEE");
  Serial.println("Waiting to connect to WiFi");
  while (WiFi.status() != WL_CONNECTED) {
    delay(500);
    Serial.print(".");
  }
  Serial.println();
  digitalWrite(LED, HIGH);

}

// PUT "{\"items\":[{\"age\":4}]}"

//INSERT "{\"item\":{\"key\":\"cba\",\"age\":4}}"

//INSERT "{\"item\":{\"key\":\"abc\",\"age\":4}}"

//UPDATE "{\"increment\":{\"age\":1}}", key:abc

//UPDATE "{\"increment\":{\"age\":1}}", key:cba

//QUERY "{\"query\":[{\"age?lt\": 10}]}"

void loop() {
  printResult(detaObj.putObject("{\"items\":[{\"age\":4}]}"));
  Serial.println();
  printResult(detaObj.getObject("cba"));
  Serial.println();
  printResult(detaObj.deleteObject("abc"));
  Serial.println();
  printResult(detaObj.insertObject("{\"item\":{\"key\":\"cba\",\"age\":4}}"));
  Serial.println();
  printResult(detaObj.insertObject("{\"item\":{\"key\":\"abc\",\"age\":4}}"));
  Serial.println();
  printResult(detaObj.updateObject("{\"increment\":{\"age\":1}}", "abc"));
  Serial.println();
  printResult(detaObj.updateObject("{\"increment\":{\"age\":1}}", "bcs"));
  Serial.println();
  printResult(detaObj.query("{\"query\":[{\"age?lt\": 10}]}"));
  Serial.println();

  while (true);
}
How the Code Works?
This code starts by including the necessary libraries for this task which includes the detaBaseArduinoESP32.h library that we recently installed and the WiFiClientSecure.h as we will be needing Wi-Fi connectivity.
#include <detaBaseArduinoESP32.h>
#include <WiFiClientSecure.h>
Specify your Project API key and ID inside the double quotations. Remember how we accessed these two parameters previously. Moreover, specify the name of your deta base as well. You can give any name that you want. In our case, we will set is as “Deta Base Test.”
char* apiKey = "MY_KEY";
char* detaID = "MY_ID";
char* detaBaseName = "MY_BASE";
Create an object of WiFiClientSecure called ‘client.’ This will be used as a parameter inside the object of DetaBaseObject called detaObj(). It takes in five parameters which include the WiFiClientSecure object, the project ID, the deta base name, the project key and a boolean variable which is set as true, hence it will enable debugging option.
WiFiClientSecure client;
DetaBaseObject detaObj(client, detaID, detaBaseName, apiKey, true);
setup()
Inside the setup() function, we open the serial communication at a baud rate of 115200.
Serial.begin(115200);Then we connect the ESP32 board with the Wi-Fi network using WiFi.begin(). Make sure to specify your SSID and password as parameters inside this function to enable the ESP32 board to successfully connect with the network.
WiFi.begin("YOUR_SSID", "YOUR_PASSWORD");After the Wi-Fi is succesffully connected, the onboard LED of ESP32 which is connected with GPIO2 will be set to a HGH state thereby turning it ON.
void setup() {
  Serial.begin(115200);
  Serial.println("Let's begin initialization");
  pinMode(LED, OUTPUT);
  digitalWrite(LED, LOW);
  Serial.println("Reached before WiFi init");
  WiFi.begin("0xCAFE", "0xC0FFEE");
  Serial.println("Waiting to connect to WiFi");
  while (WiFi.status() != WL_CONNECTED) {
    delay(500);
    Serial.print(".");
  }
  Serial.println();
  digitalWrite(LED, HIGH);

}
Inside the loop() function, we will start with the various operations on our deta base instance. Lets start with the insert operation.
Put Object
The putObject() function is used to insert an item, which is an array of items object to be stored to a database. When using a PUT operation, multiple items can be stored in a single request. If the key already exits, then the item is overwritten. The request is in a form of JSON payload which consists of items of type array.
This is the format of the JSON object
{
   // array of items to put
   "items": [
        {
            "key": {key}, // optional, a random key is generated if not provided
            "field1": "value1",
            // rest of item
        },
        // rest of items
    ]
}
In our case, the sketch uses the following code:
printResult(detaObj.putObject("{\"items\":[{\"age\":4}]}"));A key is not provided in this case, hence the deta base will assign one itself. This code will add “age”: 4 to the database. You will be able to see a new base instance and the inserted item when you open the deta base project.
This line of code inserts a single item to the data base instance. However, we can also insert multiple items at the same time using putObject() function. An example can be seen below:
printResult(detaObj.putObject("{\"items\":[{\"age\":4,\"gender\":male}]}"));In this case, two items are inserted.
Get Object
To obtain a stored item through its key, getObject() is used. This takes in the key as a parameter inside it.
In our case, the following line of code is used to retrieve an object with the key ‘cba.’
printResult(detaObj.getObject("cba"));To add an object on the UI ourselves, click the ‘+Add button’. This will automatically generate a new object with a predefined key. You can change the name of the key as well.
Delete Object
To delete an object from the database according to its, we use the function deleteObject(). Specify the key you want to delete as a parameter inside this function.
In this case, the following line of code deletes the object with the key ‘abc.’
printResult(detaObj.deleteObject("abc"));Insert Object
To insert an object using the POST request we use the function insertObject(). The POST request will create a new item with a key that does not previously exit. The request is in a form of JSON payload which consists of item of type object.
This is the format of the JSON object:
{
  "item": {
    "key": {key}, // optional
    // rest of item
  }
}
In our case, the sketch uses the following code:
printResult(detaObj.insertObject("{\"item\":{\"key\":\"cba\",\"age\":4}}"));This code will add “age”: 4 to the database along with the key ‘cba.’ If a key is not provided then the deta base will assign one itself. However, if an object with the same key is already present in the database then there will be an error in the payload.
This function is called twice in the code hence it inserts age:4 with key cba and age:4 with key abc to the database.
  printResult(detaObj.insertObject("{\"item\":{\"key\":\"cba\",\"age\":4}}"));
  Serial.println();
  printResult(detaObj.insertObject("{\"item\":{\"key\":\"abc\",\"age\":4}}"));
  Serial.println();
Update Object
To update an object with an existing key, updateObject() function is used. This function takes in two parameters. The first parameter is the JSON object and the second parameter is the key. The request containing the JSON payload can have various attributes which are listed below:
- set: Type is object. Update or Create.
- increment: Type is object. Increment value can be negative.
- append: Type is object. Appended value must be a list.
- prepend: Type is object. Prepended value must be a list.
- delete: Type is string array.
The following code is used in our code. Hence, it will increment age by 1 of the object whose key is abc.
printResult(detaObj.updateObject("{\"increment\":{\"age\":1}}", "abc"));However, as the key ‘bcs’ does not exist, hence the following code will generate an error in the payload message.
printResult(detaObj.updateObject("{\"increment\":{\"age\":1}}", "bcs"));Query
To list objects that match a query, detaObj.query() is used. This function takes in the query in JSON format as a parameter inside it.
In our code, the following function is used to query objects which have an age of less than 10.
printResult(detaObj.query("{\"query\":[{\"age?lt\": 10}]}"));Demonstration
Choose the correct board and COM port before uploading your code to the board.
Go to Tools > Board and select ESP32 Dev Module.
Next, go to Tools > Port and select the appropriate port through which your board is connected.
Click on the upload button to upload the code into the ESP32 development board. After you have uploaded your code to the ESP32 development board press its ENABLE button.
In your Arduino IDE, open up the serial monitor and set the baud rate to 115200. First, the board will connect with the local Wi-Fi then all the different operation we were performing on the Deta Base will get printed as shown below.


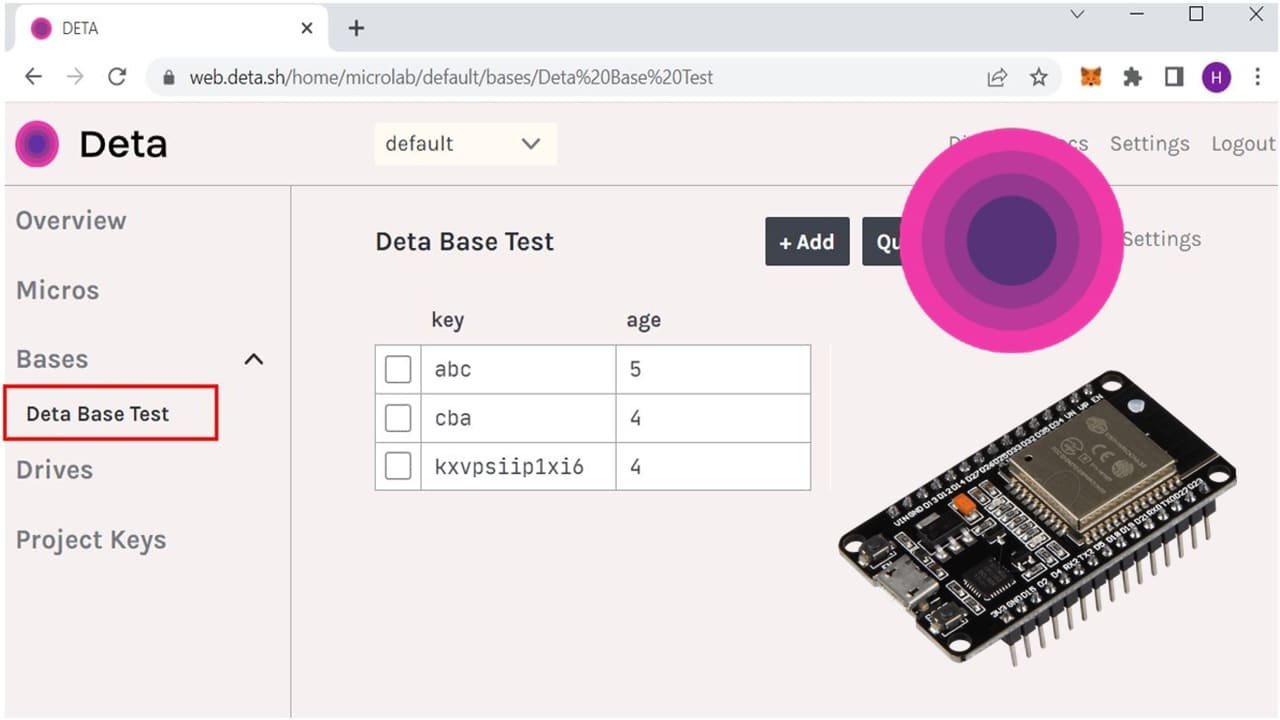
When we open our Deta Base User Interface for ‘Deta Base Test’ we can view all the entries that got inserted in our database.

You may also like to read:
- ESP32 Insert Data into MySQL Database using PHP and Arduino IDE
- ESP8266 Getting Started with InfluxDB Time Series Database
- ESP32 Getting Started with InfluxDB Time Series Database
- ESP8266 NodeMCU Data Logging to Firebase Realtime Database
- ESP32 Data Logging to Firebase Realtime Database
- ESP8266 Send Sensor Readings to Google Firebase Database and Create Web App
- ESP32 Receive Data from Google Firebase with Example to Control Outputs
- IoT Based Temperature Data Logger Using ESP8266 and pic microcontroller