In this user guide, we will introduce you to ESP32 MySQL to insert and read data to MySQL database using a PHP script. The ESP32 board will be programmed using Arduino IDE.

MySQL with ESP32 (Direct and Indirect Methods)
MySQL is an open-source relational database management system that uses a client-server model to operate. It uses a software that is used to build and manage databases that hold a collection of structured data.
There are two ways in which our ESP32 board can connect with MySQL although one way is more advantageous than the others.
Direct way: In this method, the ESP32 directly connects with MySQL server.
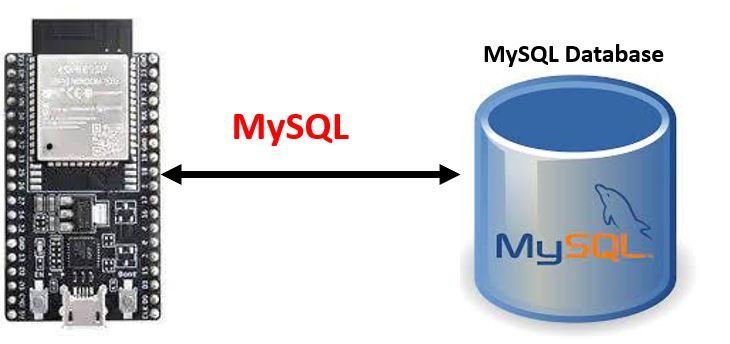
Although this method seemingly looks simpler but it has a lot of disadvantages. Some of them include:
- Granting remote access to MySQL user account is dangerous in terms of security concerns. Another security concern is that mostly MySQL libraries for ESP32 do not support SSL/TLS.
- This method takes a lot of ESP32 memory and CPU storage as the module has to send as well store MySQL queries to the server.
- The ESP32 board may run out of memory when processing MySQL response which generally consists of a large amount of data.
- Moreover, this method also increases the difficulty of the MySQL script as the server has to process raw data.
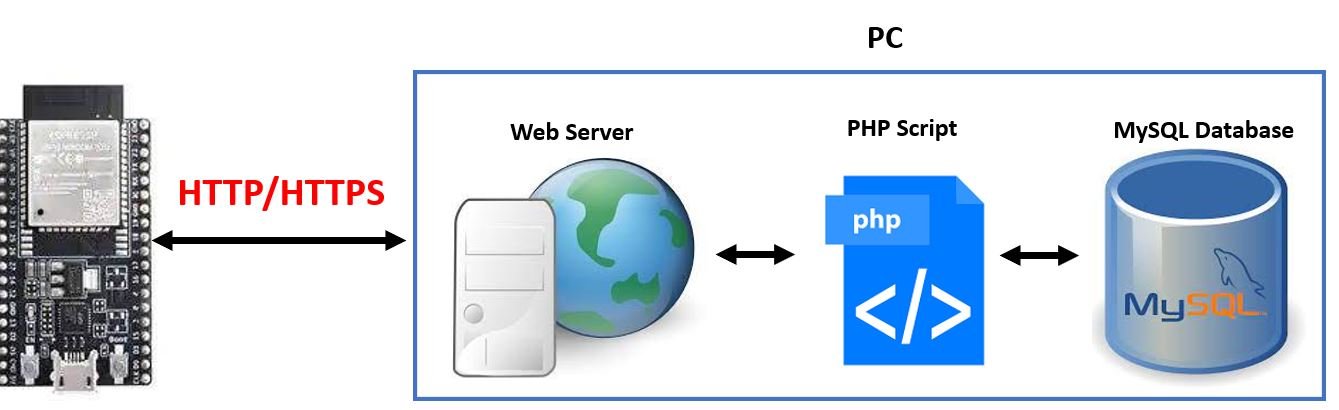
Indirect way
In this method, the ESP32 first connects to a web server using HTTP protocol then connects to the MySQL server. Lets understand how the indirect way works.
- The ESP32 sends an HTTP request to the web server with the data included in the request.
- This request is handled by a PHP script running on the web server.
- The PHP script collects information from the HTTP request, processes it, and then communicates with the MySQL database.
- The PHP script analyses the data and sends just the relevant information to the ESP32 through a HTTP response.
Some advantages of using this method over the direct method include:
This guarantees additional security for data as MySQL user account (username & password) is stored on the server. Hence it is protected. Moreover, we can give localhost access only to the MySQL account.
To reduce the load of complexity of ESP32 and MySQL server, data is processed on the PHP script file. Additionally, it is easier to process data for the PHP file hence the ESP32 and MySQL program gets further simplified.
To prevent ESP32 from running out of memory, the PHP script file only sends the relevant data to ESP32 after processing it.
Additionally, it is very simple to generate an HTTP request using ESP32 board. And to top it all off, the data is encrypted in these requests!
You can read about HTTP POST and GET requests here:
- ESP32 HTTP POST using Arduino IDE (ThingSpeak and IFTTT)
- HTTP GET using ESP32 and Arduino IDE (OpenWeatherMap.org and ThingSpeak)
ESP32 to MySQL using HTTP (Indirect Method)
We will show you how to insert and read temperature readings to MySQL database using ESP32 development board with the indirect method.
The following steps will be followed:
- Install XAMPP environment on your system. This will include Apache (web server), PHP and MySQL server.
- Create MySQL User account
- Create MySQL database with a table
- Create a PHP script file
- Program ESP32 in Arduino IDE
Install XAMPP Package
Now let us move ahead and install MySQL server on our system. Go to the following website(https://www.apachefriends.org/index.html) and download XAMPP according to your operating system.

The .exe file will start downloading. Once the download is complete, click it to install it.
Follow a series of steps to successfully install the Setup. Click Next to proceed further.

Here you will be asked to select components that you want to install. We have used the default settings where all the components for Server and Program Languages are ticked. Click Next to proceed forward.

Now you will be asked to select the installation folder.
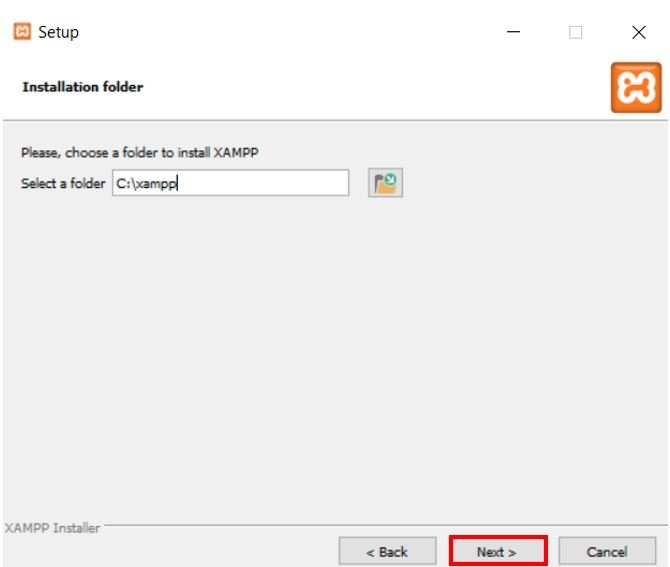
After a few more steps, the XAMPP setup will start installing. Wait for it to complete installation and then click the Next button to finish the process.

Click the Finish button.

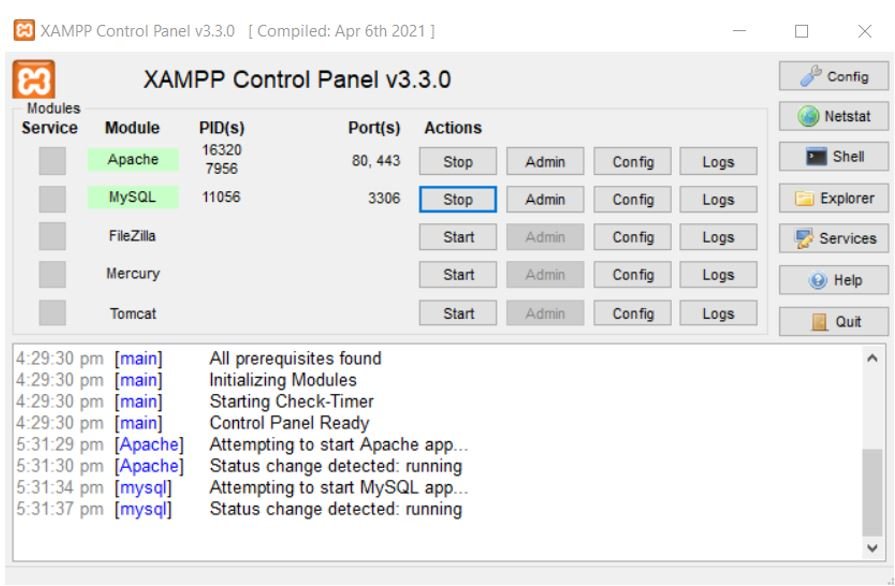
This will open the XAMPP Control Panel. Initiate the web server (Apache) and MySQL by clicking the Start buttons as highlighted below:

Both the modules have been started:
Create MySQL User Account
The next step is to create a MySQL account. The user account will be created having localhost permissions only. This will make sure that people who don’t have access to our computer, will not be able to use our MySQL database. Moreover, this user account will be used to connect to MySQL database by PHP. So let us show you how to set your MySQL username and password.
Open the command prompt. Type the following command:
cd C:\xampp\mysql\bin
Make sure your command prompt remains open throughout.
Now we will set our password. By default the root user account does not have a password but we want to incorporate one to secure our data. To add a password of your choice, type the following command in the command prompt:
Remember to replace YOUR_ROOR_PASSWORD with your own root password.
mysqladmin -u root password YOUR_ROOT_PASSWORDWe are setting the root password as microlab@123:

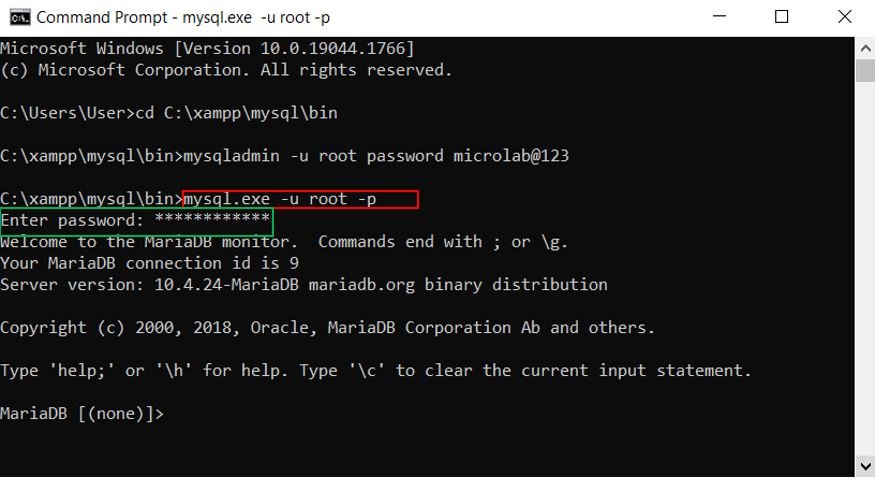
Now to login to MySQL server, type the following command in the command prompt.
mysql.exe -u root -p
You will be asked to enter your password. Enter the root password you just set and press the enter key.
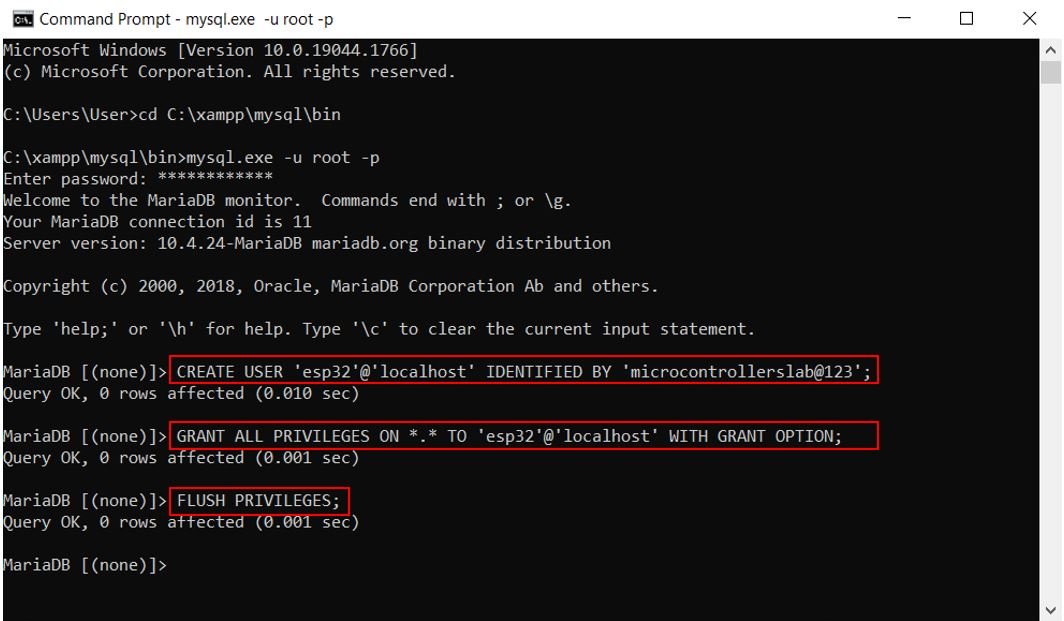
Now we will create our MySQL user account. We will set the username as ‘esp32’ and the password as ‘microcontrollerslab@123.’
Type the following commands in the command prompt and press enter to create the MySQL user account.
CREATE USER 'esp32'@'localhost' IDENTIFIED BY 'microcontrollerslab@123';
GRANT ALL PRIVILEGES ON *.* TO 'esp32'@'localhost' WITH GRANT OPTION;
FLUSH PRIVILEGES;
Create MySQL Database and Table
Now as we have set our MySQL user account, let us proceed further and create a MySQL database.
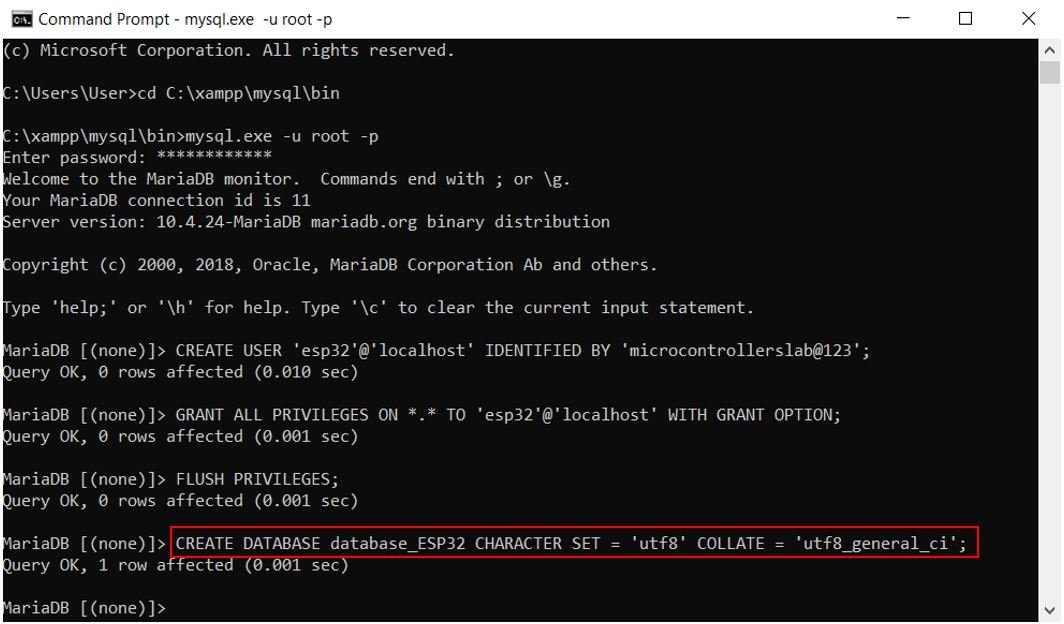
To create a database type the following command in the command prompt.
Remember to replace YOUR_DATABASE_NAME with your own database name that you want to set.
CREATE DATABASE YOUR_DATABASE_NAME CHARACTER SET = 'utf8' COLLATE = 'utf8_general_ci';We are setting the database name as database_ESP32:
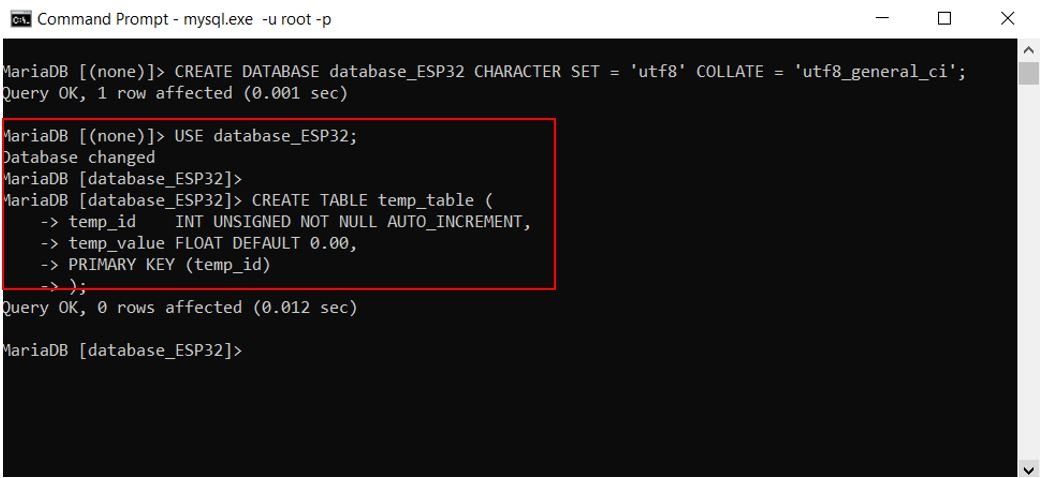
Now inside our database we will create a table.
Copy the following commands in the command prompt.
Remember to replace YOUR_DATABASE_NAME with the name of the database that you created and YOUR_TABLE_NAME with the name of the table that you want to create.
USE YOUR_DATABASE_NAME;

CREATE TABLE YOUR_TABLE_NAME (
	temp_id    INT UNSIGNED NOT NULL AUTO_INCREMENT,
	temp_value FLOAT DEFAULT 0.00,
	PRIMARY KEY (temp_id)
);
Here we have created a table named ‘temp_table’ in the database ‘database_ESP32.’
Create PHP Script File
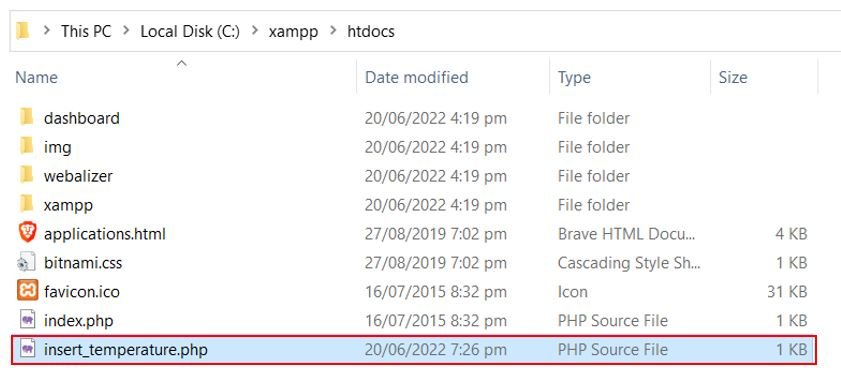
Open the notepad in your computer and copy the following script in it. Save the file as insert_temperature.php
This php file will be used to acquire the temperature reading from a HTTP request which will then be inserted inside the table of the database we just created.
Remember to replace the username, password, database_name and table name according to your values.
<?php

if(isset($_GET["temperature"])) {
   $temperature = $_GET["temperature"]; // get temperature value from HTTP GET

   $servername = "localhost";
   $username = "esp32";
   $password = "microcontrollerslab@123";
   $database_name = "database_ESP32";

   // Create MySQL connection fom PHP to MySQL server
   $connection = new mysqli($servername, $username, $password, $database_name);
   // Check connection
   if ($connection->connect_error) {
      die("MySQL connection failed: " . $connection->connect_error);
   }

   $sql = "INSERT INTO temp_table (temp_value) VALUES ($temperature)";

   if ($connection->query($sql) === TRUE) {
      echo "New record created successfully";
   } else {
      echo "Error: " . $sql . " => " . $connection->error;
   }

   $connection->close();
} else {
   echo "temperature is not set in the HTTP request";
}
?>
Save this file at the following path: C:\xampp\htdocs
Testing PHP Script
To test the PHP code, open a new web browser and type the following command and press enter:
Remember to write your PC’s IP address and the name of the PHP file that you created.
http://YOUR_IP_ADDRESS/YOUR_PHP_FILE_NAME.php?temperature=32.8We will therefore type http://192.168.10.7/insert_temperature.php?temperature=32.8 in the search browser.
The web browser shows that a new record was created successfully. Hence, we are good to go.

Note: To find your PC’s IP address, go to Start > Settings > Network & Internet > Wi-Fi > Hardware properties.
Next, let us view this data insertion in our database. In your command prompt type the following command:
Remember to replace YOUR_TABLE_NAME with the name of your table that you are using.
SELECT * from YOUR_TABLE_NAME;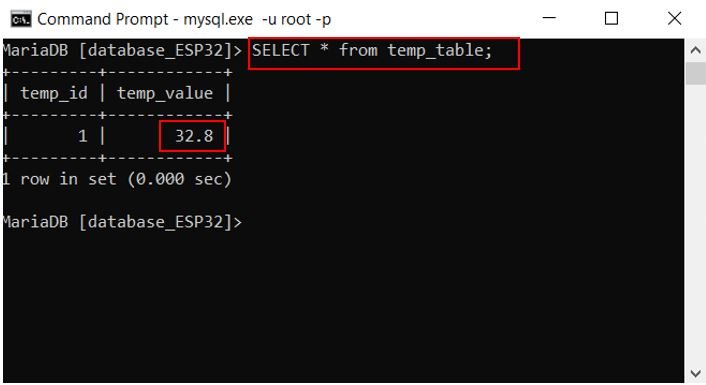
You can view that the table consists of two columns (temp_id and temp_value) and a single row showing the first temperature value as ‘32.8’. Thus, our database is storing the temperature values. Let us move ahead and involve ESP32 development board to send HTTP requests to the web server instead of manually typing them ourselves.
ESP32 MySQL Data Insertion Code
We will program our ESP32 development board in Arduino IDE, so make sure you have the latest version of the IDE and the ESP32 add-on installed on your Arduino IDE. If you have not installed the plugin before, you can follow this tutorial:
Install ESP32 in Arduino IDE ( Windows, Linux, and Mac OS)
Open your Arduino IDE and go to File > New to open a new file. Copy the code given below in that file.
#include <WiFi.h>
#include <HTTPClient.h>

const char ssid[] = "YOUR_SSID";
const char password[] = "YOUR_PASSWORD";

String HOST_NAME = "http://192.168.10.7"; // REPLACE WITH YOUR PC's IP ADDRESS
String PHP_FILE_NAME   = "/insert_temperature.php";  //REPLACE WITH YOUR PHP FILE NAME
String tempQuery = "?temperature=31.0";

void setup() {
  Serial.begin(115200);
  WiFi.begin(ssid, password);
  Serial.println("Connecting");
  while(WiFi.status() != WL_CONNECTED) {
    delay(500);
    Serial.print(".");
  }

  Serial.println("");
  Serial.print("Connected to WiFi network with IP Address: ");
  Serial.println(WiFi.localIP());

  HTTPClient http;
  String server = HOST_NAME + PHP_FILE_NAME + tempQuery;
  http.begin(server);
  int httpCode = http.GET();

  if(httpCode > 0) {
    if(httpCode == HTTP_CODE_OK) {
      String payload = http.getString();
      Serial.println(payload);
    } else {
      Serial.printf("HTTP GET... code: %d\n", httpCode);
    }
  } else {
    Serial.printf("HTTP GET... failed, error: %s\n", http.errorToString(httpCode).c_str());
  }

  http.end();
}

void loop() {

}
How Does the Code Work?
Firstly, include WiFi.h (to connect ESP32 to the local internet) and HTTPClient.h (to interact with the web server) libraries.
#include <WiFi.h>
#include <HTTPClient.h>
Next, specify your Wi-Fi’s SSID and password that will be used by ESP32 to connect to the network.
const char ssid[] = "YOUR_SSID";
const char password[] = "YOUR_PASSWORD";
Create three variables that hold the host name, php file name and the query. Write your own PC’s IP address in the HOST_NAME and your own php file name in the PHP_FILE_NAME variable. The ‘tempQuery’ variable shows that we want to insert the temperature reading 31.0 in the database.
String HOST_NAME = "http://192.168.10.7"; // REPLACE WITH YOUR PC's IP ADDRESS
String PHP_FILE_NAME   = "/insert_temperature.php";  //REPLACE WITH YOUR PHP FILE NAME
String tempQuery = "?temperature=31.0";
setup()
Inside the setup() function, open the serial communication at a baud rate of 115200.
Serial.begin(115200); Next, we will connect our ESP32 board with the local network whose network credentials we already specified above using the WiFi.begin() function. After the connection will be established, the IP address of the ESP32 board will get printed on the serial monitor.
  WiFi.begin(ssid, password);
  Serial.println("Connecting");
  while(WiFi.status() != WL_CONNECTED) {
    delay(500);
    Serial.print(".");
  }

  Serial.println("");
  Serial.print("Connected to WiFi network with IP Address: ");
  Serial.println(WiFi.localIP());
We then create an instance of HTTPClient library called ‘http’ and a string variable called ‘server’ which will hold the URL path of the HTTP GET request which the ESP32 board will make.
HTTPClient http;
String server = HOST_NAME + PHP_FILE_NAME + tempQuery;
Next make the HTTP GET request using http.begin() and specify the server as a parameter inside it. This information (‘payload’) is saved in string data type.
http.begin(server);
  int httpCode = http.GET();

  if(httpCode > 0) {
    if(httpCode == HTTP_CODE_OK) {
      String payload = http.getString();
      Serial.println(payload);
    } else {
      Serial.printf("HTTP GET... code: %d\n", httpCode);
    }
  } else {
    Serial.printf("HTTP GET... failed, error: %s\n", http.errorToString(httpCode).c_str());
  }

  http.end();
Demonstration
Make sure you choose the correct board and COM port before uploading your code to the board. Go to Tools > Board and select ESP32 Dev Module. Next, go to Tools > Port and select the appropriate port through which your board is connected.

Click on the upload button to upload the code into the ESP32 development board.
Now, we will upload the files into our ESP32 board. Go to Tools > ESP32 Data Sketch Upload. After a few moments, the files will be uploaded.

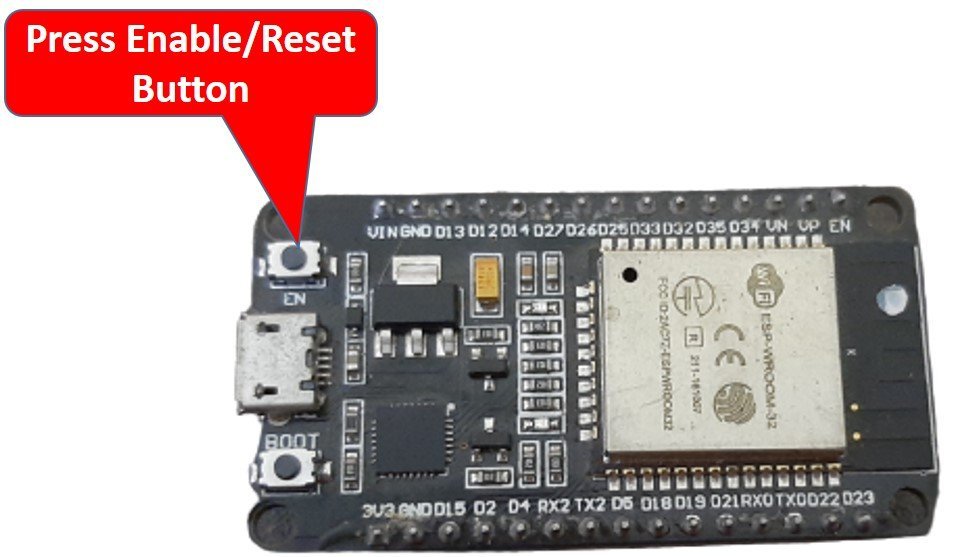
After you have uploaded your code and the files to the ESP32 development board, press its ENABLE button.
In your Arduino IDE, open up the serial monitor and you will be able to see the IP address of your ESP32 module after it connects with the local Wi-Fi network. Then it successfully connects to the server, a new record is added and then it disconnects.

Next, let us view this data insertion in our database. In your command prompt type the following command:
Remember to replace YOUR_TABLE_NAME with the name of your table that you are using.
SELECT * from YOUR_TABLE_NAME;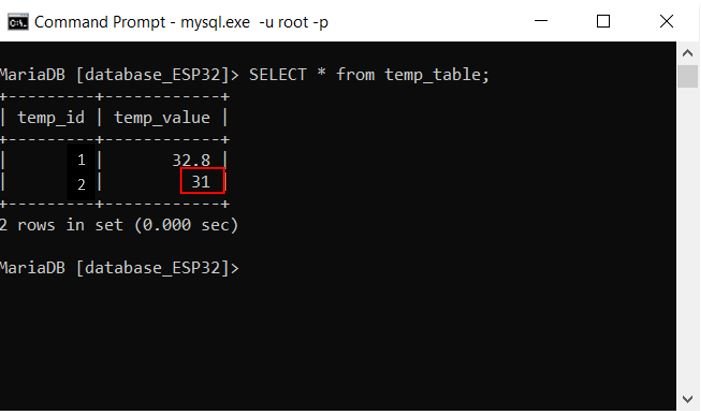
You can view that the table consists of two columns (temp_id and temp_value) and two rows showing the first temperature value as ‘32.8’ and the second temperature value as ’31’. Thus, our ESP32 was successfully able to send a HTTP request to the web server and inserted the temperature reading 31 in our database.
You may also like to read:
Hello
I tried to make a project where I post my meassurements from my ESP32 into a local database. When I want to make a user with XAMPP I get the following error:
mysqladmin: connect to server at ‘localhost’ failed
error: ‘Plugin caching_sha2_password could not be loaded: Kan opgegeven module niet vinden. Library path is ‘caching_sha2_password.dll”
Can someone help me?
Jesse
Hi. I’m trying to adapt the project to a board that do not support httpclient library (Wio LTE). The following code result in the same message do post in the SQL server? Thanks
SerialUSB.println(“### Sending POST request…”);
char httpRequestData[256];
sprintf(httpRequestData, “POST /post-esp-data-pos.php HTTP/1.1\r\n”
“Host: %s\r\n”
“Content-Type: application/x-www-form-urlencoded\r\n”
“Content-Length: %d\r\n” // Include the content length header
“\r\n” // End of headers
“api_key=%s&sensor=%s&ambiente=%.2f&interior=%.2f&voltagem=%.2f&corrente=%.2f&potencia=%.2f”,
serverName, strlen(httpRequestData), apiKeyValue.c_str(), sensor.c_str(),
temp_ambiente, temp_interior, voltage, current, power);