This guide teaches you how to create a simple ESP8266 NodeMCU web server in Arduino IDE. You will learn to control GPIO pins of ESP8266 NodeMCU from a basic Web server. You also get to know about creating password protected web server with ESP8266 based NodeMCU board. Although, you can use this tutorial for any type of ESP8266 board like ESP01, ESP12 etc.
We move from traditional Arduino development boards to new ESP8266 development boards like NodeMCU and Wemos D1 development boards. The reason behind this switching is to communicate and control the development board remotely from a internet by creating a simple web server. Yes, this is true that we can communicate and control Arduino boards through interfacing externals modules like Bluetooth RF and IR but there are many practical limitations and these techniques are not much efficient while comparing with modules having on board WiFi Like ESP8266 NodeMCU modules.
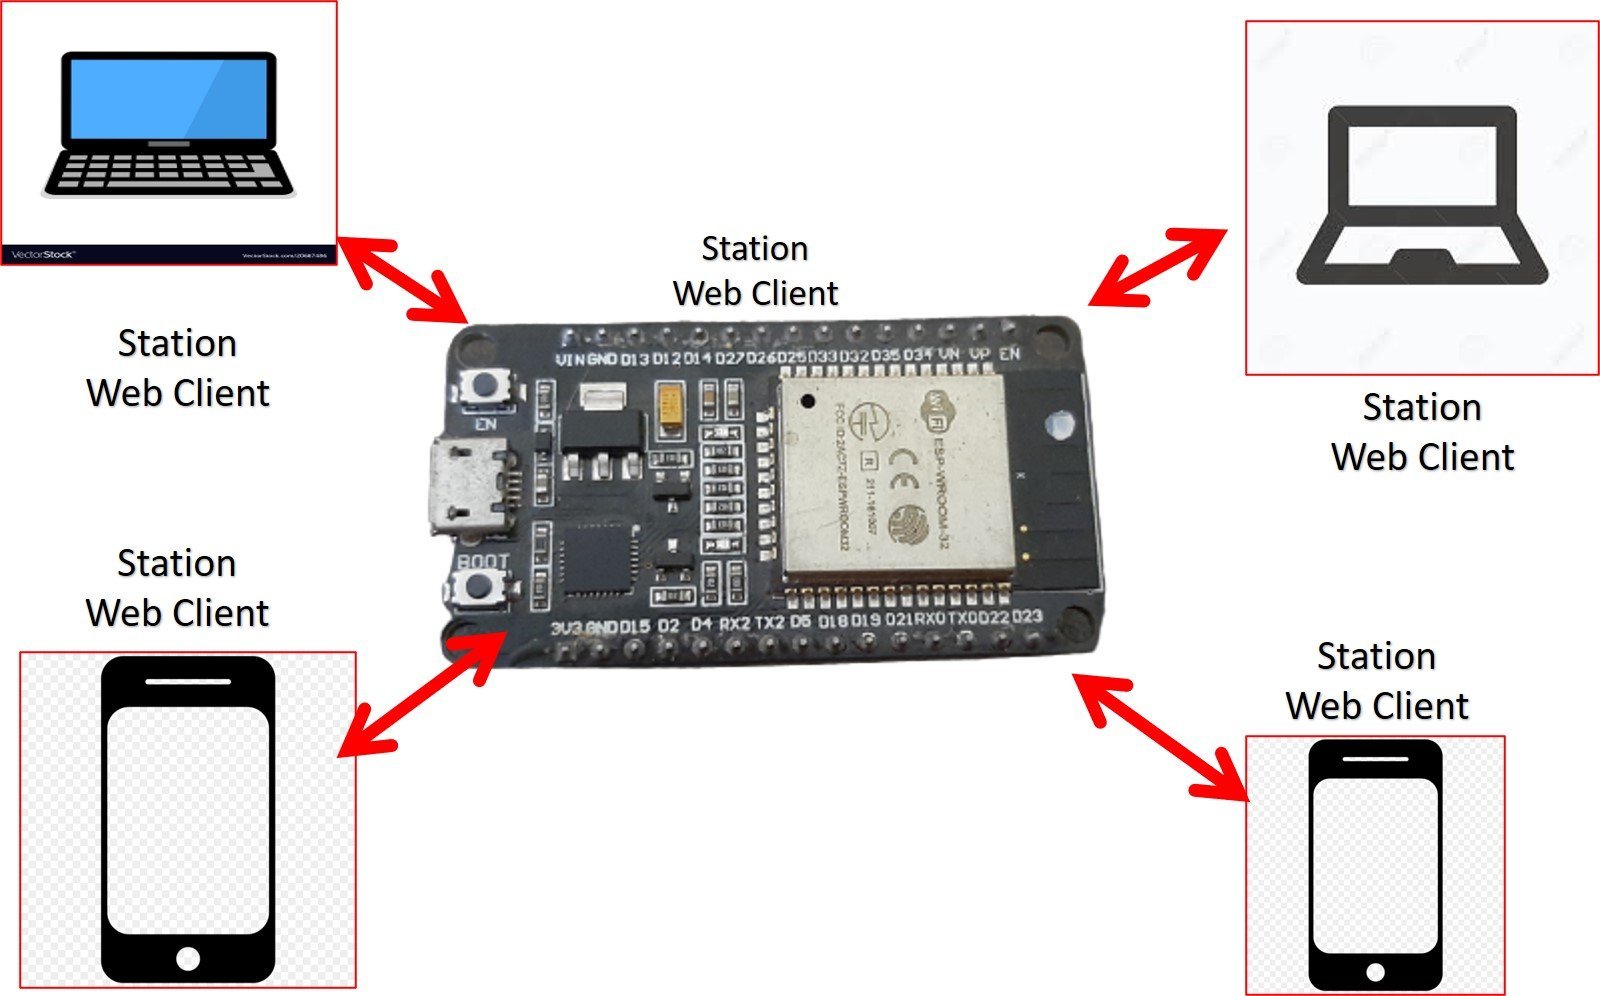
There are different ways to communicate ESP8266 development boards like Android application through WiFi, Web server through WiFi, and Serial communication with PC through the wire. In this tutorial, you will learn how to create Web server to control the GPIO’s of the development board through buttons on Web server and to protect your Web server with password from unauthorized user access. We can access our Web server from the smartphone, tablet, laptop, and desktop personal computer.
Before starting this reading, we recommend you to read these getting started guides:
- Installing ESP8266 library in Arduino IDE
- Reference for ESP8266 with Arduino IDE
- ESP8266 Pinout and reference for GPIO pins
- LED Blinking with ESP8266 based NodeMCU
We have similary guides for ESP32 and ESP8266 NodeMCU using MicroPython and Arduino IDE programming:
Introducing Web Server
When we talk about web server in the context of the internet of things, the Web server is nothing but the location where our website files stores and Web server process these files to clients based on the request of a client. Website files are web pages of any site. Like you are using this website to read an article on how to make an EPS8266 web server, this webpage is stored in a server of our hosting company. So when you click on the link to open this article, you request a client to a server of our hosting company.
After receiving this particular page request, our hosting company server processes this request to display this webpage. Similarly, we can use ESP8266 NodeMCU as a host for storing web pages, and one someone requests a web page through a local network, ESP8266 NodeMCU will serve this webpage. The picture below provides a view of client-server based communication.

Web Serve and Client Communication
This is a basic idea of server and client-based communication over the internet. Now the question is how can we establish communication between client and Web server? HTTP which is also known as hypertext transfer control is a protocol that is used to transfer data between the web client and Web server. The web server in this tutorial will be ESP8266 NodeMCU and the web client will be any web browser or Android application. Whenever a web client needs to access any web files, it starts an HTTP GET request to the web server.
How Does a Web Server respond to a Client Request?
After receiving an HTTP GET request, the server responds with web pages. The web server also responds through the HTTP protocol. If web files are not available on the Server or it is down due to some technical reasons, you will see a message of error 404 on the web browser. In the above figure, there is only one client and one server. But a server can connect to multiple web clients and service requests through HTTP protocol. Web server is also known as Server host which listens to other web clients and services the requests.
ESP8266 NodeMCU Modes of Operations
Many people think that It can be used as station mode only where it can connect to an existing network. But This WiFi module has very important features to use a soft access point mode, station mode and both modes at the same time. In this tutorial, I will talk about station mode only. In the next tutorials, I will also write about how to use this board in soft access mode. Lets now see the difference between the station mode and the soft access mode.
Station mode or STA
In this mode, the ESP8266 NodeMCU board connects to your WiFi network through a router. So the medium of communication between the web client and ESP8266 NodeMCU is the router. It gets the IP address from the Wifi router. With this IP address, web clients can access the Web server through an existing local network.
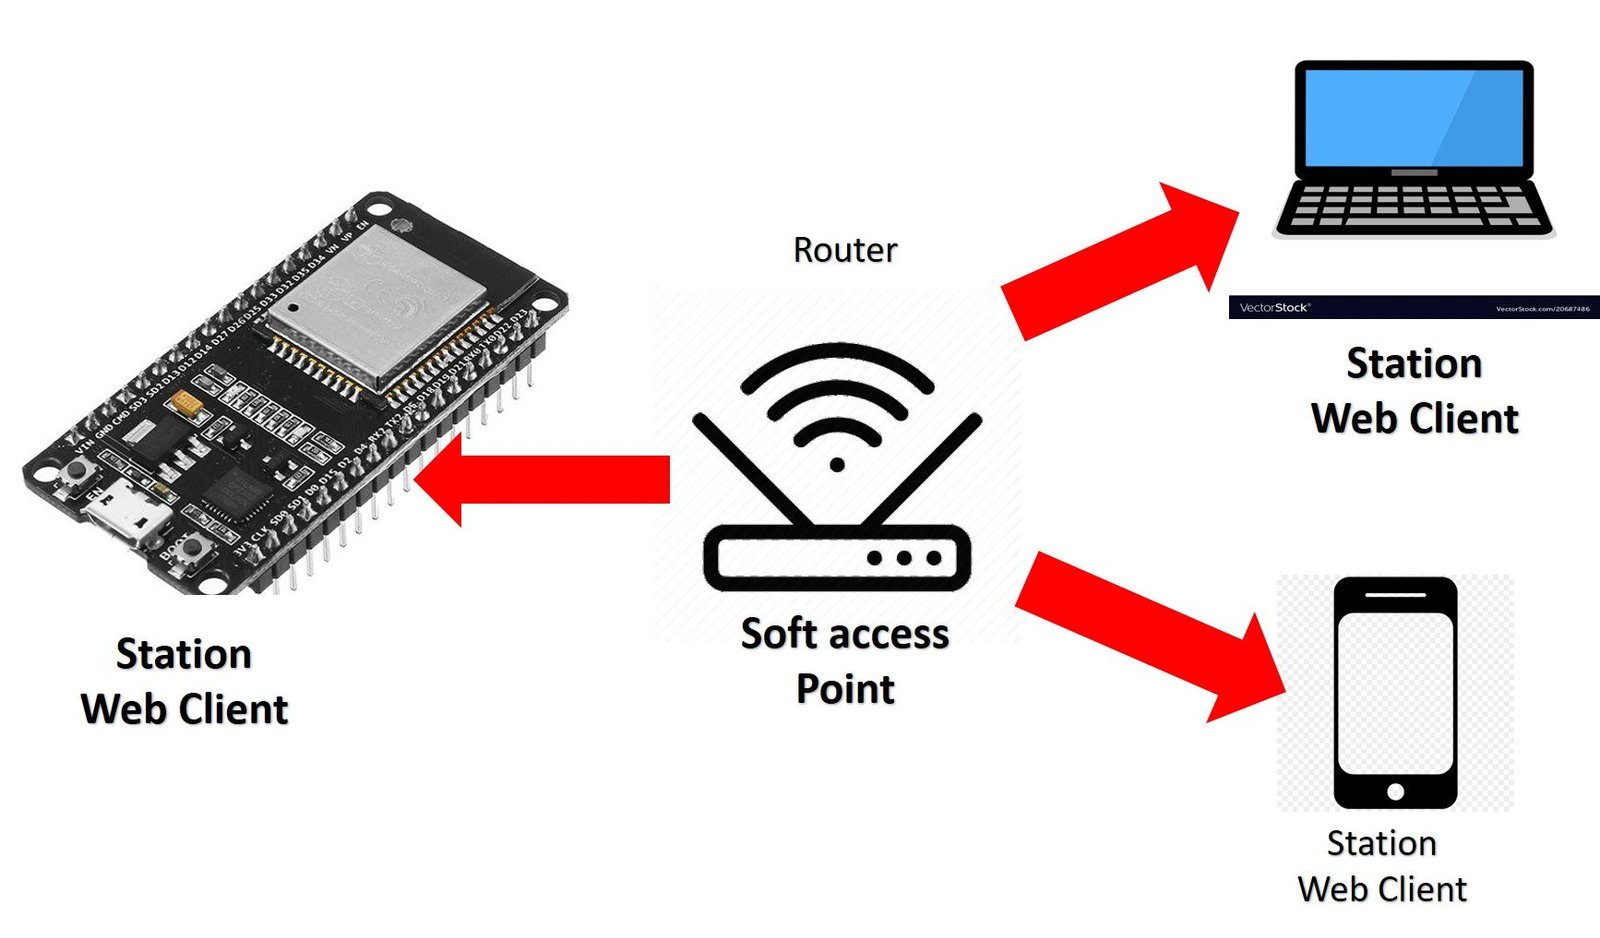
Soft access point mode
In this mode, ESP8266 NodeMCU used to create its own wireless WiFi network similar to your existing WiFi router. In this mode, we do not need to connect ESP8266 NodeMCU to a WiFi network. Up to 5 devices can connect to this Wifi network created by this WiFi board.
You can learn more about access point web server here:
- MicroPython: ESP32/ESP8266 Access Point – Web Server Example
- ESP32 Soft Access Point Web Server in Arduino IDE
Controlling LEDs with ESP8266 Web Server NodeMCU
By controlling GPIO’s of the development boards through Web server, we can connect LEDs, Relays, Servo motors, and so on. But in this tutorial, we will make Web servers with four buttons to control LEDs and to update the status of the LEDs on the Web server.
Components Required
- ESP8266 Development Board (NodeMCU or Wemos D1 Mini)
- LEDs
- Resistors (100 ohms)
- Jumper Wires
- Breadboard
- Micro USB cable
- Smartphone
- Arduino IDE
ESP8266 NodeMCU Web Server Circuit
For practical demonstration purpose, we are controlling through LEDs through a web server. Connection diagram for this functionality is shown below.

We need four LEDs with suitable resistors, NodeMCU, breadboard and jumper wires. One terminal of resistors is connected to the cathode of each LED and other terminal connected to the ground pin. Anodes of the LEDs connected to D1 to D4 pins of NodeMCU respectively.
Writing Sketch for ESP8266 Web server
First of all, we have to include ESP8266WiFi library so that we can use built-in function to connect to WiFi. Then we have to write the network credential which includes the name and the password. Make sure write your network credentials correctly otherwise, you will not be able to connect with the network. After this we have to describe the server port number, in this case, I write 443 which is Secure Hyper Text Transfer Protocol (HTTPS). We can also use the different port number like 80 which is not that secure to use.
#include <ESP8266WiFi.h> //ESP8266 Arduino library with built in functions
#define ssid "StormFiber" // Replace with your network name
#define password "23456789" // Replace with your network password
WiFiServer server(443); // Web Server on port 443
Declare a variable named as header to store the response of the request. Also declare four variable names as state1, state2.state, and state4 with string datatype and assign them a string which is ‘OFF’ that describe the default status of the LEDs. Then we declare another four variables as LED1, LED2, LED3, and LED4 with integer data type and assign them the GPIOs we want to use.
String header;
String state1 = "Off";
String state2 = "Off";
String state3 = "Off";
String state4 = "Off";
int LED1 = 5;
int LED2 = 4;
int LED3 = 0;
int LED4 = 2;
In the void setup function first of all, we initialize the serial communication with 115200 baud rate. It is recommended to always use the 115200 baud rate. Describe the status of the pins as OUTPUT and initially keep the LEDs off by defining pins as LOW.
void setup() { // only executes once

Serial.begin(115200); // Initializing serial port

pinMode(LED1, OUTPUT);
pinMode(LED2, OUTPUT);
pinMode(LED3, OUTPUT);
pinMode(LED4, OUTPUT);
digitalWrite(LED1, LOW);
digitalWrite(LED2, LOW);
digitalWrite(LED3, LOW);
digitalWrite(LED4, LOW);
The following sketch snippet explains how we begin the WiFi connection with given network credentials and print the successful connection message on the serial monitor.
 Serial.println();
Serial.print("Connecting to ");
Serial.println(ssid);
WiFi.begin(ssid, password); // Connecting to WiFi network
while (WiFi.status() != WL_CONNECTED)
{
delay(500);
Serial.print(".");
}
Serial.println("");
Serial.println("WiFi connected");
The below instructions display message “Web server initiated and Waiting for ESP IP” on serial monitor and after delay of ten seconds display the IP address on the serial monitor so that we can open your Web server using web browser.
server.begin(); // Starting the web server
Serial.println("Web server Initiated. Waiting for the ESP IP...");
delay(10000);

Serial.println(WiFi.localIP()); // Printing the ESP IP address
The void loop function starts with searching for new client when a new client connects it starts the connection. Since this is a void loop function it means it always searching for new clients.
void loop() {
// Searching for new clients
WiFiClient client = server.available();
In the following sketch snippet blank_line which is a Boolean variable provide the information when the HTTP request ends. The while loop runs as long as the client stay connected.
if (client) {
Serial.println("New client");
boolean blank_line = true; // boolean to locate when the http request ends
while (client.connected()) {
if (client.available()) {
char c = client.read();
header += c;

if (c == '\n' && blank_line) {
Serial.print(header);
To protect your Web server from the unauthorized user we have to add some kind of safety features. The below sketch snippet is used to add the username and password protection to the sketch. Whenever an unauthorized user or entering wrong credentials “Authentication Failed” message will be shown on the web browser. If you use this sketch as it is so the the username is “Admin” and password is “12345678” The user name and password converted into the base64 format and used in the sketch. If everything goes according to the plan you will successfully open the Web server.
// Finding the right credential string
if (header.indexOf("VXNlcjoxMjM0") >= 0) { //
//successful login
client.println("HTTP/1.1 200 OK");
client.println("Content-Type: text/html");
client.println("Connection: close");
client.println();
If everything goes according to the plan you will successfully open the Web server.
if (header.indexOf("GET / HTTP/1.1") >= 0) {
Serial.println("Main Web Page");
}
The following sketch snippet check which button on the Web server is pressed and which operation must be performed on which GPIO.
else if (header.indexOf("GET /LED1on HTTP/1.1") >= 0) {
Serial.println("GPIO 5 On");
state1 = "On";
digitalWrite(LED1, HIGH);
}
else if (header.indexOf("GET /LED1off HTTP/1.1") >= 0) {
Serial.println("GPIO 5 Off");
state1 = "Off";
digitalWrite(LED1, LOW);
}
else if (header.indexOf("GET /LED2on HTTP/1.1") >= 0) {
Serial.println("GPIO 4 On");
state2 = "On";
digitalWrite(LED2, HIGH);
}
else if (header.indexOf("GET /LED2off HTTP/1.1") >= 0) {
Serial.println("GPIO 4 Off");
state2 = "Off";
digitalWrite(LED2, LOW);
}
else if (header.indexOf("GET /LED3on HTTP/1.1") >= 0) {
Serial.println("GPIO 0 On");
state3 = "On";
digitalWrite(LED3, HIGH);
}
else if (header.indexOf("GET /LED3off HTTP/1.1") >= 0) {
Serial.println("GPIO 0 Off");
state3 = "Off";
digitalWrite(LED3, LOW);
}
else if (header.indexOf("GET /LED4on HTTP/1.1") >= 0) {
Serial.println("GPIO 2 On");
state4 = "On";
digitalWrite(LED4, HIGH);
}
else if (header.indexOf("GET /LED4off HTTP/1.1") >= 0) {
Serial.println("GPIO 2 Off");
state4 = "Off";
digitalWrite(LED4, LOW);
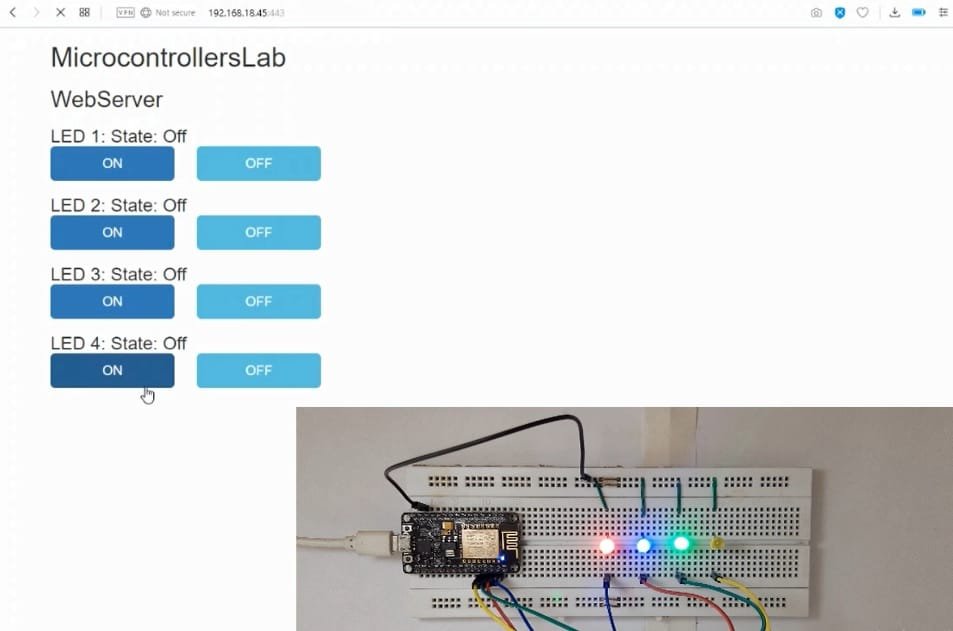
}Client.println ( ) function is used to send webpage to the client. Bootstrap Framework is used for this basic web page. This webpage has a total of eight buttons, two for each LED for “ON” and “OFF” operation.
 client.println("<!DOCTYPE HTML>");
client.println("<html>");
client.println("<head>");
client.println("<meta name=\"viewport\" content=\"width=device-width, initial-scale=1\">");
client.println("<link rel=\"stylesheet\" href=\"https://maxcdn.bootstrapcdn.com/bootstrap/3.3.4/css/bootstrap.min.css\">");
The following snippet includes two headings in the web page that’s are MicrocontrollersLab and Web server and have font size h1 and h2 respectively.
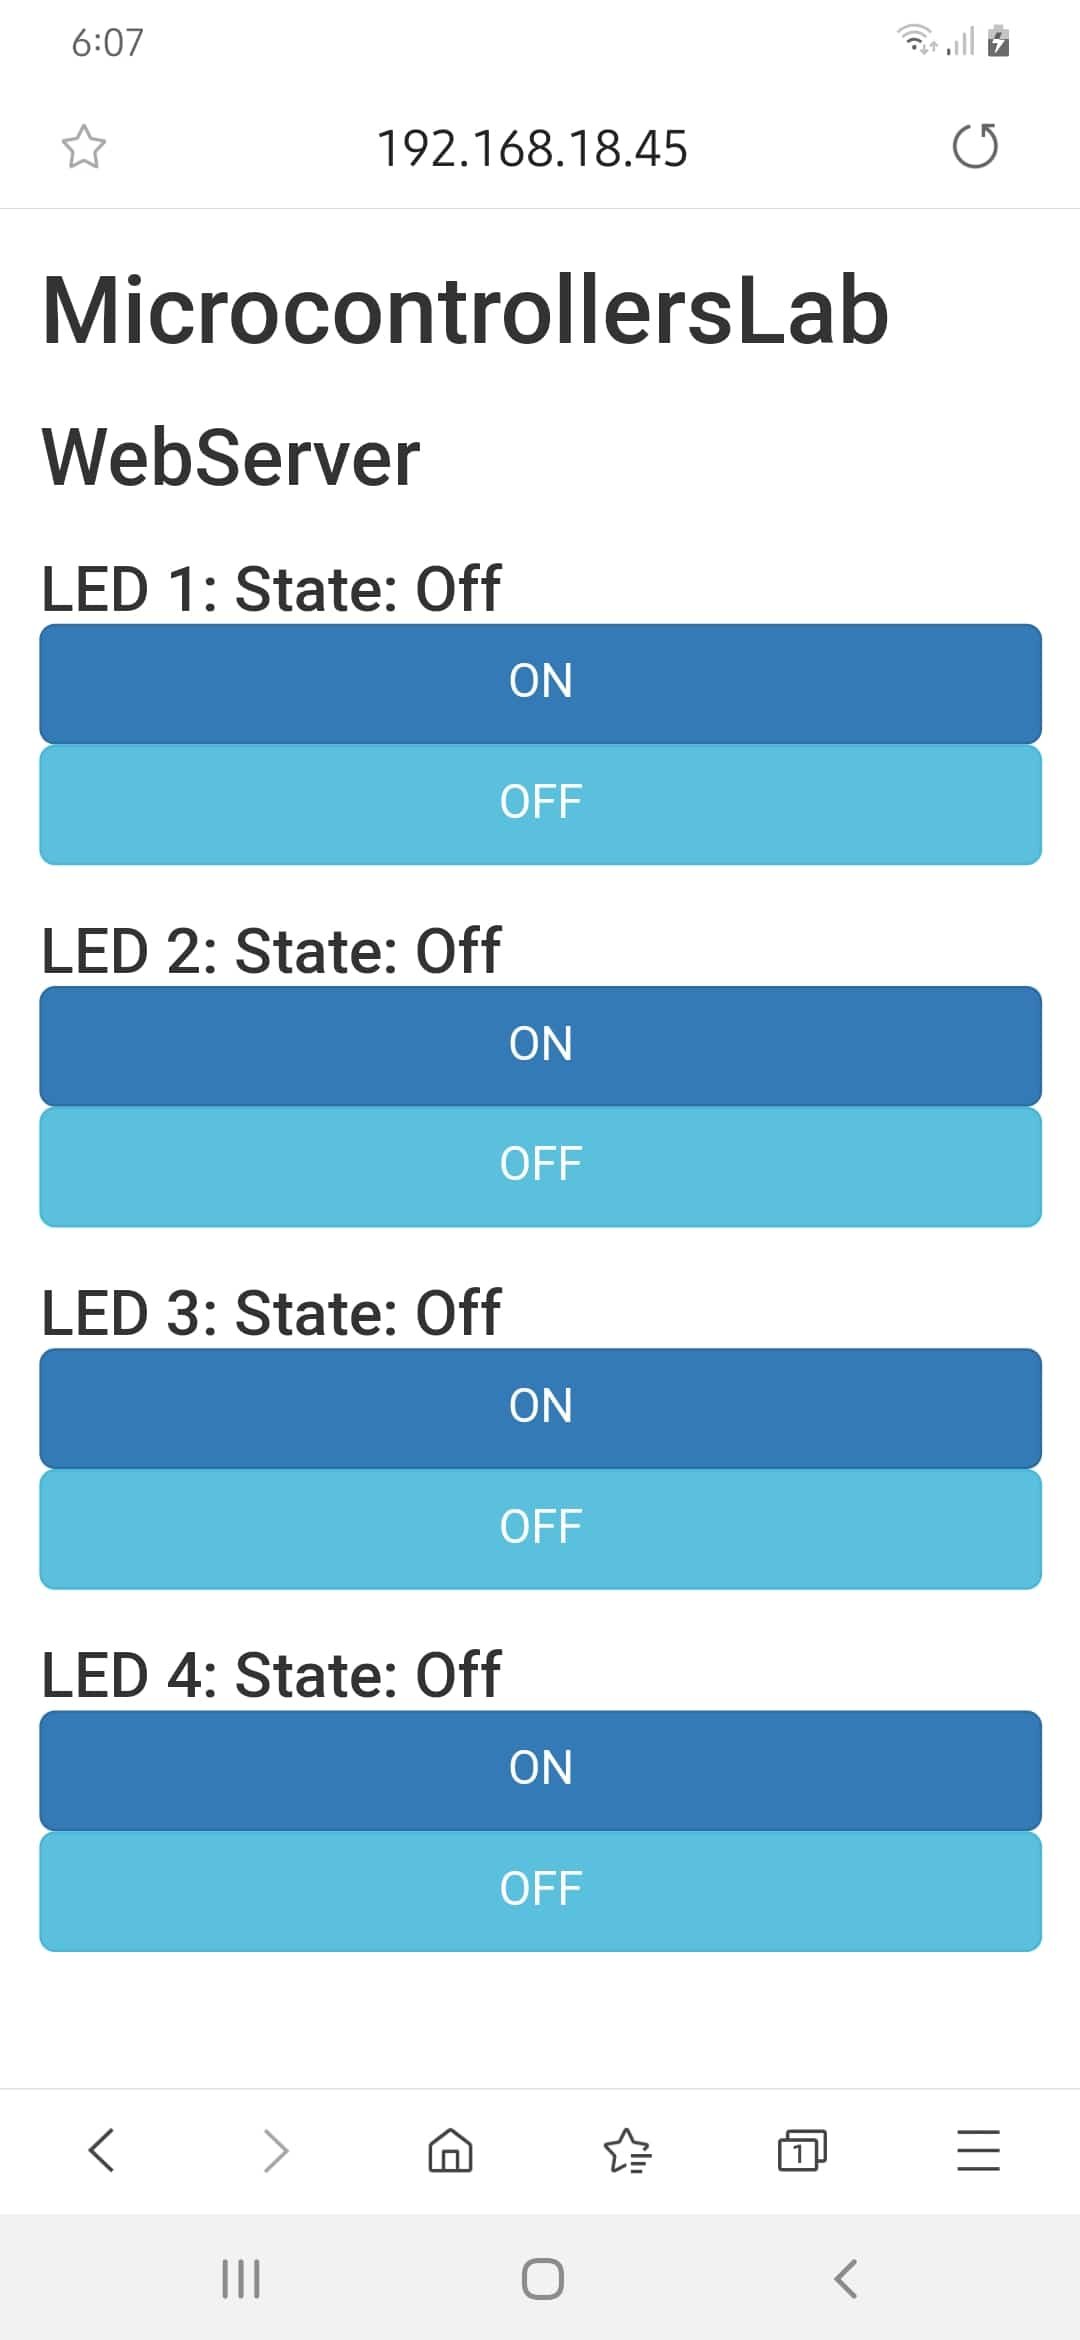
client.println("<h1>MicrocontrollersLab</h1>");
client.println("<h2>WebServer</h2>");
The below set of instructions includes the label of LED and its status and create two buttons one for on and other for off with primary and info colors respectively. Similarly, we change the LED variables to create as many buttons as we required.
client.println("<h3>LED 1: State: " + state1);
client.println("<div class=\"row\">");
client.println("<div class=\"col-md-2\"><a href=\"/LED1on\" class=\"btn btn-block btn-lg btn-primary\" role=\"button\">ON</a></div>");
client.println("<div class=\"col-md-2\"><a href=\"/LED1off\" class=\"btn btn-block btn-lg btn-info\" role=\"button\">OFF</a></div>");
client.println("</div>");
client.println("<h3>LED 2: State: " + state2);
client.println("<div class=\"row\">");
client.println("<div class=\"col-md-2\"><a href=\"/LED2on\" class=\"btn btn-block btn-lg btn-primary\" role=\"button\">ON</a></div>");
client.println("<div class=\"col-md-2\"><a href=\"/LED2off\" class=\"btn btn-block btn-lg btn-info\" role=\"button\">OFF</a></div>");
client.println("</div>");
client.println("<h3>LED 3: State: " + state3);
client.println("<div class=\"row\">");
client.println("<div class=\"col-md-2\"><a href=\"/LED3on\" class=\"btn btn-block btn-lg btn-primary\" role=\"button\">ON</a></div>");
client.println("<div class=\"col-md-2\"><a href=\"/LED3off\" class=\"btn btn-block btn-lg btn-info\" role=\"button\">OFF</a></div>");
client.println("</div>");
client.println("<h3>LED 4: State: " + state4);
client.println("<div class=\"row\">");
client.println("<div class=\"col-md-2\"><a href=\"/LED4on\" class=\"btn btn-block btn-lg btn-primary\" role=\"button\">ON</a></div>");
client.println("<div class=\"col-md-2\"><a href=\"/LED4off\" class=\"btn btn-block btn-lg btn-info\" role=\"button\">OFF</a></div>");
client.println("</div></div></html>");
When an unauthorized user wants to access or the credential entered iswrong then “Authentication Failed” message will be displayed in the browser. The following ending instructions of the sketch include emptying the header variable, closing the loop and ending the connection.
 else { // Http request fails for unauthorized users
client.println("HTTP/1.1 401 Unauthorized");
client.println("WWW-Authenticate: Basic realm=\"Secure\"");
client.println("Content-Type: text/html");
client.println();
client.println("<html>Authentication failed</html>");
}
header = "";
break;
}
if (c == '\n') { // starts reading a new line
blank_line = true;
}
else if (c != '\r') { // finds a character on the current line
blank_line = false;
}
}
}
Username and Password encoding in Base64 Format
To encode Username and Password we can use online converters. The following is a list for online base64 format converter.
- http://www.utilities-online.info/base64/#.XQJPCsTVKM8
- https://www.base64encode.net
- https://www.base64encode.org
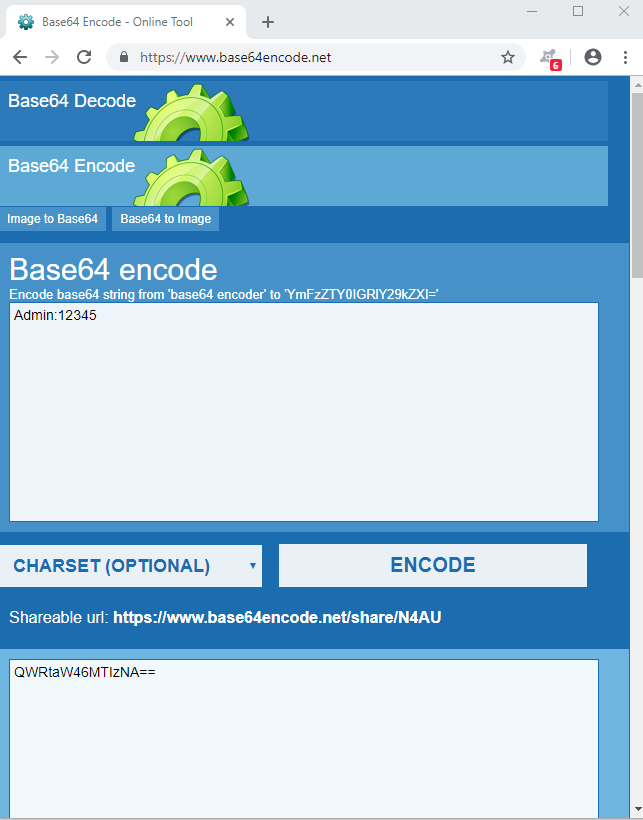
Click any above URL, click on the encode option and write the username and password you want to encode with writing colon (:) between them as shown in the below picture. After converting by clicking ENCODE copy the encoded information and paste into the sketch.
Code ESP8266 Web server NodeMCU
Now copy this code in your Arduino IDE and upload this code to NodeMCU or any ESP8266 board.
#include <ESP8266WiFi.h> //ESP8266 Arduino library with built in functions

#define ssid "StormFiber" // Replace with your network name
#define password "23456789" // Replace with your network password

WiFiServer server(443); // Web Server on port 443

String header;
String state1 = "Off";
String state2 = "Off";
String state3 = "Off";
String state4 = "Off";
int LED1 = 5;
int LED2 = 4;
int LED3 = 0;
int LED4 = 2;

void setup() { // only executes once

Serial.begin(115200); // Initializing serial port

pinMode(LED1, OUTPUT);
pinMode(LED2, OUTPUT);
pinMode(LED3, OUTPUT);
pinMode(LED4, OUTPUT);
digitalWrite(LED1, LOW);
digitalWrite(LED2, LOW);
digitalWrite(LED3, LOW);
digitalWrite(LED4, LOW);

Serial.println();
Serial.print("Connecting to ");
Serial.println(ssid);
WiFi.begin(ssid, password); // Connecting to WiFi network
while (WiFi.status() != WL_CONNECTED)
{
delay(500);
Serial.print(".");
}
Serial.println("");
Serial.println("WiFi connected");

server.begin(); // Starting the web server
Serial.println("Web server Initiated. Waiting for the ESP IP...");
delay(10000);

Serial.println(WiFi.localIP()); // Printing the ESP IP address
}

// runs over and over again
void loop() {
// Searching for new clients
WiFiClient client = server.available();

if (client) {
Serial.println("New client");
boolean blank_line = true; // boolean to locate when the http request ends
while (client.connected()) {
if (client.available()) {
char c = client.read();
header += c;

if (c == '\n' && blank_line) {
Serial.print(header);

// Finding the right credential string
if (header.indexOf("VXNlcjoxMjM0") >= 0) { //
//successful login
client.println("HTTP/1.1 200 OK");
client.println("Content-Type: text/html");
client.println("Connection: close");
client.println();
// turns the LED on and off
if (header.indexOf("GET / HTTP/1.1") >= 0) {
Serial.println("Main Web Page");
}
else if (header.indexOf("GET /LED1on HTTP/1.1") >= 0) {
Serial.println("GPIO 5 On");
state1 = "On";
digitalWrite(LED1, HIGH);
}
else if (header.indexOf("GET /LED1off HTTP/1.1") >= 0) {
Serial.println("GPIO 5 Off");
state1 = "Off";
digitalWrite(LED1, LOW);
}
else if (header.indexOf("GET /LED2on HTTP/1.1") >= 0) {
Serial.println("GPIO 4 On");
state2 = "On";
digitalWrite(LED2, HIGH);
}
else if (header.indexOf("GET /LED2off HTTP/1.1") >= 0) {
Serial.println("GPIO 4 Off");
state2 = "Off";
digitalWrite(LED2, LOW);
}
else if (header.indexOf("GET /LED3on HTTP/1.1") >= 0) {
Serial.println("GPIO 0 On");
state3 = "On";
digitalWrite(LED3, HIGH);
}
else if (header.indexOf("GET /LED3off HTTP/1.1") >= 0) {
Serial.println("GPIO 0 Off");
state3 = "Off";
digitalWrite(LED3, LOW);
}
else if (header.indexOf("GET /LED4on HTTP/1.1") >= 0) {
Serial.println("GPIO 2 On");
state4 = "On";
digitalWrite(LED4, HIGH);
}
else if (header.indexOf("GET /LED4off HTTP/1.1") >= 0) {
Serial.println("GPIO 2 Off");
state4 = "Off";
digitalWrite(LED4, LOW);
}
// Web page
client.println("<!DOCTYPE HTML>");
client.println("<html>");
client.println("<head>");
client.println("<meta name=\"viewport\" content=\"width=device-width, initial-scale=1\">");
client.println("<link rel=\"stylesheet\" href=\"https://maxcdn.bootstrapcdn.com/bootstrap/3.3.4/css/bootstrap.min.css\">");
client.println("</head><div class=\"container\">");
client.println("<h1>MicrocontrollersLab</h1>");
client.println("<h2>WebServer</h2>");
client.println("<h3>LED 1: State: " + state1);
client.println("<div class=\"row\">");
client.println("<div class=\"col-md-2\"><a href=\"/LED1on\" class=\"btn btn-block btn-lg btn-primary\" role=\"button\">ON</a></div>");
client.println("<div class=\"col-md-2\"><a href=\"/LED1off\" class=\"btn btn-block btn-lg btn-info\" role=\"button\">OFF</a></div>");
client.println("</div>");
client.println("<h3>LED 2: State: " + state2);
client.println("<div class=\"row\">");
client.println("<div class=\"col-md-2\"><a href=\"/LED2on\" class=\"btn btn-block btn-lg btn-primary\" role=\"button\">ON</a></div>");
client.println("<div class=\"col-md-2\"><a href=\"/LED2off\" class=\"btn btn-block btn-lg btn-info\" role=\"button\">OFF</a></div>");
client.println("</div>");
client.println("<h3>LED 3: State: " + state3);
client.println("<div class=\"row\">");
client.println("<div class=\"col-md-2\"><a href=\"/LED3on\" class=\"btn btn-block btn-lg btn-primary\" role=\"button\">ON</a></div>");
client.println("<div class=\"col-md-2\"><a href=\"/LED3off\" class=\"btn btn-block btn-lg btn-info\" role=\"button\">OFF</a></div>");
client.println("</div>");
client.println("<h3>LED 4: State: " + state4);
client.println("<div class=\"row\">");
client.println("<div class=\"col-md-2\"><a href=\"/LED4on\" class=\"btn btn-block btn-lg btn-primary\" role=\"button\">ON</a></div>");
client.println("<div class=\"col-md-2\"><a href=\"/LED4off\" class=\"btn btn-block btn-lg btn-info\" role=\"button\">OFF</a></div>");
client.println("</div></div></html>");
}
else { // Http request fails for unauthorized users
client.println("HTTP/1.1 401 Unauthorized");
client.println("WWW-Authenticate: Basic realm=\"Secure\"");
client.println("Content-Type: text/html");
client.println();
client.println("<html>Authentication failed</html>");
}
header = "";
break;
}
if (c == '\n') { // starts reading a new line
blank_line = true;
}
else if (c != '\r') { // finds a character on the current line
blank_line = false;
}
}
}
delay(1);
client.stop(); // ending the client connection
Serial.println("Client disconnected.");
}
}
How to Open NodeMCU based Web Server
- After uploading the code open the serial monitor and wait until NodeMCU connected with WiFi network, the Web server initiated and display IP address as shown below. If you facing a problem in getting IP address just simply press the reset button on the NodeMCU.

- Note the IP address and open your web browser on PC and write the IP address on the URL search tab followed by a colon (:) server port number, in this case, 192.168.18.45:443. If you entered the correct IP address and server port you will see a window asking for user name and password as shown in the picture.

- If you entered the right credentials so you will be given the access to the main web page. You can click the desired button to perform the operation.

- To open the Web server using smartphone open your browser on the smartphone write the IP address shown up in the serial monitor and IP address followed by a colon (:) and server port number in my case 192.168.18.45:443

- If you entered the right credentials so you will be given the access to the main web page. You can click the desired button to perform the operation.
This is how you can make a web server using Simple ESP8266 board like NodeMCU and Arduino IDE.
To encode Username and Password, there is another tool for that purpose, that tool is https://url-decode.com/tool/base64-decode that link also includes the tools related to number utilities, unit converter, developers, string utilities, converter, and IP tools as well under one link. You also check it out.
hello
what should I enter in sign in window?
which sign window?