In this user guide, we will learn how to log GPS data acquired from NEO-6M GPS module to a microSD card using Arduino and Arduino IDE. The GPS data will consist of a latitude, longitude, and altitude values as well as the current date and time. We will create a .txt file in our microSD card through programming our Arduino board and consequently log GPS data to that file after every 10 seconds. Users can later use this data for further analysis for various projects such as animals life pattern measurement, etc.
For a getting started guide to microSD card with Arduino, read the article: Micro SD Card Interfacing with Arduino using MicroSD Module
This article is divided into these sections:
- Introduction to NEO-6M GPS module and its connection with the Arduino UNO and the microSD card module
- Formatting the microSD card
- Setting up Arduino IDE for GPS data logging to microSD card (installing libraries, Arduino sketch and demonstration)
NEO-6M GPS Module Introduction
The NEO-6M GPS module is a GPS receiver that can locate all locations on Earth as it is able to track approximately 22 satellites. It consists of a high-performance u-blox 6 positioning engine. Measuring 16 x 12.2 x 2.4 mm, its compact architecture along with its low power consumption makes it a good choice for IoT projects. Overall it is a good cost-effective GPS receiver.
The diagram below shows the pinout of the NEO 6M module. It consists of 4 pins named GND, TX, RX, and VCC.
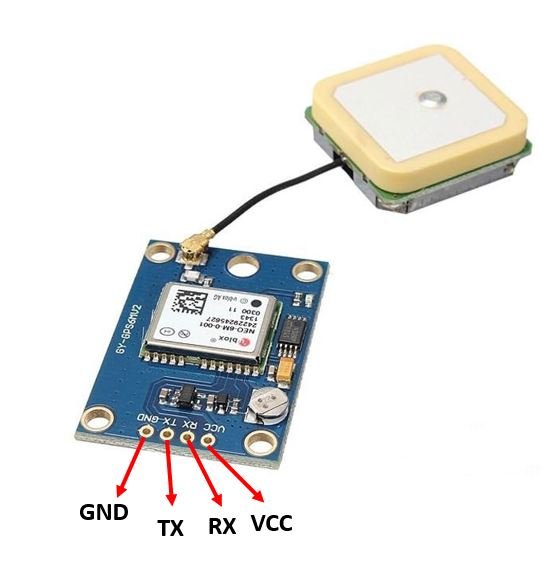
| GND | This is the ground pin that will be connected with the ground of the Arduino UNO. |
| TX | This is the transmission pin used for serial communication. |
| RX | This is the receiver pin used for serial communication. |
| VCC | This is the VCC pin used to power up the GPS module. Connect it with the 5V of the Arduino UNO board. |
Connecting NEO-6M module and microSD card module with Arduino UNO
The NEO-6M GPS module has 4 terminals which we will connect with the Arduino board. As the GPS module is 5V tolerant, hence we will connect the VCC terminal with 5V of the Arduino UNO. We will connect the TX (transmitter) terminal and the RX (receiver) terminal of the GPS module with the digital pins of the Arduino UNO. Software serial will be used for communicating between the two devices. Hence, we will set Pin 6 for TX and Pin 7 for RX in the program sketches. Therefore, TX of NEO-6M will be connected with pin 7 and RX of NEO-6M will be connected with Pin 6. You can use any other digital pin as well. Additionally, both the devices will have their grounds in common.
| Arduino UNO | NEO-6M Module |
| 5V | VCC |
| 7 | TX |
| 6 | RX |
| GND | GND |
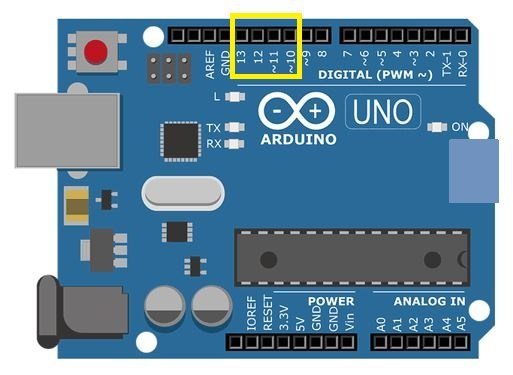
Additionally, we will connect the VCC terminal of microSD card module with 5V of Arduino UNO. Both grounds will be common. The default SPI GPIO pins of Arduino UNO are being used to connect with each of the remaining SPI terminals of the microSD card module. The figure below shows the default SPI pins of Arduino Uno.
The table below shows the connections between Arduino UNO and the microSD card module:
| Arduino UNO | MicroSD card Module |
| GND | GND |
| 5V | VCC |
| GPIO10 | CS |
| GPIO11 | MOSI |
| GPIO13 | SCK |
| GPIO12 | MISO |
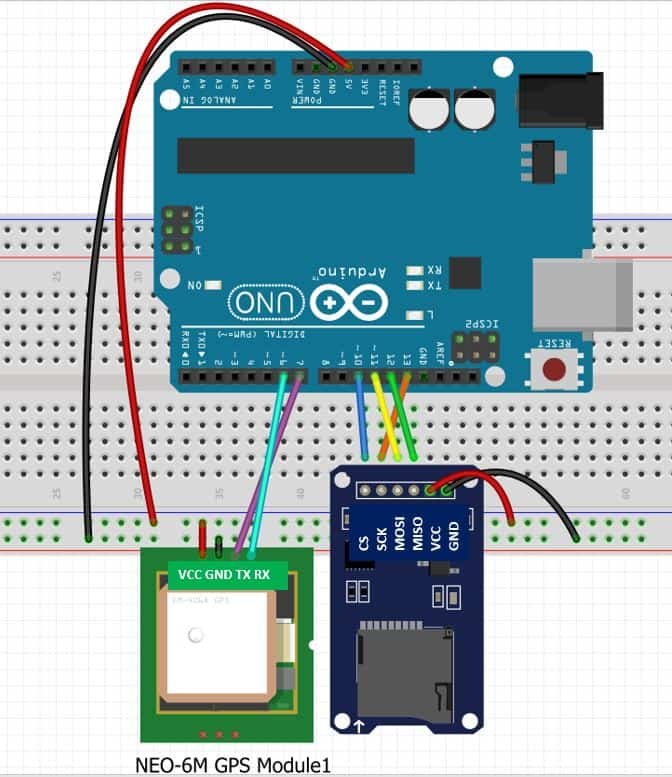
Now follow the connections between the three devices and connect them accordingly. We have used the same connections as specified in the tables above.
GPS Data Logger Schematic

Now, as we know how to interface the microSD card module, NEO-6M module and the Arduino Uno together let us learn how to prepare the microSD card for file handling in Arduino IDE.
Formatting the MicroSD card
As we have to use our microSD card in Arduino IDE so we would have to format it as FAT32. We will have to follow a series of steps to accomplish it successfully.
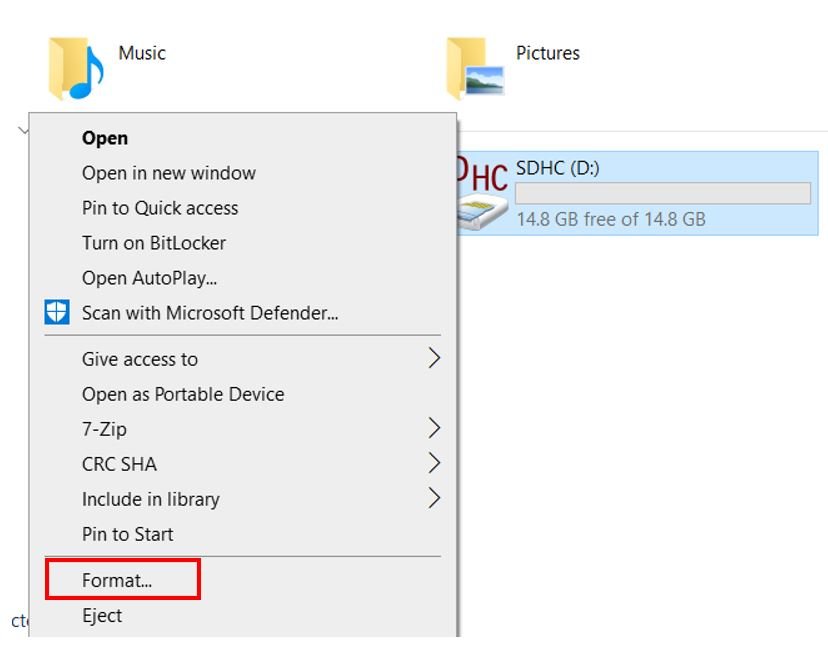
- First, insert your microSD card in your laptop/computer. Now go to ‘This PC’ and click on SD card icon. Then click on Format by right clicking the SD card icon.
- The following window will appear. Select FAT32 from the dialog box of ‘File System’ and click on ‘START.’

- You will receive a warning message that formatting will erase all previous data saved on the microSD card. Click ‘OK.’

- After a few moments, your microSD card will be formatted successfully. Click ‘OK.’
Setting up Arduino IDE for GPS Data Logger
We will use Arduino IDE to program our Arduino UNO. To program our Arduino UNO to parse NMEA messages easily we will be required to install TinyGPS++.h library.
Installing TinyGPS++ Library
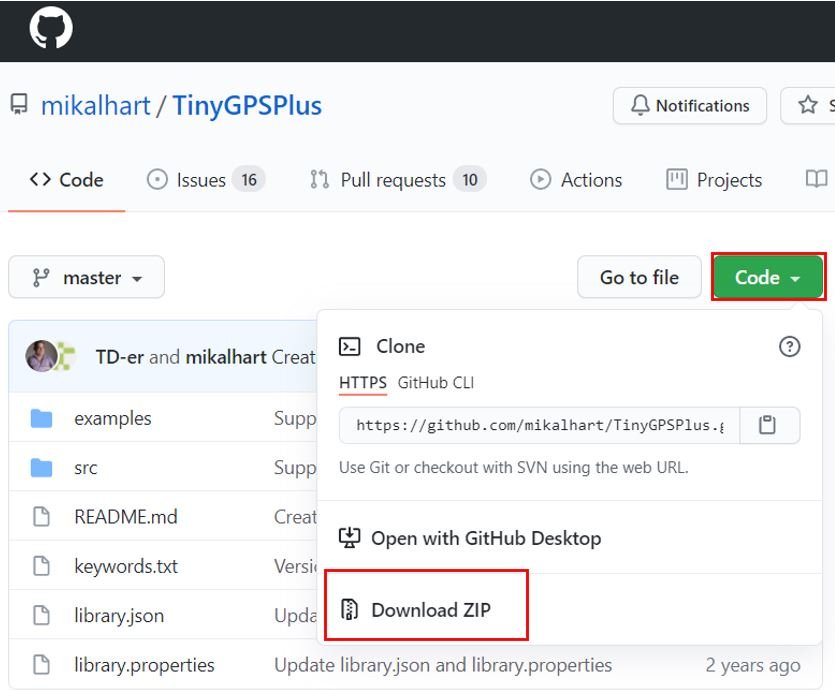
To make our project easier we will install the TinyGPS++ library to easily handle the receiving data from the GPS module. To download the library, click here. Click on ‘Code’ and then ‘Download Zip’.
You have to go to Sketch > Include Library > Add .zip Library inside the IDE to add the library as well.
Arduino Sketch – GPS Data Logger with Arduino
Open your Arduino IDE and go to File > New to open a new file. Copy the code given below in that file.
This sketch will acquire GPS data from the NEO-6M GPS module and save it in a .txt file on the micro SD card. The GPS data will consist of latitude, longitude, and altitude as well as the current date and time. This GPS data will be in the form of NMEA sentences. The TinyGPS++ library will easily parse through the NMEA message and display it in an easily convenient format.
#include "SD.h"
#include <SPI.h>
#include <TinyGPS++.h>
#include <SoftwareSerial.h>

File myFile;
int RXPin = 7;
int TXPin = 6;

TinyGPSPlus gps;
SoftwareSerial SerialGPS(RXPin, TXPin);

String Latitude, Longitude, Altitude, day, month, year, hour, minute, second, Date, Time, Data;

void setup() {
  Serial.begin(9600);
    while (!Serial) {
    ;
  }


  Serial.print("Initializing SD card...");

  if (!SD.begin(10)) {
    Serial.println("initialization failed!");
    while (1);
  }
  Serial.println("initialization done.");
  Serial.println("Creating GPS_data.txt...");
  myFile = SD.open("GPS_data.txt", FILE_WRITE);
  if (myFile) {
    myFile.println( "Latitude, Longitude, Altitude, Date and Time \r\n");
    myFile.close();

  } else {
    Serial.println("error opening GPS_data.txt");
  }
 SerialGPS.begin(9600);
}

void loop() {
  while (SerialGPS.available() > 0)
    if (gps.encode(SerialGPS.read()))
      obtain_data();
  if (millis() > 5000 && gps.charsProcessed() < 10)
  {
    Serial.println("GPS NOT DETECTED!");
    while(true);
  }

}

void obtain_data()
{
  if (gps.location.isValid())
  {
    Latitude = gps.location.lat();
    Longitude = gps.location.lng();
    Altitude = gps.altitude.meters();
  }
  else
  {
    Serial.println("Location is not available");
  }

  if (gps.date.isValid())
  {
    month = gps.date.month();
    day = gps.date.day();
    year = gps.date.year();
    Date = day + "-" + month + "-" + year;
     Serial.println(Date);
  }
  else
  {
    Serial.print("Date Not Available");
  }

  Serial.print("Time: ");
  if (gps.time.isValid())
  {
    if (gps.time.hour() < 10) ;
    hour = gps.time.hour();
    if (gps.time.minute() < 10);
    minute = gps.time.minute();
    if (gps.time.second() < 10) ;
    second = gps.time.second();
    Time = hour + ":" + minute + ":" + second;
  Serial.println(Time);
  }
  else
  {
    Serial.print("Time Not Available");
  }

  Data = Latitude + "," + Longitude + "," + Altitude + "," + Date + "," + Time;
  Serial.print("Save data: ");
  Serial.println(Data);
  myFile = SD.open("GPS_data.txt", FILE_WRITE);

  if (myFile) {
    Serial.print("GPS logging to GPS_data.txt...");
    myFile.println(Data);
    myFile.close();
    Serial.println("done.");
  } else {
    Serial.println("error opening GPS_data.txt");
  }
 Serial.println();
 delay(10000);
}
How the Code Works?
Now let us understand how each part of the code works.
Including Libraries
The first step is to include all the libraries that are necessary for this project. The SD library will be used for the microSD card functionality and the SPI library will be used as we are using SPI communication protocol between the Arduino Uno board and the microSD card module. The TinyGPS++ library will be used to extract the useful GPS data whereas the SoftwareSerial library will be used as we are software serial to communicate between the NEO-6M and Arduino UNO.
#include "SD.h"
#include <SPI.h>
#include <TinyGPS++.h>
#include <SoftwareSerial.h>
Creating File Object
Secondly, we will create an object of File and name it ‘myFile.’ This is the object which we will use later to write GPS data to our .txt file in the microSD card.
File myFile;Setting up GPS parameters for NEO-6M
Then we will set up the RX and TX pins for software serial. We will create a TinyGPSPlus object called ‘gps’ which we will use later on in the sketch to acquire the data from the GPS module. The RX and TX pins will be passed as parameters inside the SerialGPS() function of SoftwareSerial library.
int RXPin = 7;
int TXPin = 6;

TinyGPSPlus gps;
SoftwareSerial SerialGPS(RXPin, TXPin);
Defining Variables
Next, we will define several string variables that we will use later on in the sketch to save the useful data involving the location parameters, date, time, etc.
String Latitude, Longitude, Altitude, day, month, year, hour, minute, second, Date, Time, Data;setup()
Inside the setup() function, we will open a serial connection at a baud rate of 9600.
Serial.begin(9600);We will then initialize the microSD card. sing the begin() function on the SD filesystem using SD.begin(). The begin() function takes in the CS Pin as an argument which we have stated as ’10.’ Thus, it will start the SPI communication using the default SPI CS pin that is GPIO10. To change the SPI CS pin you can pass the pin number as an argument inside the begin() function.
  Serial.print("Initializing SD card...");

  if (!SD.begin(10)) {
    Serial.println("initialization failed!");
    while (1);
  }
  Serial.println("initialization done.");
Next, we will open the GPS_data.txt file on the microSD card using SD.open() and will act as read/write. If the file does not exist, it will get created.
Using the println() function on the myFile object we will write ‘Latitude, Longitude, Altitude, Date and Time’ as the heading in the GPS_data.txt file. After that, we will close the file using file.close(). This will ensure that the data written on the file gets saved as well. If the file is unable to open the serial monitor will display an error message.
Serial.println("Creating GPS_data.txt...");
  myFile = SD.open("GPS_data.txt", FILE_WRITE);
  if (myFile) {
    myFile.println( "Latitude, Longitude, Altitude, Date and Time \r\n");
    myFile.close();

  } else {
    Serial.println("error opening GPS_data.txt");
  }
Moreover, we will open the serial communication for the GPS port at a baud rate of 9600. The NEO-6M has a default baud rate of 9600 so we are using 9600.
SerialGPS.begin(9600);loop()
Inside the loop() function, we will read the GPS data and then call the obtain_data() function to acquire it and save it to the microSD card appropriately. Additionally, if there is no GPS data detected after 5s then the serial monitor will display “GPS NOT DETECTED!” message.
void loop() {
  while (SerialGPS.available() > 0)
    if (gps.encode(SerialGPS.read()))
      obtain_data();
  if (millis() > 5000 && gps.charsProcessed() < 10)
  {
    Serial.println("GPS NOT DETECTED!");
    while(true);
  }

}
obtain_data()
The obtain_data() function gets the latitude, longitude, and altitude for a valid location and saves them in their appropriate variables. Moreover, the date and the current time are also saved.
if (gps.location.isValid())
  {
    Latitude = gps.location.lat();
    Longitude = gps.location.lng();
    Altitude = gps.altitude.meters();
  }
  else
  {
    Serial.println("Location is not available");
  }

  if (gps.date.isValid())
  {
    month = gps.date.month();
    day = gps.date.day();
    year = gps.date.year();
    Date = day + "-" + month + "-" + year;
     Serial.println(Date);
  }
  else
  {
    Serial.print("Date Not Available");
  }

  Serial.print("Time: ");
  if (gps.time.isValid())
  {
    if (gps.time.hour() < 10) ;
    hour = gps.time.hour();
    if (gps.time.minute() < 10);
    minute = gps.time.minute();
    if (gps.time.second() < 10) ;
    second = gps.time.second();
    Time = hour + ":" + minute + ":" + second;
  Serial.println(Time);
  }
  else
  {
    Serial.print("Time Not Available");
  }
These values are then linked together and saved in a string variable named ‘Data.’ We will save the contents of this variable in our GPS_data.txt file after every few seconds.
Data = Latitude + "," + Longitude + "," + Altitude + "," + Date + "," + Time;We will open our GPS_data.txt file using SD.open() and set it up in FILE_WRITE mode. Then we will use myFile.println() and pass the ‘Data’ variable inside it to be written on the .txt file. After that, we will close the file using file.close(). This will ensure that the data written on the file gets saved as well.
myFile = SD.open("GPS_data.txt", FILE_WRITE);

  if (myFile) {
    Serial.print("GPS logging to GPS_data.txt...");
    myFile.println(Data);
    myFile.close();
    Serial.println("done.");
  } else {
    Serial.println("error opening GPS_data.txt");
  }
Demonstration
To see the demonstration of the above code, upload the code to Arduino. But, before uploading code, make sure to select the Arduino board from Tools > Board and also select the correct COM port to which the Arduino board is connected from Tools > Port.

Once the code is uploaded to Arduino, open the serial monitor and set the baud rate to 9600. Instantly the serial monitor will first initialize the microSD card and then start displaying the location parameters and the current date and time. We will be able to see them successfully getting saved in our GPS_data.txt file.
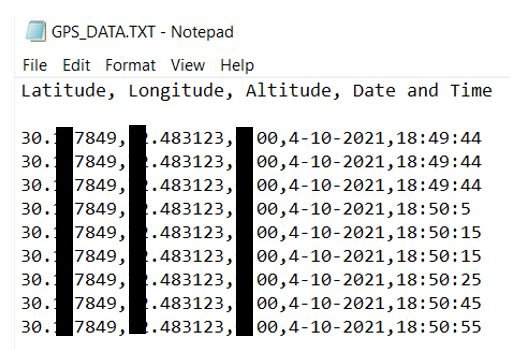
After a few minutes, take the microSD card out of its module and insert it in your system to view the GPS_data.txt file. Inside the file you will be able to view the location parameters in latitude, longitude as well as it altitude. Additionally, the current date and time will also be specified for each reading.
Conclusion
In conclusion, we learned how to create a data logger to log GPS readings to Micro SD card using Arduino and NEO-6M GPS module. We used the NEO-6M to obtain our location parameters accurately using functions from the TinyGPS++ library and logged them on our micro SD card. Additionally, we also acquired the current date and time along with the altitude in meters for our location.
For more articles regarding GPS, microSD card and data logging follow the links below:
- ESP32 Data Logging Temperature Sensor Readings to microSD card (Arduino IDE)
- Interface NEO-6M GPS Module with Arduino
- ESP32 GPS tracker – IoT based Vehicle Tracking System
- Display GPS Co-ordinates on LCD using pic microcontroller
- Interfacing GPS module with Arduino: GPS coordinates on Lcd
- Vehicle Tracking System Through GPS-GSM Modules
- GPS ( Global Positioning System) – working
The data is recording, but the longitude and latitude coordinates only show two numbers after the decimal point, whereas your example shows six after the decimal. Is there any way to increase the number?
Have you solved it? I have the same problem.
String(gps.location.lng(), 6);
Very well done.
Thank You